AWS Architecture Blog
Deploying Oracle RAC in AWS Outposts via FlashGrid Cluster
Amazon Web Services (AWS) customers are deploying AWS Outposts as a fully managed solution that delivers AWS infrastructure and services to on-premises or edge locations for a truly consistent hybrid experience. Those hybrid cloud workloads can require highly available Oracle databases running on- or close-to premises. One way to meet this requirement is Oracle Real Application Clusters (RAC) on top of two or more AWS Outposts racks using the FlashGrid Cluster solution.
In this post, we follow up on a Marketplace blog that describes how to deploy Oracle RAC via FlashGrid Cluster in the AWS Regions. Deploying the solution onto AWS Outposts requires additional steps as the Outpost racks communicate between VPCs and across the on-premises network. In the following we explain how to configure the network for a multi-Outpost setup, how to deploy FlashGrid Cluster with Oracle RAC, and how to connect to the database cluster from the on-premises network.
Solution overview
This architecture uses two logical Outposts (42U racks) that are connected to different Availability Zones (AZs) in the same region for high availability. The networking is configured such that the communication between Amazon Elastic Compute Cloud (Amazon EC2) instances on two distinct Outpost racks uses Outpost’s local gateways and the corporate network. Therefore, data will not leave the premises unless explicitly copied to the Cloud region.
The FlashGrid Cluster solution deploys one node to each Outpost rack and an additional quorum node to the Cloud region. The cluster nodes provide the Oracle ASM disk groups and the Oracle RAC nodes. FlashGrid Cluster for Oracle RAC ensures that storage is replicated between nodes (Figure 1).
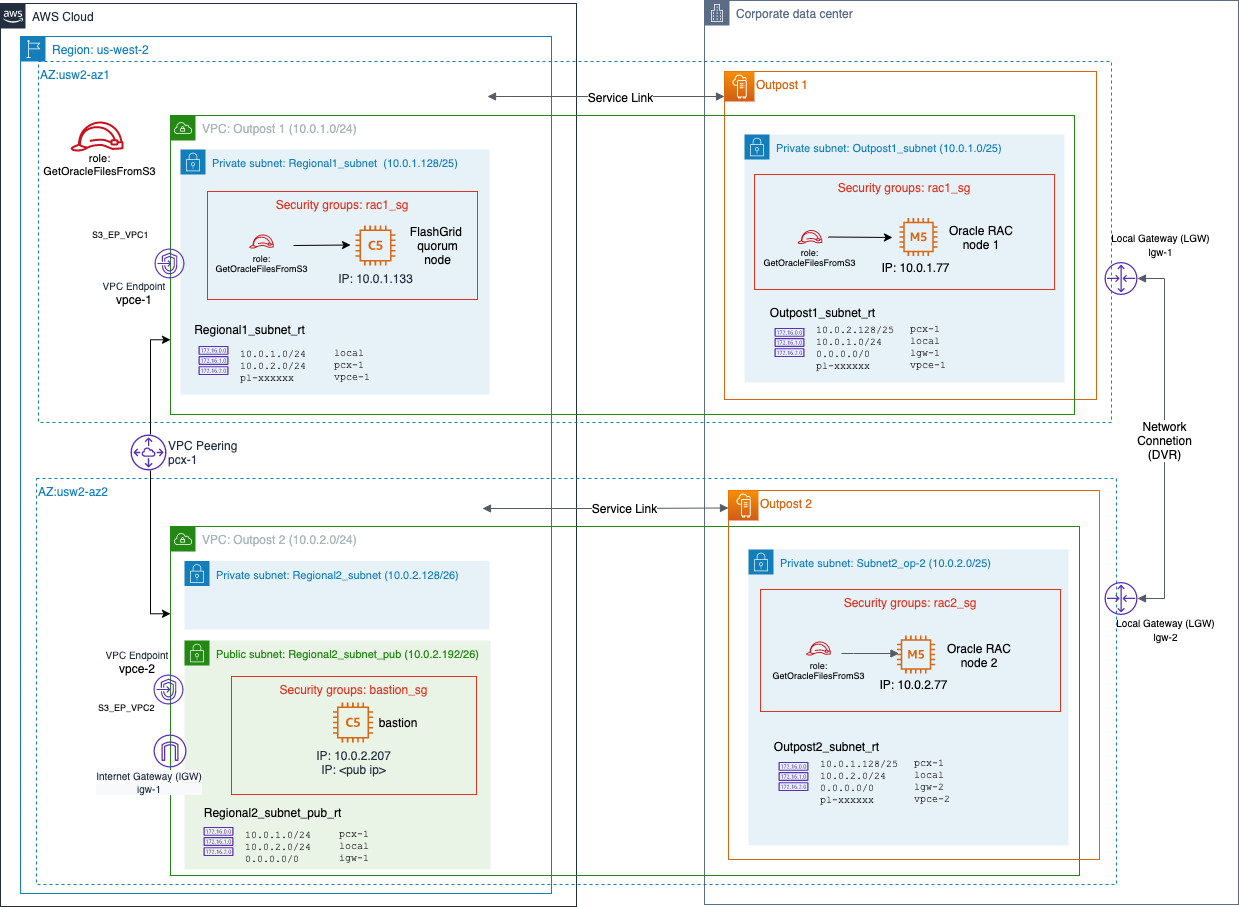
Figure 1. Architecture for a deployment across two logical AWS Outposts
We provide a complete, step-by-step guide that deploys an Oracle RAC database across two Outpost racks.
It takes three steps to get your database up and running:
- Networking: prepare the virtual private clouds (VPCs), subnets, and route tables
- FlashGrid Cluster: use the FlashGrid Launcher to create an Oracle RAC cluster
- Database: configure Oracle RAC and connect to the database
The deployment uses a CloudFormation template that is generated based on the workload’s specific parameters.
Prerequisites
For this solution, you require:
- An AWS account
- Two or more Outposts
- An evaluation license or a AWS Marketplace subscription for a FlashGrid Cluster product
- Basic Oracle database knowledge for the database configuration
Networking setup
A single VPC cannot span multiple Outposts. Therefore, each Outpost should have a separately configured VPC.
A security group allowing traffic between the nodes of the cluster must be created in each VPC. Private IP addresses of the other nodes in the cluster should be configured as allowed sources of the traffic. (A security group rule cannot reference a security group in a different VPC.)
The steps suggested for configuring the network, as in Figure 2:
- Create a VPC for each Outpost and a VPC peering connection between those VPCs. Ensure that the VPCs are associated with the respective local gateways on each Outpost.
- Within each VPC, create a subnet for the corresponding Outpost and a subnet in the Region. Add route tables to each Outpost subnet that allow cross-VPC routing (as in Table 1).Table 1. Main route table for VPC ‘Outpost 1’
Destination Target 10.0.1.0/24 local 10.0.2.0/25 lgw-11111111111111111 10.0.2.128/25 pcx-11223344556677889 pl-12345678 vpce-12345678901234567 - For each of the cluster nodes, allocate a private IP address within the corresponding subnet.
- Within each VPC create a separate security group for each cluster. The security group must allow all inbound and outbound traffic from all nodes of the same cluster using their private IP addresses.
- Optional: Create a public subnet in the region in either one of the VPCs. Deploying a bastion host EC2 instance into this subnet will allow you to connect by SSH to the Oracle RAC nodes later.
- Open SSH access (TCP 22) and Oracle client access (default ports: TCP 1521, 1522) either by adding the corresponding rules to the same security groups or assigning additional security groups to all cluster node instances after the cluster deployment is complete.
- Create an Amazon Simple Storage Service (Amazon S3) gateway endpoint in each VPC and add corresponding routes. It is critical to use Amazon S3 gateway endpoints, otherwise the Oracle RAC nodes cannot download the installation binaries from the S3 bucket.

Figure 2. Setting up subnets on each Outpost via the AWS console
FlashGrid Cluster setup
The process of deploying FlashGrid Cluster consists of five main steps:
- Subscribing to a FlashGrid Cluster product in AWS Marketplace
- Uploading Oracle installation files to an S3 bucket in the Region
- Modifying the cluster configuration template with parameters specific to Outposts
- Using the FlashGrid Launcher tool to finalize cluster configuration and generate an AWS CloudFormation template
- Deploying the CloudFormation template
Subscribing to a FlashGrid Cluster product in AWS Marketplace
- Open one of the FlashGrid Cluster product pages in AWS Marketplace corresponding with the preferred operating system.
- Select Continue.
- Select the Manual Launch tab.
- Choose Accept Software Terms.
Creating an S3 bucket for Oracle installation files
During cluster provisioning, Oracle installation files are downloaded from an S3 bucket. The list of files that must be placed in the S3 bucket is displayed on the Oracle Files tab of the FlashGrid Launcher tool (next step). The S3 bucket is not supposed to have any sensitive data in it and can be hosted in any AWS Region. You can use the same bucket for multiple deployments.
To create an S3 bucket with the correct IAM role access:
- Create an S3 bucket or folder for uploading the installation files
- Within the IAM console, create a policy named GetOracleFilesFromS3, which allows the
s3:GetObjectaction on all uploaded files - Create an EC2 instance role named GetOracleFilesFromS3 and attach the GetOracleFilesFromS3 policy to it
- Use the GetOracleFilesFromS3 role when configuring cluster parameters in the FlashGrid Launcher
- Once the FlashGrid Launcher has provided a list of required Oracle installation files, place those into the S3 bucket
Modifying the cluster configuration template with parameters specific to Outposts
Download the configuration file template, and open it in a text editor. The template is for a two-node RAC cluster on Outposts in Multi-AZ configuration.
For the database node instances in the configuration file, manually set the following attributes:
- outpost_arn: ARN of the target Outpost
- ip: private IP address assigned to the EC2 instance
- sg: security group ID
- ins_type: instance type (ensure that this matches the available types for the Outposts)
Creating a cluster configuration file using FlashGrid Launcher tool
FlashGrid Launcher is an online tool that allows creating your desired configuration for the cluster and then generating a CloudFormation template for it.
- Open FlashGrid Launcher and upload the customized configuration file created at the previous step.
- Follow the step-by-step instructions in the Launcher tool (see Figure 3) until you get to the last Launch step.
a. In the Oracle Files step, there is a list of installer files. Upload these files into the S3 bucket from the previous section (Creating an S3 bucket for Oracle installation files).
b. In the Storage step, ignore the IOPS and MBPS parameters, as these parameters will not be used because Outposts uses the GP2 type of volumes.
c. In the Network step, provide the Security Group ID that will be used for the quorum node located in the Region. Make sure to use a security group from the quorum node’s VPC. - At the Launch step, click Launch FlashGrid. This generates a CloudFormation template and takes you to the AWS CloudFormation console.
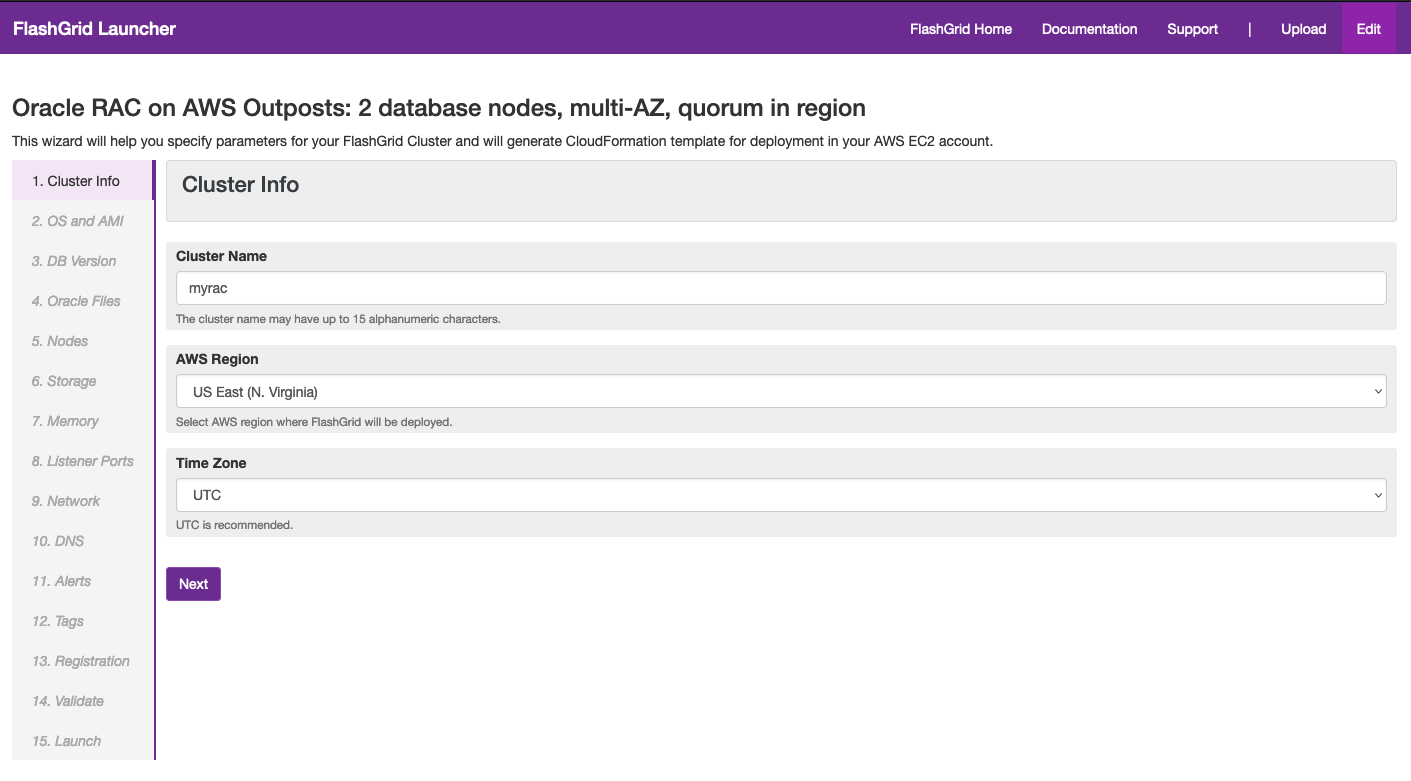
Figure 3. The FlashGrid Launcher generates a CloudFormation template based on various input parameters
Deploying the CloudFormation template
- Once you are in AWS CloudFormation console, select Next.
- Select the SSH key; do not change network parameters if you set them correctly in the Launcher. Select Next.
- On the Options page, if you added tags in FlashGrid Launcher, then do not add the same tags in CloudFormation console. You are free to add further tags in this step. Select Next.
- Select Create, and wait until the status of the stack changes to CREATE_COMPLETE.
- Connect by using SSH from the bastion host to the first cluster node as ec2-user with the SSH key you were provided when the stack was deployed.
- The welcome message details the current initialization status of the cluster: in progress, failed, or completed.
- If initialization is still in progress, wait for it to complete (this includes Oracle software installation and configuration). A broadcast message is delivered when initialization completes or fails. Cluster initialization takes 1 to 2 hours, depending on configuration.
Oracle database configuration
You can create an Oracle RAC database (or multiple databases) using Oracle DBCA tool and following standard Oracle best practices.
To connect to the Oracle RAC database using the SCAN listener, configure the Domain Name System (DNS) records and the connection string on client side:
- On the DNS server(s) used by clients, add a record resolving to the VPC Private IP address of the node instance for each database node. In a test environment without a DNS server, the entries can be added to
/etc/hosts on the clients instead of the DNS server. - In our example deployment, this is:
rac1.example.com 10.0.1.77 rac2.example.com 10.0.2.77 - It is important that hostnames and domain names in the DNS records exactly match the hostnames as reported by the hostname command on the database servers.
- Finally, define a connection string with the addresses of all database nodes listed:
SCAN=
     (DESCRIPTION=
           (TRANSPORT_CONNECT_TIMEOUT=3) (RETRY_COUNT=6)
           (ADDRESS=(PROTOCOL=tcp) (HOST=rac1.example.com) (PORT=1521))
           (ADDRESS=(PROTOCOL=tcp) (HOST=rac2.example.com) (PORT=1521))
           (CONNECT_DATA=
              (SERVER=DEDICATED)
              (SERVICE_NAME=<service name>)
           )
      )
Visit the FlashGrid Help Center for more information on creating and connecting to a database.
Cleanup
The Oracle RAC instance together with the FlashGrid Cluster solution is deployed as a single CloudFormation stack. Deleting this stack will remove all associated resources, including the EBS volumes. Follow the approach detailed in the Delete Your Stacks But Keep Your Data blog post at the deployment stage to retain snapshots of all volumes automatically. You can also take snapshots of all EBS volumes manually before deleting the stack.
Conclusion
In this blog post, we have explored how to deploy Oracle RAC across two or more Outpost racks using FlashGrid Cluster. Running Oracle RAC on top of Outposts provides a highly available database solution for use cases that require you to run the workload on-premises, as in data-residency or latency-critical scenarios. Using the growing number of features for AWS Outposts rack, and you can more efficiently run hybrid workloads using the same tools and automation both in Cloud Regions and on-premises.
Further reading
- Establishing Amazon EC2 infrastructure for Oracle RAC database migrations with FlashGrid
- AWS Outposts User Guide for racks: Local gateway
- FlashGrid Help Center: Creating a Database
- FlashGrid Help Center: Connecting Database Clients (cloud only)
- FlashGrid Help Center: Connecting Database Clients using SCAN address (alternative method)