AWS News Blog
Streaming Real-time Data into an S3 Data Lake at MeetMe

|
September 8, 2021: Amazon Elasticsearch Service has been renamed to Amazon OpenSearch Service. See details.
In today’s guest post, Anton Slutsky of MeetMe describes the implementation process for their Data Lake.
— Jeff;

Modern Big Data systems often include structures called Data Lakes. In the industry vernacular, a Data Lake is a massive storage and processing subsystem capable of absorbing large volumes of structured and unstructured data and processing a multitude of concurrent analysis jobs. Amazon Simple Storage Service (Amazon S3) is a popular choice nowadays for Data Lake infrastructure as it provides a highly scalable, reliable, and low-latency storage solution with little operational overhead. However, while S3 solves a number of problems associated with setting up, configuring and maintaining petabyte-scale storage, data ingestion into S3 is often a challenge as types, volumes, and velocities of source data differ greatly from one organization to another.
In this blog, I will discuss our solution, which uses Amazon Kinesis Firehose to optimize and streamline large-scale data ingestion at MeetMe, which is a popular social discovery platform that caters to more than a million active daily users. The Data Science team at MeetMe needed to collect and store approximately 0.5 TB per day of various types of data in a way that would expose it to data mining tasks, business-facing reporting and advanced analytics. The team selected Amazon S3 as the target storage facility and faced a challenge of collecting the large volumes of live data in a robust, reliable, scalable and operationally affordable way.
The overall aim of the effort was to set up a process to push large volumes of streaming data into AWS data infrastructure with as little operational overhead as possible. While many data ingestion tools, such as Flume, Sqoop and others are currently available, we chose Amazon Kinesis Firehose because of its automatic scalability and elasticity, ease of configuration and maintenance, and out-of-the-box integration with other Amazon services, including S3, Amazon Redshift, and Amazon Elasticsearch Service.
Business Value / Justification
![]() As it is common for many successful startups, MeetMe focuses on delivering the most business value at the lowest possible cost. With that, the Data Lake effort had the following goals:
As it is common for many successful startups, MeetMe focuses on delivering the most business value at the lowest possible cost. With that, the Data Lake effort had the following goals:
- Empowering business users with high-level business intelligence for effective decision making.
- Enabling the Data Science team with data needed for revenue generating insight discovery.
When considering commonly used data ingestion tools, such as Scoop and Flume, we estimated that, the Data Science team would need to add an additional full-time BigData engineer in order to set up, configure, tune and maintain the data ingestion process with additional time required from engineering to enable support redundancy. Such operational overhead would increase the cost of the Data Science efforts at MeetMe and would introduce unnecessary scope to the team affecting the overall velocity.
Amazon Kinesis Firehose service alleviated many of the operational concerns and, therefore, reduced costs. While we still needed to develop some amount of in-house integration, scaling, maintaining, upgrading and troubleshooting of the data consumers would be done by Amazon, thus significantly reducing the Data Science team size and scope.
Configuring an Amazon Kinesis Firehose Stream
Kinesis Firehose offers the ability to create multiple Firehose streams each of which could be aimed separately at different S3 locations, Redshift tables or Amazon Elasticsearch Service indices. In our case, our primary goal was to store data in S3 with an eye towards other services mentioned above in the future.
Firehose delivery stream setup is a 3-step process. In Step 1, it is necessary to choose the destination type, which lets you define whether you want your data to end up in an S3 bucket, a Redshift table or an Elasticsearch index. Since we wanted the data in S3, we chose “Amazon S3” as the destination option. If S3 is chosen as the destination, Firehose prompts for other S3 options, such as the S3 bucket name. As described in the Firehose documentation, Firehose will automatically organize the data by date/time and the “S3 prefix” setting serves as the global prefix that will be prepended to all S3 keys for a given Firehose stream object. It is possible to change the prefix at a later date even on a live stream that is in the process of consuming data, so there is little need to overthink the naming convention early on.

The next step of the process is the stream configuration. Here, it is possible to override various defaults and specify other meaningful values. For example, selecting GZIP compression instead of the uncompressed default will greatly reduce the S3 storage footprint and, consequently, the S3 costs. Enabling Data encryption will encrypt the data at rest, which is important for sensitive data.
One important note is that the choice of the compression algorithm affects the resulting filenames (S3 keys) for the stream objects. Therefore, while it is possible to change these settings later on a live stream, it may be prudent to settle on the compression/encryption approach early to avoid possible issues with processing scripts.
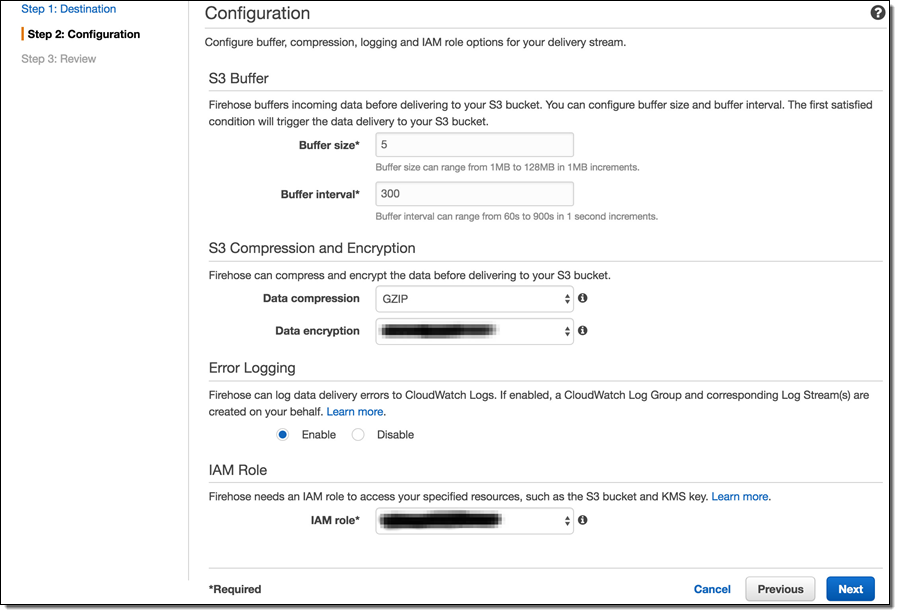
As mentioned in Amazon Kinesis Firehose Limits, Kinesis Firehose has a set of default throughput quotas. Once those quotas are exceeded, Firehose will respond with an error message “ServiceUnavailableException: Slow down.” and will drop data. Therefore, in order to avoid data loss, it is important to estimate individual throughput requirements. If those requirements are likely to exceed the default quotas, it is possible to request additional throughput by submitting a limit increase request as described in the limits.
The final step (not shown) is to review the desired configuration and create the stream.
Setting up the Upload Process
At MeetMe, RabbitMQ serves as a service bus for most of the data that flows through the system. Therefore, the task of data collection for the most part amounts to consuming large volumes of RabbitMQ messages and uploading them to S3 with the help of Firehose streams. To accomplish this, we developed lightweight RabbitMQ consumers. While RabbitMQ consumers are implemented elsewhere (such as Flume), we opted to develop our own versions to enable integration with Firehose API.
Firehose provides two ways of upload data – single record and bulk. With the single record approach, each individual record is packaged into Amazon Firehose API framework objects and each object is serialized to a Firehose end-point via HTTP/Rest. While this approach may be appropriate for some applications, we achieved better performance by using the bulk API methods. The bulk methods allow up to 500 records to be uploaded to Firehose with a single request.
To upload a batch of messages, the lightweight RabbitMQ consumer maintains a small internal buffer, which gets serialized to Firehose as often as possible by a predefined set of processor threads. Here’s the code:
new Thread(new Runnable()
{
  public void run()
  {
    logger.info("Kinesis writer thread started.  Waiting for records to process...");
    while(true)
    {
      try
      {
        if(!recordsQueue.isEmpty())
        {
           if(logger.isDebugEnabled())
             logger.debug("Uploading current batch to AWS: "+recordsQueue.size());

           List<MMMessage> records = recordsQueue;
           recordsQueue = new CopyOnWriteArrayList<MMMessage>();

           final int uploadThreshold = 499;

           List<Record> buffer = new ArrayList<Record>(uploadThreshold);

           for(int i = 0; i < records.size(); i++)
           {
             // Get a proprietary message object from an internal queue
             MMessage mmmessage = records.get(i);

             // Get the bytes
             String message = new String(mmmessage.body, "UTF-8");

             // Check for new line and tab characters in data to avoid
             // issues with Hadoop/Spark processing line-based processing
             // later on
             message = CharMatcher.anyOf("\n").replaceFrom(message, "\\n");
             message = CharMatcher.anyOf("\t").replaceFrom(message, "\\t");

             // Wrap the message bytes with Amazon Firehose API wrapper
             Record record = new Record().withData(ByteBuffer.wrap(message.getBytes()));

             buffer.add(record);

             // If the current buffer is large enough,
             if(buffer.size() == uploadThreshold)
             {
               // send it to Firehose
               uploadBuffer(buffer);
               // and instantiate a new buffer
               buffer = new ArrayList<Record>(uploadThreshold);
             }
           }
           // don't forget to upload last buffer!
           uploadBuffer(buffer);
         }
       }
       catch(Exception e)
      {
        logger.error("Error in sending to Kinesis:"+e.getMessage(), e);
      }
    }
  }
}).start();
The uploadBuffer method is a simple wrapper over the bulk upload Firehose API:
private void uploadBuffer(final List<Record> buffer)
{
  // Make a new request object
  PutRecordBatchRequest request = new PutRecordBatchRequest();
  // Specify the stream name
  request.setDeliveryStreamName("MEETME_STREAM");

  // Set the data buffer
  request.setRecords(buffer);

  // Attempt to send to Firehose
  PutRecordBatchResult result = getAmazonClient().putRecordBatch(request);

  // Always check for failures!
  Integer failed = result.getFailedPutCount();
  if (failed != null && failed.intValue() > 0)
  {
    // If there are failures, find out what caused them
    logger.warn("AWS upload of [" + buffer.size() + "] resulted in " + failed + " failures");

    // Dig into the responses to see if there are various kinds of failures
    List<PutRecordBatchResponseEntry> res = result.getRequestResponses();
    if (res != null)
    {
      for (PutRecordBatchResponseEntry r : res)
      {
        if (r != null)
        {
          logger.warn("Report " + r.getRecordId() + ", " + r.getErrorCode() + ", " + r.getErrorMessage()
                      + ", " + r.toString());
        }
        else
        {
          logger.warn("Report NULL");
        }
      }
    }
    else
    {
      logger.warn("BatchReport NULL");
    }
  }
}
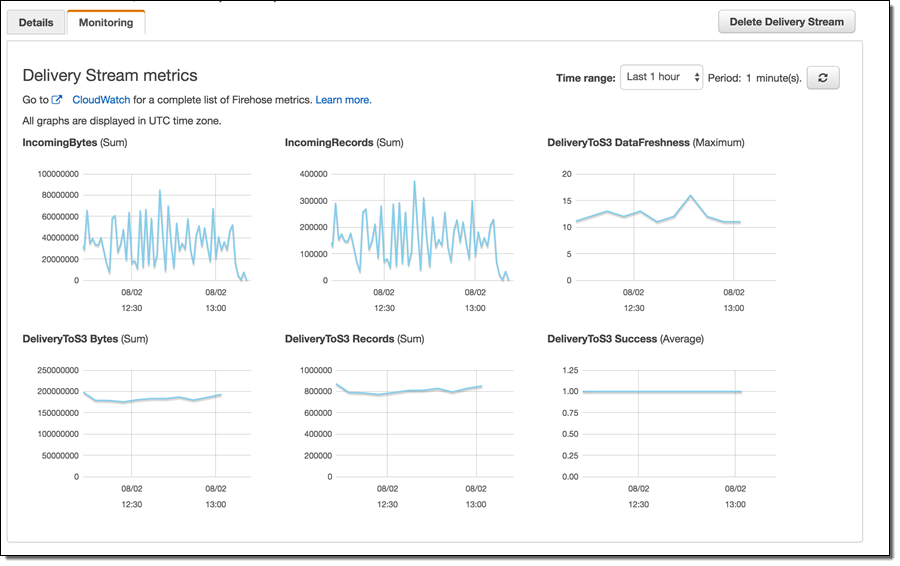
Monitoring Firehose Streams
Once the Firehose streams are set up and internal consumer processes begin to send data, a common task is to attempt to monitor the data flow. Some of the reasons for paying attention to data flow are data volume considerations, potential error conditions, capturing failures among many others. With Amazon Firehose, monitoring is accomplished with the help of Amazon CloudWatch. Common delivery stream metrics are available under the Monitoring tab in each Firehose stream configuration with additional metrics available through the CloudWatch Console.
While AWS provides an extensive set of monitoring facilities, in our experience it turned out to be important to carefully monitor internal data producer logs for errors. Such close monitoring using the syslog facility, Splunk, and other log monitoring tools allowed us to capture and fix specific errors and reduce the number of individual record failures to tolerable levels. Further, internal log monitoring allowed us to recognize early that our volumes were quickly exceeding default Firehose throughput quotas (see above).
Anton Slutsky, Director of Data Science, MeetMe