AWS Marketplace
Build and monitor custom Ethereum tokens with BlockScout from AWS Marketplace
Organizations are increasingly using blockchain to improve transparency and accuracy of their transactional data and to cut costs by removing traditional intermediaries. Blockchain is an open, distributed ledger for recording transactions that by its nature is resistant to data modification. In this post, I show how you can use blockchain tokens and the block explorer BlockScout to create pop-up economies around your customer events. BlockScout is an explorer that enables users to view, compare, and confirm all data that resides on a blockchain. BlockScout is maintained by the POA Network, an AWS Partner Network (APN) Advanced Technology Partner.
Background
Blockchain protocols typically have three common layers: ledger, consensus, and smart contracts. The ledger contains the current and the complete history views of all data. All transactions within a ledger are organized into blocks cryptographically linked to each other, making them immutable. Consensus is how the network reaches agreement on the validity of transactions and the state of the ledger. Smart contracts refer to the embedded business logic code that enables verified execution of all operations on the ledger.
In this post, I show how to create an event token based on the Ethereum ERC-20 Token smart contract specification. Ethereum is an open-source blockchain protocol with multiple compatible implementations, which are referred to as Ethereum Virtual Machine (EVM) compatible chains. You also learn how to use block explorers to track the token performance in real time and derive insights from the activity. Block explorers allow a user to search and inspect all transactions within a blockchain network, to detect anomalies, and to observe smart contracts. I show how to do this using BlockScout. BlockScout is an open-source block explorer that can connect to any private or public EVM-compatible chain.
Prerequisites
- An active AWS account
- GitHub credentials
- A valid email address
- Amazon Elastic Compute Cloud (Amazon EC2) Public Key. Here’s how to create or upload a key pair to your AWS account.
Amazon Resource Name (ARN) certificate. To obtain an ARN certificate: - Create or import an SSL certificate to the AWS Certificate Manager (ACM) service. How to create a new certificate: https://docs.aws.amazon.com/acm/latest/userguide/gs-acm-request-public.html
- How to import an existing certificate: https://docs.aws.amazon.com/acm/latest/userguide/import-certificate.html
- Access to a full archive mode of an existing EVM blockchain instance. A full archive node is a node with a full and complete record of all blockchain transactions.
Building a custom Ethereum token for an event
Event tokens provide participants with virtual currency for use during an event, such as a conference. This significantly cuts down on the reconciliation costs for any purchases and create a more inclusive and rich experience for the attendees. Event organizers can set the parameters of the conference token and distribute tokens to each participant’s wallet address, typically through a mobile phone app. Participants can then send tokens to one another and use them for in-conference purchases. This creates a one-time conference economy that promotes interactivity and provides 100% traceability.
In this blog post, I use POA network’s xDai chain to simplify token and gas management. POA network is a blockchain network. It is an AWS Partner Network (APN) Advanced Technology Partner that maintains the open-source BlockScout software. The xDai Stable Chain is an Ethereum sidechain where users do not need Ethereum (ETH) to pay for gas. Gas is a fee required to successfully conduct a transaction or execute a smart contract on Ethereum. Rather, transactions and fees on the sidechain are paid with a single, stable token called xDai.
Creating an event token
In order to create and test an ERC-20 token from scratch, you need smart contract development tools like Truffle Suite, which you can procure from the blockchain category in AWS Marketplace. However, in this post, I use a simplified deployment option on xDai chain with the open-source tool Burner Factory. These tools help you create tokens and disseminate them to your event participants’ wallet accounts.
Create and publish your token
- Navigate to BurnerFactory.com. In the middle of the screen, select GET STARTED. Select Sign in with GitHub. Enter your GitHub username and password and select Sign in.
- Enter a name for your wallet, such as Test. Select Next.
- Select Create new Token and select Next. Here is some example information for your new token:
- Token Name: New Conference Token
- Token Symbol: NCT
- Maximum number of tokens: 10,000
- Token type: select the radio button to the left of Unbacked, tokens will have no defined value
- Network: select xDai from the drop-down menu
- Token Recovery Period: select Disabled
- Select Next. Refer to the following screenshot to see token creation using this information.

- For more information on parameters, visit Creating your own burner wallet token.
- On the Plugins page, select Next.
- Enter a subdomain name for your wallet. I entered VALUE: test.burnerfactory.com. On the next page, select Publish Now. After a short time, you should see a message: Job finished: Deploy wallet to lvktest4.burnerfactory.com.
- In the Tokens tab, select your newly created token. The token page shows the details of your new token, as shown in the following screenshot of a token detail page specifying the contract name, address, and other metadata.

Mint tokens and track the transaction
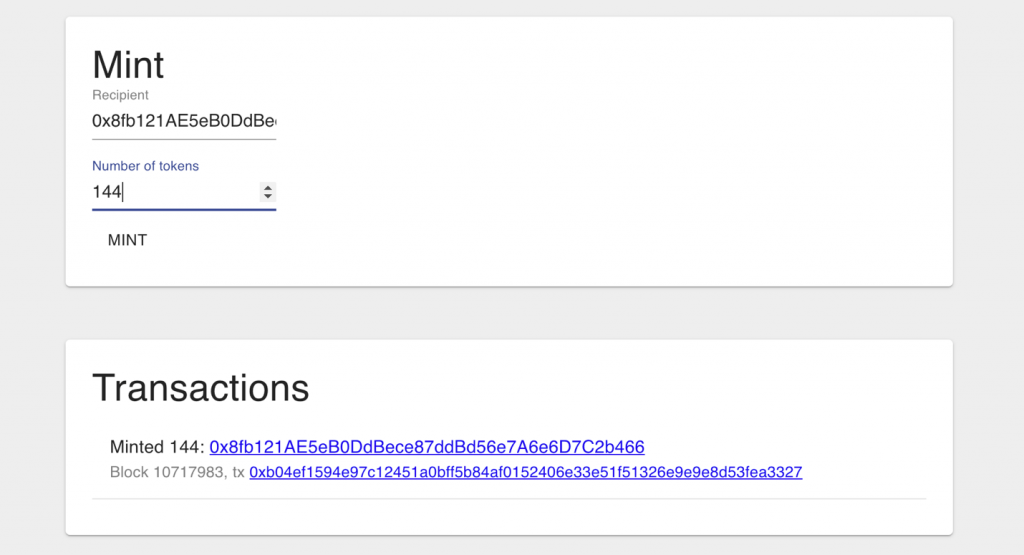
- You can now mint up to 10,000 tokens, as you specified in the Maximum Number of Tokens field. To min a token, enter a recipient’s Ethereum address and the number of tokens you would like minted to that address, and select MINT.
- After a few moments, you see your transaction in the dashboard, along with the transaction hash (tx hash). Copy the tx hash. You use it later with your own BlockScout instance. The following screenshot shows that I minted 144 tokens, with the dashboard showing the transaction as Minted 144 followed by the recipient’s Ethereum address and the transaction hash.
Install a full Ethereum Archive node on Amazon EC2
Now that you’ve successfully created and launched a custom token on xDai chain, you must configure BlockScout to monitor performance of the token. BlockScout enables you to connect to public blockchain networks like Ethereum, Ethereum Classic, RSK or various Testnets.
You can also monitor contracts launched on private Ethereum networks, for example if you are using AWS Blockchain AWS Blockchain templates.
To monitor the performance of the event token, you must install a full Ethereum Archive node on Amazon EC2 instance. This enables you to connect to the blockchain network and monitor real-time contract events and transactions.
- Follow these instructions to set up an OpenEthereum (Ethereum Client) xDai archive node on Amazon EC2: AWS EC2 archive node setup with OpenEthereum.
- Once the installation is complete, navigate to your Amazon EC2 dashboard. Select Instances and then select the corresponding archive node instance. Copy the IP address. When configuring BlockScout, you use this address, along with port 8545, to connect via the EthereumJsonRPCHttpURL parameter. For example, if your IP address is 192.0.2.1, your parameter would be: 192.0.2.1:8545.
Download and connect BlockScout to an EVM instance
- Review all prerequisites in the BlockScout installation documentation.
- Log in to your AWS account. Navigate to the BlockScout Explorer product detail page in AWS Marketplace. Review the pricing, usage, and support information.
- Follow these instructions to subscribe to and install BlockScout.
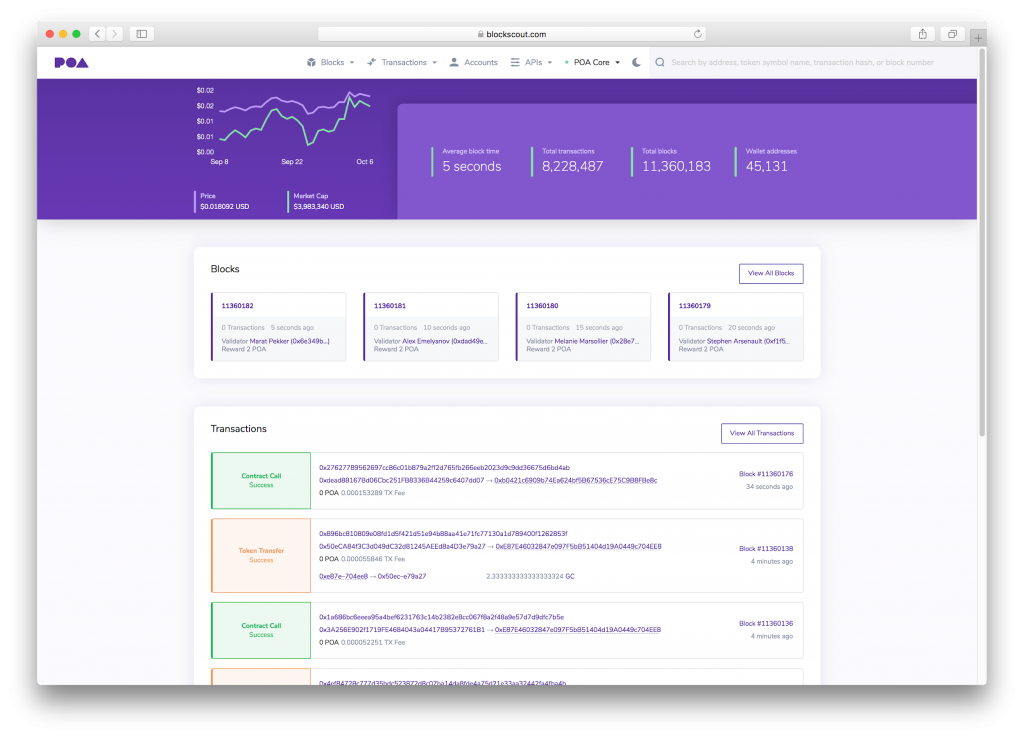
Now that your BlockScout instance is installed, you can search data available in blocks and transactions by selecting a block number or tx hash. The search tool enables you to quickly find address information, token names, and other relevant data. The main screen for a successfully installed and configured BlockScout instance will look like the following screenshot, which graphs price at the top and lists blocks and transactions.
Here’s how to look up your token tx hash.
- In the search bar, enter the tx hash value you’ve saved in step 2 of the Mint tokens and track the transaction section.
- You will see the block number, nonce (transaction id), and other details of the transaction. You can scroll deeper to view transaction details, the address where the token was sent, logs, and other valuable information about the transaction.
From here on, you can use BlockScout to query data through the APIs as well as to verify smart contracts, which is the code that runs on top of the EVM. For information on these and other features supported by BlockScout, please see the BlockScout documentation.
Conclusion
In this post, I showed how to create an ERC-20 token contract, mint tokens with BurnerFactory, and monitor the underlying blockchain network with BlockScout. By using event tokens, you can realize cost savings and provide an enriched user experience of decentralized finance applications. As you build your decentralized applications, observability and verification tools like BlockScout help your technology teams design smarter, more resilient infrastructures.
BlockScout is an explorer that enables users to view, compare, and confirm all data that resides on a blockchain. BlockScout software is an open-source solution maintained by the POA Network, an AWS Partner Network (APN) Advanced Technology Partner. In addition to BlockScout, POA also designs and implements high-performance Layer 2 scalability solutions for Ethereum, including the TokenBridge interoperability platform and the xDai stable chain. BlockScout Blockchain Explorer is available in AWS Marketplace.
About the authors
 Andrew Gross is a technical writer with the POA Network and xDai Stable Chain where he researches and writes on blockchain protocols, ecosystem tools, decentralization and interoperability.
 Lana Kalashnyk is a Principal Blockchain Architect and a Global Partner Technology Lead at Amazon Web Services. While at AWS, Lana led the creation of the Blockchain Partner Program and the technical incubation of the Blockchain Partners in multiple industries. Prior to AWS Lana has over 12 years of lead engineering positions launching innovative solutions for bourgeoning startups and Fortune 500 companies.