AWS Marketplace
Deploy third-party software add-ons from AWS Marketplace to Amazon EKS clusters
At re:Invent 2022, we announced the availability of AWS Marketplace add-ons for Amazon Elastic Kubernetes Service (Amazon EKS). This feature extends the add-ons experience to include operational software for security, storage, observability, and networking available in AWS Marketplace. Instead of a lengthy discovery, procurement, deployment and management process, you can now deploy third-party software on Amazon EKS clusters using the same methods you use to deploy previously existing Amazon EKS add-ons.
This new feature makes it easier for you to discover, deploy, and govern third-party software such as Kubecost, Teleport, Tetrate, FactorHouse, Upbound UXP, and Dynatrace. You can now deploy commercial and packaged open-source software from AWS Marketplace to your Amazon EKS clusters. You can deploy using the Amazon EKS console, APIs, Command Line Interface (CLI), or other Infrastructure as Code (IAC) tools such as Cloudformation and Terraform.
Third-party software from AWS Marketplace is continually scanned for common vulnerabilities and exposures and is validated by AWS to work with Amazon EKS. With the use of command-line tools and automation frameworks, you can now create Amazon EKS clusters with production-ready third-party software.
The following third-party software products are ready to deploy as Amazon EKS add-ons as of publishing:
- Kubecost
- Upbound Universal Crossplane (UXP)
- Dynatrace Container Agent
- Factorhouse (KPOW)
- Tetrate
- Teleport
In this post, Swaminathan and I will show you how to find, subscribe to, and deploy AWS Marketplace add-ons from the Amazon EKS Console or using a CLI approach. Specifically, we’ll show how you can subscribe to and deploy Kubecost, a third-party cost optimization software, to your cluster as an Amazon EKS add-on.
Architecture overview
To deploy third-party software add-ons into your Amazon EKS clusters, you must first obtain a subscription through AWS Marketplace. You can then deploy the add-on either from Amazon EKS console or using the Amazon CLI commands. The add-on checks for an active subscription from AWS Marketplace and then initializes the resources in your Amazon EKS cluster.
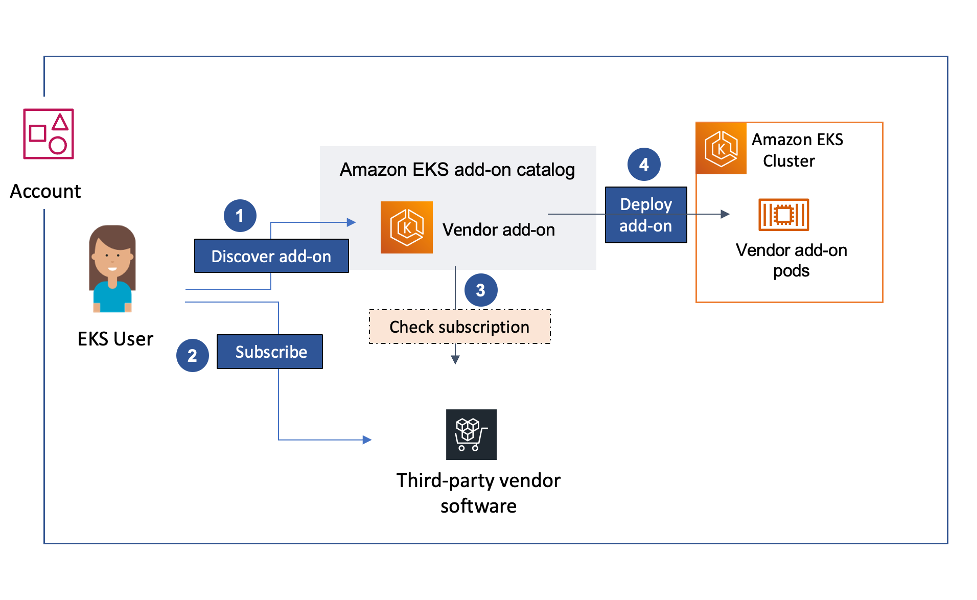
The following diagram shows an overview of the process:
- On the left, the Amazon EKS cluster operator discovers add-ons in the Amazon EKS add-on catalog.
- The cluster operator then subscribes to the third-party vendor add-on using AWS Marketplace.
- Amazon EKS checks the subscription, verifying that the cluster operator is entitled to use the third-party software add-on.
- Amazon EKS deploys the add-on to the EKS cluster.
Solution walkthrough: Deploy third-party software add-ons from AWS Marketplace to Amazon EKS clusters
Prerequisites
- For CLI walk-through: Install the following tools: kubectl and AWS CLI.
- You have access to an Amazon EKS cluster running Kubernetes 1.20 or greater.
- To deploy a cluster, see Getting started with Amazon EKS.
- At launch only new Amazon EKS clusters are supported. Support for existing clusters will be added soon after launch.
- You have access to subscribe to a product via AWS Marketplace. Check AWS Marketplace Subscription Permissions.
- If your cluster is running Kubernetes version 1.23 or later, you must have the Amazon EBS CSI driver installed on your cluster.
A. Deploying add-ons using the Amazon EKS Console
Discover add-ons
- Navigate to the Amazon EKS Console. Select an existing Amazon EKS cluster. On the cluster info page, go to the Add-ons tab info page.
The following screenshot shows the cluster info page add-ons tab for my example cluster. It shows the Kubernetes version, an active status, and EKS as the provider for the cluster. The Add-ons tab shows the previously installed CoreDNS add-on. It also shows networking category, active status, version as v1.8.7-eksbuild.1, and an IAM role as Inherited from node for the CoreDNS add-on. In the middle right is the orange Get more add-ons button.

- To find more add-ons, in the middle right, select Get more add-ons. Scroll down to browse the different add-on software options available for installation from AWS Marketplace. Select Kubecost – Amazon EKS cost monitoring and Next.
- If you do not have subscription to the add-on through the AWS Marketplace, you will see a callout to subscribe to the software. Choose Next again, review the information, and choose Create.
Subscribe to the offering
- Step A.3 takes you back to the add-ons page. To complete the add-on subscription, choose the Subscribe button.
- This redirects you to the Kubecost Product detail in AWS Marketplace to complete the subscription process. In the upper right, choose Continue to Subscribe.
- In the middle of the page, choose Accept Terms. Wait a few minutes for the subscription to process to complete. The following screenshot shows the success screen after we successfully subscribed to Kubecost – Amazon EKS cost monitoring software. In the upper right, it has a Return to Amazon EKS Console button.

- In the upper right, choose the Return to Amazon EKS Console button.
- To finish installing the Kubecost add-on into your cluster, you must re-install it. Once you’re back in the Amazon EKS Console, find the Kubecost add-on and choose Remove and reinstall. Confirm by choosing Reinstall add-on.
The Kubecost add-on is now deployed!
To access the Kubecost portal to see cost optimization information about your cluster, use the port-forward ... CLI step B.4. To check the status of the add-on at any time, you can visit the Add-Ons tab in the cluster info page.
B. Deploying add-ons using the AWS CLI
To deploy the Kubecost add-on using the AWS CLI, you must be subscribed to Kubecost in AWS Marketplace.
Create the add-on
- In AWS CLI, describe the add-on versions for Kubecost by entering the following commands:
$ aws eks describe-addon-versions --addon-name kubecost_kubecost
{
    "addons": [
        {
            "addonName": "kubecost_kubecost",
            "type": "cost-management",
            "addonVersions": [
                {
                    "addonVersion": "v1.97.0-eksbuild.1",
                    "architecture": [
                        "amd64"
                    ],
                    "compatibilities": [
                        {
                            "clusterVersion": "1.22",
                            "platformVersions": [
                                "*"
                            ],
                            "defaultVersion": true
                        },
                        {
                            "clusterVersion": "1.21",
                            "platformVersions": [
                                "*"
                            ],
                            "defaultVersion": true
                        },
                        {
                            "clusterVersion": "1.20",
                            "platformVersions": [
                                "*"
                            ],
                            "defaultVersion": true
                        }
                    ]
                }
            ]
        }
    ]
}
You should receive a response showing you the add-on versions, publisher name, and product listing information. You can find a more detailed explanation of the response on the DescribeAddonVersions page in the AWS CLI Command Reference.
- Create the add-on by entering the following command, replacing my-cluster with the cluster name:
$ aws eks create-addon \
   --cluster-name my-cluster \
  --addon-name kubecost_kubecost

{
  "addon": {
    "addonName": "kubecost_kubecost",
    "clusterName": "my-cluster",
    "status": "CREATING",
    "addonVersion": "v1.97.0-eksbuild.1",
    "health": {
      "issues": []
    },
    "addonArn": "arn:aws:eks:us-east-1:123456789012:addon/my-cluster/example-addon/example2-abcd-1234-5ef6-7890abcdef12",
    "createdAt": "2022-10-17T12:36:25.012000-07:00",
    "modifiedAt": "2022-10-17T12:36:25.034000-07:00",
    "tags": {}
  }
}
The value of the status field in the response is currently CREATING.
- To check the status of the add-on, run the following command.
$ aws eks describe-addon \
  --cluster-name my-cluster \
  --addon-name kubecost_kubecost
When the creation is complete, the value of the status field changes to ACTIVE. Wait for the add-on to finish deploying before moving to the next step. While the add-on is being created, the underlying Kubernetes resources for the add-on are automatically deployed. Each add-on can deploy different kinds of Kubernetes resources. Check the vendor documentation to determine which resources you may want to monitor during creation.
Access the Kubecost add-on portal
- To access the Kubecost dashboard, run the following command to temporarily port-forward the service to your localhost.
$ kubectl port-forward --namespace kubecost deployment/cost-analyzer 9090:9090

Forwarding from 127.0.0.1:9090 -> 9090
Forwarding from [::1]:9090 -> 9090
Handling connection for 9090
Handling connection for 9090
...
You may want to set up an ingress for proper access to this portal, as documented in the Kubecost guide.
- In your browser, navigate to localhost:9090 and explore the Kubecost dashboard. The following screenshot shows the Kubecost dashboard. It shows a monthly savings identified of $50.32 and monthly Kubernetes costs of $141.95, both depicted in green. It also shows a cost efficiency of 2.0%, shown in red, signifying a scope for improvement. The two main panes of the dashboard show stacked bar charts with dates ranging from 11-12-2022 to 11-18-2022 on the x-axis and dollar costs ranging from $0 to $8 on the y-axis. The left chart is titled Cost Allocation, and the right chart is entitled Kubernetes Access Costs. Refer to the following screenshot.

Conclusion
In this post, Swami and I showed you how to find, subscribe to, and deploy add-ons both from the Amazon EKS Console and using AWS CLI. With Amazon EKS add-ons, you can now find, select, and deploy software from AWS Marketplace sellers directly from Amazon EKS Console or using APIs, CLI, or automation tools. By following this tutorial, you can deploy third-party software validated to be compatible with Amazon EKS clusters and checked for common vulnerabilities and exposures (CVEs).
Cleanup
If you used the Amazon EKS Console method, to delete Kubecost, you should first navigate to the Amazon EKS Console and select your Amazon EKS cluster. On the cluster info page, go to the Add-ons tab. Select the Kubecost add-on and choose Remove. To confirm removal of this add-on, in the field at the bottom of the pop-up, enter the add-on name kubecost_kubecost and select Remove.
If you used the AWS CLI method, to delete the Kubecost add-on and all installed components, in AWS CLI, run the following command:
aws eks delete-addon \
  --cluster-name my-cluster \
  --addon-name kubecost_kubecost
Next steps
- To learn more about Amazon EKS add-ons in AWS Marketplace, read the Amazon EKS add-ons Documentation.
- To try out the new add-ons experience, navigate to the Amazon EKS Console.
- If you’re an AWS Partner, start using AWS Marketplace and Amazon EKS add-ons to provide a better experience for your customers. To onboard your software to AWS Marketplace, visit the Getting started as a seller and Container-based products in the AWS documentation. If you have any further questions, email aws-mp-eks@amazon.com.
About the authors

Sai Vennam is a Principal Developer Advocate on the AWS Kubernetes team. As an advocate of containers, Kubernetes and other cloud-native technologies, he distills complex topics into simple language to promote community adoption, learning, and career growth.
.
.

Swaminathan Jayaraman is a Solutions Architect with AWS Marketplace. He supports buyers on procuring third party products via AWS Marketplace and sellers on listing their products successfully in AWS Marketplace. He has over 14 years of industry experience in developing and managing large scale applications, deploying SaaS solutions and supporting cloud migrations. He loves problem solving and always enjoys a good technical conversation.