AWS Big Data Blog
Enforce customized data quality rules in AWS Glue DataBrew
GIGO (garbage in, garbage out) is a concept common to computer science and mathematics: the quality of the output is determined by the quality of the input. In modern data architecture, you bring data from different data sources, which creates challenges around volume, velocity, and veracity. You might write unit tests for applications, but it’s equally important to ensure the data veracity of these applications, because incoming data quality can make or break your application. Incorrect, missing, or malformed data can have a large impact on production systems. Examples of data quality issues include but are not limited to the following:
- Missing or incorrect values can lead to failures in the production system that require non-null values
- Changes in the distribution of data can lead to unexpected outputs of machine learning (ML) models
- Aggregations of incorrect data can lead to wrong business decisions
- Incorrect data types have a big impact on financial or scientific institutes
In this post, we introduce data quality rules in AWS Glue DataBrew. DataBrew is a visual data preparation tool that makes it easy to profile and prepare data for analytics and ML. We demonstrate how to use DataBrew to define a list of rules in a new entity called a ruleset. A ruleset is a set of rules that compare different data metrics against expected values.
The post describes the implementation process and provides a step-by-step guide to build data quality checks in DataBrew.
Solution overview
To illustrate our data quality use case, we use a human resources dataset. This dataset contains the following attributes:
For this post, we downloaded data with 5 million records, but feel free to use a smaller dataset to follow along with this post.
The following diagram illustrates the architecture for our solution.
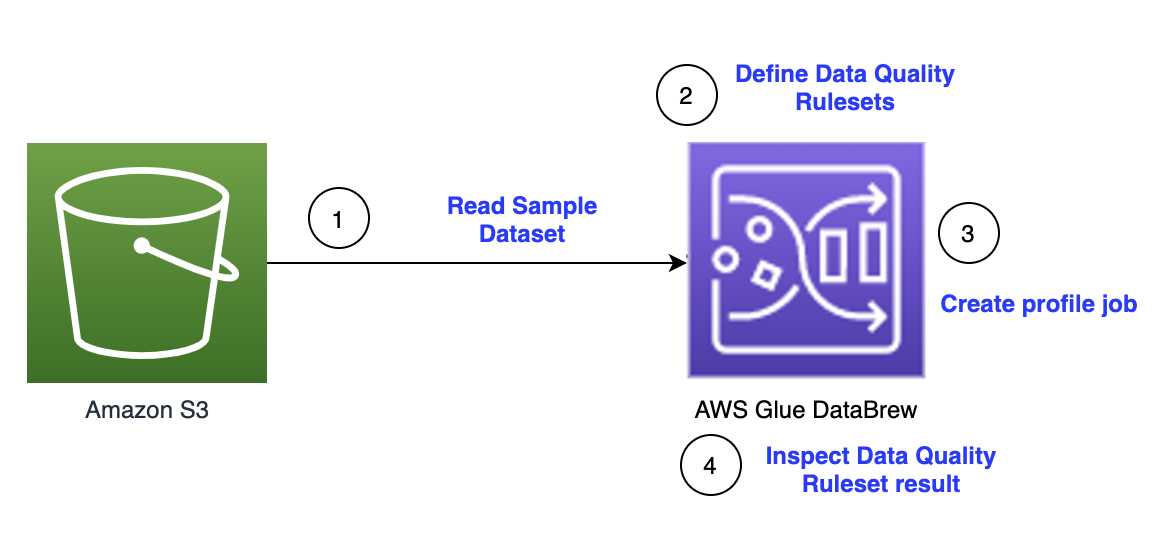
The steps in this solution are as follows:
- Create a sample dataset.
- Create a ruleset.
- Create data quality rules.
- Create a profile job.
- Inspect the data quality rules validation results.
- Clean the dataset.
- Create a DataBrew job.
- Validate the data quality check with the updated dataset.
Prerequisites
Before you get started, complete the following prerequisites:
- Have an AWS account.
- Download the sample dataset.
- Extract the CSV file.
- Create an Amazon Simple Storage Service (Amazon S3) bucket with three folders:
input,output, andprofile. - Upload the sample data in input folder to your S3 bucket (for example, s3://<s3 bucket name>/input/).
Create a sample dataset
To create your dataset, complete the following steps:
- On the DataBrew console, in the navigation pane, choose Datasets.
- Choose Connect new dataset.
- For Dataset name, enter a name (for example,
human-resource-dataset). - Under Data lake/data store, choose Amazon S3 as your source.
- For Enter your source from Amazon S3, enter the S3 bucket location where you uploaded your sample files (for example, s3://<s3 bucket name>/input/).

- Under Additional configurations, keep the selected file type CSV and CSV delimiter comma (,).
- Scroll to the bottom of the page and choose Create dataset.
The dataset is now available on the Datasets page.

Create a ruleset
We now define data quality rulesets against the dataset created in the previous step.
- On the DataBrew console, in the navigation pane, choose DQ Rules.
- Choose Create data quality ruleset.
- For Ruleset name, enter a name (for example,
human-resource-dataquality-ruleset). - Under Associated dataset, choose the dataset you created earlier.

Create data quality rules
To add data quality rules, you can use rules and add multiple rules, and within each rule, you can define multiple checks.
For this post, we create the following data quality rules and data quality checks within the rules:
- Row count is correct
- No duplicate rows
- Employee ID, email address, and SSN are unique
- Employee ID and phone number are not be null
- Employee ID and employee age in years has no negative values
- SSN data format is correct (123-45-6789)
- Phone number for string length is correct
Regioncolumn only has the specified region- Employee ID is an integer
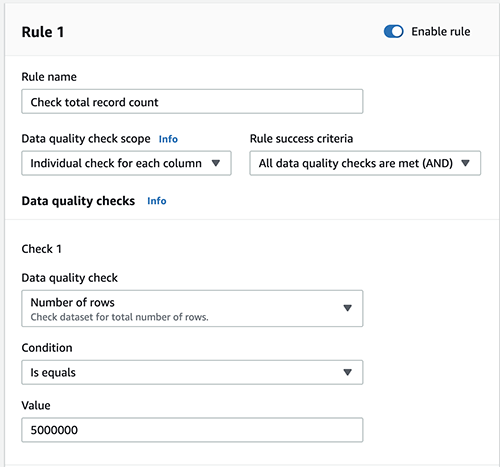
Row count is correct
To check the total row count, complete the following steps:
- Add a new rule.
- For Rule name, enter a name (for example,
Check total record count). - For Data quality check scope, choose Individual check for each column.
- For Rule success criteria, choose All data quality checks are met (AND).
- For Data quality checks¸ choose Number of rows.
- For Condition, choose Is equals.
- For Value, enter
5000000.
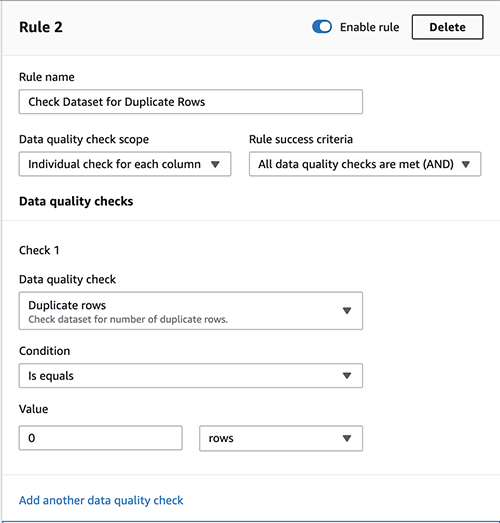
No duplicate rows
To check the dataset for duplicate rows, complete the following steps:
- Choose Add another rule.
- For Rule name, enter a name (for example,
Check dataset for duplicate rows). - For Data quality check scope, choose Individual check for each column.
- For Rule success criteria, choose All data quality checks are met (AND).
- Under Check 1, for Data quality check¸ choose Duplicate rows.
- For Condition, choose Is equals.
- For Value, enter
0and choose rows on the drop-down menu.
Employee ID, email address, and SSN are unique
To check that the employee ID, email, and SSN are unique, complete the following steps:
- Choose Add another rule.
- For Rule name, enter a name (for example,
Check dataset for Unique Values). - For Data quality check scope, choose Common checks for selected columns.
- For Rule success criteria, choose All data quality checks are met (AND).
- For Selected columns, select Selected columns.
- Choose the columns
Emp ID,e mail, andSSN. - Under Check 1, for Data quality check, choose Unique values.
- For Condition, choose Is equals.
- For Value, enter
100and choose %(percent) rows on the drop-down menu.

Employee ID and phone number are not be null
To check that employee IDs and phone numbers aren’t null, complete the following steps:
- Choose Add another rule.
- For Rule name, enter a name (for example,
Check Dataset for NOT NULL). - For Data quality check scope, choose Common checks for selected columns.
- For Rule success criteria, choose All data quality checks are met (AND).
- For Selected columns, select Selected columns.
- Choose the columns
Emp IDandPhone No. - Under Check 1, for Data quality check, choose Value is not missing.
- For Condition, choose Greater than equals.
- For Threshold, enter
100and choose %(percent) rows on the drop-down menu.

Employee ID and age in years has no negative values
To check the employee ID and age for positive values, complete the following steps:
- Choose Add another rule.
- For Rule name, enter a name (for example,
Check emp ID and age for positive values). - For Data quality check scope, choose Individual check for each column.
- For Rule success criteria, choose All data quality checks are met (AND).
- Under Check 1, for Data quality check, choose Numeric values.
- Choose Emp ID on the drop-down menu.
- For Condition, choose Greater than equals.
- For Value, select Custom value and enter
0.

- Choose Add another quality check and repeat the same steps for age in years.
SSN data format is correct
To check the SSN data format, complete the following steps:
- Choose Add another rule.
- For Rule name, enter a name (for example,
Check dataset format). - For Data quality check scope, choose Individual check for each column.
- For Rule success criteria, choose All data quality checks are met (AND).
- Under Check 1, for Data quality check, choose String values.
- Choose SSN on the drop-down menu.
- For Condition, choose Matches (RegEx pattern).
- For RegEx value, enter
^[0-9]{3}-[0-9]{2}-[0-9]{4}$.

Phone number string length is correct
To check the length of the phone number, complete the following steps:
- Choose Add another rule.
- For Rule name, enter a name (for example, Check
Dataset Phone no. for string length). - For Data quality check scope, choose Individual check for each column.
- For Rule success criteria, choose All data quality checks are met (AND).
- Under Check 1, for Data quality check, choose Value string length.
- Choose Phone No on the drop-down menu.
- For Condition, choose Greater than equals.
- For Value, select Custom value and enter
9. - Under Check 2, for Data quality check, choose Value string length.
- Choose Phone No on the drop-down menu.
- For Condition, choose Less than equals.
- For Value¸ select Custom value and enter
12.

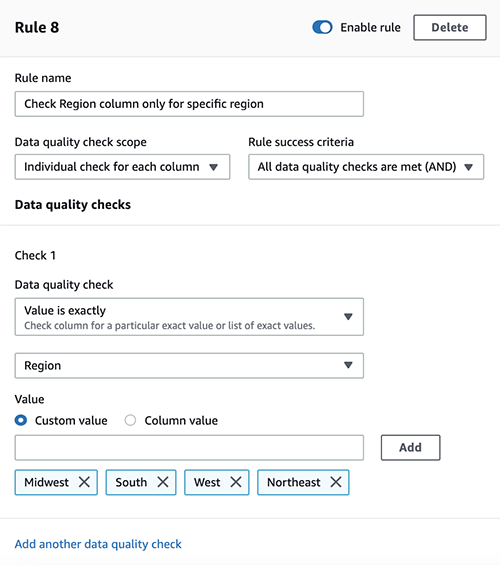
Region column only has the specified region
To check the Region column, complete the following steps:
- Choose Add another rule.
- For Rule name, enter a name (for example, Check
Region column only for specific region). - For Data quality check scope, choose Individual check for each column.
- For Rule success criteria, choose All data quality checks are met (AND).
- Under Check 1, for Data quality check, choose Value is exactly.
- Choose Region on the drop-down menu.
- For Value, select Custom value.
- Choose the values
Midwest,South,West, andNortheast.
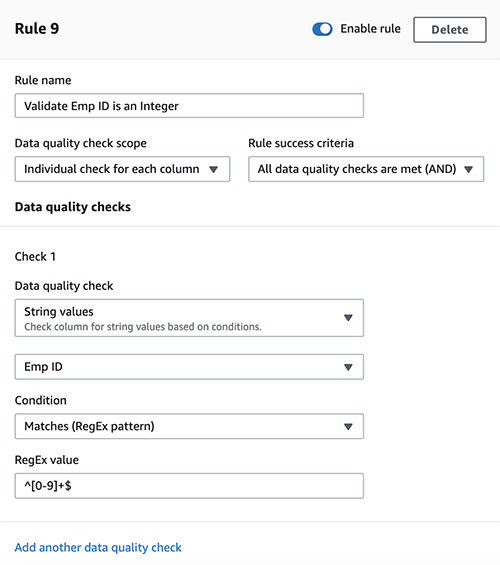
Employee ID is an integer
To check that the employee ID is an integer, complete the following steps:
- Choose Add another rule.
- For Rule name, enter a name (for example,
Validate Emp ID is an Integer). - For Data quality check scope, choose Individual check for each column.
- For Rule success criteria, choose All data quality checks are met (AND).
- Under Check 1, for Data quality check, choose String values.
- Choose Emp ID on the drop-down menu.
- For Condition, choose Matches (RegEx pattern).
- For RegEx value, enter
^[0-9]+$.
- After you create all the rules, choose Create ruleset.

Your ruleset is now listed on the Data quality rulesets page.

Create a profile job
To create a profile job with your new ruleset, complete the following steps:
- On the Data quality rulesets page, select the ruleset you just created.
- Choose Create profile job with ruleset.

- For Job name, keep the prepopulated name or enter a new one.
- For Data sample, select Full dataset.
The default sample size is important for data quality rules validation, because it matters if you validate all the roles or a limited sample.
- Under Job output settings, for S3 location, enter the path to the
profilebucket.
If you enter a new bucket name, the folder is created automatically.
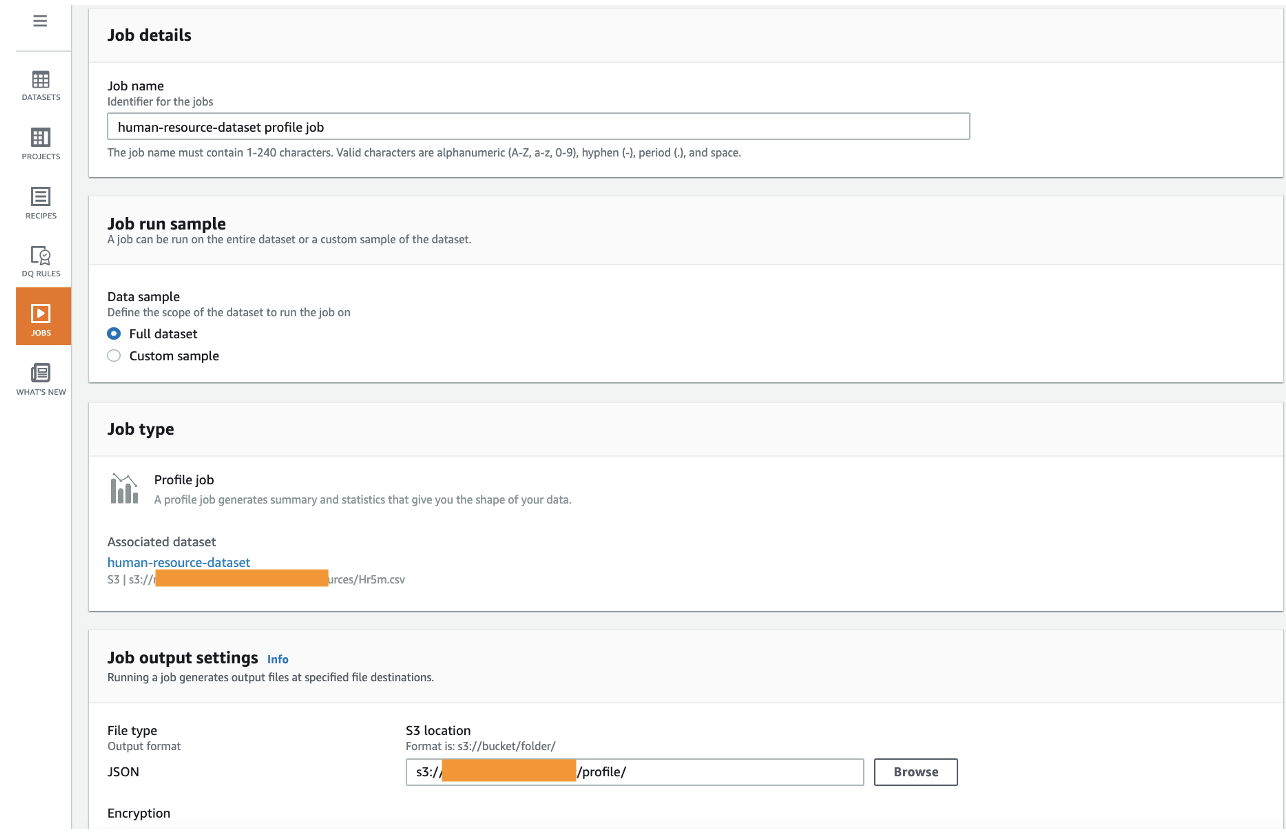
- Keep the default settings for the remaining optional sections: Data profile configurations, Data quality rules, Advanced job settings, Associated schedules, and Tags.

The next step is to choose or create the AWS Identity and Access Management (IAM) role that grants DataBrew access to read from the input S3 bucket and write to the job output bucket.
- For Role name, choose an existing role or choose Create a new IAM role and enter an IAM role suffix.
- Choose Create and run job.

For more information about configuring and running DataBrew jobs, see Creating, running, and scheduling AWS Glue DataBrew jobs.
Inspect data quality rules validation results
To inspect the data quality rules, we need to let the profile job complete.
- On the Jobs page of the DataBrew console, choose the Profile jobs tab.
- Wait until the profile job status changes to
Succeeded. - When the job is complete, choose View data profile.
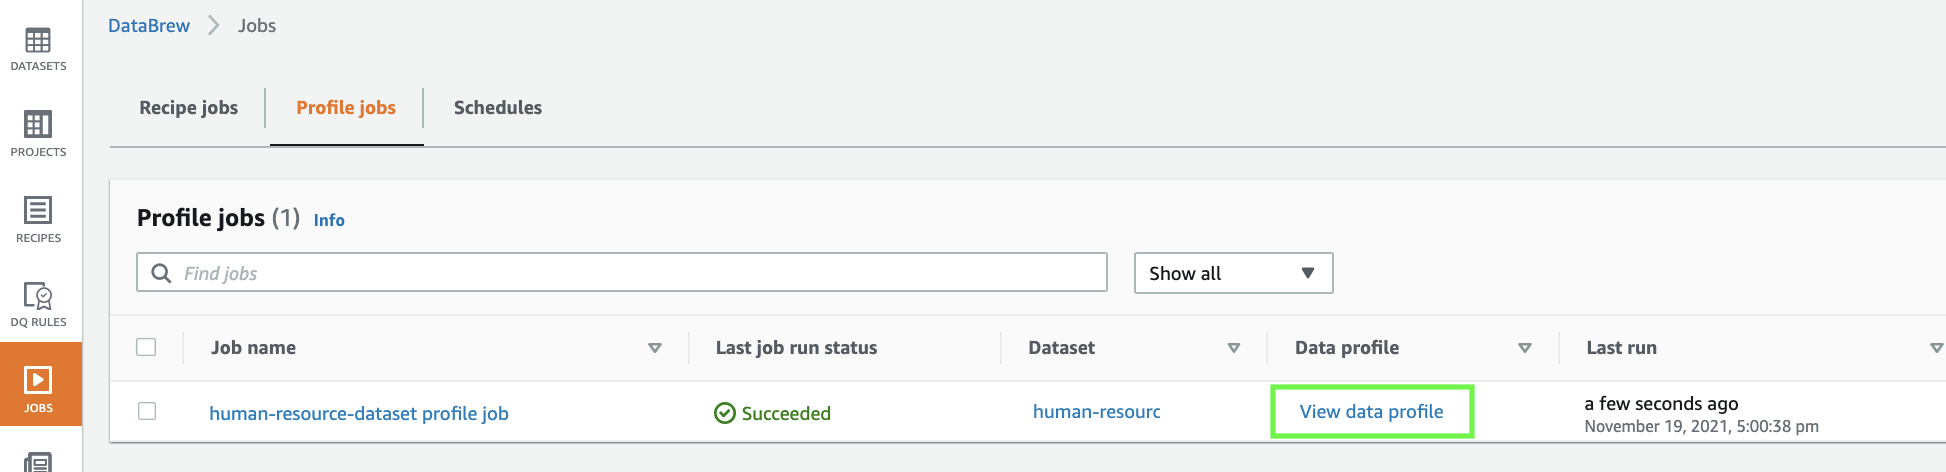
You’re redirected to the Data profile overview tab on the Datasets page.
- Choose the Data quality rules tab.
Here you can review the status to your data quality rules. As shown in the following screenshot, eight of the nine data quality rules defined were successful, and one rule failed.
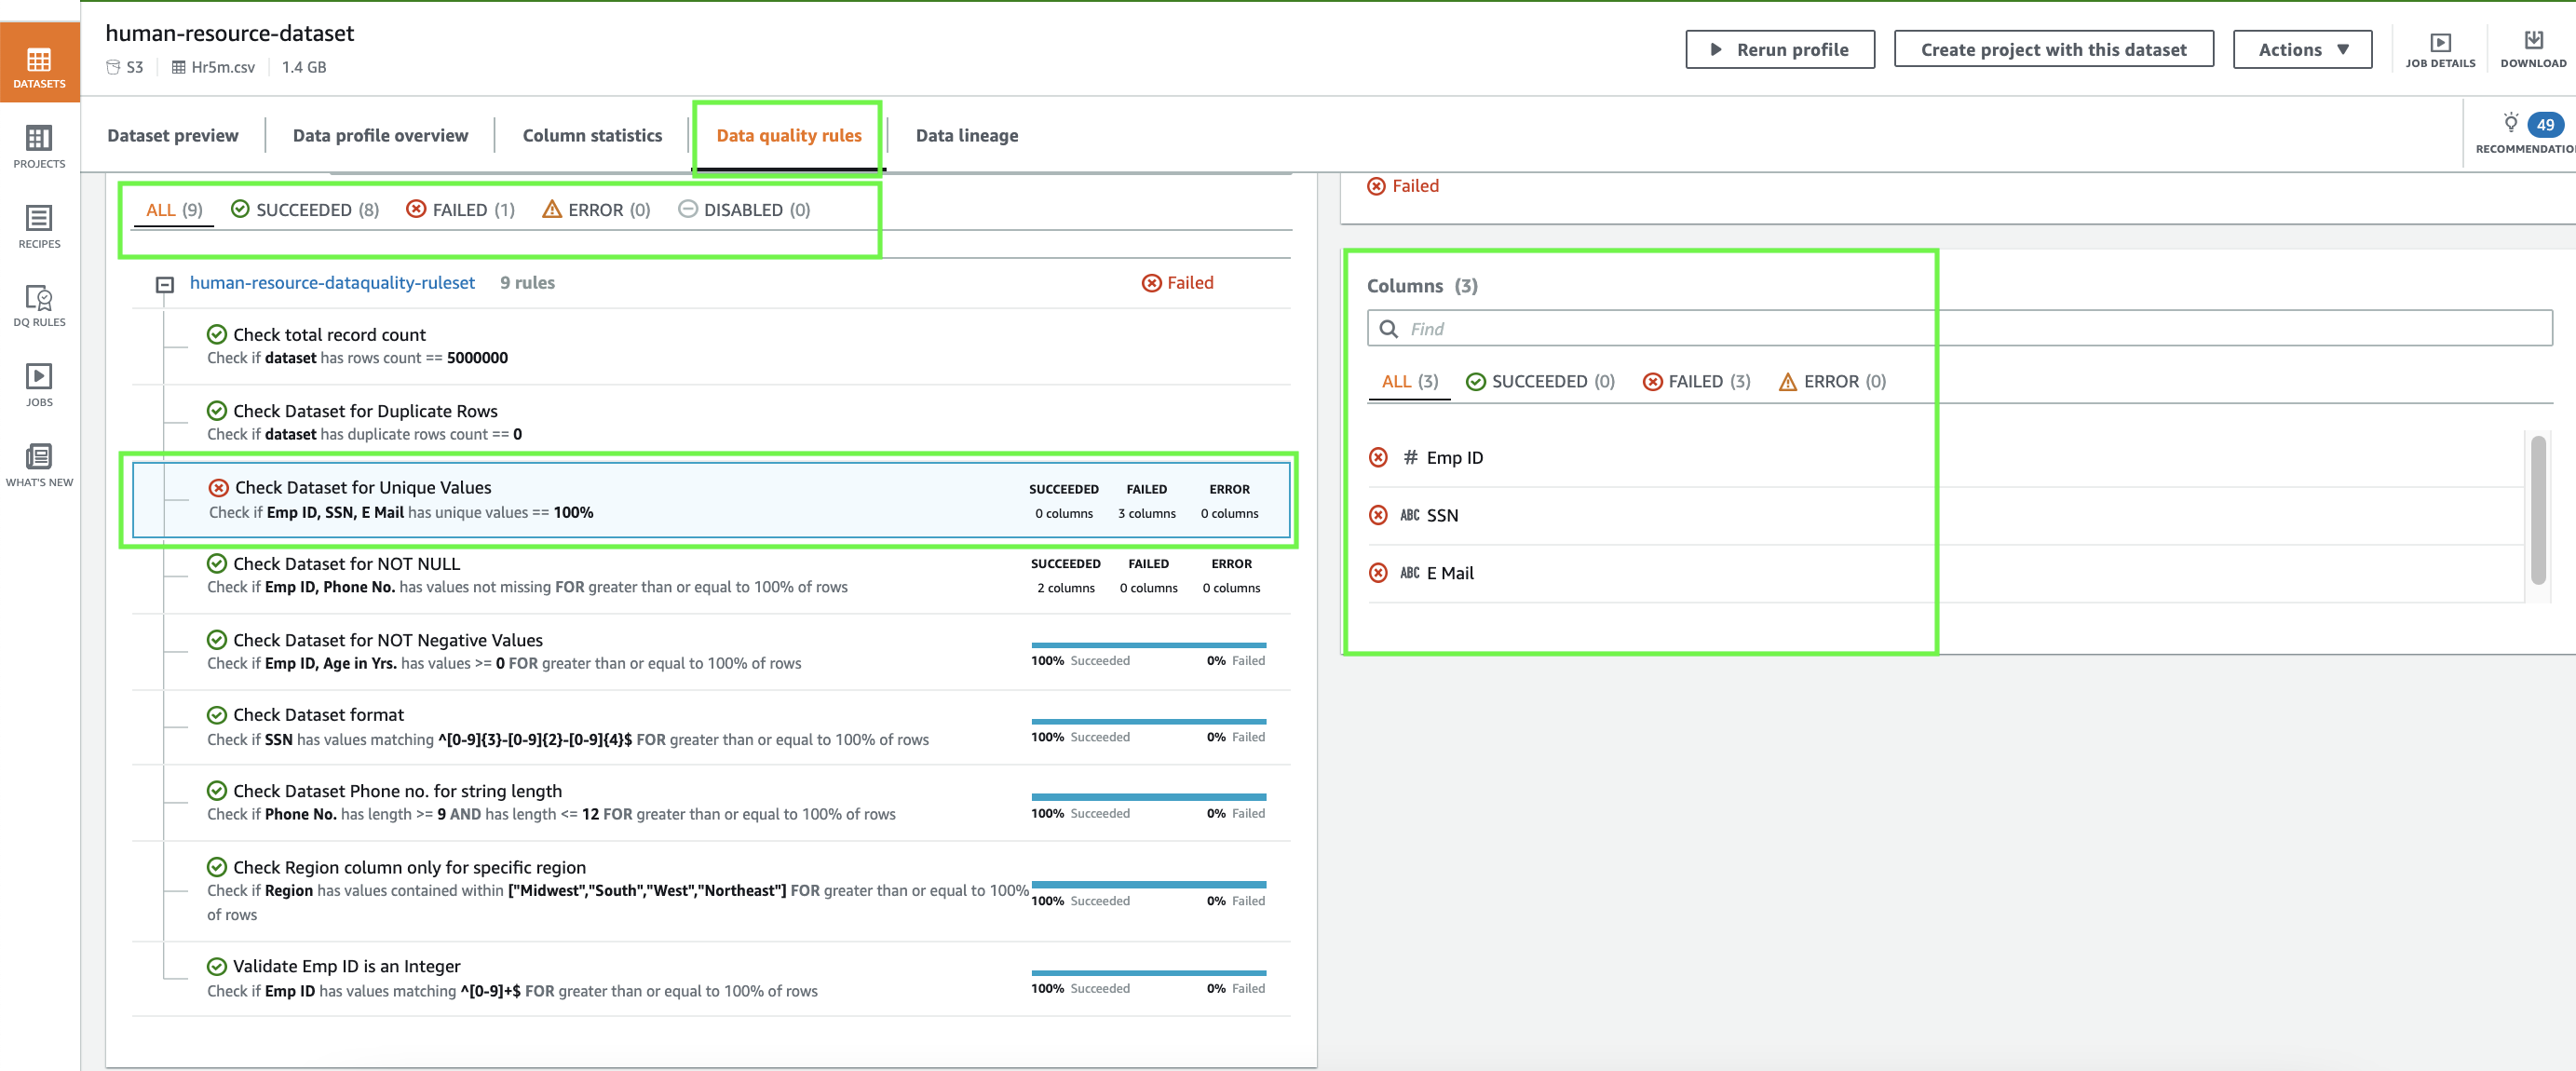
Our failed data quality rule indicates that we found duplicate values for employee ID, SSN, and email.
- To confirm that the data has duplicate values, on the Column statistics tab, choose the
Emp IDcolumn.

- Scroll down to the section Top distinct values.


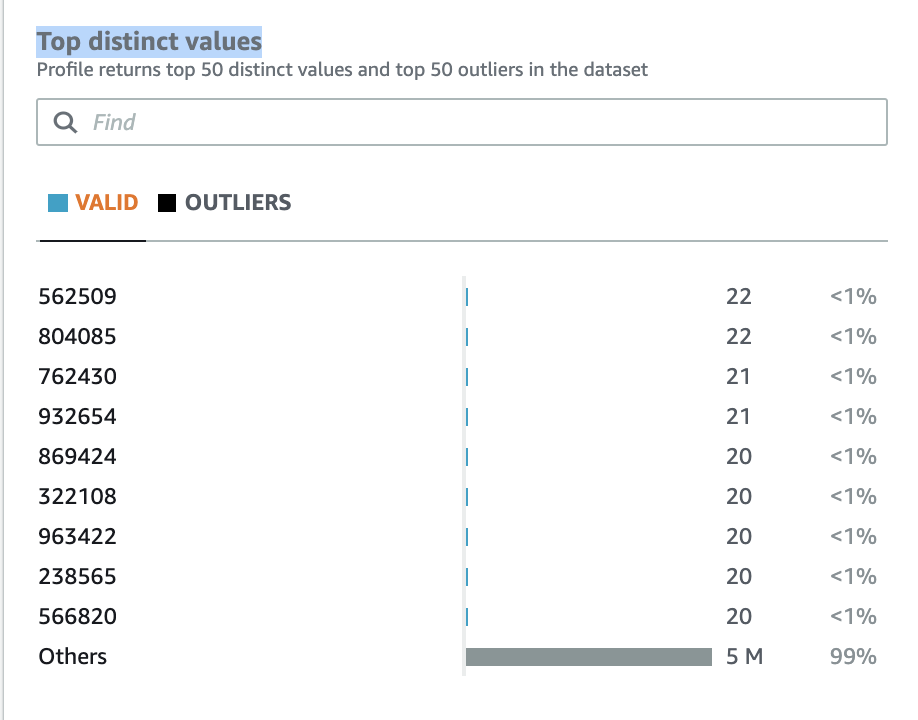
Similarly, you can check the E Mail and SSN columns to find that those columns also have duplicate values.
Now we have confirmed that our data has duplicate values. The next step is to clean up the dataset and rerun the quality rules validation.
Clean the dataset
To clean the dataset, we first need to create a project.
- On the DataBrew console, choose Projects.
- Choose Create project.
- For Project name, enter a name (for this post,
human-resource-project-demo). - For Select a dataset, select My datasets.
- Select the
human-resource-dataset dataset. - Keep the sampling size at its default.
- Under Permissions, for Role name, choose the IAM role that we created previously for our DataBrew profile job.
- Choose Create project.

The project takes a few minutes to open. When it’s complete, you can see your data.
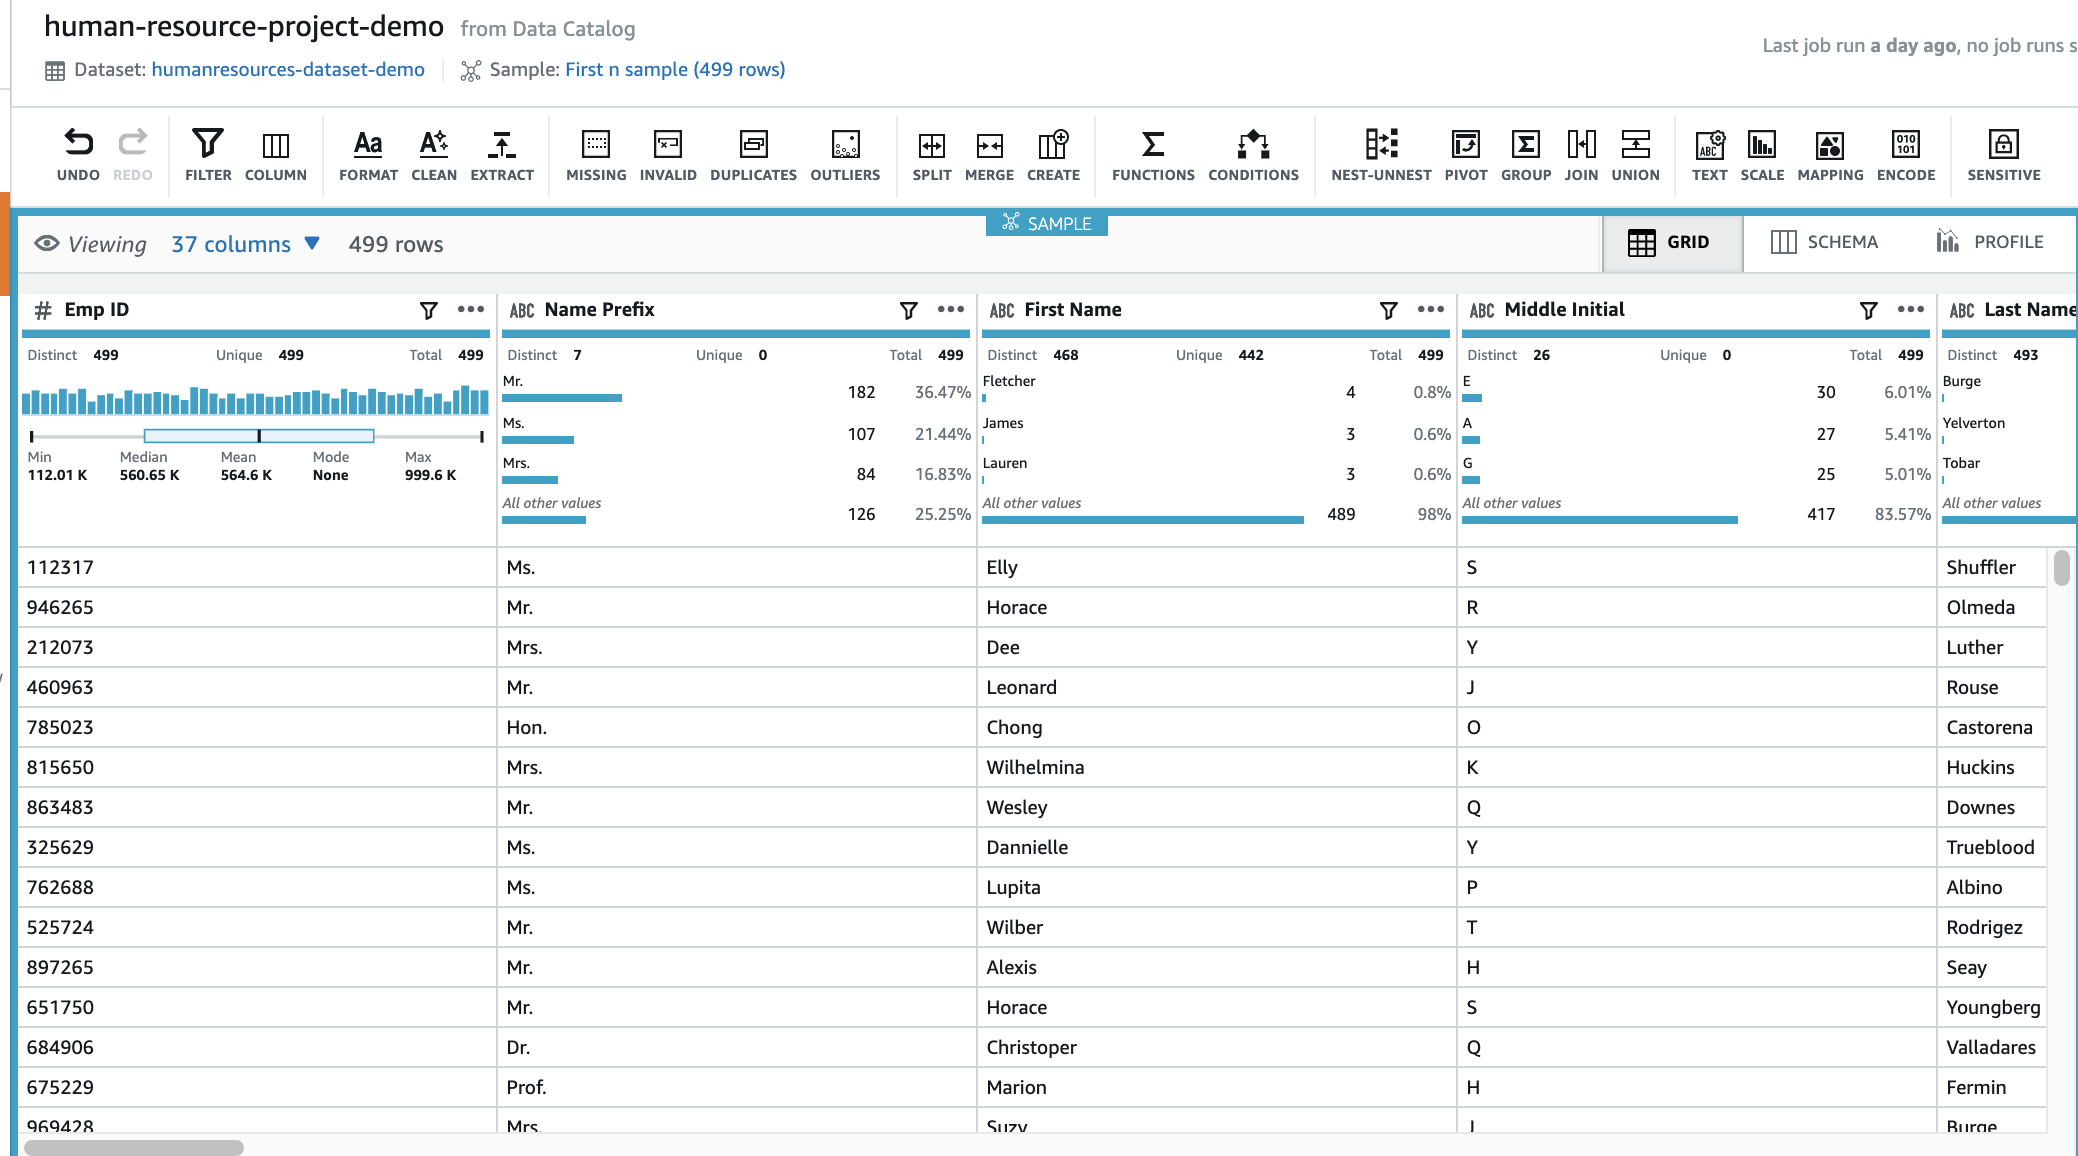
Next, we delete the duplicate value from the Emp ID column.
- Choose the
Emp IDcolumn. - Choose the more options icon (three dots) to view all the transforms available for this column.
- Choose Remove duplicate values.

- Repeat these steps for the
SSNandE Mailcolumns.
You can now see the three applied steps in the Recipe pane.

Create a DataBrew job
The next step is to create a DataBrew job to run these transforms against the full dataset.
- On the project details page, choose Create job.

- For Job name, enter a name (for example,
human-resource-after-dq-check). - Under Job output settings¸ for File type, choose your final storage format to be CSV.
- For S3 location, enter your output S3 bucket location (for example,
s3://<s3 bucket name>/output/). - For Compression, choose None.

- Under Permissions, for Role name¸ choose the same IAM role we used previously.
- Choose Create and run job.

- Wait for job to complete; you can monitor the job on the Jobs page.

Validate the data quality check with the corrected dataset
To perform the data quality checks with the corrected dataset, complete the following steps:
- Follow the steps outlined earlier to create a new dataset, using the corrected data from the previous section.
- Choose the Amazon S3 location of the job output.

- Choose Create dataset.

- Choose DQ Rules and select the ruleset you created earlier.
- On the Actions menu, choose Duplicate.
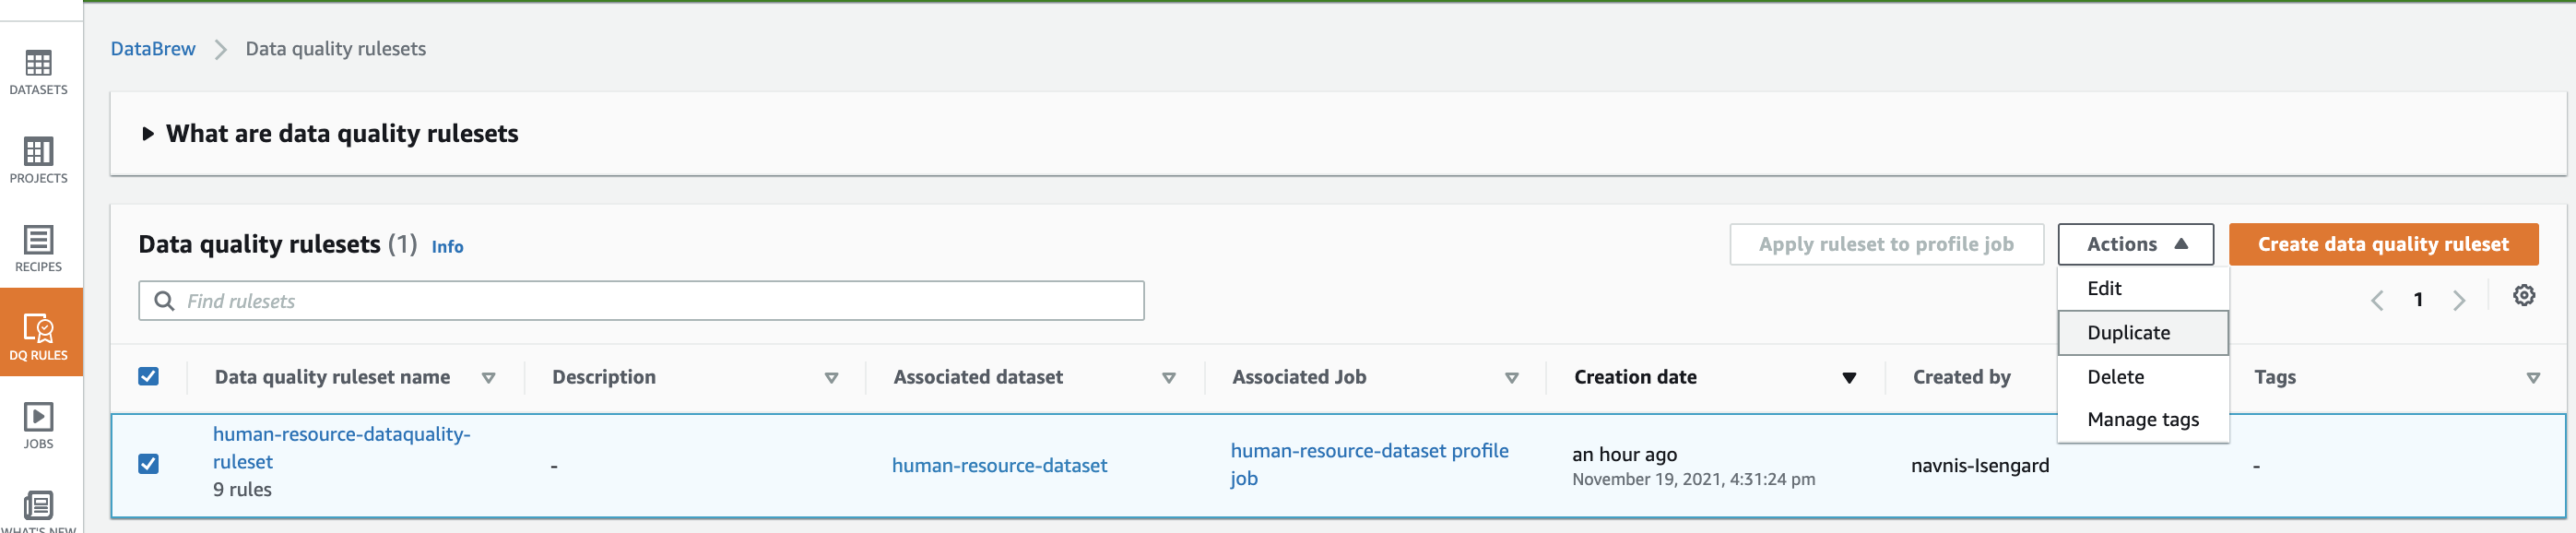
- For Ruleset name, enter a name (for example,
human-resource-dataquality-ruleset-on-corrected-dataset). - Select the newly created dataset.

- Choose Create data quality ruleset.

- After the ruleset is created, select it and choose Create profile job with ruleset.
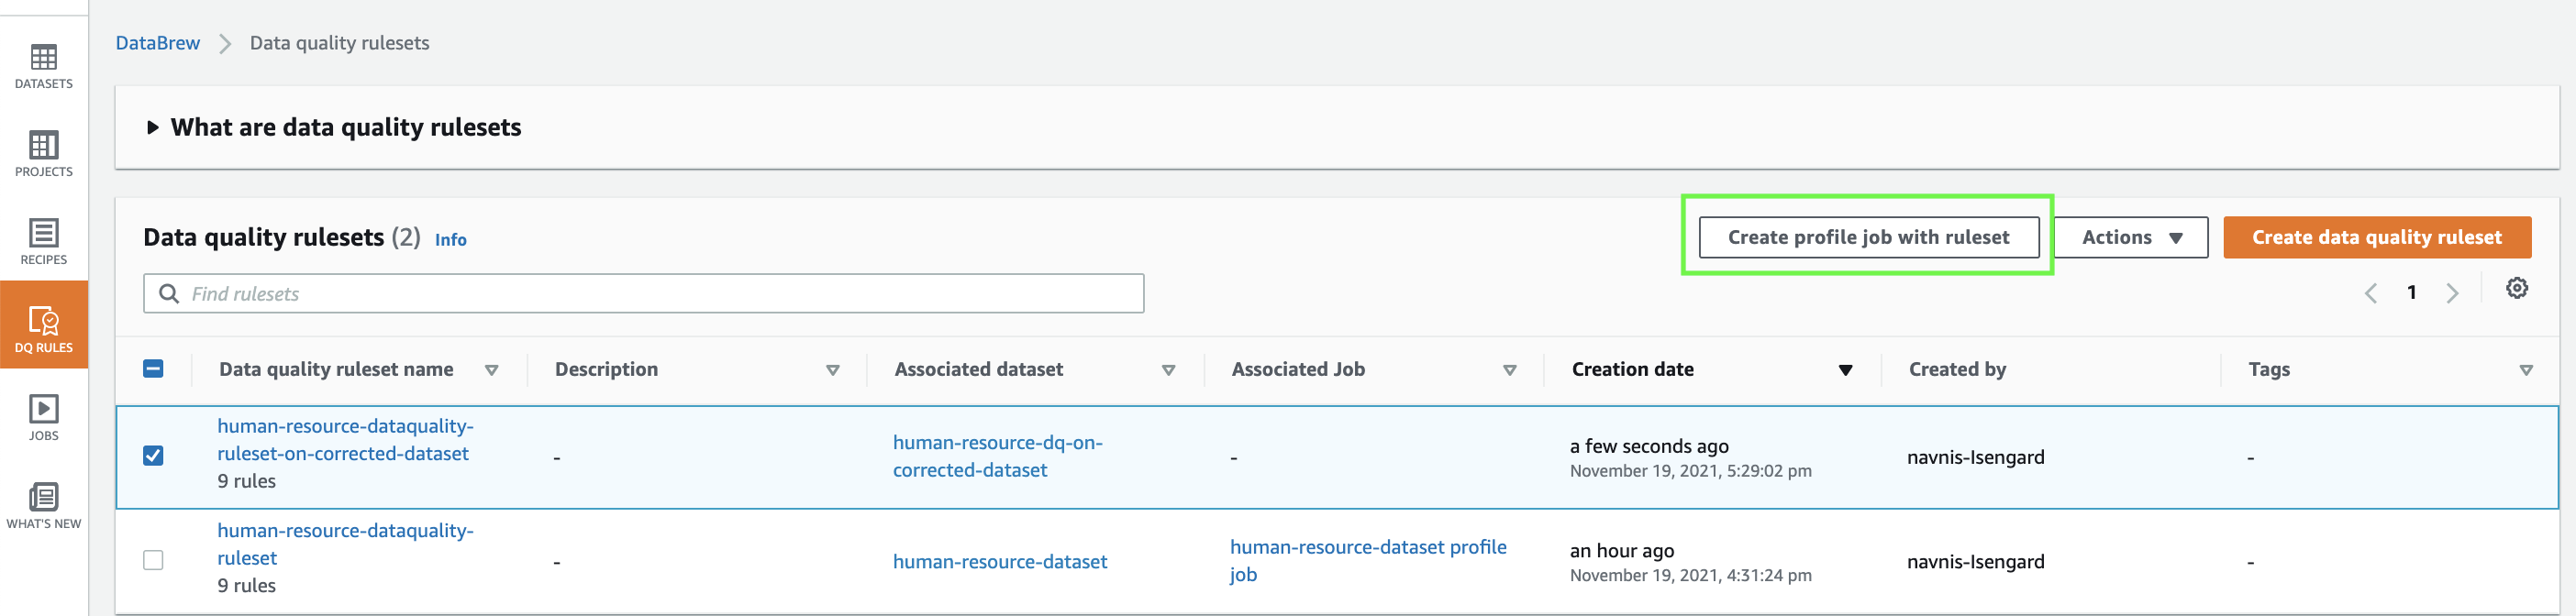
- Create a new profile job.

- Choose Create and run job.

- When the job is complete, repeat the steps from earlier to inspect the data quality rules validation results.
This time, under Data quality rules, all the rules are passed except Check total record count because you removed duplicate values.

On the Column statistics page, under Top distinct values for the Emp ID column, you can see the distinct values.

You can find similar results for the SSN and E Mail columns.
Clean up
To avoid incurring future charges, we recommend you delete the resources you created during this walkthrough.
Conclusion
As demonstrated in this post, you can use DataBrew to help create data quality rules, which can help you identify any discrepancies in your data. You can also use DataBrew to clean the data and validate it going forwards. You can learn more about AWS Glue DataBrew from here and learn around AWS Glue DataBrew pricing here.
About the Authors
 Navnit Shukla is an AWS Specialist Solution Architect, Analytics, and is passionate about helping customers uncover insights from their data. He has been building solutions to help organizations make data-driven decisions.
 Harsh Vardhan Singh Gaur is an AWS Solutions Architect, specializing in Analytics. He has over 5 years of experience working in the field of big data and data science. He is passionate about helping customers adopt best practices and discover insights from their data.