AWS Big Data Blog
Extracting and joining data from multiple data sources with Athena Federated Query
With modern day architectures, it’s common to have data sitting in various data sources. We need proper tools and technologies across those sources to create meaningful insights from stored data. Amazon Athena is primarily used as an interactive query service that makes it easy to analyze unstructured, semi-structured, and structured data stored in Amazon Simple Storage Service (Amazon S3) using standard SQL. With the federated query functionality in Athena, you can now run SQL queries across data stored in relational, non-relational, object, and custom data sources and store the results back in Amazon S3 for further analysis.
The goals for this series of posts are to discuss how we can configure different connectors to run federated queries with complex joins across different data sources, how to configure a user-defined function for redacting sensitive information when running Athena queries, and how we can use machine learning (ML) inference to detect anomaly detection in datasets to help developers, big data architects, data engineers, and business analysts in their daily operational routines.
Athena Federated Query
Athena uses data source connectors that run on AWS Lambda to run federated queries. A data source connector is a piece of code that translates between your target data source and Athena. You can think of a connector as an extension of Athena’s query engine. Prebuilt Athena data source connectors exist for data sources like Amazon CloudWatch Logs, Amazon DynamoDB, Amazon DocumentDB, Amazon OpenSearch Service, Amazon ElastiCache for Redis, and JDBC-compliant relational data sources such as MySQL, PostgreSQL, and Amazon RedShift under the Apache 2.0 license. You can also use the Athena Query Federation SDK to write custom connectors. After you deploy data source connectors, the connector is associated with a catalog name that you can specify in your SQL queries. You can combine SQL statements from multiple catalogs and span multiple data sources with a single query.
When a query is submitted against a data source, Athena invokes the corresponding connector to identify parts of the tables that need to be read, manages parallelism, and pushes down filter predicates. Based on the user submitting the query, connectors can provide or restrict access to specific data elements. Connectors use Apache Arrow as the format for returning data requested in a query, which enables connectors to be implemented in languages such as C, C++, Java, Python, and Rust. Because connectors run in Lambda, you can use them to access data from any data source on the cloud or on premises that is accessible from Lambda.
The first post of this series discusses how to configure Athena Federated Query connectors and use them to run federated queries for data residing in HBase on Amazon EMR, Amazon Aurora MySQL, DynamoDB, and ElastiCache for Redis databases.
Test data
To demonstrate Athena federation capabilities, we use the TPCH sample dataset. TPCH is a decision support benchmark and has broad industry-wide relevance. This benchmark illustrates decision support systems that examine large volumes of data, run queries with a high degree of complexity, and give answers to critical business questions. For our use case, imagine a hypothetical ecommerce company with the following architecture:
Lineitemsprocessing records stored in HBase on Amazon EMR to meet requirements for a write-optimized data store with high transaction rate and long-term durability- ElastiCache for Redis stores
NationsandActiveOrderstables so that the processing engine can get fast access to them - An Aurora with MySQL engine is used for
Orders,Customer, andSuppliersaccounts data like email addresses and shipping addresses - DynamoDB hosts
PartandPartsuppdata, because DynamoDB offers high flexibility and high performance
The following diagram shows a schematic view of the TPCH tables and their associated data stores.

Building a test environment using AWS CloudFormation
Before following along with this post, you need to create the required AWS resources in your account. To do this, we have provided you with an AWS CloudFormation template to create a stack that contains the required resources: the sample TPCH database on Amazon Relational Database Service (Amazon RDS), HBase on Amazon EMR, Amazon ElastiCache for Redis, and DynamoDB.
The template also creates the AWS Glue database and tables, S3 bucket, Amazon S3 VPC endpoint, AWS Glue VPC endpoint, Athena named queries, AWS Cloud9 IDE, an Amazon SageMaker notebook instance, and other AWS Identity and Access Management (IAM) resources that we use to implement the federated query, user-defined functions (UDFs), and ML inference functions.
This template is designed only to show how you can use Athena Federated Query, UDFs, and ML inference. This setup isn’t intended for production use without modification. Additionally, the template is created for use in the us-east-1 Region, and doesn’t work in other Regions.
Before launching the stack, you must have the following prerequisites:
- An AWS account that provides access to AWS services
- An IAM user with an access key and secret key to configure the AWS Command Line Interface (AWS CLI), and permissions to create an IAM role, IAM policies, and stacks in AWS CloudFormation
To create your resources, complete the following steps:
- Choose Launch Stack:

- Select I acknowledge that this template may create IAM resources.
This template creates resources that incur costs while they remain in use. Follow the cleanup steps at the end of this post to delete and clean up the resources to avoid any unnecessary charges.
- When the CloudFormation template is complete, record the outputs listed on the Outputs tab on the AWS CloudFormation console.

The CloudFormation stack takes approximately 20–30 minutes to complete. Check the AWS CloudFormation console and wait for the status CREATE_COMPLETE.

When stack creation is complete, your AWS account has all the required resources to implement this solution.
- On the Outputs tab of the Athena-Federation-Workshop stack, capture the following:
S3BucketSubnetsWorkshopSecurityGroupEMRSecurityGroupHbaseConnectionStringRDSConnectionString
You need all this information when setting up connectors.
- When the stacks are complete, check the status of the Amazon EMR steps on the Amazon EMR console.
It can take up to 15 minutes for this step to complete.
Deploying connectors and connecting to data sources
Preparing to create federated queries is a two-part process: deploying a Lambda function data source connector, and connecting the Lambda function to a data source. In the first part, you give the Lambda function a name that you can later choose on the Athena console. In the second part, you give the connector a name that you can reference in your SQL queries.
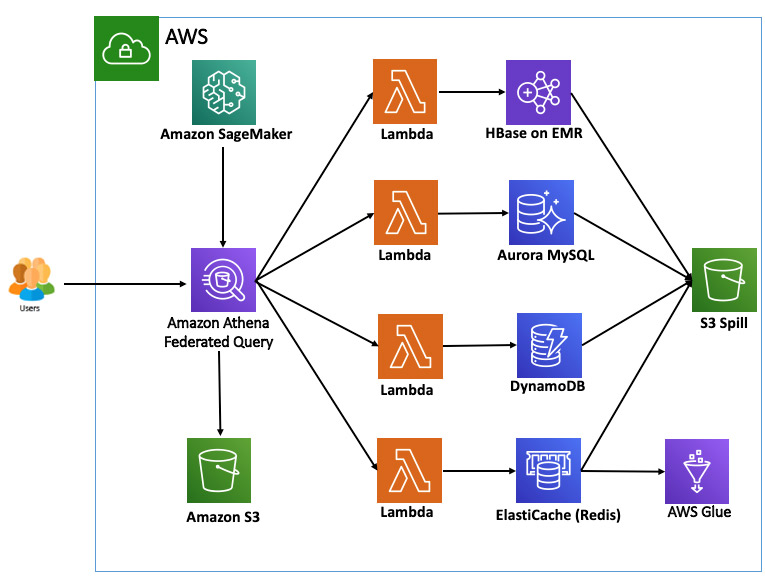
We want to query different data sources, so in the following sections we set up Lambda connectors for HBase on Amazon EMR, Aurora MySQL, DynamoDB, and Redis before we start creating complex joins across data sources using Athena federated queries. The following diagram shows the architecture of our environment.
Installing the Athena JDBC connector for Aurora MySQL
The Athena JDBC connector supports the following databases:
- MySQL
- PostGreSQL
- Amazon Redshift
To install the Athena JDBC connector for Aurora MySQL, complete the following steps:
- In your AWS account, search for
serverless application repository. - Choose Available applications.
- Make sure that Show apps that create custom IAM roles or resource policies is selected.
- Search for
athena federation. - Locate and choose AthenaJdbcConnector.
- Provide the following values:
- Application name – Leave it as default name,
AthenaJdbcConnector. - SecretNamePrefix – Enter
AthenaJdbcFederation. - SpillBucket – Enter the
S3Bucketvalue from the AWS CloudFormation outputs. - DefaultConnectionString – Enter the
RDSConnectionStringvalue from the AWS CloudFormation outputs. - DisableSpillEncryption – Leave it as the default value
false. - LambdaFunctionName – Enter
mysql. - LambdaMemory – Leave it as the default value
3008. - LambdaTimeout – Leave it as the default value
900. - SecurityGroupIds – Enter the
WorkshopSecurityGroupvalue from the AWS CloudFormation outputs. - SpillPrefix – Change the default value to
athena-spill/jdbc. - SubnetIds – Enter the
Subnetsvalue from the AWS CloudFormation outputs.
- Application name – Leave it as default name,
- Select I acknowledge that this app creates custom IAM roles.
- Choose Deploy.
This deploys the Athena JDBC connector for Aurora MySQL; you can refer to this Lambda function in your queries as lambda:mysql.
For more information about the Athena JDBC connector, see the GitHub repo.
Installing the Athena DynamoDB connector
To install Athena DynamoDB Connector, complete the following steps:
- In your AWS account, search for
serverless application repository. - Choose Available applications.
- Make sure that Show apps that create custom IAM roles or resource policies is selected.
- Search for
athena federation. - Locate and choose AthenaDynamoDBConnector.
- Provide the following values:
- Application name – Leave it as default name
AthenaDynamoDBConnector. - SpillBucket – Enter the
S3Bucketvalue from the AWS CloudFormation outputs. - AthenaCatalogName – Enter
dynamo. - DisableSpillEncryption – Leave it as the default value
false. - LambdaMemory – Leave it as the default value
3008. - LambdaTimeout – Leave it as the default value
900. - SpillPrefix – Enter
athena-spill-dynamo.
- Application name – Leave it as default name
- Select I acknowledge that this app creates custom IAM roles.
- Choose Deploy.
This deploys Athena DynamoDB connector; you can refer to this Lambda function in your queries as lambda:dynamo.
For more information about the Athena DynamoDB connector, see the GitHub repo.
Installing the Athena HBase connector
To install the Athena HBase connector, complete the following steps:
- In your AWS account, search for
serverless application repository. - Choose Available applications.
- Make sure that Show apps that create custom IAM roles or resource policies is selected.
- Search for
athena federation. - Locate and choose AthenaHBaseConnector.
- Provide the following values:
- Application name – Leave it as default name
AthenaHBaseConnector - SecretNamePrefix – Enter
hbase-*. - SpillBucket – Enter the
S3Bucketvalue from the AWS CloudFormation outputs. - AthenaCatalogName – Enter
hbase. - DisableSpillEncryption – Leave it as the default value
false. - DefaultConnectionString – Enter the
HbaseConnectionStringvalue from the AWS CloudFormation outputs. - LambdaMemory – Leave it as the default value of
3008. - LambdaTimeout – Leave it as the default value of
900. - SecurityGroupIds – Enter the
EMRSecurityGroupvalue from the AWS CloudFormation outputs. - SpillPrefix – Enter
athena-spill-hbase. - SubnetIds – Enter the
Subnetsvalue from the AWS CloudFormation outputs.
- Application name – Leave it as default name
- Select I acknowledge that this app creates custom IAM roles.
- Choose Deploy.
This deploys the Athena HBase connector; you can refer to this Lambda function in your queries as lambda:hbase.
For more information about the Athena HBase connector, see the GitHub repo.
Installing the Athena Redis connector
To install Athena Redis Connector, complete the following steps:
- In your AWS account, search for
serverless application repository. - Choose Available applications.
- Make sure that Show apps that create custom IAM roles or resource policies is selected.
- Search for
athena federation. - Locate and choose AthenaRedisConnector.
- Provide the following values:
- Application name – Leave it as default name
AthenaRedisConnector. - SecretNameOrPrefix – Enter
redis-*. - SpillBucket – Enter the
S3Bucketvalue from the AWS CloudFormation outputs. - AthenaCatalogName – Enter
redis. - DisableSpillEncryption – Leave it as the default value
false. - LambdaMemory – Leave it as the default value
3008. - LambdaTimeout – Leave it as the default value
900. - SecurityGroupIds – Enter the
EMRSecurityGroupvalue from the AWS CloudFormation outputs. - SpillPrefix – Enter
athena-spill-redis. - SubnetIds – Enter the
Subnetsvalue from the AWS CloudFormation outputs.
- Application name – Leave it as default name
- Select I acknowledge that this app creates custom IAM roles.
- Choose Deploy.
This deploys the Athena Redis connector; you can refer to this Lambda function in your queries as lambda:redis.
For more information about the Athena Redis connector, see the GitHub repo.
Redis database and tables with the AWS Glue Data Catalog
Because Redis doesn’t have a schema of its own, the Redis connector can’t infer the columns or data type from Redis. The Redis connector needs an AWS Glue database and tables to be set up so it can associate the data to the schema. The CloudFormation template creates the necessary Redis database and tables in the Data Catalog. You can confirm this on the AWS Glue console.
Running federated queries
Now that the connectors are deployed, we can run Athena queries that use those connectors.
- On the Athena console, choose Get Started.
- Make sure you’re in the workgroup
AmazonAthenaPreviewFunctionality. If not, choose Workgroups, select AmazonAthenaPreviewFunctionality, and choose Switch Workgroup.
On the Saved Queries tab, you can see a list of pre-populated queries to test.

The Sources saved query tests your Athena connector functionality for each data source, and you can make sure that you can extract data from each data source before running more complex queries involving different data sources.
- Highlight the first query up to the semicolon and choose Run query.
After successfully testing connections to each data source, you can proceed with running more complex queries, such as:
FetchActiveOrderInfoProfitBySupplierNationByYrOrdersRevenueDateAndShipPrioShippedLineitemsPricingReportSuppliersWhoKeptOrdersWaiting
If you see an error on the HBase query like the following, try rerunning it and it should resolve the issue.
As an example of the advanced queries, the SuppliersWhoKeptOrdersWaiting query identifies suppliers whose product was part of a multi-supplier order (with current status of F) and they didn’t ship the required parts on time. This query uses multiple data sources: Aurora MySQL and HBase on Amazon EMR. As shown in the following screenshot, the query extracts data from the supplier table on Aurora MySQL, the lineitem table on HBase, and the orders tables on Aurora MySQL. The results are returned in 7.13 seconds.

Cleaning up
To clean up the resources created as part of our CloudFormation template, complete the following steps:
- On the Amazon S3 console, empty the bucket
athena-federation-workshop-<account-id>. - If you’re using the AWS CLI, delete the objects in the
athena-federation-workshop-<account-id>bucket with the following code (make sure you’re running this command on the correct bucket): - On the AWS CloudFormation console, delete all the connectors so they’re no longer attached to the elastic network interface (ENI) of the VPC. Alternatively, go to each connector and deselect the VPC so it’s no longer attached to the VPC created by AWS CloudFormation.

- On the Amazon SageMaker console, delete any endpoints you created as part of the ML inference.
- On the Athena console, delete the
AmazonAthenaPreviewFunctionalityworkgroup. - On the AWS CloudFormation console or the AWS CLI, delete the stack
Athena-Federation-Workshop.
Summary
In this post, we demonstrated the functionality of Athena federated queries by creating multiple different connectors and running federated queries against multiple data sources. In the next post, we show you how you can use the Athena Federation SDK to deploy your UDF and invoke it to redact sensitive information in your Athena queries.
About the Authors
 Saurabh Bhutyani is a Senior Big Data Specialist Solutions Architect at Amazon Web Services. He is an early adopter of open-source big data technologies. At AWS, he works with customers to provide architectural guidance for running analytics solutions on Amazon EMR, Amazon Athena, AWS Glue, and AWS Lake Formation.
 Amir Basirat is a Big Data Specialist Solutions Architect at Amazon Web Services, focused on Amazon EMR, Amazon Athena, AWS Glue, and AWS Lake Formation, where he helps customers craft distributed analytics applications on the AWS platform. Prior to his AWS Cloud journey, he worked as a big data specialist for different technology companies. He also has a PhD in computer science, where his research primarily focused on large-scale distributed computing and neural networks.