AWS Big Data Blog
Use AWS Glue to read and write Apache Iceberg tables with ACID transactions and perform time travel
September 2023: This post was reviewed and updated for accuracy.
Nowadays, many customers have built their data lakes as the core of their data analytic systems. In a typical use case of data lakes, many concurrent queries run to retrieve consistent snapshots of business insights by aggregating query results. A large volume of data constantly comes from different data sources into the data lakes. There is also a common demand to reflect the changes occurring in the data sources into the data lakes. This means that not only inserts but also updates and deletes need to be replicated into the data lakes.
Apache Iceberg provides the capability of ACID transactions on your data lakes, which allows concurrent queries to add or delete records isolated from any existing queries with read-consistency for queries. Iceberg is an open table format designed for large analytic workloads on huge datasets. You can perform ACID transactions against your data lakes by using simple SQL expressions. It also enables time travel, rollback, hidden partitioning, and schema evolution changes, such as adding, dropping, renaming, updating, and reordering columns.
AWS Glue is one of the key elements to building data lakes. It extracts data from multiple sources and ingests your data to your data lake built on Amazon Simple Storage Service (Amazon S3) using both batch and streaming jobs. To expand the accessibility of your AWS Glue extract, transform, and load (ETL) jobs to Iceberg, AWS Glue natively supports Apache Iceberg since Glue 3.0. You can build Iceberg tables on your data lakes and run Iceberg operations such as ACID transactions, time travel, rollbacks, and so on from your AWS Glue ETL jobs.
In this post, we give an overview of how to use Apache Iceberg on AWS Glue and configure the relevant resources to use Iceberg with AWS Glue ETL jobs. We also demonstrate how to run typical Iceberg operations on AWS Glue interactive sessions with an example use case.
Apache Iceberg for AWS Glue
With the Apache Iceberg for AWS Glue, you can take advantage of the following Iceberg capabilities:
- Basic operations on Iceberg tables – This includes creating Iceberg tables in the AWS Glue Data Catalog and inserting, updating, and deleting records with ACID transactions in the Iceberg tables
- Inserting and updating records – You can run
UPSERT(update and insert) queries for your Iceberg table - Time travel on Iceberg tables – You can read a specific version of an Iceberg table from table snapshots that Iceberg manages
- Rollback of table versions – You can revert an Iceberg table back to a specific version of the table
Iceberg offers additional useful capabilities such as hidden partitioning; schema evolution with add, drop, update, and rename support; automatic data compaction; and more. For more details about Iceberg, refer to the Apache Iceberg documentation.
Next, we demonstrate how the Apache Iceberg for AWS Glue works for each Iceberg capability based on an example use case.
Overview of example customer scenario
Let’s assume that an ecommerce company sells products on their online platform. Customers can buy products and write reviews to each product. Customers can add, update, or delete their reviews at any time. The customer reviews are an important source for analyzing customer sentiment and business trends.
In this scenario, we have the following teams in our organization:
- Data engineering team – Responsible for building and managing data platforms.
- Data analyst team – Responsible for analyzing customer reviews and creating business reports. This team queries the reviews daily, creates a business intelligence (BI) report, and shares it with sales team.
- Customer support team – Responsible for replying to customer inquiries. This team queries the reviews when they get inquiries about the reviews.
Our solution has the following requirements:
- Query scalability is important because the website is huge.
- Individual customer reviews can be added, updated, and deleted.
- The data analyst team needs to use both notebooks and ad hoc queries for their analysis.
- The customer support team sometimes needs to view the history of the customer reviews.
- Customer reviews can always be added, updated, and deleted, even while one of the teams is querying the reviews for analysis. This means that any result in a query isn’t affected by uncommitted customer review write operations.
- Any changes in customer reviews that are made by the organization’s various teams need to be reflected in BI reports and query results.
In this post, we build a data lake of customer review data on top of Amazon S3. To meet these requirements, we introduce Apache Iceberg to enable adding, updating, and deleting records; ACID transactions; and time travel queries. We also use an AWS Glue Studio notebook to integrate and query the data at scale. First, we configure necessary resources and permissions to use Iceberg on Glue.
Configure resources and permissions
We use a provided AWS CloudFormation template to set up Iceberg configuration for AWS Glue. AWS CloudFormation creates the following resources:
- An S3 bucket to store an Iceberg configuration file and actual data
- An AWS Lambda function to generate an Iceberg configuration file based on parameters provided by a user for the CloudFormation template, and to clean up the resources created through this post
- AWS Identity and Access Management (IAM) roles and policies with necessary permissions
- An AWS Glue database in the Data Catalog to register Iceberg tables
To deploy the CloudFormation template, complete the following steps:
- Choose Launch Stack:
![]()
- For IcebergDatabaseName, enter a name for the AWS Glue database that is created in the Data Catalog and used for registering Iceberg tables.
- Choose Next.

- Select I acknowledge that AWS CloudFormation might create IAM resources with custom names.
- Choose Create stack.
Start an AWS Glue Studio notebook to use Apache Iceberg
After you launch the CloudFormation stack, you create an AWS Glue Studio notebook to perform Iceberg operations. Complete the following steps:
- Download the Jupyter notebook file.
- On the AWS Glue console, choose Jobs in the navigation pane.
- Under Create job, select Jupyter Notebook.

- Select Upload and edit an existing notebook and upload
iceberg-with-glue.ipynb.
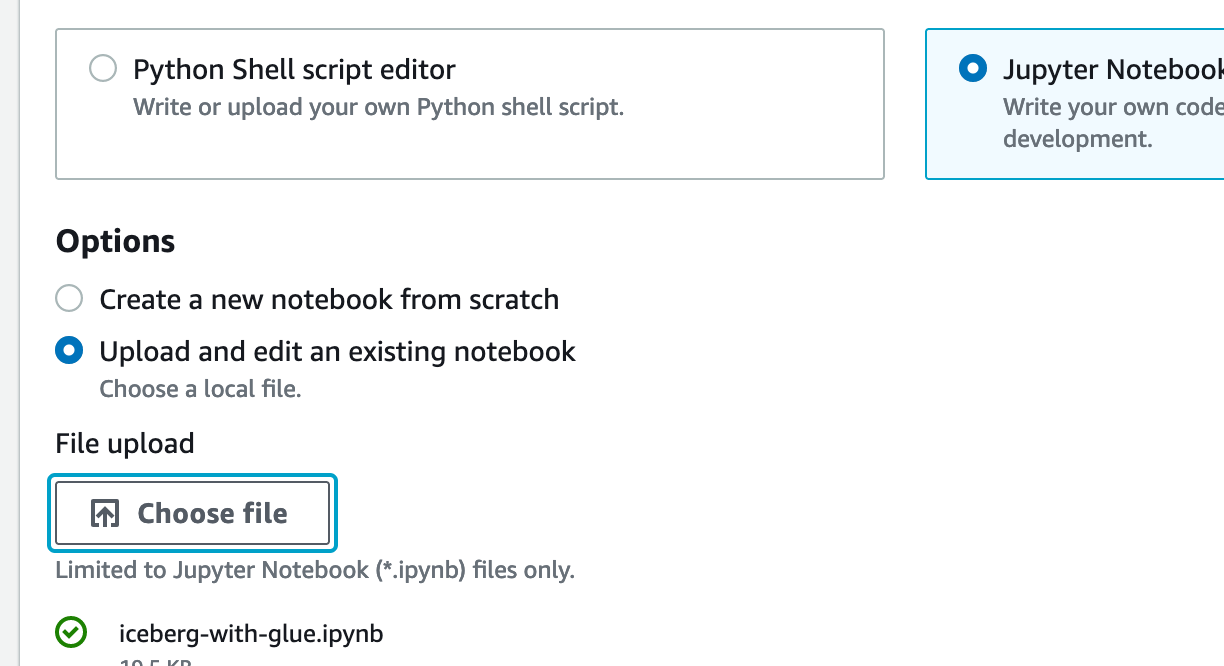
- Choose Create.
- For Job name, enter a name.
- For IAM role, choose IcebergGlueJobRole, which was created via the CloudFormation template.
- Choose Start notebook job.

The process takes a few minutes to complete, after which you can see an AWS Glue Studio notebook view.
- Choose Save to save the notebook.

Set up the Iceberg configuration
To set up the Iceberg configuration, complete the following steps:
- Run the following cell with multiple options (magics). Confirm setting
icebergto--datalake-formatsthat enables Iceberg on Glue.
For more information, refer to Configuring AWS Glue Interactive Sessions for Jupyter and AWS Glue Studio notebooks.

In the next cell, your Iceberg configuration is loaded. The Iceberg configuration is specified when launching the CloudFormation stack. The configuration includes a warehouse path for Iceberg actual data, a database name for your Iceberg tables, and more.
To load the configuration, set the S3 bucket name that was created via the CloudFormation stack.
- On the AWS CloudFormation console, choose Stacks in the navigation pane.
- Choose the stack you created.
- On the Outputs tab, copy the S3 bucket name.

- Set the S3 name as the
S3_BUCKETparameter in your notebook.
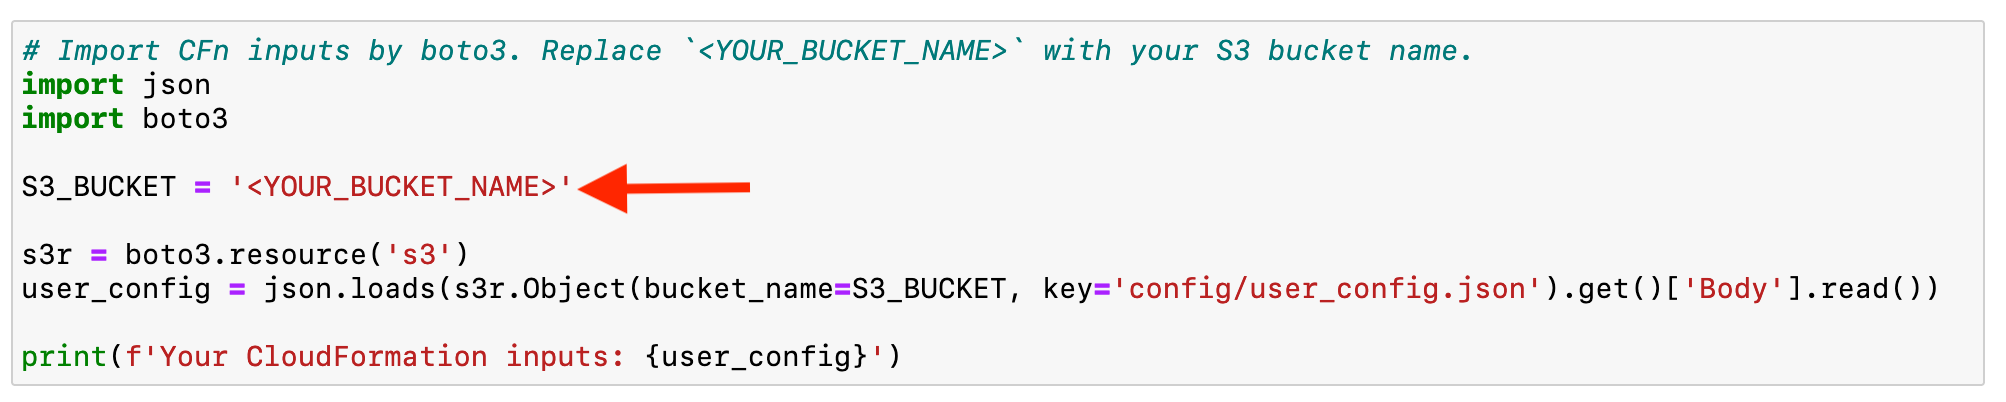
- Run the cell and load the Iceberg configuration that you set.

A message Session <session-id> has been created appears when your AWS Glue Studio notebook is ready as the following screenshot.
Initialize the job with Iceberg configurations
We continue to run cells to initiate a SparkSession in this section.
- Set an Iceberg warehouse path and a DynamoDB table name for Iceberg commit locking from the
user_configparameter. - Initialize a
SparkSessionby setting the Iceberg configurations.
The following screenshot shows the relevant section in the notebook.

We provide the details of each parameter that you configure for the SparkSession in the appendix of this post.
For this post, we demonstrate setting the Spark configuration for Iceberg. You can also set the configuration as AWS Glue job parameters. For more information, refer to the Enabling the Iceberg framework section in the Glue developer guide.
Use case walkthrough
To walk through our use case, we use two tables; cr_iceberg and cr_iceberg_report. The table cr_iceberg contains the customer review data. The table cr_iceberg_report contains BI analysis results based on the customer review data. All changes to cr_iceberg also impact cr_iceberg_report. The table cr_iceberg_report needs to be updated daily, right before sharing business reports with stakeholders.
To demonstrate this use case, we walk through the following typical steps:
- A data engineering team registers the
cr_icebergandcr_iceberg_reporttables in the Glue Data Catalog. - Customers (ecommerce users) add reviews to products in the
industrial_suppliescategory. These reviews are added to the Iceberg table. - A customer requests to update their reviews. We simulate updating the customer review in the
cr_iceberg - We reflect the customer’s request of the updated review in
cr_icebergintocr_iceberg_report. - We revert the customer’s request of the updated review for the customer review table
cr_iceberg, and reflect the reversion incr_iceberg_report.
1. Create Iceberg tables of customer reviews and BI reports
In this step, the data engineering team creates the cr_iceberg Iceberg table for customer reviews data, and the team creates the cr_iceberg_report Iceberg table for BI reports.
Create the cr_iceberg table for customer reviews
The following code initially extracts the customer reviews, which are stored in a public S3 bucket. Then it creates an Iceberg table of the customer reviews and loads these reviews into your specified S3 bucket (created via CloudFormation stack). Note that the script loads partial datasets to avoid taking a lot of time to load the data.
Regarding the tableProperty parameter, we specify format version 2 to make the table version compatible with Amazon Athena. For more information about Athena support for Iceberg tables, refer to Considerations and limitations. To learn more about the difference between Iceberg table versions 1 and 2, refer to Appendix E: Format version changes.
Let’s run the following cells. Running the second cell takes around 1–2 minutes.

After you run the cells, the cr_iceberg table is available in your specified database in the Glue Data Catalog.

You can also see the actual data and metadata of the Iceberg table in the S3 bucket that is created through the CloudFormation stack. Iceberg creates the table and writes actual data and relevant metadata that includes table schema, table version information, and so on. See the following objects in your S3 bucket:
Create the cr_iceberg_report Iceberg table for BI reports
The data engineer team also creates the cr_iceberg_report table for BI reports in the Glue Data Catalog. This table initially has the following records.
| comment_count | avg_star | product_category |
| 120 | 4.20729367860598 | book |
| 18 | 4.80167540490342 | drink |
| 95 | 3.80123467540571 | industrial_supplies |
To create the table, run the following cell.

The two Iceberg tables have been created. Let’s check the cr_iceberg table records by running a query.
Review the average star rating for each product category by querying the Iceberg table
You can see the Iceberg table records by using a SELECT statement. In this section, we query the cr_iceberg table to simulate seeing a current BI report data by running an ad hoc query.
Run the following cell in the notebook to get the rating count and mean star rating for each product_category.

The cell output has the following results.

Another way to query Iceberg tables is using Amazon Athena (when you use the Athena with Iceberg tables, you need to set up the Iceberg environment) or Amazon EMR.
2. Add customer reviews in the Iceberg table
In this section, customers add comments for some products in the industrial_supplies product category, and we add these comments to the cr_iceberg table. To demonstrate this scenario, we create a Spark DataFrame based on the following new customer reviews and then add them to the table with an INSERT statement.
| customer_id | product_id | product_name | product_category | star_rating | review | date | year |
| 2348 | ISG43F00EDBY7X8 | plastic containers | industrial_supplies | 5 | Great product! | 2022-02-01T08:36:48Z | 2022 |
| 2182 | ISADBZ00D7JFOPC | battery tester | industrial_supplies | 3 | nice one, but it broke some days later | 2022-02-01T11:21:58Z | 2022 |
| 3291 | ISA480002LHA74O | spray bottle | industrial_supplies | 2 | the bottle isn’t as big as pictured. | 2022-02-01T15:12:12Z | 2022 |
| 4187 | ISBVR800ARPLCGY | 3d printer | industrial_supplies | 5 | very useful | 2022-02-01T03:56:58Z | 2022 |
| 8987 | ISCDCD180ARDQCY | circuit board | industrial_supplies | 4 | you should buy this, but note the price | 2022-04-02T02:01:12Z | 2022 |
Run the following cells in the notebook to insert the customer comments to the Iceberg table. The process takes about 1 minute.

Run the next cell to see an addition to the product category industrial supplies with 5 under rating_count.

3. Update a customer review in the Iceberg table
In the previous section, we added new customer reviews to the cr_iceberg Iceberg table. In this section, a customer requests an update of their review. Specifically, customer 78901234 requests the following update of the review ID IS4392CD4C3C4.
- change
star_ratingfrom 3 to 5 - update the
review_headlinefrom nice one, but it broke some days later to very good
Update the customer comment by using an UPDATE query by running the following cell.

You can review the updated record by running the next cell as follows.

Also, when you run this cell for the reporting table, you can see the updated avg_star column value for the Industrial_Supplies product category. Specifically, the avg_star value has been updated from 3.8 to 4.2 as a result of the star_rating changing from 3 to 5:

4. Reflect changes in the customer reviews table in the BI report table with a MERGE INTO query
In this section, we reflect the changes in the cr_iceberg table into the BI report table cr_iceberg_report. To do so, we run the MERGE INTO query and combine the two tables based on the condition of the product_category column in each table. This query works as follows:
- When the
product_categorycolumn in each table is the same, the query returns the sum of each column record - When the column in each table is not the same, the query just inserts a new record
This MERGE INTO operation is also referred to as an UPSERT (update and insert).
Run the following cell to reflect the update of customer reviews in the cr_iceberg table into the cr_iceberg_report BI table.

After the MERGE INTO query is complete, you can see the updated cr_iceberg_report table by running the following cell.

The MERGE INTO query performed the following changes:
- In the book, drink, and
industrial_suppliesproduct categories, eachrating_countis the sum between the initial value of thecr_iceberg_reporttable and the aggregated table value. For example, in the industrial_supplies product category row, the rating_count 100 is calculated by 95 (in the initial version ofcr_iceberg_report) + 5 (in the aggregated report table). - In addition to rating_count, the
avg_starin thebook,drinkandindustrial_suppliesproduct category rows are also computed by averaging between eachavg_starvalue incr_iceberg_reportand in the aggregated table. - In other product categories, each
rating_countandavg_staris the same as each value in the aggregated table, which means that each value in the aggregated table is inserted into thecr_iceberg_report
5. Roll back the Iceberg tables and reflect changes in the BI report table
In this section, the customer who requested the update of the review now requests to revert the updated review.
Iceberg stores versioning tables through the operations for Iceberg tables. We can see the information of each version of table by inspecting tables, and we can also time travel or roll back tables to an old table version.
To complete the customer request to revert the updated review, we need to revert the table version of cr_iceberg to the earlier version when we first added the reviews. Additionally, we need to update the cr_iceberg_report table to reflect the rollback of the cr_iceberg table version. Specifically, we need to perform the following three steps to complete these operations:
- Check the history of table changes of
cr_icebergandcr_iceberg_reportto get each table snapshot. - Roll back
cr_icebergto the version when first we inserted records, and also roll back thecr_iceberg_reporttable to the initial version to reflect the customer review update. - Merge the
cr_icebergtable with thecr_iceberg_reporttable again.
Get the metadata of each report table
As a first step, we check table versions by inspecting the table. Run the following cells.

Now you can see the following table versions in cr_iceberg and cr_iceberg_report:
cr_iceberghas three versions:- The oldest one is the initial version of this table, which shows the append operation
- The second oldest one is the record insertion, which shows the append operation
- The latest one is the update, which shows the overwrite operation
cr_iceberg_reporthas two versions:- The oldest one is the initial version of this table, which shows the append operation
- The other one is from the MERGE INTO query in the previous section, which shows the overwrite operation
As shown in the following screenshot, we roll back to the cr_iceberg table version, inserting records based on the customer revert request. We also roll back to the cr_iceberg_report table version in the initial version to discard the MERGE INTO operation in the previous section.

Roll back the cr_iceberg and cr_iceberg_report tables
Based on your snapshot IDs, you can roll back each table version:
- For
cr_iceberg, use the second-oldest snapshot_id (in this example, 5919828597856202972) and replace<Type snapshot_id in cr_iceberg table>in the following cell with thissnapshot_id. - For
cr_iceberg_reporttable, use the initialsnapshot_id(in this example, 5118576560192462956) and replace<Type snaphost_id in ace_iceberg_report table> in the following cell with thissnapshot_id.
After you specify the snapshot_id for each rollback query, run the following cells.

When this step is complete, you can see the previous and current snapshot IDs of each table.

Each Iceberg table has been reverted to the specific version now.
Reflect changes in cr_iceberg into cr_iceberg_report again
We reflect the cr_iceberg table reversion into the current cr_iceberg_report table. To complete this, run the following cell.

After you rerun the MERGE INTO query, run the following cell to see the new table records. When we compare the table records, we observe that the avg_star value in industrial_supplies is lower than the value of the previous table avg_star.

You were able to reflect a customer’s request of reverting their updated review on the BI report table. Specifically, you can get the updated avg_star record in the industrial_supplies product category.
Clean up
To clean up all resources that you created, delete the CloudFormation stack.
Conclusion
In this post, we walked through Apache Iceberg features with AWS Glue. We created an Iceberg table built on Amazon S3, and ran queries such as reading the Iceberg table data, inserting a record, merging two tables, and time travel.
The operations for the Iceberg table that we demonstrated in this post aren’t all of the operations Iceberg supports. Refer to the Apache Iceberg documentation for information about more operations.
Appendix: Spark configurations to use Apache Iceberg on AWS Glue
As we mentioned earlier, the notebook sets up a Spark configuration to integrate Iceberg with AWS Glue. The following table shows what each parameter defines.
| Spark Configuration Key | Value | Description |
spark.sql.catalog.{CATALOG} |
org.apache.iceberg.spark.SparkCatalog |
Specifies a Spark catalog interface that communicates with Iceberg tables. |
spark.sql.catalog.{CATALOG}.warehouse |
{WAREHOUSE_PATH} |
A warehouse path for jobs to write iceberg metadata and actual data. |
spark.sql.catalog.{CATALOG}.catalog-impl |
org.apache.iceberg.aws.glue.GlueCatalog |
The implementation of the Spark catalog class to communicate between Iceberg tables and the AWS Glue Data Catalog. |
spark.sql.catalog.{CATALOG}.io-impl |
org.apache.iceberg.aws.s3.S3FileIO |
Used for Iceberg to communicate with Amazon S3. |
spark.sql.extensions |
org.apache.icerberg.spark.extensions.IcebergSparkSessionExtensions |
The implementation that enables Spark to run Iceberg-specific SQL commands. |
About the Author
 Tomohiro Tanaka is a Sr. Cloud Support Engineer at Amazon Web Services. He’s passionate about helping customers use Apache Iceberg for their data lakes on AWS. In his free time, he enjoys coffee breaks with his colleagues and making coffee at home.