AWS Compute Blog
Microservices without the Servers
![]() Tim Wagner, AWS Lambda General Manager
Tim Wagner, AWS Lambda General Manager
At LinuxCon/ContainerCon 2015 I presented a demo-driven talk titled, “Microservices without the Servers”. In it, I created an image processing microservice, deployed it to multiple regions, built a mobile app that used it as a backend, added an HTTPS-based API using Amazon API Gateway and a website, and then unit and load tested it, all without using any servers.
This blog recreates the talk in detail, stepping you through all the pieces necessary for each of these steps and going deeper into the architecture. For a high-level overview, check out the slides. For another example of this architecture, check out the executable gist repository, SquirrelBin.
Serverless Architecture
By “serverless”, we mean no explicit infrastructure required, as in: no servers, no deployments onto servers, no installed software of any kind. We’ll use only managed cloud services and a laptop. The diagram below illustrates the high-level components and their connections: a Lambda function as the compute (“backend”) and a mobile app that connects directly to it, plus Amazon API Gateway to provide an HTTP endpoint for a static Amazon S3-hosted website.
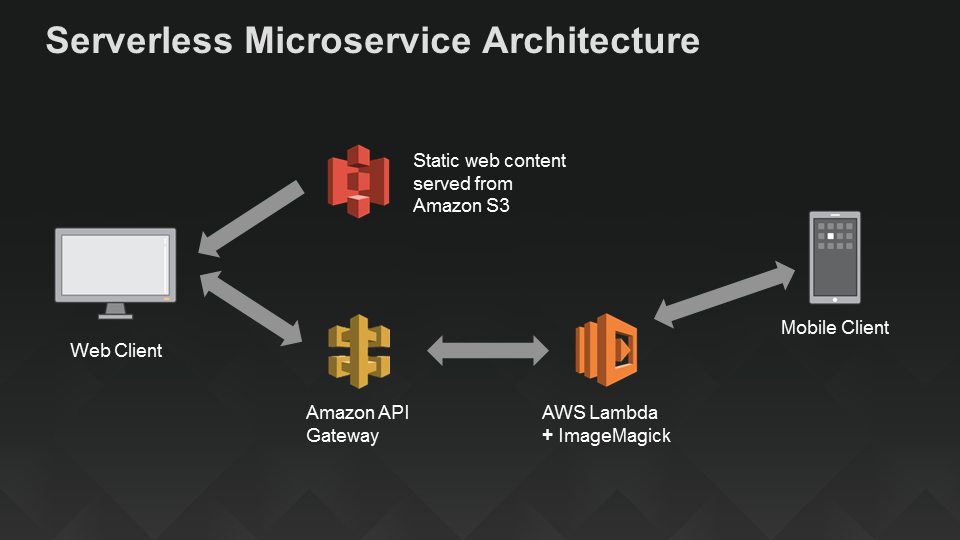
A Serverless Architecture for Mobile and Web Apps Using AWS Lambda
Now, let’s start building!
Step 1: Create the Image Processing Service
To make this a little easier to follow along, we’re going to use a library that comes built in with Lambda’s nodejs language: ImageMagick. However, that’s not required – if you prefer to use your own library instead, you can load JavaScript or native libraries, run Python, or even wrap wrap a command line executable. The examples below are implemented in nodejs, but you can also build this service using Java, Clojure, Scala, or other jvm-based languages in AWS Lambda.
The code below is a sort of “hello world” program for ImageMagick – it gives us a basic command structure (aka a switch statement) and enables us to retrieve the built-in rose image and return it. Apart from encoding the result so it can live happily in JSON, there’s not much to this.
var im = require("imagemagick");
var fs = require("fs");
exports.handler = function(event, context) {
    if (event.operation) console.log("Operation " + event.operation + " requested");
    switch (event.operation) {
        case 'ping': context.succeed('pong'); return;
        case 'getSample':
            event.customArgs = ["rose:", "/tmp/rose.png"];
            im.convert(event.customArgs, function(err, output) {
                if (err) context.fail(err);
                else {
                    var resultImgBase64 = new Buffer(fs.readFileSync("/tmp/rose.png")).toString('base64');
                    try {fs.unlinkSync("/tmp/rose.png");} catch (e) {} // discard
                    context.succeed(resultImgBase64);
                }
            });
            break; // allow callback to complete
        default:
            var error = new Error('Unrecognized operation "' + event.operation + '"');
            context.fail(error);
            return;
    }
};
First, let’s make sure the service is running by sending it the following JSON in the AWS Lambda console’s test window:
{
  "operation": "ping"
}
You should get the requisite “pong” response. Next, we’ll actually invoke ImageMagick by sending JSON that looks like this:
{
  "operation": "getSample"
}
This request retrieves a base64-encoded string representing a PNG version of a picture of a rose: “”iVBORw0KGg…Jggg==”. To make sure this isn’t just some random characters, copy-paste it (sans double quotes) into any convenient Base64-to-image decoder, such as codebeautify.org/base64-to-image-converter. You should see a nice picture of a rose:

Sample Image (red rose)
Now, let’s complete the image processing service by exposing the rest of the nodejs wrapper around it. We’re going to offer a few different operations:
- ping: Verify service is available.
- getDimensions: Shorthand for calling identify operation to retrieve width and height of an image.
- identify: Retrieve image metadata.
- resize: A convenience routine for resizing (which calls convert under the covers)
- thumbnail: A synonym for resize.
- convert: The “do-everything” routine – can convert media formats, apply transforms, resize, etc.
- getSample: Retrieve a sample image; the “hello world” operation.
Most of the code is extremely straightforward wrapping of the nodejs ImageMagick routines, some of which take JSON (in which case the event passed in to Lambda is cleaned up and forwarded along) and others of which take command line (aka “custom”) arguments, which are passed in as a string array. The one part of this that might be non-obvious if you haven’t used ImageMagick before is that it works as a wrapper over the command line, and the names of files have semantic meaning. We have two competing needs: We want the client to convey the semantics (e.g., the output format of an image, such as PNG versus JPEG) but we want the service author to determine where to place the temporary storage on disk so we don’t leak implementation details. To accomplish both at once, we define two arguments in the JSON schema: “inputExtension” and “outputExtension”, and then we build the actual file location by combining the client’s portion (file extension) with the server’s portion (directory and base name). You can see (and use!) the completed code in the image processing blueprint.
There are lots of tests you can run here (and we’ll do more later), but as a quick sanity check, retrieve the sample rose image again and the pass it back in using a negation (color inversion) filter. You can use JSON like this in the Lambda console, just replace the base64Image field with the actual image characters (it’s a little long to include here in the blog page).
{
  "operation": "convert",
  "customArgs": [
    "-negate"
  ],
  "outputExtension": "png",
  "base64Image": "...fill this in with the rose sample image, base64-encoded..."
}
The output, decoded as an image, should be that elusive botanical rarity, a blue rose:

Blue Rose (negative of red rose sample image)
So that’s all there is to the functional aspect of the service. Normally, this is where it would start to get ugly, going from “worked once” to “scalable and reliable service with 24x7x365 monitoring and production logging”. But that’s the beauty of Lambda: our image processing code is already a fully deployed, production strength microservice. Next, let’s add a mobile app that can call it…
Step 2: Create a Mobile Client
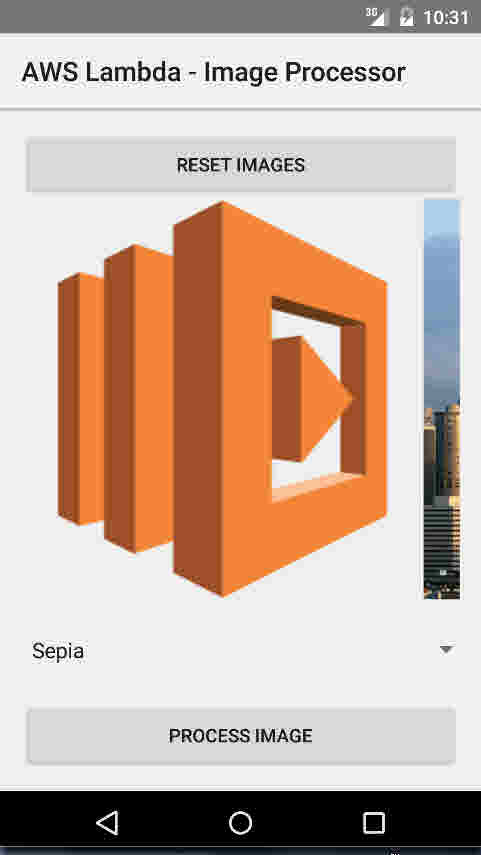
Our image processing microservice can be accessed in a number of ways, but to demonstrate a sample client, we’ll build a quick Android app. Below I’m showing the client-side code that we used in the ContainerCon talk to create a simple Android app that let’s you pick an image and a filter and then displays the effect of applying the filter to the image by calling the “convert” operation in the image processing service that’s now running in AWS Lambda.
To get a sense of what the app does, here’s one of its sample images, the AWS Lambda Icon:
Android Emulator Displaying the AWS Lambda Icon Image
We’ll pick the “negate” filter to invert the colors in the icon:
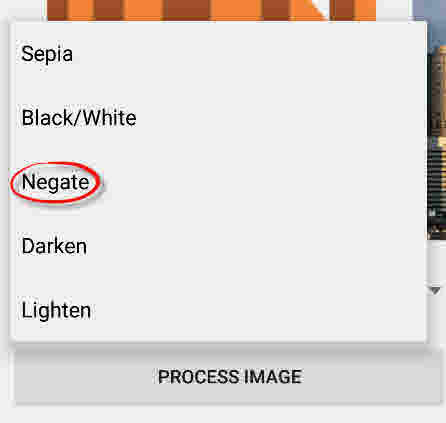
Selecting the ‘Negate’ Image Conversion Filter
..and here’s the result: A blue version of our (originally orange) Lambda moniker:

Result of Applying the ‘Negate’ Filter to the AWS Lambda Icon
We could also give an old-world feel to the modern Seattle skyline by choosing the Seattle image and aplying a sepia-tone filter:

A Sepia-toned Seattle Skyline
Now on to the code. I’m not trying to teach basic Android programming here, so I’ll just focus on the Lambda-specific elements of this app. (If you’re creating your own, you’ll also need to include the AWS Mobile SDK jar to run the sample code below.) Conceptually there are four parts:
- POJO Data Schema
- Remote Service (Operation) Definition
- Initialization
- Service Invocation
We’ll take a look at each one in turn.
The data schema defines any objects that need to be passed between client and server. There are no “Lambda-isms” here; these objects are just POJOs (Plain Old Java Objects) with no special libraries or frameworks. We define a base event and then extend it to reflect our operation structure – you can think of this as the “Javaification” of the JSON we used when defining and testing the image processing service above. If you were also writing the server in Java, you’d typically share these files as part of the common event structure definition; in our example, these POJOs turn into JSON on the server side.
LambdaEvent.java
package com.amazon.lambda.androidimageprocessor.lambda;
public class LambdaEvent {
    private String operation;
    public String getOperation() {return operation;}
    public void setOperation(String operation) {this.operation = operation;}
    public LambdaEvent(String operation) {setOperation(operation);}
}
ImageConvertRequest.java
package com.amazon.lambda.androidimageprocessor.lambda;
import java.util.List;
public class ImageConvertRequest extends LambdaEvent {
    private String base64Image;
    private String inputExtension;
    private String outputExtension;
    private List customArgs;
    public ImageConvertRequest() {super("convert");}
    public String getBase64Image() {return base64Image;}
    public void setBase64Image(String base64Image) {this.base64Image = base64Image;}
    public String getInputExtension() {return inputExtension;}
    public void setInputExtension(String inputExtension) {this.inputExtension = inputExtension;}
    public String getOutputExtension() {return outputExtension;}
    public void setOutputExtension(String outputExtension) {this.outputExtension = outputExtension;}
    public List getCustomArgs() {return customArgs;}
    public void setCustomArgs(List customArgs) {this.customArgs = customArgs;}
}
So far, not very complicated. Now that we have a data model, we’ll define the service endpoint using some Java annotations. We’re exposing two operations here, “ping” and “convert”; it would be easy to extend this to include the others as well, but we don’t need them for the sample app below.
ILambdaInvoker.java
package com.amazon.lambda.androidimageprocessor.lambda;
import com.amazonaws.mobileconnectors.lambdainvoker.LambdaFunction;
import java.util.Map;
public interface ILambdaInvoker {
    @LambdaFunction(functionName = "ImageProcessor")
    String ping(Map event);
    @LambdaFunction(functionName = "ImageProcessor")
    String convert(ImageConvertRequest request);
}
Now we’re ready to do the main part of the app. Much of this is boilerplate Android code or simple client-side resource management, but I’ll point out a couple of sections that are Lambda related:
This is the “init” section; it creates the authentication provider to call the Lambda APIs and creates a Lambda invoker capable of calling the endpoints defined above and transmitting the POJOs in our data model:
        // Create an instance of CognitoCachingCredentialsProvider
        CognitoCachingCredentialsProvider cognitoProvider = new CognitoCachingCredentialsProvider(
                this.getApplicationContext(), "us-east-1:<YOUR COGNITO IDENITY POOL GOES HERE>", Regions.US_EAST_1);

        // Create LambdaInvokerFactory, to be used to instantiate the Lambda proxy.
        LambdaInvokerFactory factory = new LambdaInvokerFactory(this.getApplicationContext(),
                Regions.US_EAST_1, cognitoProvider);

        // Create the Lambda proxy object with a default Json data binder.
        lambda = factory.build(ILambdaInvoker.class);
The other code section that’s interesting (well, sort of) is the actual remote procedure call itself:
                try {
                    return lambda.convert(params[0]);
                } catch (LambdaFunctionException e) {
                    Log.e("Tag", "Failed to convert image");
                    return null;
                }
It’s actually not that interesting because the magic (argument serialization and result deserialization) is happening behind the scenes, leaving just some error handling to be done here.
Here’s the complete source file:
MainActivity.java
package com.amazon.lambda.androidimageprocessor;

import android.app.Activity;
import android.app.ProgressDialog;
import android.graphics.Bitmap;
import android.graphics.BitmapFactory;
import android.os.AsyncTask;
import android.os.Bundle;
import android.util.Base64;
import android.util.Log;
import android.view.View;
import android.widget.ImageView;
import android.widget.Spinner;
import android.widget.Toast;

import com.amazon.lambda.androidimageprocessor.lambda.ILambdaInvoker;
import com.amazon.lambda.androidimageprocessor.lambda.ImageConvertRequest;
import com.amazonaws.auth.CognitoCachingCredentialsProvider;
import com.amazonaws.mobileconnectors.lambdainvoker.LambdaFunctionException;
import com.amazonaws.mobileconnectors.lambdainvoker.LambdaInvokerFactory;
import com.amazonaws.regions.Regions;

import java.io.ByteArrayOutputStream;
import java.util.ArrayList;
import java.util.HashMap;
import java.util.List;
import java.util.Map;
import java.util.Objects;

public class MainActivity extends Activity {

    private ILambdaInvoker lambda;
    private ImageView selectedImage;
    private String selectedImageBase64;
    private ProgressDialog progressDialog;

    @Override
    protected void onCreate(Bundle savedInstanceState) {
        super.onCreate(savedInstanceState);
        setContentView(R.layout.activity_main);

        // Create an instance of CognitoCachingCredentialsProvider
        CognitoCachingCredentialsProvider cognitoProvider = new CognitoCachingCredentialsProvider(
                this.getApplicationContext(), "us-east-1:2a40105a-b330-43cf-8d4e-b647d492e76e", Regions.US_EAST_1);

        // Create LambdaInvokerFactory, to be used to instantiate the Lambda proxy.
        LambdaInvokerFactory factory = new LambdaInvokerFactory(this.getApplicationContext(),
                Regions.US_EAST_1, cognitoProvider);

        // Create the Lambda proxy object with a default Json data binder.
        lambda = factory.build(ILambdaInvoker.class);

        // ping lambda function to make sure everything is working
        pingLambda();
    }

    // ping the lambda function
    @SuppressWarnings("unchecked")
    private void pingLambda() {
        Map event = new HashMap();
        event.put("operation", "ping");

        // The Lambda function invocation results in a network call.
        // Make sure it is not called from the main thread.
        new AsyncTask<Map, Void, String>() {
            @Override
            protected String doInBackground(Map... params) {
                // invoke "ping" method. In case it fails, it will throw a
                // LambdaFunctionException.
                try {
                    return lambda.ping(params[0]);
                } catch (LambdaFunctionException lfe) {
                    Log.e("Tag", "Failed to invoke ping", lfe);
                    return null;
                }
            }

            @Override
            protected void onPostExecute(String result) {
                if (result == null) {
                    return;
                }

                // Display a quick message
                Toast.makeText(MainActivity.this, "Made contact with AWS lambda", Toast.LENGTH_LONG).show();
            }
        }.execute(event);
    }

    // event handler for "process image" button
    public void processImage(View view) {
        // no image has been selected yet
        if (selectedImageBase64 == null) {
            Toast.makeText(this, "Please tap one of the images above", Toast.LENGTH_LONG).show();
            return;
        }

        // get selected filter
        String filter = ((Spinner) findViewById(R.id.filter_picker)).getSelectedItem().toString();
        // assemble new request
        ImageConvertRequest request = new ImageConvertRequest();
        request.setBase64Image(selectedImageBase64);
        request.setInputExtension("png");
        request.setOutputExtension("png");

        // custom arguments per filter
        List customArgs = new ArrayList();
        request.setCustomArgs(customArgs);
        switch (filter) {
            case "Sepia":
                customArgs.add("-sepia-tone");
                customArgs.add("65%");
                break;
            case "Black/White":
                customArgs.add("-colorspace");
                customArgs.add("Gray");
                break;
            case "Negate":
                customArgs.add("-negate");
                break;
            case "Darken":
                customArgs.add("-fill");
                customArgs.add("black");
                customArgs.add("-colorize");
                customArgs.add("50%");
                break;
            case "Lighten":
                customArgs.add("-fill");
                customArgs.add("white");
                customArgs.add("-colorize");
                customArgs.add("50%");
                break;
            default:
                return;
        }

        // async request to lambda function
        new AsyncTask() {
            @Override
            protected String doInBackground(ImageConvertRequest... params) {
                try {
                    return lambda.convert(params[0]);
                } catch (LambdaFunctionException e) {
                    Log.e("Tag", "Failed to convert image");
                    return null;
                }
            }

            @Override
            protected void onPostExecute(String result) {
                // if no data was returned, there was a failure
                if (result == null || Objects.equals(result, "")) {
                    hideLoadingDialog();
                    Toast.makeText(MainActivity.this, "Processing failed", Toast.LENGTH_LONG).show();
                    return;
                }
                // otherwise decode the base64 data and put it in the selected image view
                byte[] imageData = Base64.decode(result, Base64.DEFAULT);
                selectedImage.setImageBitmap(BitmapFactory.decodeByteArray(imageData, 0, imageData.length));
                hideLoadingDialog();
            }
        }.execute(request);

        showLoadingDialog();
    }

    /*
    Select methods for each image
     */

    public void selectLambdaImage(View view) {
        selectImage(R.drawable.lambda);
        selectedImage = (ImageView) findViewById(R.id.static_lambda);
        Toast.makeText(this, "Selected image 'lambda'", Toast.LENGTH_LONG).show();
    }

    public void selectSeattleImage(View view) {
        selectImage(R.drawable.seattle);
        selectedImage = (ImageView) findViewById(R.id.static_seattle);
        Toast.makeText(this, "Selected image 'seattle'", Toast.LENGTH_LONG).show();
    }

    public void selectSquirrelImage(View view) {
        selectImage(R.drawable.squirrel);
        selectedImage = (ImageView) findViewById(R.id.static_squirrel);
        Toast.makeText(this, "Selected image 'squirrel'", Toast.LENGTH_LONG).show();
    }

    public void selectLinuxImage(View view) {
        selectImage(R.drawable.linux);
        selectedImage = (ImageView) findViewById(R.id.static_linux);
        Toast.makeText(this, "Selected image 'linux'", Toast.LENGTH_LONG).show();
    }

    // extract the base64 encoded data of the drawable resource `id`
    private void selectImage(int id) {
        Bitmap bmp = BitmapFactory.decodeResource(getResources(), id);
        ByteArrayOutputStream stream = new ByteArrayOutputStream();
        bmp.compress(Bitmap.CompressFormat.PNG, 100, stream);
        selectedImageBase64 = Base64.encodeToString(stream.toByteArray(), Base64.DEFAULT);
    }

    // reset images to their original state
    public void reset(View view) {
        ((ImageView) findViewById(R.id.static_lambda)).setImageDrawable(getResources().getDrawable(R.drawable.lambda, getTheme()));
        ((ImageView) findViewById(R.id.static_seattle)).setImageDrawable(getResources().getDrawable(R.drawable.seattle, getTheme()));
        ((ImageView) findViewById(R.id.static_squirrel)).setImageDrawable(getResources().getDrawable(R.drawable.squirrel, getTheme()));
        ((ImageView) findViewById(R.id.static_linux)).setImageDrawable(getResources().getDrawable(R.drawable.linux, getTheme()));

        Toast.makeText(this, "Please choose from one of these images", Toast.LENGTH_LONG).show();
    }

    private void showLoadingDialog() {
        progressDialog = ProgressDialog.show(this, "Please wait...", "Processing image", true, false);
    }

    private void hideLoadingDialog() {
        progressDialog.dismiss();
    }
}
That’s it for the mobile app: a data model (aka Java class), a control model (aka a couple of methods), three statements to initialize things, and then a remote call with a try/catch block around it…easy stuff.
Multi-region Deployments
So far we haven’t said much about where this code runs. Lambda takes care of deploying your code within a region, but you have to decide in which region(s) you’d like to run it. In my original demo, I built the function initially in the us-east-1 region, aka the Virginia data center. To make good on the claim in the abstract that we’d build a global service, let’s extend that to include eu-west-1 (Ireland) and ap-northeast-1 (Tokyo) so that mobile apps can connect from around the globe with low latency:
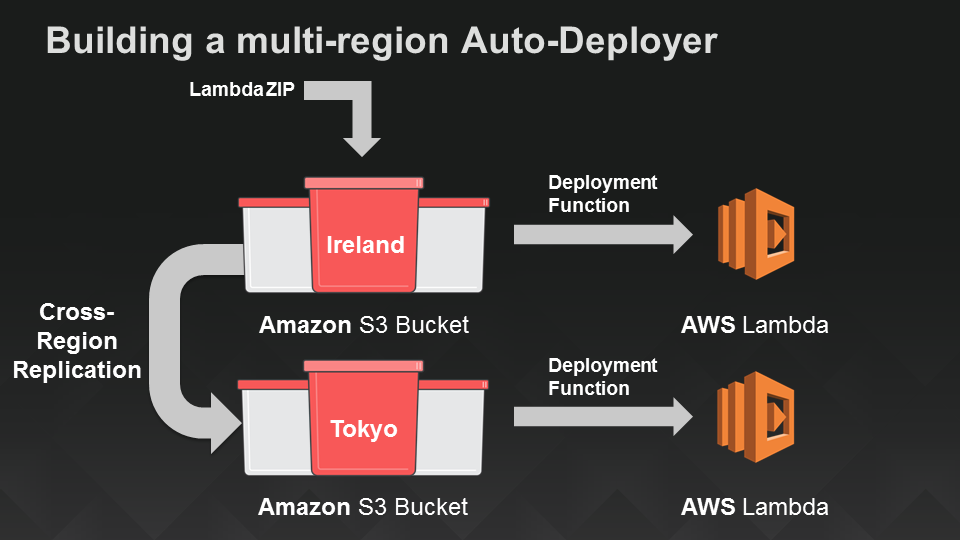
A Serverless Mechanism to Deploy Lambda Functions in Two Additional Regions
This one we’ve already discussed in the blog: In the S3 Deployment post, I show how to use a Lambda function to deploy other Lambda functions stored as ZIP files in Amazon S3. In the ContainerCon talk we made this slightly fancier by also turning on S3 cross-region replication, so that we could upload the image processing service as a ZIP file to Ireland, have S3 automatically copy it to Tokyo, and then have both regions automatically deploy it to the associated Lambda services in those respective regions. Gotta love serverless solutions :).
A Serverless Web App, Part 1: API Endpoints
Now that we have a mobile app and a globally-deployed image processing service serving as its backend, let’s turn our attention to creating a serverless web app for those folks who prefer a browser to a device. We’ll do this in two parts: First, we’ll create an API endpoint for our image processing service. Then in the next section we’ll add the actual website using Amazon S3.
One of the ways in which AWS Lambda makes it easy to turn code into services is by providing a web service front end “built in”. However, this requires clients (like the mobile client we built in the last section) to sign requests with AWS-provided credentials. That’s handled by the Amazon Cognito auth client in our Android app, but what if we wanted to provide public access to the image processing service via a website?
To accomplish this, we’ll turn to another server, the Amazon API Gateway. This service lets you define an API without requiring any infrastructure – the API is fully managed by AWS. We’ll use the API gateway to create a URL for the image processing service that provides access to a subset of its capabilities to anyone on the web. Amazon API Gateway offers a variety of ways to control access to APIs: API calls can be signed with AWS credentials, you can use OAuth tokens and simply forward the token headers for verification, you can use API keys (not recommended as a way to secure access), or make an API completely public, as we’ll show here.
In addition to a variety of access models, the API Gateway has a lot of features that we won’t get to explore in this post. Some are builtin (like anti-DDOS protection) and others, like caching, would enable us to further reduce latency and cost for repeated retrievals of a popular image. By inserting an layer of indirection between clients and (micro)services, API Gateway also makes it possible to evolve them independently through its versioning and staging features. For now, though, we’ll focus on the basic task of exposing our image processing service as an API.
Ok, let’s create our API. In the AWS Console, pick the API Gateway and then select “New API”, provide a name for the API and an optional description. In my example, I named this “ImageAPI”.

Next, create a resource for your new API (I called this “ImageProcessingService”) and then create a POST method in it. Select “Lambda function” as the integration type, and type in the name of the Lambda function you’re using as your image processing service. In the “Method Request” configuration, set the authorization type to “none” (aka, this will be a publicly accessible endpoint). That’s pretty much it.

To test the integration, click the “Test” button:

then supply a test payload such as {“operation”: “ping”}. You should get the expected “pong” result, indicating that you’ve successfully linked your API to the your Lambda function.
Aside: We’ll get to more (and deeper) testing later, but one thing I sometimes find useful is to add a GET method at the top level resource in my API, bound to something simple, like the ping operation, to enable me to also quickly vet from any browser that my API is linked up to my Lambda function as expected. Not required for this demo (or in general), but you might find it useful as well.
For what comes next (S3 static content) we also need CORS enabled. It’s straightforward but there are several steps. The API Gateway team continues to make this easier, so instead of repeating the instructions here (and potentially having them get out of date quickly), I’ll point you to the documentation.
Click on the “Deploy this API” button. With that, you should be all set for website creation!
A Serverless Web App, Part 2: Static Website Hosting in Amazon S3
This part is easy – upload the following Javascript website code to your S3 bucket of choice:
var ENDPOINT = 'https://fuexvelc41.execute-api.us-east-1.amazonaws.com/prod/ImageProcessingService';

angular.module('app', ['ui.bootstrap'])

    .controller('MainController', ['$scope', '$http', function($scope, $http) {
        $scope.loading = false;
        $scope.image = {
            width: 100
        };

        $scope.ready = function() {
            $scope.loading = false;
        };

        $scope.submit = function() {
            var fileCtrl = document.getElementById('image-file');
            if (fileCtrl.files && fileCtrl.files[0]) {
                $scope.loading = true;
                var fr = new FileReader();
                fr.onload = function(e) {
                    $scope.image.base64Image = e.target.result.slice(e.target.result.indexOf(',') + 1);
                    $scope.$apply();
                    document.getElementById('original-image').src = e.target.result;
                    // Now resize!
                    $http.post(ENDPOINT, angular.extend($scope.image, { operation: 'resize', outputExtension: fileCtrl.value.split('.').pop() }))
                        .then(function(response) {
                            document.getElementById('processed-image').src = "data:image/png;base64," + response.data;
                        })
                        .catch(console.log)
                        .finally($scope.ready);
                };
                fr.readAsDataURL(fileCtrl.files[0]);
            }
        };
    }]);
And here’s the HTML source we used for the (very basic) website in the demo:
<!DOCTYPE html>
<html lang="en">
<head>
    <title>Image Processing Service</title>
    <meta charset="utf-8">
    <meta http-equiv="X-UA-Compatible" content="IE=edge">
    <meta name="viewport" content="width=device-width, initial-scale=1">
    <link rel="stylesheet" type="text/css" href="https://cdnjs.cloudflare.com/ajax/libs/twitter-bootstrap/3.3.4/css/bootstrap.min.css">
    <link rel="stylesheet" type="text/css" href="http://fonts.googleapis.com/css?family=Open+Sans:400,700">
    <link rel="stylesheet" type="text/css" href="main.css">
</head>
<body ng-app="app" ng-controller="MainController">
    <div class="container">
        <h1>Image Processing Service</h1>
        <div class="row">
            <div class="col-md-4">
                <form ng-submit="submit()">
                    <div class="form-group">
                        <label for="image-file">Image</label>
                        <input id="image-file" type="file">
                    </div>
                    <div class="form-group">
                        <label for="image-width">Width</label>
                        <input id="image-width" class="form-control" type="number"
                               ng-model="image.width" min="1" max="4096">
                    </div>
                    <button type="submit" class="btn btn-primary">
                        <span class="glyphicon glyphicon-refresh" ng-if="loading"></span>
                        Submit
                    </button>
                </form>
            </div>
            <div class="col-md-8">
                <accordion close-others="false">
                    <accordion-group heading="Original Image" is-open="true">
                        <img id="original-image" class="img-responsive">
                    </accordion-group>
                    <accordion-group heading="Processed Image" is-open="true">
                        <img id="processed-image" class="img-responsive">
                    </accordion-group>
                </accordion>
            </div>
        </div>
    </div>
    <script type="text/javascript" src="https://cdnjs.cloudflare.com/ajax/libs/angular.js/1.3.15/angular.min.js"></script>
    <script type="text/javascript" src="https://cdnjs.cloudflare.com/ajax/libs/angular-ui-bootstrap/0.13.3/ui-bootstrap.min.js"></script>
    <script type="text/javascript" src="https://cdnjs.cloudflare.com/ajax/libs/angular-ui-bootstrap/0.13.3/ui-bootstrap-tpls.min.js"></script>
    <script type="text/javascript" src="main.js"></script>
</body>
</html>
Finally, here’s the CSS:
body {
    font-family: 'Open Sans', sans-serif;
    padding-bottom: 15px;
}

a {
    cursor: pointer;
}

/** LOADER **/

.glyphicon-refresh {
    -animation: spin .7s infinite linear;
    -webkit-animation: spin .7s infinite linear;
}

@keyframes spin {
    from { transform: rotate(0deg); }
    to { transform: rotate(360deg); }
}

@-webkit-keyframes spin {
    from { -webkit-transform: rotate(0deg); }
    to { -webkit-transform: rotate(360deg); }
}
…then turn on static website content serving in S3:

The URL will depend on your S3 region and object names, e.g. “http://image-processing-service.s3-website-us-east-1.amazonaws.com/”. Visit that URL in a browser and you should see your image website:

Unit and Load Testing
With API Gateway providing a classic URL-based interface to your Lambda microservice, you have a variety of options for testing. But let’s stick to our serverless approach and do it entirely without infrastructure or even a client!
First, we want to make calls through the API. That’s easy; we use Lambda’s HTTPS invocation blueprint to POST to the endpoint we got when we deployed with API Gateway:
{
  "options": {
    "host": "fuexvelc41.execute-api.us-east-1.amazonaws.com",
    "path": "/prod/ImageProcessingService",
    "method": "POST"
  },
  "data": {
    "operation": "getSample"
  }
}
Now that we have that, let’s wrap a unit test around it. Our unit test harness doesn’t do much; it just runs another Lambda function and pops the result into an Amazon DynamoDB table that we specify. We’ll use the unit and load test harness Lambda blueprint for this in its “unit test” mode:
{
  "operation": "unit",
  "function": "HTTPSInvoker",
  "resultsTable": "unit-test-results",
  "testId": "LinuxConDemo",
  "event": {
    "options": {
      "host": "fuexvelc41.execute-api.us-east-1.amazonaws.com",
      "path": "/prod/ImageProcessingService",
      "method": "POST"
    },
    "data": {
      "operation": "getSample"
    }
  }
}
Finally, we ‘ll do a simple load test by running the unit test multiple times. We’ll use the Lambda unit and load test harness again, this time in “load test” mode:
{
  "operation": "load",
  "iterations": 100,
  "function": "TestHarness",
  "event": {
    "operation": "unit",
    "function": "HTTPSInvoker",
    "resultsTable": "unit-test-results",
    "testId": "LinuxConLoadTestDemo",
    "event": {
      "options": {
        "host": "fuexvelc41.execute-api.us-east-1.amazonaws.com",
        "path": "/prod/ImageProcessingService",
        "method": "POST"
      },
      "data": {
        "operation": "getSample"
      }
    }
  }
}
Here’s a picture of our serverless testing architecture:
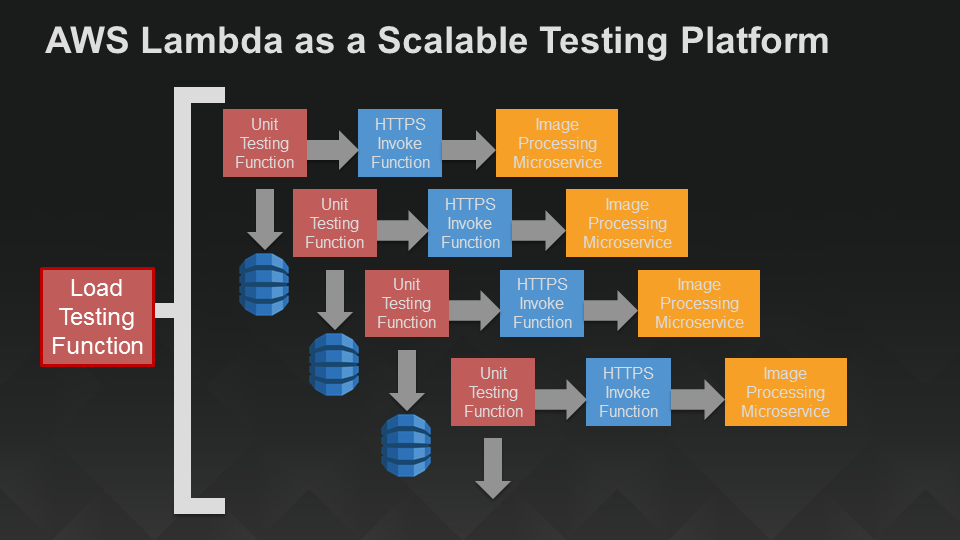
A Serverless Unit and Load Test Harness
You can easily vary this approach to incorporate validation, run a variety of unit tests, etc. If you don’t need the web app infrastructure, you can skip the API Gateway and HTTP invocation and simply run the image processing service directly in your unit test. If you want to summarize or analyze the test output, you can easily attach a Lambda function as an event handler to the DynamoDB table that holds the test results.
Summary
This was a longish post, but it’s a complete package for building a real, scalable backend service and fronting it with both mobile clients and a website, all without the need for servers or other infrastructure in any part of the system: frontend, backend, API, deployment, or testing. Go serverless!
Until next time, happy Lambda (and serverless microservice) coding!