Containers
Secure end-to-end traffic on Amazon EKS using TLS certificate in ACM, ALB, and Istio
I was helping a customer to migrate a Kubernetes workload from an on-premises data center into Amazon Elastic Kubernetes Service (Amazon EKS). The customer had an existing investment in Istio and wanted to continue using it as their preferred service mesh in the Amazon EKS environment. However, the customer was struggling to implement end-to-end encryption using Transport Layer Security (TLS) in the AWS environment.
In this blog post, I will address this task and focus on implementing end-to-end encryption using a TLS certificate in AWS Certificate Manager (ACM), Application Load Balancer (ALB), and Istio in an Amazon EKS environment. However, this blog post assumes that your workspace meets the following requirements.
Assumptions and prerequisites
To proceed, you must have the following:
- An existing AWS account with proper permissions.
- An existing and working EKS cluster with Kubernetes v1.21
- The latest versions of utilities installed and configured on the workspace that you will use to interact with AWS and the Amazon EKS cluster
- AWS Load Balancer Controller v2.3 or newer installed and configured on your Amazon EKS cluster
- An existing and valid certificate in AWS Certificate Manager (ACM). You can request one if you do not have one.
I will demonstrate installing a sample Kubernetes application called yelb and expose it using Kubernetes service of type load balancer. Later, I will configure the ALB ingress controller to pass this traffic to Istio for further processing.
Note: I am using the Bash terminal for code, but it is not strictly required. Example code can be easily tweaked for Microsoft Windows Terminal.
Install yelb application
git clone https://github.com/aws-samples/eks-alb-istio-with-tls

cd eks-alb-istio-with-tls

kubectl apply -f yelb-k8s-loadbalancer.yaml
Let us visualize our current state of application.
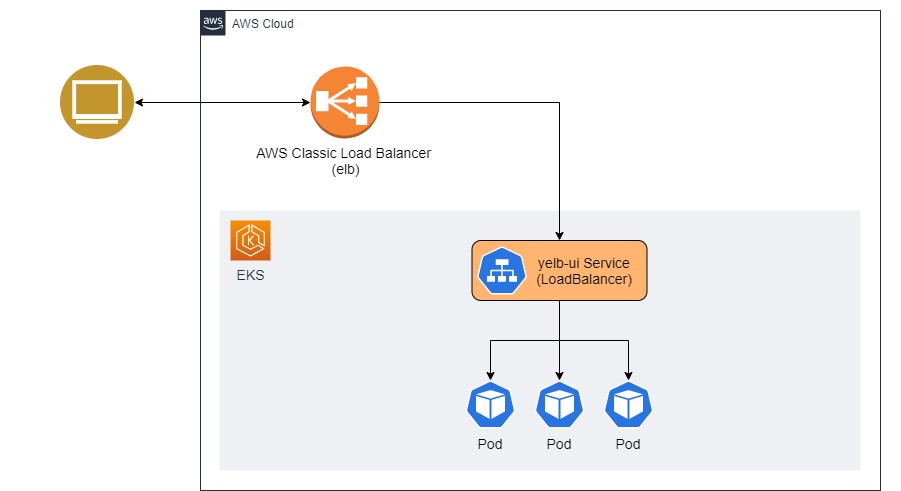
Figure 01: Current state of application
In the future state of application, I will implement end-to-end traffic encryption using a TLS certificate from ACM, ALB, and Istio in the Amazon EKS. The target state of cluster will look like Figure 02.
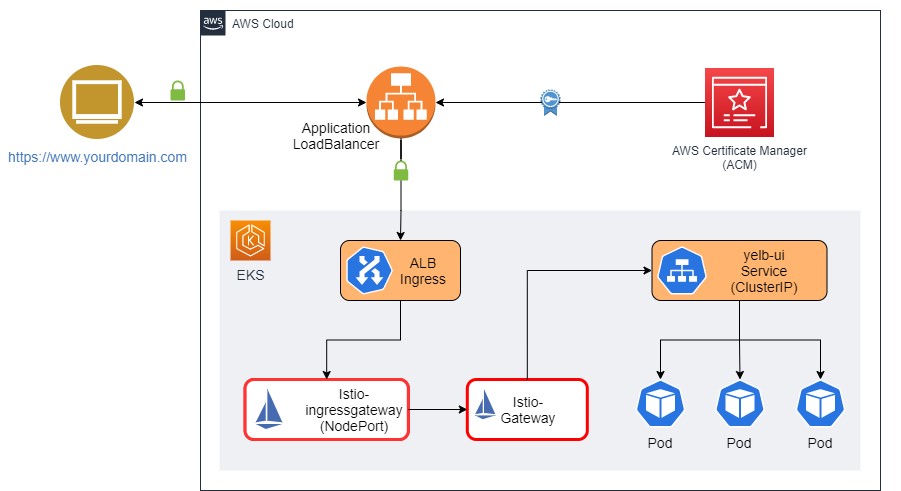
Figure 02: Target state of application
Install and configure Istio
I am installing Istio using istioctl and changing the service type of istio-ingressgateway to NodePort. The service type of NodePort is required when forwarding traffic from ALB to EC2 instances.
istioctl install \
--set profile=demo \
--set values.gateways.istio-ingressgateway.type=NodePort
Verify Istio installation is properly enabled by using kubectl get po -n istio-system. You should see pods running. Next, attach a label to the default namespace. This will tell Istio to inject a proxy sidecar to pods running in the namespace. You will need to delete existing pods in the default namespace.
# label default namespace
kubectl label ns default istio-injection=enabled --overwrite

# delete existing pods so that Istio can inject sidecar
kubectl delete po --all

# get list of pods
kubectl get po
You will notice that there are two containers running in each pod.

Figure 03: Kubernetes pods for yelb application
Generate self-signed TLS certificates
Generate self-signed certificates. We will use a key/pair to encrypt traffic from ALB to Istio Gateway.
openssl req -x509 -newkey rsa:4096 -sha256 -days 3650 -nodes \
  -keyout certs/key.pem -out certs/cert.pem -subj "/CN=yourdomain.com" \
  -addext "subjectAltName=DNS:yourdomain"
Generate Kubernetes secret containing key.pem and cert.pem. We will use it with Istio Gateway to implement traffic encryption.
kubectl create -n istio-system secret generic tls-secret \
--from-file=key=certs/key.pem \
--from-file=cert=certs/cert.pem
Configure Istio Gateway and virtual services
I will configure traffic routing for Istio using gateway and virtual services.
# install and configure Istio gateway
kubectl apply -f istio/gateway.yaml

# install and configure external service
kubectl apply -f istio/external-services.yaml

# install and configure Istio virtual services for yelb
kubectl apply -f istio/yelb-services.yaml
I have attached self-signed certificates to Ingress Gateway. Istio will use these certificates to encrypt traffic between ALB and Istio which is a key part to implement end-to-end encryption.
Let us look at Istio Gateway.
cat istio/gateway.yaml
apiVersion: networking.istio.io/v1alpha3
kind: Gateway
metadata:
  name: yelb-gateway
spec:
  selector:
    istio: ingressgateway
  servers:
    - port:
        number: 443
        name: https-443
        protocol: HTTPS
      tls:
        mode: SIMPLE
        credentialName: "tls-secret"
      hosts:
        - "*"
You will notice that I am using the Kubernetes secret named tls-secret as credentialName that we generated earlier. The secret contains openssl generated key/cert. Gateway yelb-gateway is listening on port 443 for encrypted traffic.
Configure ALB Ingress resource
Istio cannot use the TLS certificate in ACM directly. However, I will use ACM certificates with AWS Application Load Balancer to terminate HTTPS traffic and then forward it to Istio Ingress Gateway for further processing.
I need arn of ACM public certificate and domain configured in the Amazon Domain Name System (DNS) web service, Amazon Route 53. I will create an Ingress resource to receive traffic from ALB and forward it to the Istio gateway. You will need to edit the Ingress resource to configure annotations for AWS Application Load Balancer with TLS certificates. To make it simple, I have created a Helm chart that accepts ACM certificate arn and host name as parameters. Generate and install Ingress correctly.
helm install alb-istio-ingress ./helm/ALB-Istio-TLS \
--set host=blog.yourdomain.com \
--set certificate_arn=arn:aws:acm:xxxxxx:999999999999:certificate/xxxxxxxxxNote: Make sure to use your own valid domain and certificate arn.
Once Ingress is installed, it will provision AWS Application Load Balancer, bind it with the ACM certificate for HTTPS traffic and forward traffic to Istio resources inside the EKS cluster. You can get a generated manifest of Ingress resource using
kubectl get ingress gw-ingress -n istio-system -o yamlThe generated output will look like the snippet below. Note the values corresponding to alb.ingress.kubernetes.io/backend-protocol and host fields.
apiVersion: networking.k8s.io/v1
kind: Ingress
metadata:
  annotations:
    kubernetes.io/ingress.class: alb
    alb.ingress.kubernetes.io/scheme: internet-facing
    alb.ingress.kubernetes.io/healthcheck-path: /healthz/ready
    alb.ingress.kubernetes.io/healthcheck-port: traffic-port
    alb.ingress.kubernetes.io/backend-protocol: HTTPS
    alb.ingress.kubernetes.io/listen-ports: '[{"HTTP": 80}, {"HTTPS":443}]'
    alb.ingress.kubernetes.io/actions.ssl-redirect: |
      {
        "Type": "redirect",
        "RedirectConfig": {
          "Protocol": "HTTPS",
          "Port": "443",
          "StatusCode": "HTTP_301"
        }
      }
    alb.ingress.kubernetes.io/certificate-arn: |
      arn:aws:acm:xxxxxx:999999999999:certificate/xxxxxxxxx
  name: gw-ingress
  namespace: istio-system
spec:
  rules:
  - host: blog.yourdomain.com
    http:
      paths:
      - backend:
          service:
            name: ssl-redirect
            port:
              name: use-annotation
        path: /
        pathType: Prefix
      - backend:
          service:
            name: istio-ingressgateway
            port:
              number: 15021
        path: /healthz/ready
        pathType: Prefix
      - backend:
          service:
            name: istio-ingressgateway
            port:
              number: 443
        path: /
        pathType: Prefix
Get ALB load balancer DNS and make a note of it.
echo $(kubectl get ingress gw-ingress -n istio-system \
-o jsonpath="{.status.loadBalancer.ingress[*].hostname}")
We should get an output like this
k8s-istiosys-xxxxxxxxxxxxxxxxxxx.us-east-1.elb.amazonaws.comCreate a DNS record in Amazon Route 53
Create a record in Route53 to bind your domain with ALB. Make sure you are creating a DNS record in the corresponding hosting zone, matching the domain name. I have compiled a list of useful resources to learn more about DNS records and hosting zones in AWS.
- Registering domain names using Amazon Route 53
- Working with public hosted zones
- Working with records
- Routing traffic to an ELB load balancer
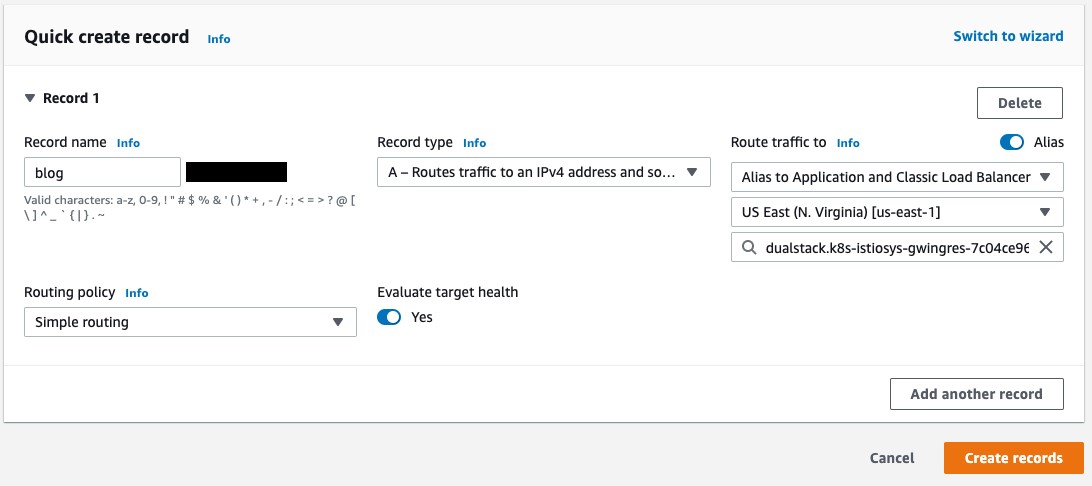
Figure 04: Create DNS record
It can take a few minutes to populate DNS servers. Open blog.yourdomain.com in the web browser, and you will notice a padlock in the address bar for secure TLS communication. We have a Kubernetes application running in EKS with end-to-end encryption enabled using a TLS certificate from ACM, ALB, and Istio.
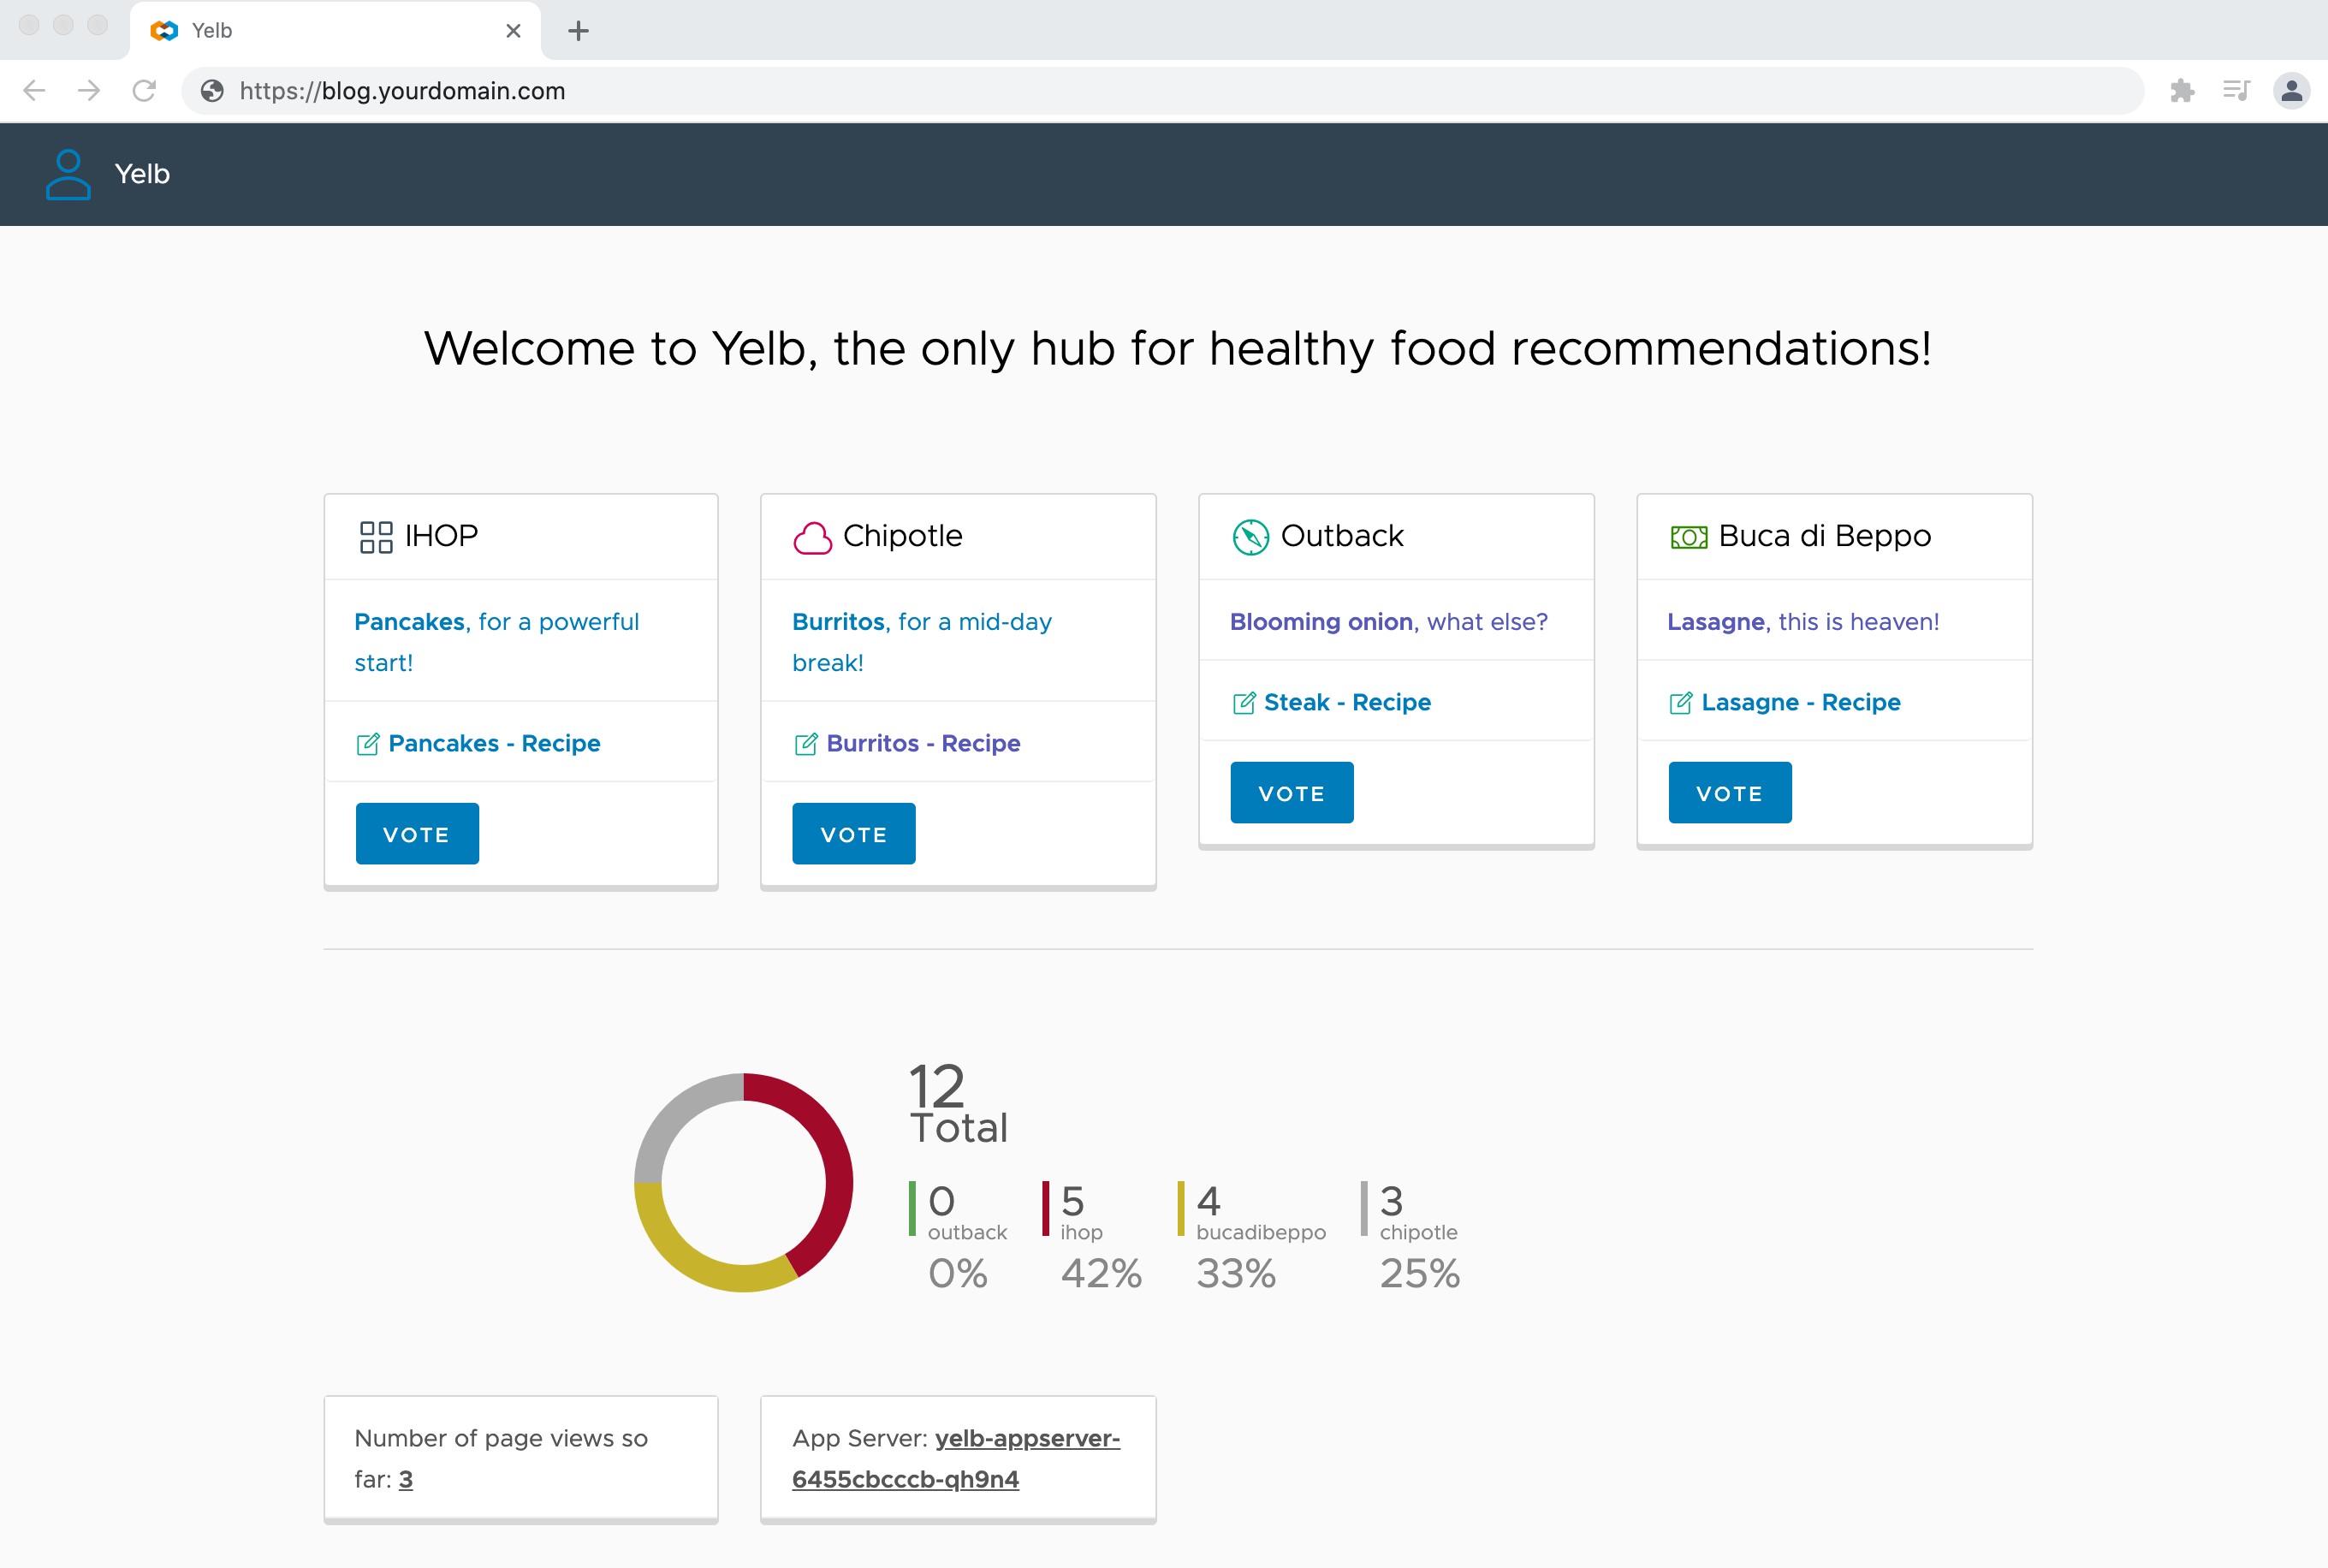
Figure 05: Secured application with TLS
Cleaning up
To undo changes made in the Kubernetes cluster, execute the following CLI commands in the terminal
# remove label from default namespace
kubectl label ns default istio-injection-

# install and configure Istio gateway
kubectl delete -f istio/gateway.yaml

# install and configure external service
kubectl delete -f istio/external-services.yaml

# install and configure Istio virtual services for yelb
kubectl delete -f istio/yelb-services.yaml

# uninstall yelb application
kubectl delete -f yelb-k8s-loadbalancer.yaml

# uninstall istio
istioctl x uninstall -purge

# delete istio namespace
kubectl delete namespace istio-system
Conclusion
Amazon EKS is a managed Kubernetes service that makes it easy for you to run Kubernetes on AWS and on-premises. Kubernetes is an open-source system for automating deployment, scaling, and management of containerized applications. Amazon EKS is certified Kubernetes-conformant, so existing applications that run on upstream Kubernetes are compatible with Amazon EKS
Amazon EKS is fully compatible with Kubernetes community tools and supports popular Kubernetes add-ons. These include CoreDNS, which creates a DNS service for your cluster, and both the Kubernetes Dashboard web-based UI and the kubectl command line tool, which help access and manage your cluster on Amazon EKS.
This blog post described how you can secure end-to-end traffic on Amazon EKS using your preferred service mesh such as Istio, AWS Certificate Manager, and Application Load Balancer.
I hope this post helps with your Kubernetes projects and make your journey to Amazon EKS easier. If you have questions or suggestions, please leave a comment.