Containers
Shift left to secure your container supply chain
Introduction
When we talk about securing container solutions, most of the focus is on securing the orchestrator or the infrastructure that the orchestrator runs on. However, at the heart of your container solutions are the containers themselves. In this post, we show you how we ensured that before we even push a container into our repository, it’s evaluated for security risks automatically and rejected if it doesn’t meet the required standards. If you have read the Security Pillar from the container build lens, you’ll know that linting docker files, scanning images, and making sure you don’t commit secrets into your codebase are all important practices that this post helps you put into practice.
There are lots of tools out there that help you secure your container images and you can usually run these tools on your desktop or laptop. This is all well and good, but in terms of security, we want to make sure the same standards are applied by everyone. To do this, I’ll apply automatic checks using a build pipeline. Creating a build pipeline for securing container images is not a new idea, and indeed this build pipeline is an iteration on an earlier post. The tools I will use are all open source and include: Hadolint (used for applying linting rules to a Dockerfile), Trufflehog (used for looking for secrets that have been committed as part of a build before they make it into your codebase), and Trivy, which is being used for static scanning of images.
Tools in use
Hadolint is a Dockerfile linting tool. It parses the Dockerfile into an AST (Abstract Syntax Tree) and then performs rules on that AST. It also uses Shellcheck to lint the BASH code inside RUN instructions.
Trivy is an opensource vulnerability scanner, which is made available by Aqua Security. It can scan for both OS and language-specific package vulnerabilities. It also supports different templates for integration with third-party applications, one of which is AWS Security Hub (Security Hub). I’ll use this integration to create an audit trail for vulnerabilities.
This opensource tool searches through Git repositories for secrets, and can search commit history and branches to find accidentally committed secrets.
Pipeline plan
I implemented all three security tools in the same stage, so that they run in parallel and ensure that all three checks complete successfully for the artefact before it moves on to the build stage.
An audit level is built into the pipeline that is set one level below what the company deems to be the acceptable vulnerability threshold. If the company prefers containers to be blocked with critical vulnerabilities, then any with HIGH vulnerabilities would trigger the audit threshold and be logged. Similarly, if the security threshold for blocking the pipeline was set to HIGH, then any containers with MEDIUM vulnerabilities would have those logged. This means that the company has a record of what was deemed acceptable and when, so that they can remediate when time allows or validate in case of future issues.
I’m using Trivy in client server mode. This is so that the vulnerability database doesn’t have to be downloaded for every scan. This approach can also be adopted so several pipeline flows or repositories can use the same scanner. The Server downloads the vulnerability database automatically and continues to fetch the latest database in the background. The client then queries the remote address of the load balancer Infront of the server instead of downloading the vulnerability database locally.
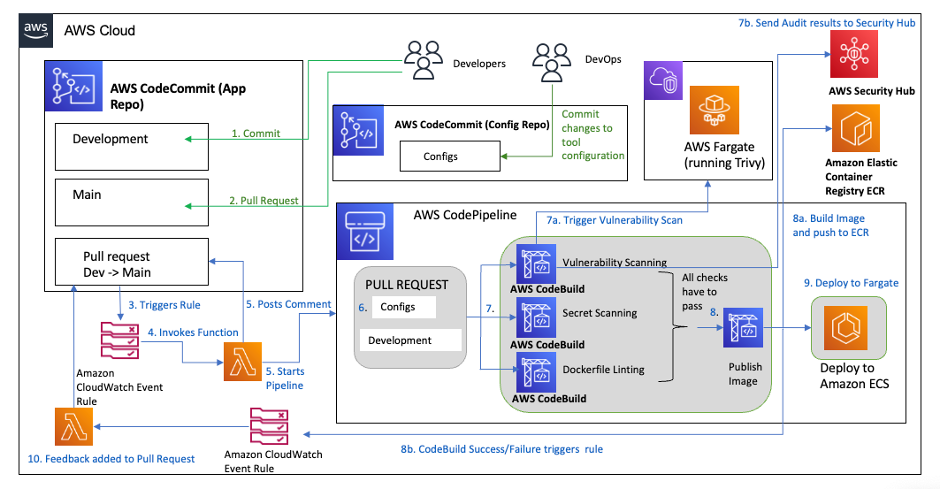
Solution overview
The solution architecture is shown in the following diagram:
Walkthrough
So how does the pipeline work?
- A developer is working on an update to a container image to be used for an application and submits code to the application repository.
- The developer then submits a pull request to get the changes approved and merged. This also creates the tag for the image as the pull request is being monitored by Amazon Eventbridge and that triggers an AWS Lambda function to set some parameters in AWS Systems Manager Parameter Store, including the commit id that’s used for the tag.
- This triggers the pipeline to start the security analysis stage. In this stage, there are the three checks using the tools mentioned above. The configuration of the tools is initially done on the build of the environment and a separate repository is also created that enables the team responsible for managing the security tools to update and manage those tools. Typically, this team is separate from the development team, with the latter building the business logic of the applications.
- Hadolint check – In this check, we specify any trusted registries that can be pulled from. If the image specified an untrusted registry, then it fails this check. We also specify some additional rules to ignore.
- Trufflehog check – In this check, we look for any strings that match known patterns for specific secrets (e.g., AKIA followed by a combination of 16 numbers and letters to make up an AWS Identity and Access Management [AWS IAM] secret key). We scan the repository so that any such commits cause the check to fail.
- Trivy scan – In this check, we set the level that is acceptable for security vulnerabilities (i.e., MEDIUM). Any vulnerability flagged by the Trivy scan above the MEDIUM level then causes the check to fail. Any MEDIUM vulnerabilities are converted to Security Hub Format and sent to Security Hub as an audit trail.
- Only if all three of the above checks pass will the image then be built, tagged, and pushed to the Amazon Elastic Container Registry (Amazon ECR) repository.
- Once the image has been built, the pipeline deploys that image (i.e., to Amazon Elastic Container Service (AWS Fargate) in this case), but this could be changed to deploy on Amazon Elastic Kubernetes Service (Amazon EKS).
The full repository is available to clone here.
Let’s look at the build specifications used for the different tools and what we can easily alter according to the security standards of the company.
First, we will look at Hadolint:
The following build specification is the buildspec_dockerfile.yml file in the AWS CodeCommit (CodeCommit) “container-security-demo-config” repository.
The configuration of Hadolint is found in the container-security-demo-config/hadolint.yml file in the repository.
The buildspec installs Hadolint, which is then used to inspect the Dockerfile to apply linting rules.
This means that the Hadolint rules are applied with the exception of rules 3000 (i.e., the rule that requires an absolute workdir to be used) and 3025 (i.e., the rule that states that JSON notation must be used for CMD and ENTRYPOINT arguments) and we only allow images to be pulled from the Public Amazon ECR Gallery. Instead, you could insert your company’s private repositories here. These are simply examples of rules you may choose to include; however, you should review the available rules and confirm if they are applicable for your company’s security posture.
Let’s look at the Trivy buildspec in more detail (i.e., this is the buildspec_vuln.yml file in the CodeCommit container-security-demo-config repository).
The pre_build installs some dependencies and Trivy. It also grabs the Commit reference to use as a tag for an audit-trail.
A temporary image is built and pushed to a separate repository so that it can be used in the scan. Having a separate repository here means that any images are evaluated before being pushed to the main repository. If an image has a security issue, this means that it is prevented from being made available in the main repository. We scan the image using the remote server for any vulnerabilities that match or exceed the threshold. If those vulnerabilities exist, then the build job exits with a failed status. At the same time, the image is scanned for any vulnerabilities that match the audit level and those vulnerabilities are transformed into AWS Security Finding Format (ASFF) for Security Hub and imported into Security Hub to create an audit trail.
Finally let’s look at the Secret scan with Trufflehog.
Here is the buildspec for Trufflehog (i.e., this is the buildspec_secrets.yml file in the CodeCommit container-security-demo-config repository).
Trufflehog can search through an entire Git repository for accidentally committed secrets. For this check, we’re scanning the CodeCommit repository for the application for any strings that match a regex. The configuration of those regex are set up in the secrets.json file and look for common patterns for secrets such as AWS application programming interface (API) keys or Github credentials. By setting a max_depth parameter, we limit the scanning to the most recent commit.
How can you test out this pipeline?
Prerequisites
In order to implement the instructions, you need to have access to an AWS account with administrative permissions. You also need to have the AWS cli installed locally or on an AWS Cloud9 instance and Git installed.
Steps
1. Clone the repository.
2. The demo is using nested AWS CloudFormation templates and some configuration files that need to be uploaded to an Amazon Simple Storage Service (Amazon S3) bucket. Create a bucket in the same Region that you’ll create the demonstration in, the bucket doesn’t need to be public facing.
3. Security Hub is used in this demonstration and has an integration with Trivy. To enable this, go to Security Hub in the AWS Management Console and select Integrations from the menu on the left. Filter for Aqua Security and select Accept findings.

This should now look like the following image.

If you do not have Security Hub setup in your account, please follow the instructions here.
4. Upload files in the environment directory directly to the new bucket. This can be done via the Console or via the CLI as shown.
5. There are 2 zipfiles required which need to be created in the following way.
6. Upload the entire devsecops folder to the bucket.
Your bucket structure should now look like the following:

- Create a stack using the container-devsecops-demo.yml template and use the bucket name of the bucket that you just created as the DevSecOpsResourcesBucket
Once all the nested stacks have completed building, you’ll have a CICD (Continuous Integration Continuous Delivery) pipeline with built‑in configurable security tools, that deploys new images to an Amazon ECS on AWS Fargate cluster.
Now it’s time to clone the application repository to your local machine or to an AWS Cloud9 instance, if that’s what you’re running. You need the AWS Command Line Interface (AWS CLI) and Git commands available to update the application.
- Clone the CodeCommit repository container-security-demo-app to your local machine or AWS Cloud9, depending on what you want to use.
- We also want an application to use with the pipeline. We will clone the popular application 2048 from Github to use. This application uses the MIT License.
- Switch into the new Git repository that you cloned from CodeCommit.
- Switch to the development branch.
- Now, it’s time to fully populate the application as only a Dockerfile and some additional required Nginx settings are committed initially.
-
- At this stage, you have committed your changes to the repo but not instigated the pipeline as it’s waiting for a pull request. Create the pull request:
- Now if you go to look at the pipeline by selecting AWS Codepipeline (CodePipeline) from the AWS Console and select the container-security-demo-pipeline, you can see the change being submitted through the pipeline.
The image is tested for vulnerabilities, secrets, and linting errors. If all tests pass, then the container image is built, tagged, and added to the Amazon ECR private repository. Once there, the pipeline continues to the next stage and deploys to Amazon ECS on AWS Fargate. You can then interact with the application using the public load balancer created as part of the ECS Service stack.
If there are any vulnerabilities at the specified failure level or above, then the pipeline stops and the image won’t be added to the Amazon ECR repository.
You can test out various failure scenarios using this pipeline. Try replacing the COPY commands in the Dockerfile with ADD. If the Nginx image included in the Dockerfile has HIGH vulnerabilities (which it did at the time of testing) try replacing it with “public.ecr.aws/nginx/nginx:1.24-alpine-slim”, or alternatively you can change the pipeline settings to only block on “CRITICAL” instead of “HIGH and CRITICAL” by updating the parameters in the CloudFormation template.
- You can see how this looks in the following examples. The first image shows a failed scan and then the second image is a snippet from CodeBuild logs that shows how many vulnerabilities have been detected and sent to Security Hub.


- If there are vulnerabilities only at the audit level and below, those are logged directly with Security Hub so that there is an audit trail for the future. To see these, go to Security Hub and add a filter on findings (Product Name is Aqua Security).
If there are vulnerabilities you will see them displayed like those in the image below.

Changing the image for a new version is easy by editing the Dockerfile.
Now you have a pipeline with some open-source tooling that enables you to add security checks for your container images as they are built, and prevents images with CRITICAL or HIGH (depending on the threshold you set) vulnerabilities from being used as part of a task.
Cleanup
To clean up the stack please complete the following actions:
- Delete all objects from the Amazon S3 bucket that was created for CodePipeline, which is found in the AWS CloudFormation stack for DSO-Initial-Pipeline under Resources as the Pipeline Bucket (i.e., container-security-demo-<accountid>-<region>-artifacts).
- Delete all images from the Amazon ECR Private repositories container-demo-security-sample and container-security-demo-trivy.
- Now go to the AWS CloudFormation console and delete the DSO-ECS stack that you created from the AWS CloudFormation yaml.
Conclusion
In this post, we showed you how to create a DevSecOps pipeline that performs three different types of security checks on container images, tags the images and then deploys them onto Amazon ECS on AWS Fargate. It also creates an audit log of any images that have Common Vulnerabilities and Exposures (CVEs) listed as HIGH, MEDIUM or below (depending on the level you choose for the audit setting). This example helps you to implement the security posture that suits your company security profile and requirements.