AWS Database Blog
Backfilling an Amazon DynamoDB Time to Live (TTL) attribute with Amazon EMR
If you have complex data types such as maps and lists in your Amazon DynamoDB data, refer to Part 2 of this series.
Bulk updates to a database can be disruptive and potentially cause downtime, performance impacts to your business processes, or overprovisioning of compute and storage resources. When performing bulk updates, you want to choose a process that runs quickly, enables you to operate your business uninterrupted, and minimizes your cost. Let’s take a look at how we can achieve this with a NoSQL database such as Amazon DynamoDB.
DynamoDB is a NoSQL database that provides a flexible schema structure to allow for some items in a table to have attributes that don’t exist in all items (in relational database terms, some columns can exist only in some rows while being omitted from other rows). DynamoDB is built to run at extreme scale, which allows for tables that have petabytes of data and trillions of items, so you need a scalable client for doing these types of whole-table mutations. For these use cases, you typically use Amazon EMR. Because DynamoDB provides elastic capacity, there is no need to over-provision during normal operations to accommodate occasional bulk operations; you can simply add capacity to your table during the bulk operation and remove that capacity when it’s complete.
DynamoDB supports a feature called Time to Live (TTL). You can use TTL to delete expired items from your table automatically at no additional cost. Because deleting an item normally consumes write capacity, TTL can result in significant cost savings for certain use cases. For example, you can use TTL to delete the session data or items that you’ve already archived to an Amazon Simple Storage Service (Amazon S3) bucket for long-term retention.
To use TTL, you designate an attribute in your items that contains a timestamp (encoded as number of seconds since the Unix epoch), at which time DynamoDB considers the item to have expired. After the item expires, DynamoDB deletes it, generally within 48 hours of expiration. For more information about TTL, see Expiring Items Using Time to Live.
Ideally, you choose a TTL attribute before you start putting data in your DynamoDB table. However, DynamoDB users often start using TTL after their table includes data. It’s straightforward to modify your application to add the attribute with a timestamp to any new or updated items, but what’s the best way to backfill the TTL attribute for all older items? It’s usually recommended to use Amazon EMR for bulk updates to DynamoDB tables because it’s a highly scalable solution with built-in functionality for connecting with DynamoDB. You can run this Amazon EMR job after you modify your application to add a TTL attribute for all new items.
This post shows you how to create an EMR cluster and run a Hive query inside Amazon EMR to backfill a TTL attribute to items that are missing it. You calculate the new TTL attribute on a per-item basis using another timestamp attribute that already exists in each item.
DynamoDB schema
To get started, create a simple table with the following attributes:
- pk – The partition key, which is a string in universally unique identifier (UUID) form
- creation_timestamp – A string that represents the item’s creation timestamp in ISO 8601 format
- expiration_epoch_time – A number that represents the item’s expiration time in seconds since the epoch, which is 3 years after the
creation_timestamp
This post uses a table called TestTTL with 4 million items. One million of those items were inserted after deciding to use TTL, which means 3 million items are missing the expiration_epoch_time attribute. The following screenshot shows a sample of the items in the TestTTL table.

Due to the way Hive operates with DynamoDB, this method is safe for modifying items that don’t change while the Hive INSERT OVERWRITE query is running. If your applications might be modifying items with the missing expiration_epoch_time attribute, you need to either take application downtime while running the query or use another technique based on condition expressions (which Hive and the underlying emr-dynamodb-connector don’t do). For more information, see Condition Expressions.
Some of your DynamoDB items already contain the expiration_epoch_time attribute. Also, you can consider some of the items expired, based on your rule regarding data that is at least 3 years old. See the following code from the AWS CLI; you refer to this item later when the Hive query is done to verify that the job worked as expected:
Creating the EMR cluster
To create your cluster, complete the following steps:
- On the Amazon EMR console, choose Create cluster.
- For Cluster name, enter a name for your cluster; for example,
emr-ddb-ttl-update. - Optionally, change the Amazon S3 logging folder.
The default location is a folder that uses your account number. - In the Software configuration section, for Release, choose emr-6.6.0 or the latest Amazon EMR release available.
- For Applications, select Core Hadoop.
This configuration includes Hive and has everything you need to add the TTL attribute. - In the Hardware configuration section, for Instance type, choose c5.4xlarge.
This core node (where the Hive query runs) measures approximately how many items instances of that size can process per minute. - In the Security and access section, for EC2 key pair, choose a key pair you have access to, because you need to SSH to the master node to run the Hive CLI.
To optimize this further and achieve a better cost-to-performance ratio, you could go into the advanced options and choose a smaller instance size for the master node (such as an m5.xlarge), which doesn’t have large computational requirements and is used as a client for running tasks, or disable unnecessary services such as Ganglia, but those changes are out of the scope of this post. For more information about creating an EMR cluster, see Analyzing Big Data with Amazon EMR. - Choose Create cluster.

SSHing to the Amazon EMR master node
After you have created your EMR cluster and it’s in the Waiting state, SSH to the master node of the cluster. In the cluster view on the console, you can find SSH instructions. For instructions on how to SSH into the EMR cluster’s master node, choose the SSH link for Master public DNS on the Summary tab.

You might have to edit the security group of your master node to allow SSH from your IP address. The Amazon EMR console links to the security group on the Summary tab.
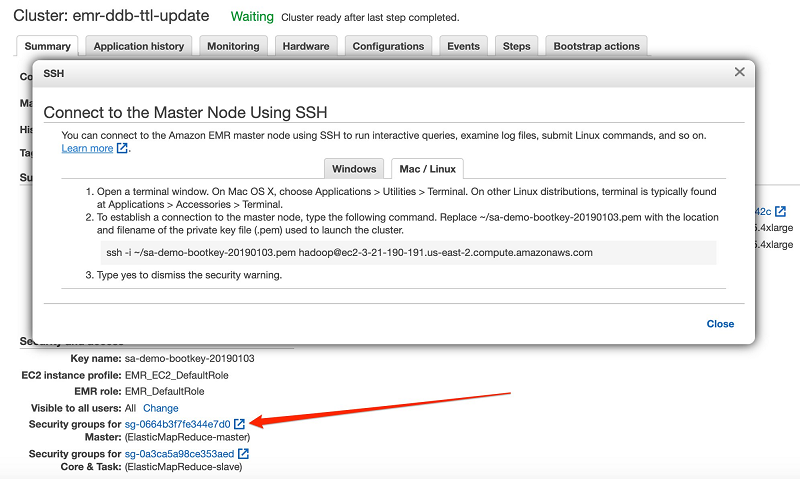
For more information, see Authorizing inbound traffic for your Linux instances.
Running Hive CLI commands
You’re now ready to run the Hive CLI on the master node.
- Verify that there are no databases, and create a database to host your external DynamoDB table.
This database doesn’t actually store data in your EMR cluster; you create anEXTERNAL TABLEin a future step that is a pointer to the actual DynamoDB table. The commands you run at the Hive CLI prompt are noted in bold type in the following code. Start by running thehivecommand at the Bash prompt: - Create your external DynamoDB table mapping in Hive by entering the following code (adjust this to match your attribute names and schema):
For more information, see Creating an External Table in Hive.
- To find out how many items exist that don’t contain the
expiration_epoch_timeattribute, enter the following code:For this use case, a Hive query needs to update 3 million items and add the expiration_epoch_time attribute to each.
- Run the Hive query to add the
expiration_epoch_timeattribute to rows where it’s missing. You want the items to expire 3 years after they were inserted, so add the number of seconds in 3 years to the creation timestamp.
.
To achieve this addition, you need to modify yourcreation_timestampstring values (see the following example code). The Hive helper functionunix_timestamp()converts dates stored in string format to an integer of seconds since the Unix epoch.
.
However, the helper function expects dates in the formatyyyy-MM-dd HH:mm:ss, but the date format of these items is an ISO 8601 variant ofyyyy-MM-ddTHH:mm:ssZ. You need to tell Hive to strip theTbetween the days (dd) and hours (HH), and tell Hive to strip the trailingZthat represents the UTC time zone. For that you can use theregex_replace()helper function to modify the creation_timestamp attribute into theunix_timestamp()function.
.
Depending on the exact format of the strings in your data, you might need to modify thisregex_replace(). For more information, see Date Functions in the Apache Hive manual.In the preceding results of running the query, the Map 1 phase of this job launched a total of 14 mappers with a single core node, which makes sense because a c5.4xlarge instance has 16 vCPU, so the Hive job used most of them. The Hive job took 167 seconds to run.
- Check the query to see how many items are still missing the
expiration_epoch_timeattribute. See the following code:As you can see from the
0answer after theOKstatus of the job, all items are updated with the new attribute. For example, see the following code of the single item you examined earlier:The
expiration_epoch_timeattribute has been added to the item with a value of 1602447050, which according to EpochConverter corresponds to Sunday, October 11, 2020, at 8:10:50 PM GMT, exactly 3 years after the item’screation_timestamp.
Sizing and testing considerations
For this use case, you used a single c5.4xlarge EMR core instance to run the Hive query, and the instance scanned 4 million documents and modified 3 million of them in approximately 3 minutes. By default, Hive consumes half the read and write capacity of your DynamoDB table to allow operational processes to function while the Hive job is running. You need to choose an appropriate number of core or task instances in your EMR cluster and set the DynamoDB capacity available to Hive to an appropriate percentage so that you don’t overwhelm the capacity you’ve chosen to provision for your table and experience throttling in your production workload. For more information about adjusting the Hive DynamoDB capacity, see DynamoDB Provisioned Throughput.
To make the job run faster, make sure your table is using provisioned capacity mode and temporarily increase the provisioned RCU and WCU while the Hive query is running. This is especially important if you have a large amount of data but low table throughput for regular operations. When the Hive query is complete, you can scale down your provisioned capacity or switch back to on-demand capacity for your table.
Additionally, increase the parallelism of the Hive tasks by increasing the number of core or task instances in the EMR cluster, or by using different instance types. Hive launches approximately one mapper task for each vCPU in the cluster (a few vCPUs are reserved for system use). For example, running the preceding Hive query with three c5.4xlarge EMR core instances uses 46 mappers, which reduces the runtime from 3 minutes to 74 seconds. Running the query with 10 c5.4xlarge instances uses 158 mappers and reduces the runtime to 24 seconds. For more information about core and task nodes, see Understanding Master, Core, and Task Nodes.
One option for testing your hive query against the full dataset is to use DynamoDB on-demand backup and restore to create a temporary copy of your table. You can run the Hive query against that temporary copy to determine an appropriate EMR cluster size before running the query against your production table. However, there is a cost associated with running the on-demand backup and restore.
In addition, you can restart this Hive query safely if there is an interruption. If the job exits early for some reason, you can always restart the query because it makes modifications only to rows where the TTL attribute is missing. However, restarting it results in extra read capacity unit consumption because each Hive query restarts the table scan.
Cleaning up
To avoid unnecessary costs, don’t forget to terminate your EMR cluster after the Hive query is done if you no longer need that resource.
Conclusion
Hive queries offer a straightforward and flexible way to add new, calculated attributes to DynamoDB items that are missing those attributes. If you have a need to backfill a TTL attribute for items that already exist, get started today!
About the Authors

Chad Tindel is a DynamoDB Specialist Solutions Architect based out of New York City. He works with large enterprises to evaluate, design, and deploy DynamoDB-based solutions. Prior to joining Amazon he held similar roles at Red Hat, Cloudera, MongoDB, and Elastic.

Andre Rosa is a Partner Trainer with Amazon Web Services. He has 20 years of experience in the IT industry, mostly dedicated to the database world. As a member of the AWS Training and Certification team, he exercises one of his passions: learning and sharing knowledge with AWS Partners as they work on projects on their journey to the cloud.

Suthan Phillips is a big data architect at AWS. He works with customers to provide them architectural guidance and helps them achieve performance enhancements for complex applications on Amazon EMR. In his spare time, he enjoys hiking and exploring the Pacific Northwest.