AWS Database Blog
Connect to Amazon Keyspaces from your desktop using IntelliJ, PyCharm, or DataGrip IDEs
AWS customers use Amazon Keyspaces (for Apache Cassandra) to modernize their Cassandra workloads. Keyspaces offers customers scalability and fast performance to provide users a great end-user experience. Amazon Keyspaces is a scalable, highly available, and managed Apache Cassandra-compatible database service. With Amazon Keyspaces, you can run your Cassandra workloads on AWS using the same Cassandra application code and developer tools you use today. When developing with Amazon Keyspaces, it’s helpful to be able to connect to Amazon Keyspaces directly from your development environment. This allows you to develop quickly by writing code and iterating on schemas within the same tool.
In this post, I provide step-by-step instructions to connect to Amazon Keyspaces from your local machine using a commonly used integrated development environment (IDE). Additionally, I show how to create new Amazon Keyspaces tables, run CQL queries, and enable advanced functionalities such as point-in-time recovery. In the end, you will have a functioning development environment to start building modern data applications with Amazon Keyspaces.
If you’re using Java, Python, Go, Php, or .Net, you’re likely already using one of the various IDEs developed by JetBrains. The functionality I cover in this post is available in the Enterprise version of these tools. You can also download the evaluation version of the software, which is free for 30 days.
Architecture

Prerequisites
To follow the instructions in this post, you need service-specific credentials for an existing AWS Identity and Access Management (IAM) user. Service-specific credentials enable you to use the existing Apache Cassandra module for IntelliJ’s IDE. The service-specific credentials are useful when integrating existing Apache Cassandra tooling or applications without modifying the code.
When building applications, keep in mind that service-specific credentials aren’t the only way to authenticate and authorize access to Amazon Keyspaces resources. If you can modify the code or access its external configuration, we recommend using the AWS authentication plugin for Cassandra drivers. Available for multiple programming languages, this plugin enables IAM users, roles, and federated identities to add authentication information to Amazon Keyspaces API requests.
The following code is an example of a service-specific credential. For the steps in this post, you need the ServiceUserName and the ServiceUserPassword.
Connect to Amazon Keyspaces
Amazon Keyspaces is serverless, and there is no infrastructure to set up. When connecting to Amazon Keyspaces, you need to connect to one of the service endpoints. In this post, we use a public service endpoint. You also have an option to use interface VPC endpoints powered by AWS PrivateLink. Interface VPC endpoints enable private communication between your virtual private cloud (VPC) running in Amazon VPC and Amazon Keyspaces. VPC endpoints enable you to control access to resources using IAM and VPC polices.
In this step, you use the service-specific credentials to connect to Amazon Keyspaces through the IntelliJ IDE. For this post, I’m using the 2021.1.x version of the tool.
- Create a new project in the IDE.
- On the View menu, choose Tool Windows, then choose Database.
- Choose the Data Source Properties
![]()
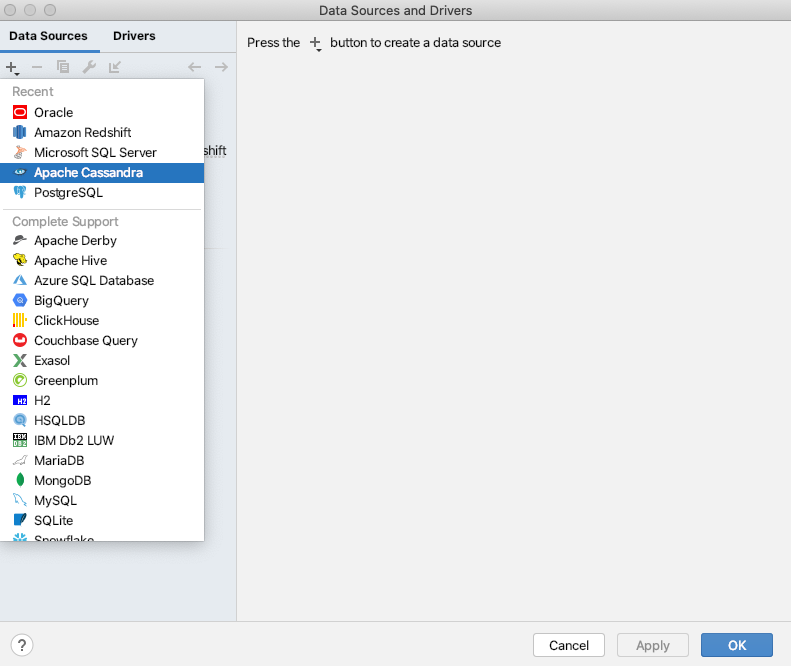
- On the Data Sources tab, choose the Add icon (+).
- Choose Apache Cassandra.
Currently, Amazon Keyspaces isn’t listed as one of the databases, but because it’s compatible with Apache Cassandra, you can use the existing module to connect and interact with Amazon Keyspaces.
- Choose Download missing driver files.
The IDE downloads the drivers required to interact with Amazon Keyspaces.
- On the General tab, for Host, enter an Amazon Keyspaces service endpoint.
Typically with Apache Cassandra, you connect to the IP address of a seed node, but with Amazon Keyspaces, you have to specify one of the Amazon Keyspaces service endpoints for your AWS Region as the host name.
- For Port, enter
9142.
Amazon Keyspaces only accepts secure connections using Transport Layer Security (TLS). Encryption in transit provides an additional layer of data protection by encrypting your data as it travels to and from Amazon Keyspaces. Organizational policies, industry and government regulations, or compliance requirements often require the use of encryption in transit to increase the data security of your applications when they transmit data over the network.
- For User, enter the value for
ServiceUserName. - For Password, enter the value for
ServiceUserPassword.
The JDBC URL is generated automatically after you provide the host, user, and password information.
- Leave Keyspace

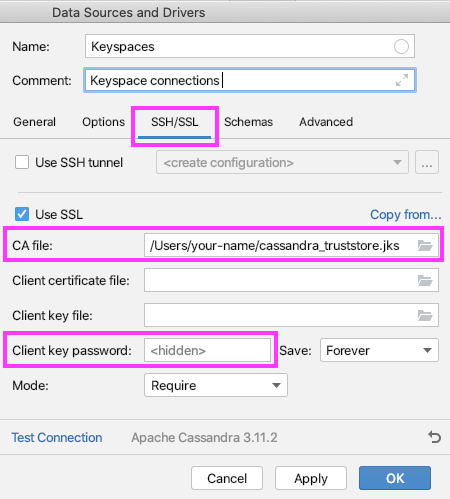
On the SSH/SSL tab, you configure SSL by downloading the certificate, generating the truststore, and populating necessary fields on the IDE console. Amazon Keyspaces requires the use of TLS to help secure connections with clients.
- Select Use SSL.
This opens up the rest of the fields.
- Download the following Amazon digital certificate directly or by entering the following code:
- Convert your Amazon digital certificate to a truststore file:
In this step, you need to create a password for the keystore and trust this certificate. For more information and an example, see Using a Cassandra Java Client Driver to Access Amazon Keyspaces Programmatically
- After you generate the
cassandra_truststore.jksfile, populate the CA file field with the file location and password from the previous step.
On the Advanced tab, we have to specify additional connection properties, such as consistencyLevel and sslenabled.
Amazon Keyspaces only supports LOCAL_QUORUM for write operations. Amazon Keyspaces replicates all write operations three times across multiple Availability Zones for durability and high availability. Writes are durably stored before they’re acknowledged using the LOCAL_QUORUM consistency level. For more information about Amazon Keyspaces consistency levels, see Supported Apache Cassandra Consistency Levels in Amazon Keyspaces.
- Change
sslenabledto true. - Change
consistencyLevelto LOCAL_QUORUM.

Validate the connection
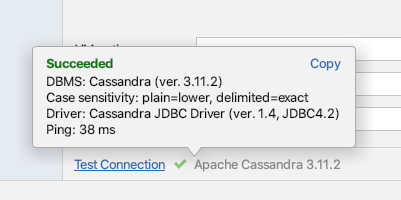
To validate that your connection is working, choose Test Connection. If you specified everything correctly, you see a pop-up similar to the following screenshot.
Run queries
We have established a connection to the Amazon Keyspaces service. Now we run a few sample queries using CQL (Cassandra Query Language).
- On the View menu, choose Tool Windows and Database.
- Choose a data source (right-click) and choose New, then Query Console.
For more information about working with the console, see Working with console files.
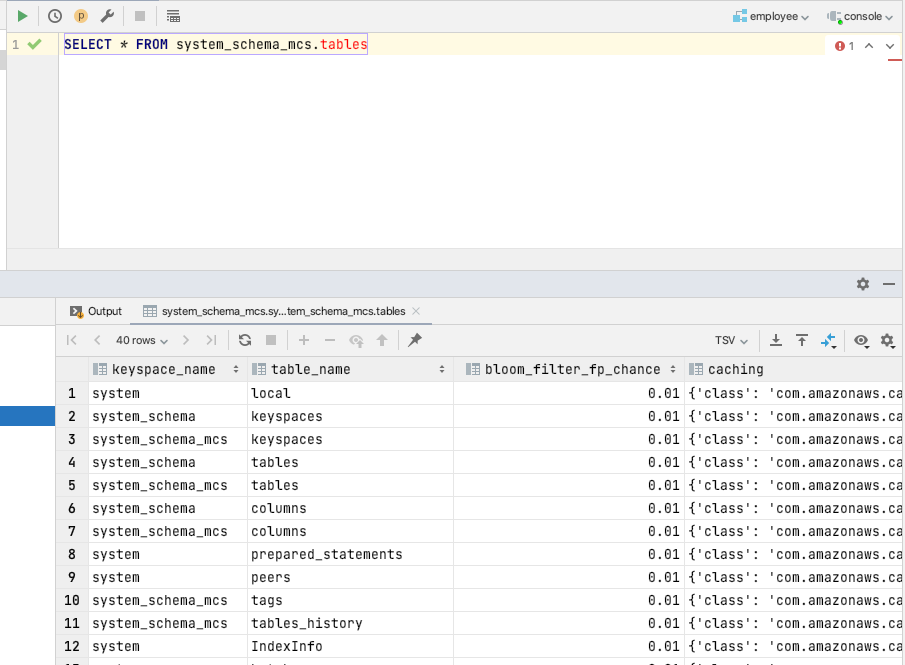
- Enter the following query:
This CQL statement lists all the tables in your account, including internal system tables created by Amazon Keyspaces.
- Choose the Run icon on the toolbar.
You should see a list of system tables (see the following screenshot), even if no tables have been previously created.
Next, you create and populate a new keyspace and a table using the IDE.
- Choose the database connection (right-click) and choose +New, then Keyspaces.
- For Name, enter the name of your keyspace (for example,
employee_ks). - Choose OK.
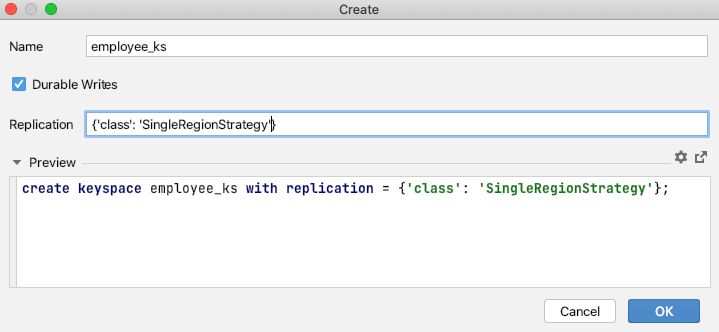
The IDE by default shows the SimpleSrategy strategy and a replication factor of 1.
Amazon Keyspaces ignores replication strategy settings and replaces it with SingleRegionStrategy. SingleRegionStrategy replicates data across three Availability Zones in its AWS Region for high availability. You don’t need to manage replication factors. The per-GB price of Amazon Keyspaces storage already includes replication. See Creating a Keyspace and Amazon Keyspaces (for Apache Cassandra) Pricing for more information.
Now you have a new keyspace and can create a table and populate it with data.
- Enter the following CQL statements into the IDE to create a new table
employee_by_id_divisionin theemployee_kskeyspace:
Amazon Keyspaces created the table and keyspaces asynchronously. To learn how to monitor the creation status of resources, see Creating Keyspaces in Amazon Keyspaces and Creating Tables in Amazon Keyspaces.
In addition to creating a table, you can define AWS tags and specify Amazon Keyspaces-specific options, such as capacity_mode, point_in_time_recovery, or encryption using CUSTOM_PROPERTIES.
The following screenshot shows our CQL statement in the IDE.

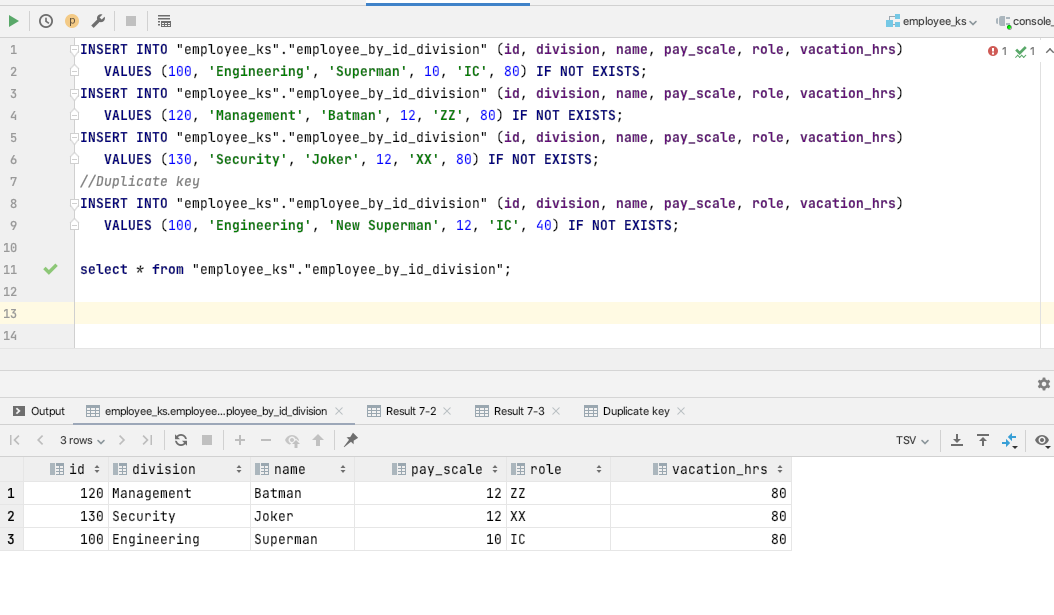
- Populate the new table and insert four new records using CQL insert statements:
In the preceding example code, I used lightweight transactions (LWTs) to check if a row existed before inserting data. With Amazon Keyspaces, we use LWTs to perform conditional write operations, such as IF NOT EXISTS. As a serverless offering, Amazon Keyspaces provides consistent performance at any scale, including for lightweight transactions. With Amazon Keyspaces, LWT operations have similar performance as non-LWT operations.
The following screenshot shows the results of an INSERT statement in the IDE.
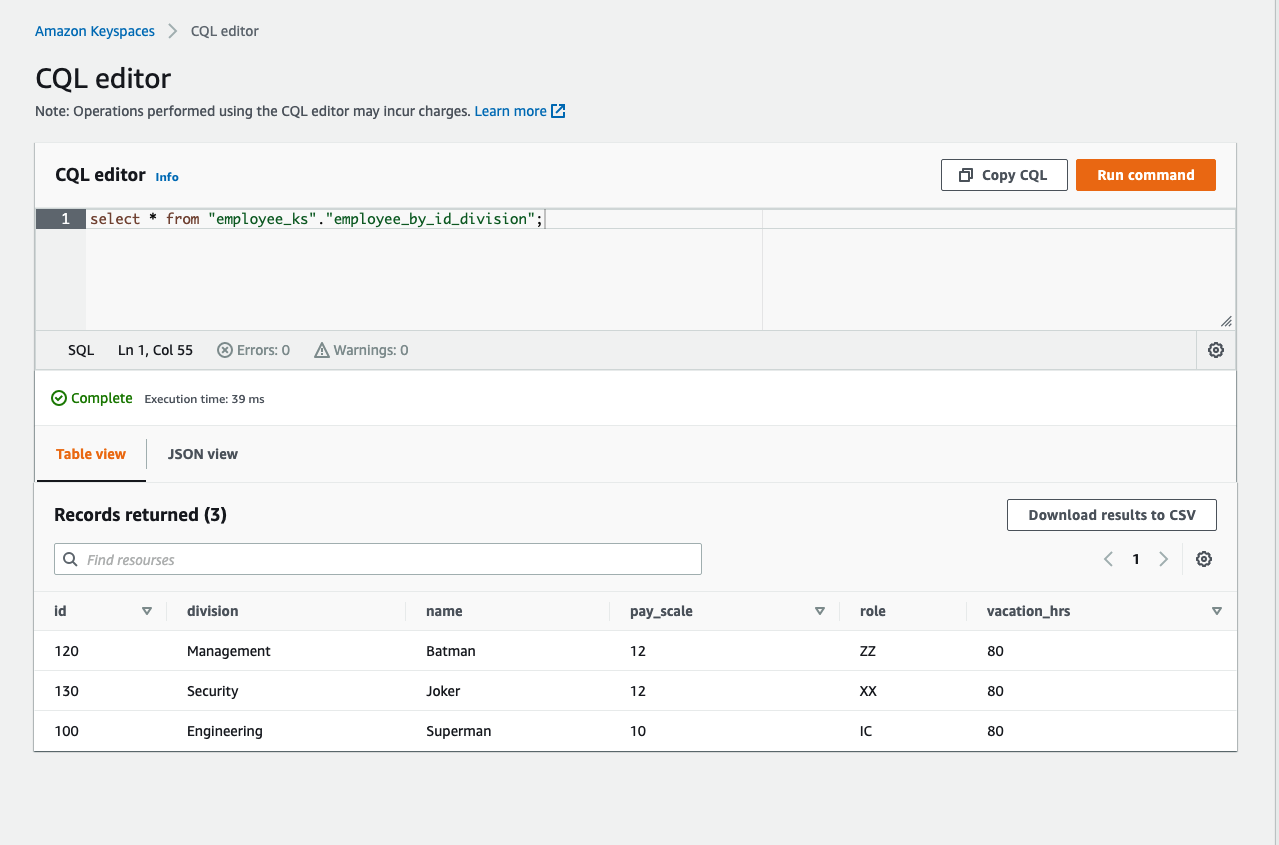
We can also validate the results by running the same CQL statement from the Amazon Keyspaces console, as illustrated by the following screenshot.
Clean up
To clean up the resources created during this tutorial and avoid incurring unnecessary charges, you can use the drop keyspace command. This deletes the keyspace and all underlying tables in that keyspace:
For more information about deleting Amazon Keyspaces resources, see Delete a Table and Keyspace in Amazon Keyspaces.
Conclusion
In this post, I provided step-by-step instructions to connect to Amazon Keyspaces from your local machine. If you’re developing applications using IntelliJ, PyCharm, DataGrip, or other JetBrains tools, this post showed you how to run database queries without leaving your IDE and connecting to the Amazon Keyspaces console.
You can use the IDE to view and change data structures in your databases, run DDL and DML queries, and view your data.
In addition, if you’re using purpose-built databases, the JetBrains IDE allows you to access multiple databases without the need to download a separate editor for each database.
To learn more about Amazon Keyspaces, see the following resources:
-
- Amazon Keyspaces blog posts
- CQL Language Reference for Amazon Keyspaces (for Apache Cassandra)
- How to set up command-line access to Amazon Keyspaces (for Apache Cassandra) by using the new developer toolkit Docker image
- Amazon Keyspaces (for Apache Cassandra) developer toolkit
- Identity and Access Management for Amazon Keyspaces (for Apache Cassandra)
- Databases on AWS
- JetBrains tools
- SQL Workbench/J blog posts
About the Author
 Vadim Lyakhovich is a Senior Solutions Architect at Amazon Web Services in San Francisco Bay Area helping customer to migrate to AWS. He is working with organizations ranging from large enterprises to small startups to support their innovations. He is helping customers to architect scalable, secure, and cost-effective solutions on AWS.