AWS Database Blog
How realtor.com maximized data upload from Amazon S3 into Amazon DynamoDB
This is a customer post by Arup Ray, VP Data Technology at realtor.com, and Daniel Whitehead, AWS Solutions Architect. Arup Ray would like to acknowledge Anil Pillai, Software Development Engineer at Amazon, for his pioneering contributions to this project during his former tenure at realtor.com as Senior Principal Data Engineer.
realtor.com , operated by Move, Inc., is in their own words, “a trusted resource for home buyers, sellers, and dreamers. It offers a robust database of for-sale properties across the U.S. and the information, tools, and professional expertise to help people move confidently through every step of their home journey.”
At realtor.com, data and analytics are an important part of making the process of buying a home easier and more rewarding. As our customers search for properties, we identify the attributes of most interest to our customers and use that data to generate more tailored recommendations for similar houses within the area, to help our customers find their ideal new home.
Personalized home suggestions are of critical importance to finding a customer’s dream home. This is why realtor.com utilizes Amazon DynamoDB, a NoSQL database that allows for a flexible schema to house the customer analytics data sets, the basis for realtor.com’s recommendation engine. These data sets are created and updated by aggregating data from multiple upstream services, which are ingested into realtor.com’s analytics engine.
There are tens of millions of nightly updates, which would take multiple hours to process if realtor.com uploaded each item serially to DynamoDB using the PutItem API. Instead, realtor.com created a system that segments the data set and takes advantage of the BatchWrite API, which allows us to concurrently upload 10-MB files across 25 concurrent data streams, accelerating realtor.com’s data ingestion from hours to minutes.
This post shows how realtor.com uploaded hundreds of GB data sets in parallel from Amazon S3 into DynamoDB using Amazon Athena and AWS Glue. This system increased the speed-to-market for realtor.com’s recommendation and personalization services API from hours to minutes.
Solution overview
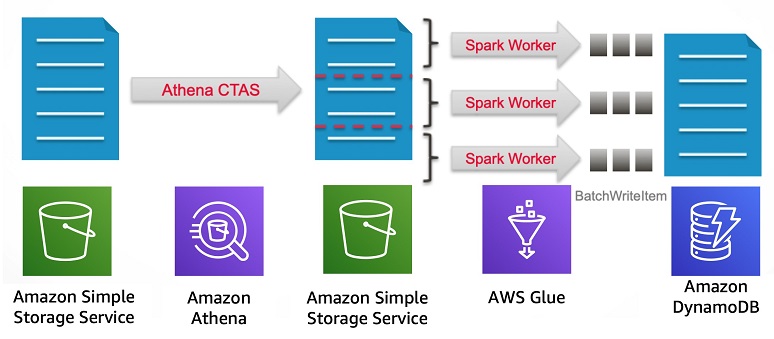
At a high level, the solution includes the following steps:
- Data is gathered from upstream sources that produces a file. This file contains millions of records and is then stored on S3 via the output of a batch job every night.
- When the file lands in an S3 bucket, an Athena query is triggered by the object landing in the bucket to partition the large file into 25 smaller chunks with each line having 16 MB of data utilizing Athena’s Create Table As Function.
- Once the Athena queries are finished running, an AWS Glue job is initiated with multiple spark workers that uploads the data in parallel into DynamoDB.
- Once the process is complete, the files in the staging bucket are deleted.
The following diagram illustrates this workflow:
This solution uses AWS CLI, S3, Athena, AWS Glue, and DynamoDB. There is a cost associated with building out this pipeline.
Preparing the data store
The first step is to create the DynamoDB table to be the target destination for your data. Complete the following steps:
- From the DynamoDB console, choose Create Table.
- For Table name, enter
target_table. - For Primary key, enter
pk. - Select Use default settings and select Create Table.
The following screenshot demonstrates steps 1–4.

- Choose Create table.
- Choose the table you created as seen in the screenshot below.

- Choose Capacity.
- Under Write capacity, for Minimum provisioned capacity, enter
5000as shown in the screenshot below.

- Choose Save.
This post uses DynamoDB’s automatic scaling feature to scale up the entries into the table. You must initially set this at 5000 minimum to provide ample throughput for the BatchWrite operations and mimic the writes that occur on the table as part of daily operation. This allows your table to scale to a maximum throughput that increases the amount of writes until all the items are in the DynamoDB table.
Creating the data set
To simulate the pipeline, this post uses a subset of the New York City Taxi and Limousine Commission (TLC) Trip Record Data. You need an S3 bucket in the same Region as your DynamoDB table. For more information, see Create a Bucket.
The first step is to copy a file of the data set to your bucket. You must set up permissions and access controls that allow you to upload a file to your bucket. After you have a secret key and access key configured into your CLI, complete the following steps:
- Enter the following command into your terminal configured with the AWS Command Line Interface:
- After the data is in S3, open the Athena console.
- Choose Create a table.
- Choose From S3 bucket data.
- For Database, enter
input_db. - For Table Name, enter
input_raw. - For Location of Input Data Set, enter the location of your S3 bucket where you copied your data.
The following screenshot demonstrates steps 5–7.

- Choose Next.
- On the data format screen, select Text File with Custom Delimiters as shown in the screenshot below.

- Choose Next.
- On the Columns screen, for Column Name, enter
s3_dataas shown below.

- Choose Next.
- Keep the defaults for your partition and choose Create Table.
The query editor is updated with a query that looks similar to the following code:
- Choose Run Query.
The resulting table pulls in two values for theVendor Nameand thePickup Dateover the 14 million rows in the data set. The raw data for this pipeline has now been created and the next step is to prepare this data to upload into DynamoDB.
Because this data set doesn’t have a unique identifier, you must create a unique partition key from the data. To create the primary key, take your raw data from Athena and make an md5 hash and covert that into hex to grant a unique identifier for your rows. You can make sure that you don’t have any duplicates within your data by using the distinct operator. You do not need to apply this process to your data set if you have clean data with unique records (it is also not part of the realtor.com pipeline).
- On the Athena console, navigate to the query editor and enter the following code:
This creates a new table with the prepared data.
The next step is to shard the data using
ntile, which is a window function to distribute rows of an ordered partition into equal groups. This splits a data set into smaller chunks and maximizes your ability to upload into DynamoDB.
- Enter the following code:
The last step for preparing the data is to run a query that joins the data from the two previous tables you created and creates the final data set that is pushed to DynamoDB.
Running the process
After this query is finished, complete the following steps:
- On the AWS Glue console, under ETL, choose Jobs.
- Choose Add Job.
- In the AWS Glue Job configuration screen, name your job S3toDynamoDB.
- Choose Create IAM role.
- Choose Roles.
- Choose Create a Role.
- On the Create role screen, select Glue.
- Choose Next: Permissions.
- Choose Create a policy. A new window opens.
- Choose JSON.
- Enter the following policy (make sure you enter in your AWS account number):
- Choose Next: Tags.
- Choose Next: Review.
- Name your policy
AWSGlueServicePolicy. - Choose Create.
- In the Role window, find your newly created policy.
- Choose Next: Tags.
- Choose Next: Review.
- Name your role
AWSGlueServiceRole. - Find this new role in the dropdown for your AWS Glue job.
- For Type, choose Spark.
- For Glue version, select Spark 2.2 Python 2.
- For This job runs, select A new script to be authored by you.

- Under Security configuration, script libraries, and job parameters, for Maximum capacity, enter 30.
- Leave everything else as default.

- Choose Next.
- On the next screen, choose Save job and edit script.
- On the next screen, enter the following code (make sure to change <AWS Region> to the region you are operating in):
- Choose Save.
In this script, you are reading the prepared data that you previously created with Athena. The chunks that were created are loaded into DynamoDB using the parallel processing capability of AWS Glue Spark workers in addition to the DynamoDBBatchWriteItemAPI. - Choose Run job.
The AWS Glue job takes some time to provision but after it is running, you can see the logs from the AWS Glue cluster.
Throughput should be maximized and scale up dynamically as time goes on until the AWS Glue job has finished. The metrics in the DynamoDB Metrics tab should look similar to the following screenshot.
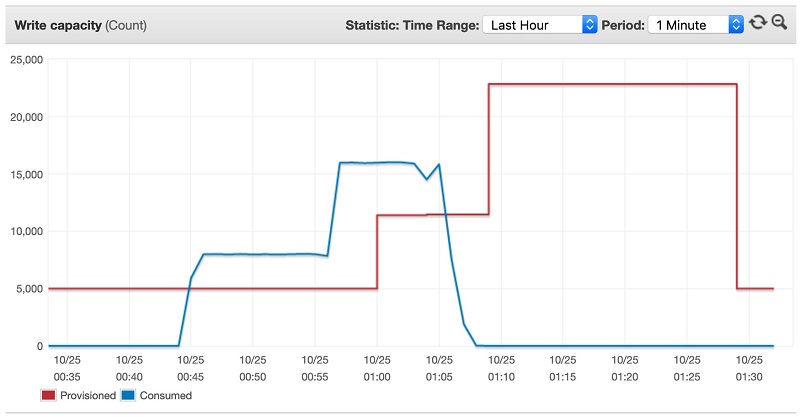
DynamoDB’s autoscaling feature began scaling based upon the number of writes the AWS Glue job was uploading into the DynamoDB table. At certain thresholds, the table increased the amount of write capacity to accommodate for the target of 70% utilization on the table. AWS Glue had multiple concurrent writers that used the retry logic of the BatchWrite call within the AWS SDK, which made it so that even if there were a throttled request, it would eventually get written to the DynamoDB table by successful completion of the job. The preceding screenshot shows that you uploaded 14 million items into DynamoDB in less than half an hour.
In realtor.com’s case, this is a batch job that runs at one time during the day. With AWS Glue and DynamoDB, realtor.com has a system that scales up dynamically with the amount of data that must be written to DynamoDB and scales down after the completion of the job without having to manage infrastructure.
Conclusion
This post demonstrated how to do the following:
- Set up a DynamoDB table to land your data into.
- Run multiple queries using Athena to prepare ingested raw data into a format that AWS Glue can parallelize.
- Set up an AWS Glue job that you can invoke on demand, either triggered by an event or on a schedule to parallelly upload into DynamoDB.
realtor.com built out the Athena and AWS Glue to DynamoDB pipeline to lower overall management while allowing the system to scale dynamically. This decreases the amount of time it takes to update realtor.com’s analytic profiles, which further help users find the house of their dreams.
About the Author

Arup Ray is the VP of Engineering at realtor.com and heads the Data Technology team. The data team at realtor.com has been using AWS technologies to make data actionable for home buyers and real estate professionals.

Daniel Whitehead is a Solutions Architect with Amazon Web Services.