AWS Database Blog
Import and export CloudFormation templates and CSV sample data with NoSQL Workbench for Amazon DynamoDB
NoSQL Workbench for DynamoDB is a client-side application with a point-and-click interface that helps you design, visualize, and query non-relational data models for Amazon DynamoDB. NoSQL Workbench clients are available for Windows, macOS, and Linux.
Over time, NoSQL Workbench has added many features, such as the ability to use it with Amazon Keyspaces for (Apache Cassandra). Many NoSQL patterns apply to multiple database technologies that share the same principles. For example, both DynamoDB and Cassandra take inspiration from the original Amazon’s Dynamo paper. Also, you can now use PartiQL for Amazon DynamoDB with the operation builder in NoSQL Workbench. With PartiQL, you can use DynamoDB with a familiar SQL syntax.
In this post, I demonstrate using the recently added NoSQL Workbench support for AWS CloudFormation and comma-separated values (CSV) files. Now, you can:
- Export your data model as a CloudFormation template to manage your database tables as code.
- Import CloudFormation templates into your data model to start working from an existing implementation.
- Import and export sample data into your model using CSV files to help visualize and understand how your data model would work.
Let’s see how you can use these new features in practice.
Export a data model as a CloudFormation template
On my laptop, I start NoSQL Workbench and select DynamoDB in the database catalog. In the welcome screen, I look for the sample data models that are included with the download and choose to import the Bookmark Data Model. This is the model I created for my previous post on NoSQL Workbench and it uses a single table to store customer information and web bookmarks.
Note: You can find instructions on how to download and install NoSQL Workbench in the documentation.
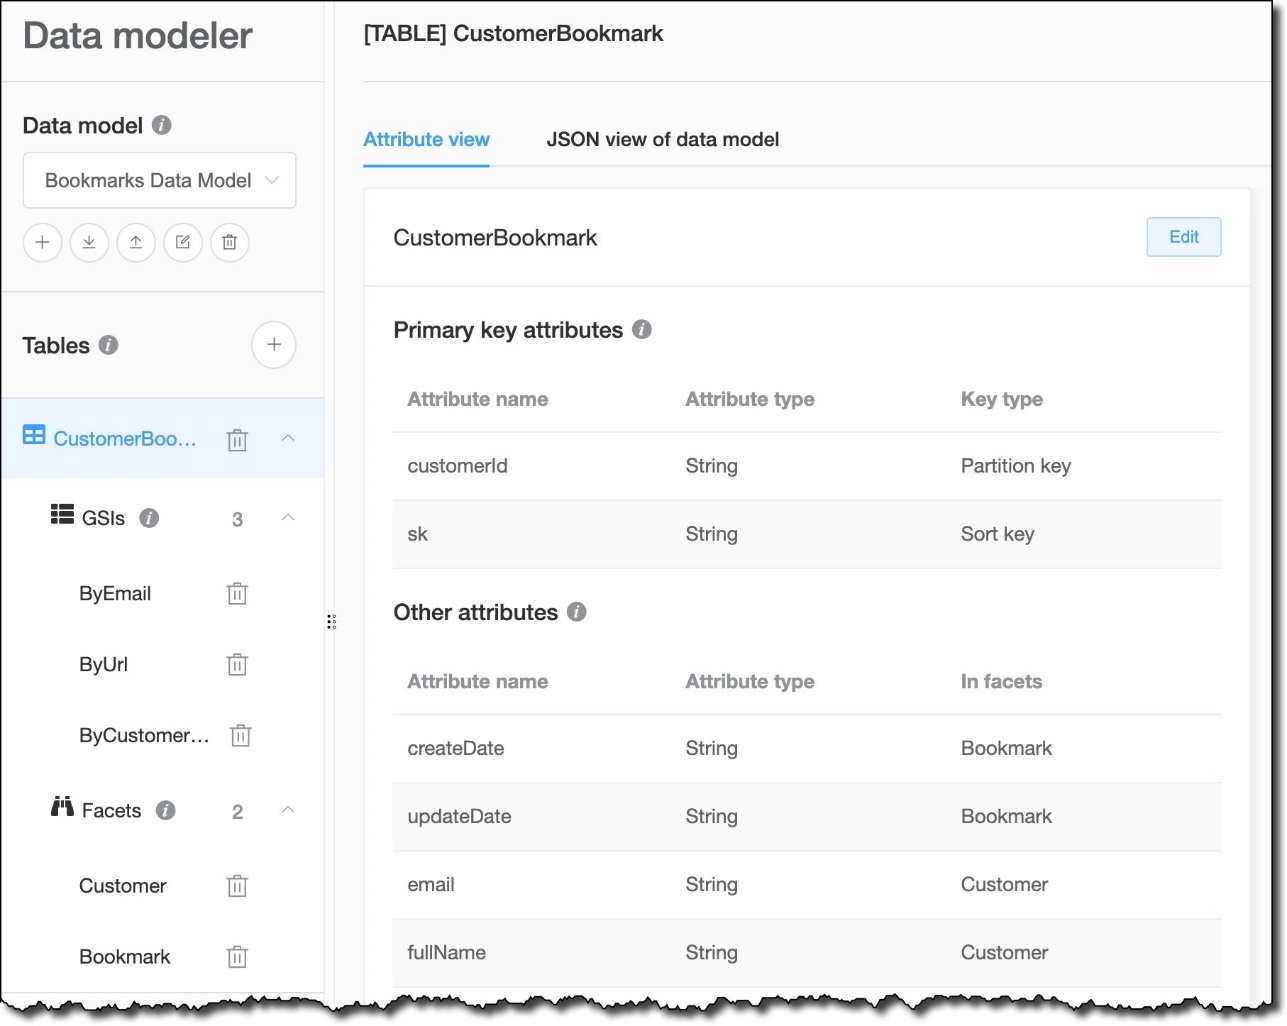
Figure 1: Bookmark Data Model included with NoSQL Workbench
The table shown in the preceding figure, Figure 1, has three global secondary indexes that can be used to access data using different keys:
- Customer email
- Bookmark URL
- Customer ID
The data model also includes two facets. Facets are specific to NoSQL Workbench and help describe access patterns that an application can use to interact with the table. This is especially useful when using overloaded attributes, like the sk range key in the CustomerBookmark table, which can be used to store different information. In this case, there are two facets:
- The Customer facet, which shows how to access customer information stored in the
CustomerBookmarktable. - The Bookmark facet, which describes how to access bookmark data stored in the
CustomerBookmarktable.
Now, I want to deploy this data model in production. I can connect an Amazon Web Services (AWS) account and select an AWS Region to create all the tables and the resources used by this data model, but I prefer to use this functionality only for development. In production, I prefer to manage my infrastructure as code and use CloudFormation templates for the deployment. Previously, I’d have to create that template myself, using the data model as reference. Now, I can export the data model as a CloudFormation template and use it as part of my continuous integration and continuous delivery (CI/CD) process.
Before exporting the model, I want to be sure everything is configured as I prefer. For example, I can now configure read/write capacity settings for my tables and indexes directly from NoSQL Workbench. In the Data modeler, I select the CustomerBookmark table and choose Edit. At the bottom, I see that the capacity settings for the table are using the default settings for NoSQL Workbench, which are to use provisioned capacity with auto scaling enabled on reads and writes. I prefer to use on-demand capacity, which is more flexible for my use case. I clear Default settings, select On-demand for the Capacity mode, and save my edits.
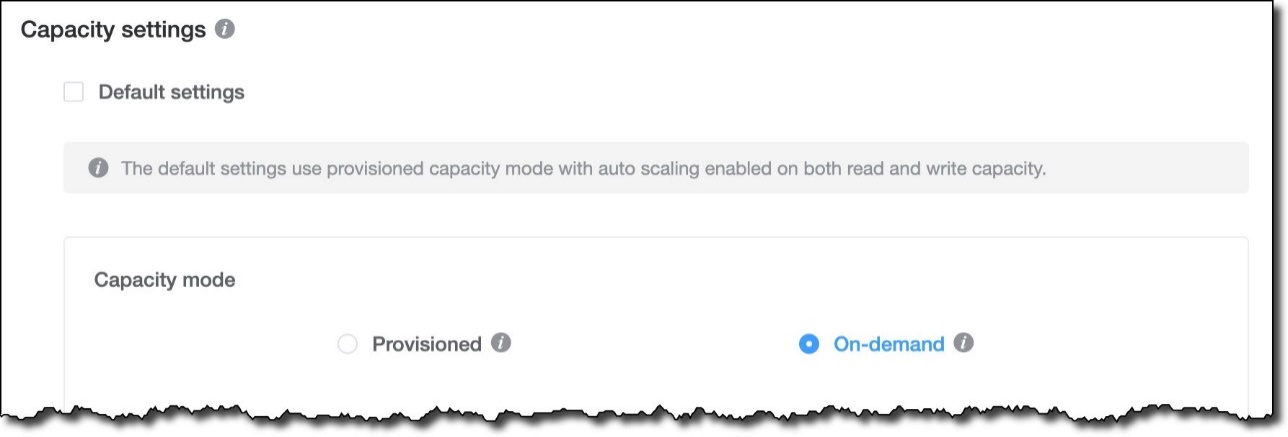
Figure 2: Setting on-demand capacity for the DynamoDB table
Now I’m ready to export the data model. I choose the export icon, select Export CloudFormation JSON, and enter my-template.json as filename.

Figure 3: Exporting a data model as a CloudFormation template
I prefer to have my CloudFormation templates in YAML, so I use a tool like yq to convert the template from JSON to YAML:
Let’s have a look at the YAML template:
I see that it’s doing what I expect, so I jump to the AWS Management Console for CloudFormation and create a new stack using this template. When the stack creation is complete, I look in the Resources tab to see what’s been created.

Figure 4: Resources created by the CloudFormation template
I select the CustomerBookmark link to go to the DynamoDB console and get more details. There, I see that the table structure is as expected.

Figure 5: Details on the DynamoDB table created by CloudFormation
Also, the three indexes needed for my application access patterns have been created.

Figure 6: Indexes created by the CloudFormation template
Import CloudFormation templates into your data model
Before I continue development, I want to add another table to my data model to store payments that my customers are making through the application. I remember that I used a similar table in another application and look for its CloudFormation template. I remove all the other resources from the template and keep only the Payments table:
NoSQL Workbench requires JSON syntax, so I convert the template from YAML to JSON:
Now, I choose the import icon, and select Import CloudFormation template JSON into current model to import the converted template into NoSQL Workbench. I can create a new data model or add the content of the template to the current model. I choose the latter and select the payments-template.json file.
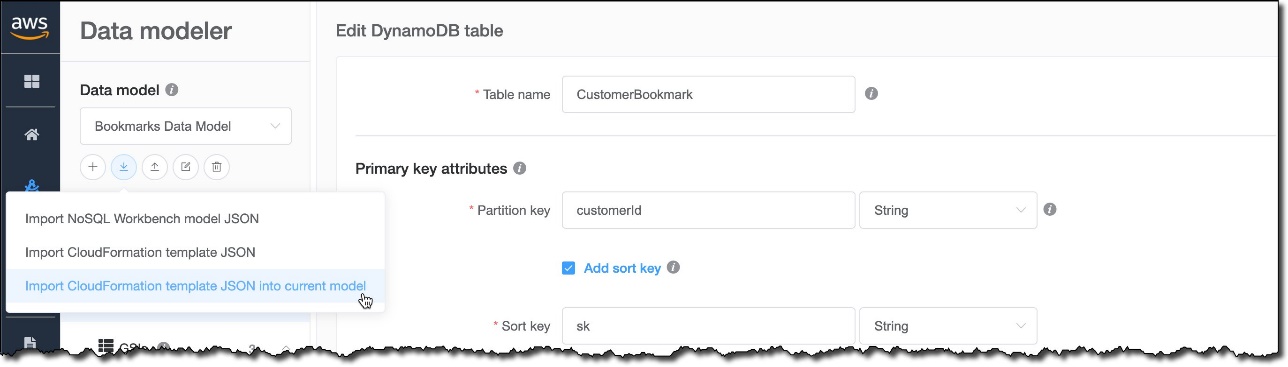
Figure 7: Importing a CloudFormation template into a data model
Now, my data model includes the Payments table and its two global secondary indexes.

Figure 8: Indexes imported into the data model
Import and export sample data using CSV files
To better visualize how the Payments table is going to be used, I load some sample data from a CSV file. I can also insert the data straight from the NoSQL Workbench interface, but I prefer to use a file so that I can share it with other developers and use it for testing.
Note: You can use a tool like Faker to generate test data using Python (similar libraries are available for many programming languages).
The first line of the CSV file contains the attribute names. The order of the attributes can be different from what I used when creating the table, but it must be the same as the order used for the data. Here’s the sample data I use for the Payments table:
In the Visualizer, I choose Update near the name of the table.

Figure 9: Updating a table in the data model
No sample data is present now. Instead of adding data manually, I choose Import CSV file at the top.

Figure 10: Adding sample data to a data model
I select the CSV file and confirm. I review the data, remove the empty item at the bottom, and then choose Save.

Figure 11: Storing sample data into NoSQL Workbench
Now, I can use the data to visualize my data model. For example, I can select the Payments table to see how data is stored in DynamoDB and how the partition and sort keys are used.

Figure 12: Visualizing a data model using sample data
In a similar way, I can select each of the indexes to see how data is used by them. For example, this is the view for the index giving access to the data by paymentId.
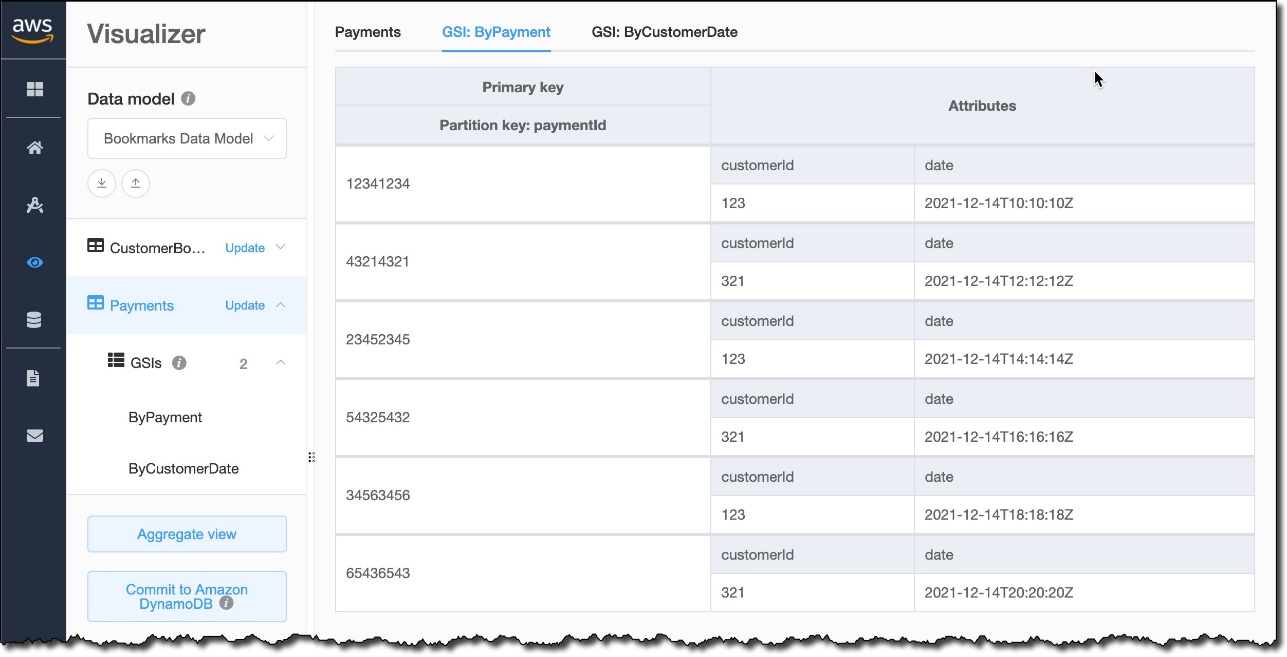
Figure 13: Using sample data to visualize how the first index works
This is the other index giving access to the data by customerID and date.

Figure 14: Using sample data to visualize how the second index works
In the Operation builder, I can also export the content of a table or the results of a query to a CSV file using the new Export to CSV option. This can be useful to share sample data with other developers working on the project or for testing.
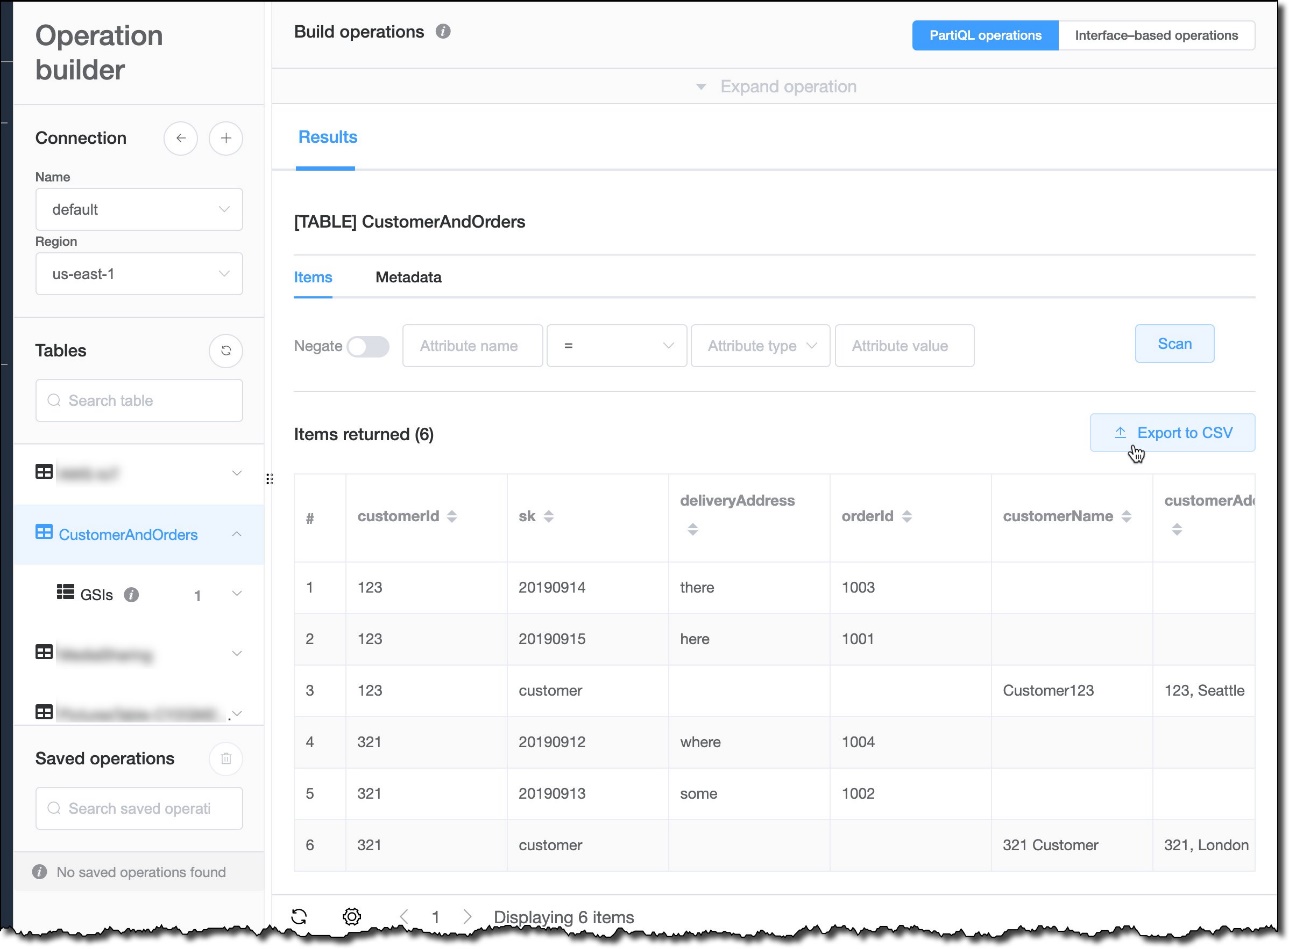
Figure 15: Exporting sample data into a CSV file
I can now use all the features of NoSQL Workbench, including the Visualizer and the Operation builder, to further enhance my data model and build my operations. For example, I find it useful that I can type SQL statements or select DynamoDB operations to quickly generate Python, JavaScript (Node.js), and Java code for my applications.

Figure 16: Generating the code for database operations
Clean up
To clean up the resources created in this post, I go back to the CloudFormation console to select and delete the stack I created.
Conclusion
The NoSQL Workbench team has continued to invest in enriching the data modeling, visualization, and query capabilities of the tool, and there is lot of new functionality to come. To get started, download NoSQL Workbench. Then, you can create your first data model from one of the provided samples, or import your own model using a CloudFormation template.
If there is anything else that you would like to see in NoSQL Workbench to help you be more productive with Amazon DynamoDB, use the Email us button in NoSQL Workbench. For more updates, you can follow DynamoDB on Twitter.
About the Author
 Danilo Poccia works with startups and companies of any size to support their innovation. In his role as Chief Evangelist (EMEA) at Amazon Web Services, he leverages his experience to help people bring their ideas to life, focusing on serverless architectures and event-driven programming, and on the technical and business impact of machine learning and edge computing. He is the author of AWS Lambda in Action from Manning.