AWS Database Blog
Develop a Full Stack Serverless NFT Application with Amazon Managed Blockchain – Part 1
The advent of blockchain technology, a decentralized ledger on which digital assets can be created and exchanged peer to peer, has shifted the conventional understanding of ownership. Often, these digital assets are referred to as tokens, which you can use as a medium of exchange like a currency, a representation of a physical or digital item, or even an identity attribute like a driver’s license.
Ethereum, the second-largest blockchain by market capital and the first blockchain to launch smart contracts, is a blockchain network that offers a flexible platform on which to build decentralized applications using the native Solidity scripting language and Ethereum Virtual Machine. These decentralized applications are composed of smart contracts, or programmable logic that allows transactions of tokens such as issuing new tokens, transferring tokens between accounts based on different conditions, or exchanging tokens. The programmability enabled by smart contracts lets developers create many forms of digital assets or tokens, such as USDC, a popular fungible cryptocurrency pegged to the value of the US dollar. Recently, a renaissance of digital art, collectibles, and digital assets like certificates of valuation or authority has emerged from the adoption of another form of token: non-fungible tokens (NFTs).
This is the first of a two-part series, in which we discuss how to set up a development environment with Amazon Managed Blockchain for a full-stack NFT application as well as introduce different libraries and concepts that can help you develop and test of your NFT application. The second part of the post walks you through a sample full stack NFT application that enforces some of the concepts discussed in this post.
Solution overview
Like other tokens, NFTs are issued and managed using smart contracts. One of the common standards in the Ethereum ecosystem is the ERC-721 token standard. The ERC-721 token standard maps a unique identifier (the token) to a user’s public address (derived from their public key), and establishes a mapping of that token to a storage location where the underlying media or metadata for that NFT is stored. For example, many NFTs point to media assets like images stored in the decentralized file storage network Interplanetary File System (IPFS). Amazon Simple Storage Service (Amazon S3) can be another option to store the NFT metadata. For a more in-depth explanation of NFTs, visit Non-Fungible Tokens (NFTs) Explained.
We start by presenting a reference architecture of a full stack NFT application. The following architecture shows how you can deploy a fully tested NFT application on AWS infrastructure for a production environment.
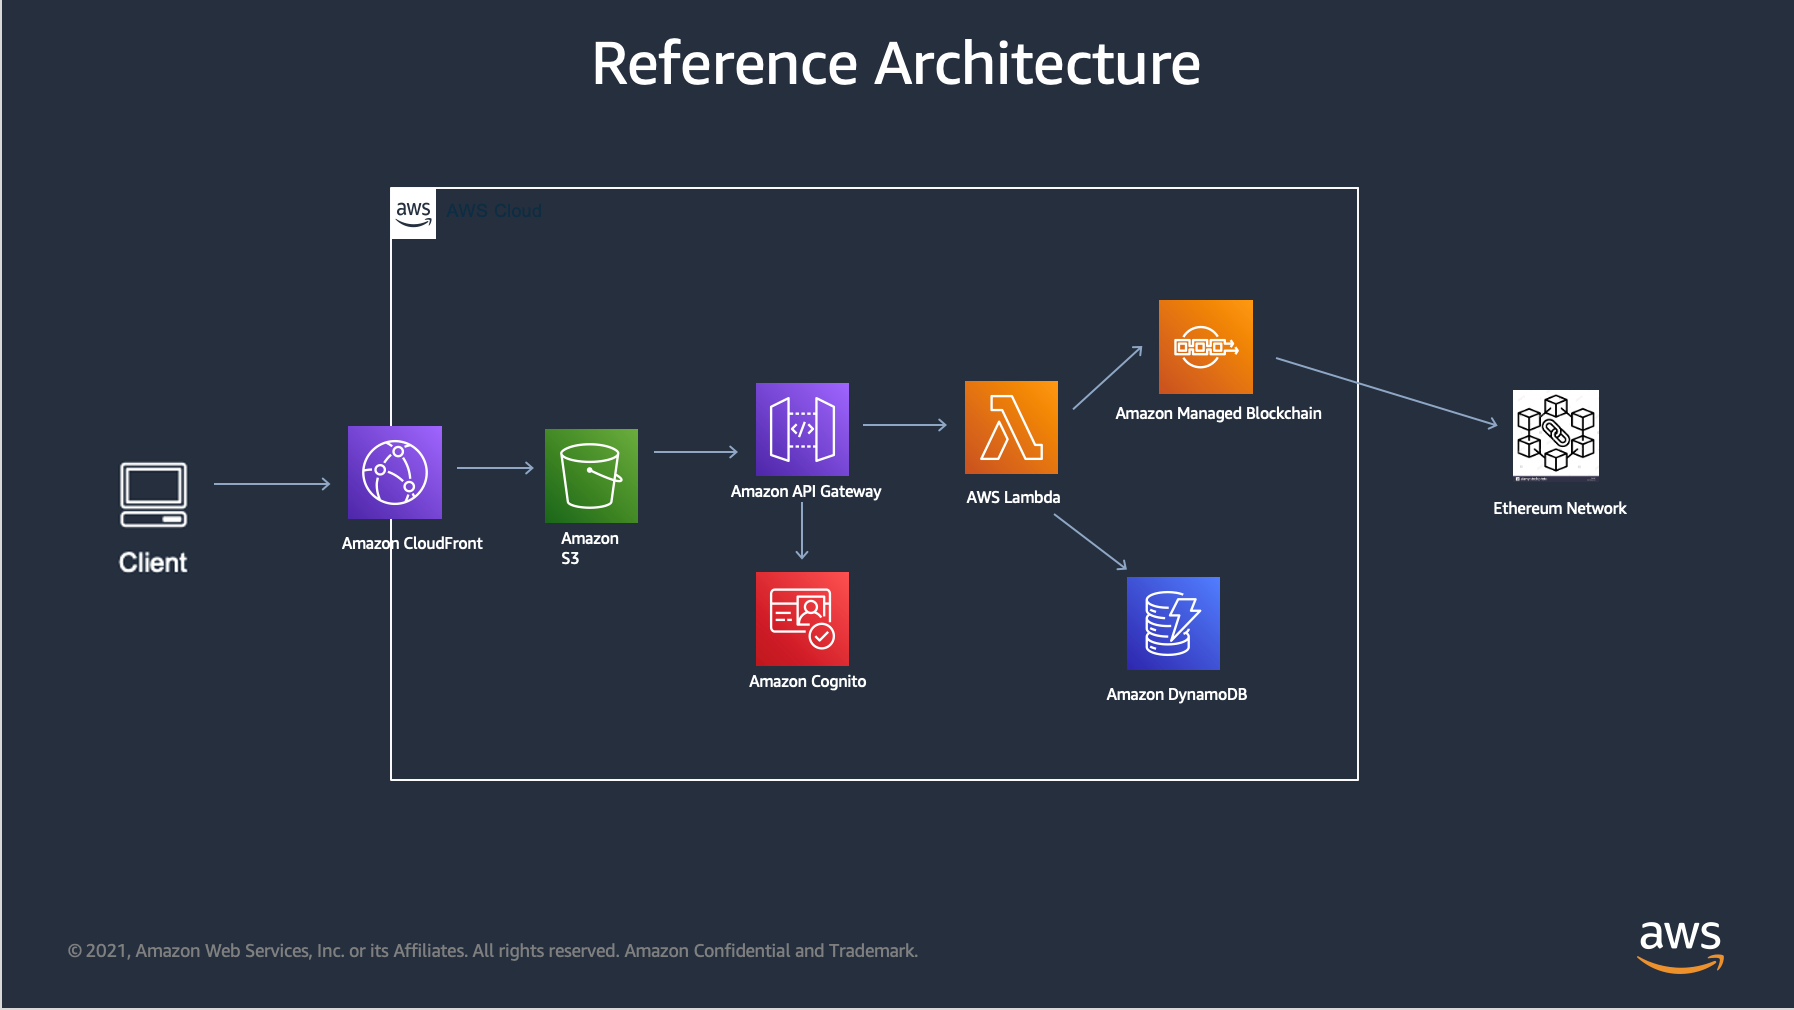
The NFT full stack application consists of three tiers. The first tier is a presentation tier that you can deploy to Amazon S3 and access via Amazon CloudFront. The middle tier is responsible for implementing the business logic as well as connecting the front-end client application to the blockchain network. In the reference architecture, the middle tier uses Amazon API Gateway, Amazon Cognito, and AWS Lambda to provide a highly secure and scalable solution. You can integrate this solution with other purpose-built databases to store data outside of the blockchain network. The Lambda function in this tier works with Managed Blockchain to provide seamless access to the Ethereum network for sending and monitoring transactions. Finally, the third tier is the smart contract that will implement NFT specification.
Prerequisites
Make sure the following prerequisites exist in your development environment:
- An AWS account
- Configured AWS credentials
- js (the code in this post was testing for node version 14.16.0)
- Git client (you need to download sample code from the AWS samples repository)
Although Visual Studio Code or a similar IDE isn’t required, it’s highly recommended because it makes development tasks much easier. You can set up your development environment on a local machine or a remote machine, such as an Amazon Elastic Compute Cloud (Amazon EC2) instance. For this post, we use an EC2 instance as a development machine and connect to it via the Remote Development extension for Visual Studio Code.
Setting up Development Environment
To set up the development environment, complete the following steps:
- Install
ganache-cliandtruffleas global npm packages:
Running ganache-cli creates a local Ethereum network that listens on port 8545. The default parameters of the CLI creates 10 accounts in an HD wallet and gives 100 Ethers to each account that can be used for development and testing purposes. You can specify different optional parameters while running the CLI command to change these default configurations. Check out the ganache-cli GitHub repo for these optional parameters.
You can connect Metamask to the development Ethereum network listening on port 8545. After you’re connected to theS development network, you can import the test accounts created by ganache-cli. When test accounts are imported to Metamask, you can look at the available Ether in these accounts as well as send Ethers from these accounts to other accounts and smart contracts. If you’re using a remote development environment with the VS code Remote Development extension, make sure port 8545 is forwarded to your laptop, otherwise Metamask can’t connect to the Ganache network. For detailed instructions on how to forward a port, see Remote development over SSH.
- Bring the Ganache network up by opening a terminal window and entering the following code:
The ganache-cli displays a list of the test account’s public and private keys.
- Make a note of the private keys of these accounts so you can import them into Metamask.
When the Ethereum development network is running, we create three node projects to implement the three tiers of our full-stack application.
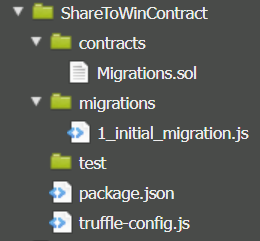
We first create a node project for our smart contract called ShareToWinContract. This holds our smart contract files but also contains any third-party APIs that we use to implement the smart contracts.
- Run the following commands to create the node project using all the defaults. After creating a node project, we will use truffle to scaffold all the files for a smart contract project.
After running the truffle init commands, our project structure looks like the following screenshot.
Truffle uses a truffle-config.js file to configure the blockchain network as well as the solidity version that is used to compile the smart contract.
- Because we’re using ganache as a development Ethereum network, the
truffle-config.jsfile needs to have the following settings under the network for the Ganache server:
- Install the OpenZeppelin API:
To create an NFT, our smart contract has to implement ERC-721 specification. OpenZeppelin is an open-source library of smart contracts that implements the core ERC-721 specification. Therefore, by inheriting from a contract in the OpenZeppelin SDK, we can speed up NFT development. To learn more about the OpenZeppelin implementation of ERC-721 specification, visit ERC721. Install the OpenZeppelin library in the contract project via npm.
All the smart contract files are stored in contract folder.
- Create the smart contract file, in the contract folder, for the NFT by inheriting from one of the OpenZeppelin contracts and implementing the application-specific logic in the smart contract:
Truffle looks at the migration folder to determine which smart contract needs to be migrated to the Ethereum network.
- Create the truffle migration JavaScript file in the migration folder. The following code is an example of what this migration file looks like:
For additional details regarding the truffle migration file, visit Running Migrations.
Next, you compile and migrate the contract to the network. Make sure ganache-cli is running and therefore the Ganache network is up.
- In a separate terminal window, run the following commands:
Alternatively, you can start the truffle console by specifying the network and running the compile and migrate commands from within the console. The advantage of running the console is that it allows you to interact with the Ethereum network via web3 JavaScript libraries. To connect to the console, enter the following code (we called the ganache network development in truffle-config.js file):
When truffle migrates your smart contract to the network, it displays the deployed contract address.
- Keep a note of this address to use when you configure your REST API project. If the truffle console is running, you can invoke the functions in the smart contract.
- At this time you can test your deployed contract via the console. First, get an instance of the deployed contract and then call the function through that instance:
- Create a REST API project that implements the middle tier of the reference architecture discussed earlier.
If this project is written in JavaScript, you can use the popular JavaScript library web3js, which is widely used to invoke smart contract methods in Ethereum network. This REST API project must meet the following requirements in order to invoke functions in the smart contract:
- It has the contract address deployed to the Ethereum network
- The Application Binary Interface (ABI) of the smart contract that is deployed
When truffle compiles the smart contract, it stores a JSON file in the build folder that has the name of your smart contract. This file contains the ABI that needs to be copied to the REST API project so it can invoke functions in the smart contract. You can store the contract address as an environmental variable that the project retrieves to communicate with the smart contract. The following is a sample code that shows how to get a handle to the smart contract:
Here jsonInterface is a javascript object that give access to the json containing the contract abi.
- Create a client application that implements a user interface that interacts with the smart contract via the REST API that we developed in the earlier steps.
Conclusion
This concludes part one of this series. In this post, we showed the step-by-step process to create the development environment and different projects files for NFT development. We continue the discussion of developing NFTs in the next part of the post, where we walk you through a sample NFT marketplace application showing how to associate NFTs with physical assets, and buy and sell NFTs through the marketplace application.
About the Authors
 Rafia Tapia is a Blockchain Specialist Solution Architecture. Having more than 25 years of experience in software development and architecture, she has a keen interest in developing design patterns and best practices for smart contracts and blockchain technologies.
 Forrest Colyer is a blockchain specialist solutions architect at Amazon Web Services (AWS). Through his experience with private blockchain solutions led by consortia and public blockchain use cases like NFTs and DeFi, Forrest helps enable customers to identify and implement high-impact blockchain solutions. Prior to AWS, Forrest spent five years at Deloitte Consulting, where he supported various blockchain projects as a full-stack developer and solutions architect in the public and private sectors.
 Charles Okochu is the Global Business Development Manager for Amazon Managed Blockchain and Amazon Quantum Ledger Database (QLDB). He is based out of New York City and has a background in Financial Services, Blockchain, Digital Assets and is passionate about how blockchain technologies can transform the technology landscape. In his spare time, Charles enjoys running, playing and coaching soccer, and spending time with friends and family.