AWS Database Blog
Develop a full stack serverless NFT application with Amazon Managed Blockchain – Part 2
This post builds upon the full-stack non-fungible token (NFT) development environment setup outlined in a previous post, which is considered a prerequisite to the topics we discuss in this post. Part 1 discussed how to set up a development environment; in this post we walk you through a complete NFT marketplace application using Amazon Managed Blockchain, Amazon API Gateway, and AWS Lambda.
Solution overview
The code sample in this post is built upon the reference architecture from Part 1, which is depicted in the following diagram.

To support this reference architecture, the sample code that is referenced within this post consists of three functional modules:
- ShareToWinWeb – The frontend web application, written in React and TypeScript, which provides the NFT marketplace user interface
- ShareToWinRestAPI – The REST API that connects the React front end to the underlying NFT smart contract on the Ethereum Blockchain
- ShareToWinContract – The implementation of the Solidity script, or smart contract, which is deployed to the Ethereum blockchain to run the core functionality of the application
In this post, I explain each module in its own section to give you a complete understanding of how to implement a full stack NFT application. The entire application code is available on the GitHub repo.
ShareToWinWeb: React/TypeScript UI
The code in the folder ShareToWinWeb of the GitHub repo is the frontend application. This application, written in React and TypeScript, is a single page application (SPA) that interacts with the REST API to provide NFT marketplace functionality. In a production marketplace application, you can deploy this code on Amazon Simple Storage Service (Amazon S3). Amazon S3 is an object storage service offering industry-leading scalability, data availability, security, and performance. The following screenshot showcases the application.
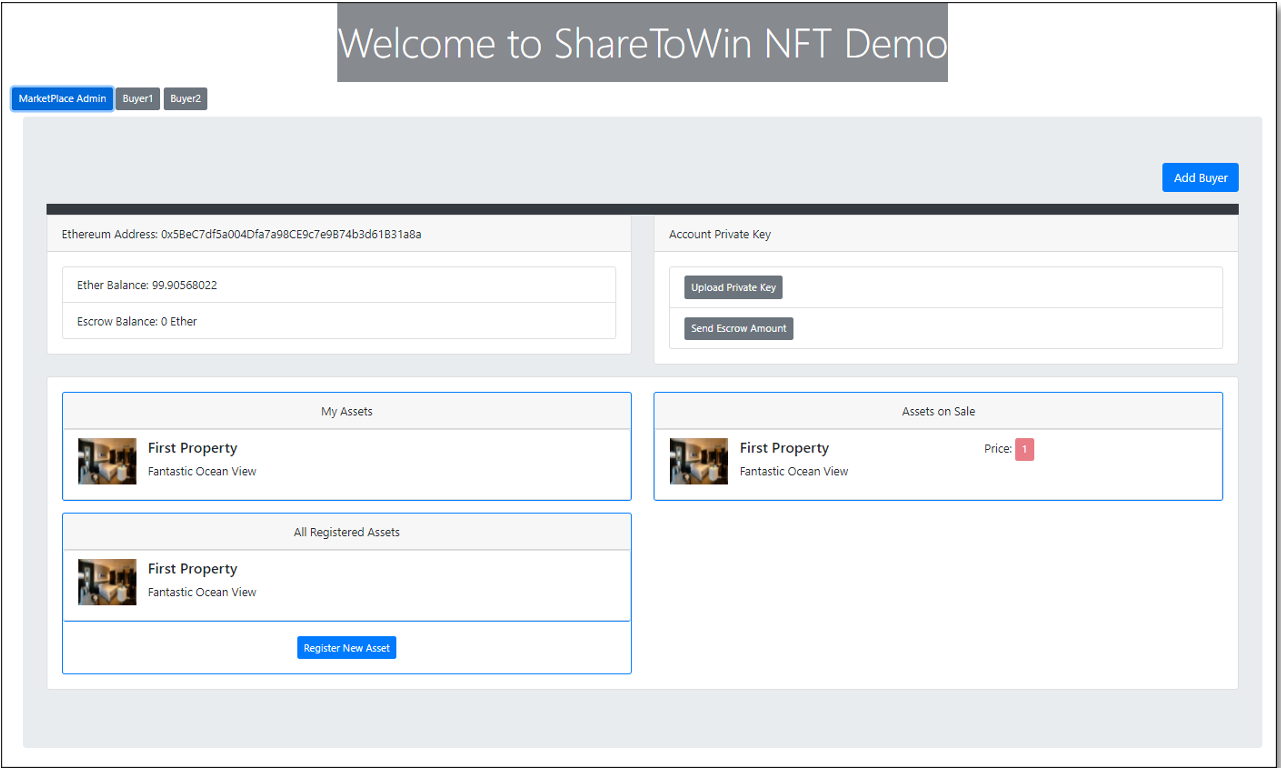
The application has two types of users: a marketplace admin and a buyer. Even though this sample application shows a very simplistic approach of adding a user to the marketplace, a production system should implement user management functionality by utilizing AWS services like Amazon Cognito. In the sample code, a buyer user points to an account created when the Ganache development network is started. The admin user can choose Add Buyer to associate an existing account in the Ganache network to the application.
Both the admin and buyer can register a new asset by choosing Register New Asset, which shows a form that collects some basic information such as asset name, description about the asset, and an initial price in Ether for the asset. This information is passed to the REST API function registerNewAsset, which generates a unique ID for the asset and passes this ID to a smart contract. The smart contract function registerAsset mints a new NFT and associates the asset’s unique ID with the NFT token ID. This REST API function further saves the asset ID, NFT token ID, and the data sent to it by the UI application into an Amazon DynamoDB table for querying purposes. DynamoDB is a fully managed, serverless, key-value NoSQL database designed to run high-performance applications at any scale.
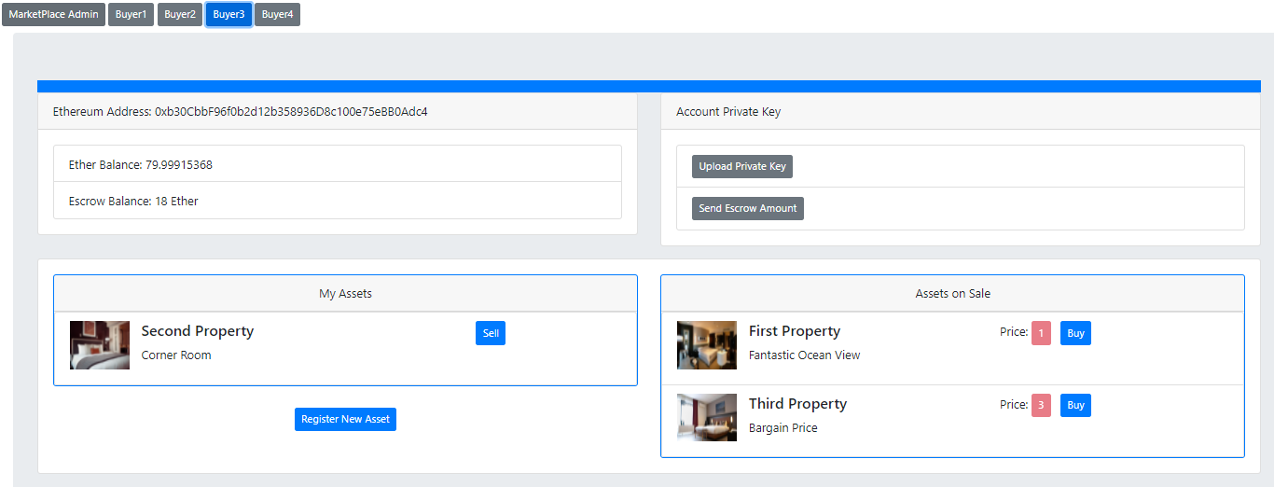
After an asset is registered and an NFT has been minted, the NFT is available for buying and selling in the marketplace. The following screenshot shows the view of the application from a buyer’s perspective, who has the ability to buy two NFTs associated with two distinct assets, as well as sell an NFT that the buyer owns.
Wallet and private key
Two things need to happen when an NFT is transferred from a buyer to a seller. First the smart contract updates the owner address of the NFT and second Ether balance needs to be adjusted from the buyer and seller account. In order for a marketplace to adjust buyer and seller’s Ether balance, it needs to create a balance transfer transaction between the buyer and seller for the NFT purchased amount. To complete this transfer, this transaction must be signed with the buyer’s private key. This requires the NFT marketplace application to integrate with a web wallet such as MetaMask which is a browser extension that provides wallet capabilities to the NFT marketplace application.
This sample application takes another approach for facilitating the transfer of the NFT by using a concept of escrow in the smart contract. In this sample application, a buyer who wants to buy an NFT from the marketplace has to deposit an escrow balance with the smart contract, implementing the NFT. When escrow is used, the escrow balance becomes part of the NFT smart contract and therefore gives the smart contract the ability to adjust escrow balance of the two parties involved in the NFT transfer as well as send Ether to the seller from the escrow amount. In this approach, NFT transaction amount can be sent to the seller without the NFT application knowing the buyer’s private keys. The escrow money can be sent to the smart contract by using any standard wallet like MetaMask that the application user has access to. To transfer escrow money to the smart contract, the user simply needs the contract address, and then can use any wallet to initiate a transfer of funds to the smart contract.
In addition to the escrow approach, this sample application also provides a feature that demonstrates transaction signing capabilities. This feature showcases how an NFT application can create a balance transfer transaction on behalf of the buyer if it has access to the buyer’s private key. When a buyer in the application uses this feature, it creates a balance transfer transaction between the buyer and the smart contract and is similar to how a wallet like MetaMask would have sent escrow balance to the smart contract. This approach of getting the private key from the application user is purely for demo purposes to show private key integration. You shouldn’t use this approach in the production-ready application. For the production-ready application, you should consider integrating the application with a web HD wallet like MetaMask.
Note: It’s against security best practices to use the private key capture implementation of this sample application in a production-ready system. A production-ready NFT marketplace should incorporate a wallet functionality into the application to handle an account’s private key.
ShareToWinRestApi: Javascript/Express REST API
The source files containing in the folder ShareToWinRestApi in the GitHub repo is the REST API project that connects the frontend application with the smart contract, allowing the frontend application to trigger the functions in the smart contract to run. The application code is written in JavaScript and uses express.js to create a local web server to host the REST API files.
Amazon API Gateway and AWS Lambda are an ideal way to deploy this functionality in a production-ready NFT marketplace. API Gateway is a fully managed service that allows developers to create, publish, maintain, monitor, and secure APIs at any scale. Lambda is a serverless, event-driven compute service that lets you run code for virtually any type of application or backend service without provisioning or managing servers.
Two popular JavaScript libraries, Web3.js and Ethers.js, are widely used to invoke the smart contract functions deployed in a Ethereum network. For this sample application, we use Web3.js.
The Web3.js library has an object called HttpProvider that must to be created to connect to an Ethereum network. The file contractProvider.js in the sample code provides a mechanism to create a provider that points to either a Ganache network or to a Ropsten, Rinkeby, or Mainnet Ehthreum network via Amazon Managed Blockchain based on an environment variable. Amazon Managed Blockchain (AMB) is a fully managed service that makes it easy to interact with a public network like Ethereum.
Our REST API project must have two pieces of information in order to interact with the smart contract: the deployed contract address and the contract’s ABI. The following is a sample ABI code that is generated for the registerAsset smart contract function:
{
        "inputs": [
          {
            "internalType": "uint256",
            "name": "assetID",
            "type": "uint256"
          },
          {
            "internalType": "uint256",
            "name": "salePrice",
            "type": "uint256"
          },
          {
            "internalType": "string",
            "name": "_uri",
            "type": "string"
          }
        ],
        "name": "registerAsset",
        "outputs": [
          {
            "internalType": "uint256",
            "name": "newTokenID",
            "type": "uint256"
          }
        ],
        "stateMutability": "nonpayable",
        "type": "function"
}
Each contract that is deployed to the Ethereum network has a unique address that gets created at the time of deployment of that contract to the network. Because smart contracts in the Ethereum network are immutable, deploying a new contract to the network generates a new contract address that must be configured in the REST API project for it to invoke smart contract functions. For the sample application, we store this contract address as an environment variable that is retrieved by the REST API code to communicate with the smart contract.
On the Ethereum blockchain, it’s recommended to only store that data on the chain that is intrinsic to the required functionality of the smart contract, and store any additional data outside of the Ethereum network in some other external database. This sample application is using Amazon DynamoDB as that external storage.
ShareToWinContract: Solidity smart contract
The last component of this full stack NFT application is the smart contract that implements the ERC721 specification to enable NFT functionality. The files for the smart contract are located under the folder ShareToWinContract. The file AssetToken.sol contains the AssetToken NFT implementation and has a dependency on the OpenZeppelin SDK. OpenZeppelin is an open-source collection of smart contracts that provides a base implementation of many Ethereum specifications, including ERC721 and ERC20. As we discussed earlier, we use Ganache as a development network to deploy the smart contract code. Run the following command to start the development network as well as store the public/private keys in a file:
The above command stores the public and private keys of all the test accounts in a file called ethaccounts.json. This file will be located in the REST API project and will be available to retrieve an account’s private key to be used in the application.
When using the Truffle development framework to deploy this smart contract into a Blockchain network, make sure to keep a note of the contract address that is deployed. This contract address is used to set the environment variable CONTRACTADDRESS in the envExport.sh file in the REST API project. Running the migrate command from the Truffle console produces an output similar to the following, which indicates the contract address:

Whenever changes are made to the smart contract code in the AssetToken.sol file, the smart contract should be compiled and the generated ABI should be copied to the REST API project’s contractAbi.js file. The generated ABI code that gets produced as a result of smart contract compilation is located in the build folder under the ShareToWinContract folder. The JSON file that has the same name as the smart contract, AssetToken.json in the sample code, has the contract’s ABI. This makes sure that the REST API is aware of any changes to the interface of the functions of the smart contract.
To send the escrow money to the NFT smart contract, use the test account’s public and private keys found in the file ethaccounts.json in the ShareToWinRestApi folder.
When a production-ready NFT application is fully developed and tested, it can be deployed to the Ethereum mainnet via an Amazon Managed Blockchain (AMB) node. You can use Amazon Managed Blockchain (AMB), a fully managed service, to join an Ethereum network with just a few clicks. An AMB node that is connected to an Ethereum network can be integrated with other AWS services such as AWS Lambda to invoke smart contract functions to mint and transfer NFTs.
Conclusion
In this post, we expanded on the post Develop a Full Stack Serverless NFT Application with Amazon Managed Blockchain – Part 1 and walked you through all three tiers of a complete NFT marketplace application. The entire working code discussed in this post is available on GitHub. This two-part series of posts provides a comprehensive overview of how to setup a development environment for the smart contract as well as write an NFT smart contract to implement a fully functional marketplace application for NFT transactions.
We encourage you to try the sample code and reach out to us with your feedback in the comments.
About the Author
 Rafia Tapia is a Blockchain Specialist Solution Architecture. Having more than 25 years of experience in software development and architecture, she has a keen interest in developing design patterns and best practices for smart contracts and blockchain technologies.