Desktop and Application Streaming
Optimize end user experience for Zoom® on Amazon AppStream 2.0
Customers using Amazon AppStream 2.0 frequently encounter end user experience challenges while using collaboration tools like Zoom®. It can be mitigated by adhering to key recommendations and best practices that can significantly streamline the operations related to AppStream 2.0 environment.
In this blog, we will delve into a similar scenario in one of our global customers in ITS vertical that wanted to utilize Zoom® collaboration tool with audio-video [AV] capabilities within the Amazon AppStream2.0 environment.
Overview of solution
AppStream 2.0 facilitates real-time AV support by redirecting the local webcam video input to streaming sessions. This functionality empowers users to engage in AV conferences using their local webcam within the AppStream 2.0 streaming environment. Upon initiating a video conference from an AppStream 2.0 session, the platform first compresses the webcam video and microphone audio inputs locally. Post this, it sends the data via an encrypted channel to the streaming instance in a secure manner. For further details, please refer to this link.
In the post-pandemic landscape, our customer had transitioned to a hybrid work model, where working from home [WFH] plays a significant role in the office operations. In this context, services such as AppStream 2.0 had become indispensable for ensuring their success in managing remote teams effectively. Simultaneously, collaboration tools like Zoom® have gained utmost importance in facilitating seamless teamwork from any location. In our discussion, we will explore various factors that influenced the end-user experience when using Zoom®.
While addressing the end-user experience for the AppStream 2.0 using Zoom®, we encountered a few points that needed consideration.
- The Zoom® client was not correctly installed and configured
- The AppStream 2.0 instance type was not suitable to run Zoom® with AV and screen share enabled.
- Updated AppStream 2.0 instance drivers for specific functionality
| Time to read | 10 minutes |
| Time to complete | 1 hour |
| Learning level | Intermediate (Level 200) |
| Cost to complete (estimated) | You only pay for the streaming resources that you provision plus a small monthly fee per streaming user depending on the operating system chosen. For more information, see the Amazon AppStream 2.0 pricing. |
| Services used | AppStream 2.0 |
Configuration of Zoom® on Amazon AppStream 2.0
We must ensure that the following steps are taken into consideration while installing Zoom® client for Windows on Amazon AppStream 2.0.
Prerequisites
- An AWS account.
- Functional knowledge of VPC, NAT gateways, subnets, AppStream 2.0 and Windows Operating System.
- Familiarize yourself with system requirements & feature support for AppStream 2.0 client
- Follow detailed steps on setting up for AppStream 2.0
- Explore steps to configure and test for real-time AV
Configure Zoom® Client on AppStream 2.0
Now, let’s get on to the steps that the customer followed to successfully configure Zoom® client on Windows specifically.
Installing Zoom® on the Image Builder
-
- Login to the AppStream Console and select “Images” on the AppStream 2.0 navigation panel and switch to “Image builder” tab.

-
- Launch the Image Builder [IB] in private subnet with a NAT gateway by clicking “Launch Image builder” using latest Windows Server public image.

-
- Choose the applicable Windows image.

-
- Configure Image Builder: give a name to your AppStream 2.0 image builder and choose the instance type, click Next. Configure network; Review and Create.
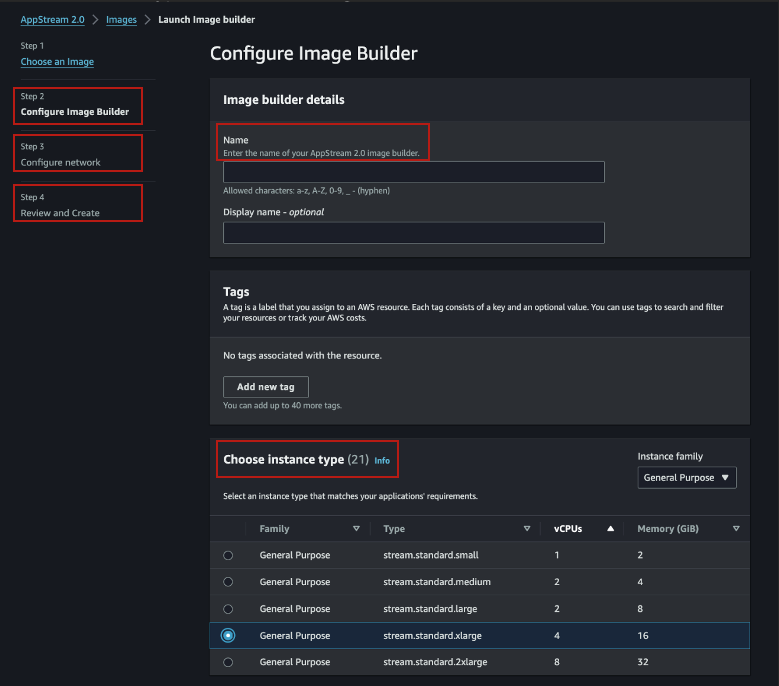
Image and instance type used >> a. Image : AppStream-WinServer2019-11-13-2023 b. Instance : stream.standard.xlarge
-
- Connect to Image Builder as Administrator in the Image Builder instance login option window.

-
- Download Zoom® Amazon Workspace Universal Installer and install it on the Image Builder.

-
- Download and install Zoom® Windows 64-bit client
- Launch the installed Zoom® application, sign-in with credentials.
- Save the configuration in AppStream 2.0 Image Assistant and click Next.

-
- Switch to Test User and launch Zoom® application to verify that it is working as expected by joining a meeting.
- Switch back to Administrator, optimize and configure the image. Create the image.
Making the Zoom® application available
- From the navigation panel in the AppStream 2.0 console, select “Fleets” and click “Create Fleet”

- Choose onDemand as the fleet type in the “Select fleet type” section and click “Next”.
- In “Configure fleet” section, provide a Name, Display name and Description. Choose stream.standard.xlarge instance and click “Next”.
- Choose zoomPublished image in “Choose an Image” section and click “Next”.
- Choose a private subnet with a NAT gateway to enable internet access in “Configure network” section and click “Next”.
- In the “Review and Create” section review the configuration and click “Create fleet” to create a fleet [zoomFleet].
- From the navigation panel in the AppStream 2.0 console, select “Stacks” and click “Create Stack”.
- Provide a Name, select “zoomFleet” in Fleet in Stack Details and click on “Next” keeping the default configurations.
- Click on next in “Enable storage” and “Edit user settings” sections keeping the default configuration.
- In the “Review and Create” section review the configuration and click “Create Stack” to create a stack [zoomStack].

Test Result
- Created streaming URL.
- Launched Zoom® app on Google Chrome browser
- AV performance during the Zoom® session was continuous and smooth without any jitters. Background image worked as expected. There was latency but not significant.
Sizing Consideration
AppStream 2.0 Sizing Considerations
- It plays an important role in maintaining the end-user experience as far as AV enabled collaboration tools like Zoom® are concerned.
- Furthermore, based on our review of the Zoom® application requirements that recommends to use minimum 4 core processor and 8GB memory, it is recommended to consider the following instance types that is best suitable for your environment –
| Instance Family | Instance Type | vCPU | Memory (GiB) |
| General Purpose | stream.standard.xlarge | 4 | 16 |
| Compute Optimized | stream.compute.xlarge | 4 | 7.5 |
| Compute Optimized | stream.compute.2xlarge | 8 | 15 |
- We tested the general purpose AppSteam 2.0 instance in the customer’s test lab for their use case and a lower instance type to check & match the difference in end-user experience and found out the following guidance with respect to the sizing –
| Instance Type | vCPU | Memory (GiB) | Remarks |
| stream.standard.xlarge | 4 | 16 | Works fine with AV and screen share ON |
| stream.standard.large | 2 | 8 | Works fine with audio and screen share |
Have a Look at the Drivers
We reviewed the customer’s AppStream 2.0 image & found that the instance was not using the required version of PV, NVMe and ENA drivers. This can cause issues including performance impact that could lead to negative end-user experience. Hence, we want to go through the process of updating the drivers.
Launch the Image Builder with the image in question. There are two steps involved in updating the drivers.
Step 1
- Upgrade the AWS drivers by downloading and installing the following to the Image Builder
- Please note that when the AWS PV driver/ ENA are getting installed, the network connection to the Image builder will be lost for brief amount of time while the network drivers are being upgraded
- Once the network connection is restored, please restart the image builder after the driver upgrade
- Verify control panel – Add remove Programs section for the updated drivers
- Open Image assistant and create Image <ImageDriverUpdated>
Step 2
- Update the image with the latest Windows operating system updates and AppStream 2.0 agent software
- Open Appstream AWS Console >> Image and select the above new updated Image <ImageDriverUpdated>
- Choose Actions, Update
- In the Update image dialog box, do the following >> For New image name, enter an image name that is unique within the AWS account and Region
- Choose Update image
Step 1 is required one time only. As a best practice, it is recommended to keep the AppStream 2.0 image updated regularly to prevent any unknown/ security issues. Please refer to this link for more information.
Cleaning up
It is important to stop your running fleet and delete your active stack to free up resources and to avoid unintended charges to your account. We recommend stopping any unused, running fleets. Follow the following steps to clean up your resources.
- In the navigation panel, choose Stack
- Select zoomStack stack and choose Actions, Disassociate Fleet. In the confirmation dialog box, choose Disassociate
- In the navigation pane, choose Fleets
- Select zoomFleet, choose Actions, and then choose Stop. It takes about 5 minutes to stop a fleet
- When the status of the fleet is Stopped, choose Actions, Delete
- In the navigation pane, choose Stacks
- Select zoomStack stack and choose Actions, Delete
Conclusion
In this blog, you learned the steps to configure an image builder with Zoom® application and enable your users to securely access Zoom® application published using AppStream 2.0.
 |
Iqbaal Singh is the Technical Account Manager with AWS India. He is focused on improving customer experience in their cloudOps to build and operate a secure and cost optimized cloud infrastructure. He is passionate about technology and his interest includes EUC, Amazon Connect, EKS, ECS. Outside of work, he enjoys reading and travelling with family. |
 |
Deepanshu is a Technical Account Manager based in India. He has over 7 years of experience in IT industry and specialize in End User Computing. He is passionate about Cloud, DevOps and VDIs. |
 |
Goldie is a Enterprise Solution Architect with AWS India. He has a total of 21 years of experience and is based out of New Delhi and looks after large enterprises/ GSI. His interest includes EUC, networking and cloud cost optimization. |