AWS DevOps & Developer Productivity Blog
Simplify Amazon EKS Deployments with GitHub Actions and AWS CodeBuild
In this blog post, we will explore how to simplify Amazon EKS deployments with GitHub Actions and AWS CodeBuild. In today’s fast-paced digital landscape, organizations are turning to DevOps practices to drive innovation and streamline their software development and infrastructure management processes. One key practice within DevOps is Continuous Integration and Continuous Delivery (CI/CD), which automates deployment activities to reduce the time it takes to release new software updates. AWS offers a suite of native tools to support CI/CD, but also allows for flexibility and customization through integration with third-party tools.
Throughout this post, you will learn how to use GitHub Actions to create a CI/CD workflow with AWS CodeBuild and AWS CodePipeline. You’ll leverage the capabilities of GitHub Actions from a vast selection of pre-written actions in the GitHub Marketplace to build and deploy a Python application to an Amazon Elastic Kubernetes Service (EKS) cluster.
GitHub Actions is a powerful feature on GitHub’s development platform that enables you to automate your software development workflows directly within your repository. With Actions, you can write individual tasks to build, test, package, release, or deploy your code, and then combine them into custom workflows to streamline your development process.
Solution Overview
This solution being proposed in this post uses several AWS developer tools to establish a CI/CD pipeline while ensuring a streamlined path from development to deployment:
- AWS CodeBuild: A fully managed build service that compiles source code, runs tests, and produces software packages that are ready to deploy.
- AWS CodePipeline: A continuous delivery service that orchestrates the build, test, and deploy phases of your release process.
- Amazon Elastic Kubernetes Service (EKS): A managed service that makes it easy to run Kubernetes on AWS without needing to install and operate your own Kubernetes control plane.
- AWS CloudFormation: AWS CloudFormation lets you model, provision, and manage AWS and third-party resources by treating infrastructure as code. You’ll use AWS CloudFormation to deploy certain baseline resources required to follow along.
- Amazon Elastic Container Registry (ECR): A fully managed container registry that makes it easy for developers to store, manage, and deploy Docker container images.
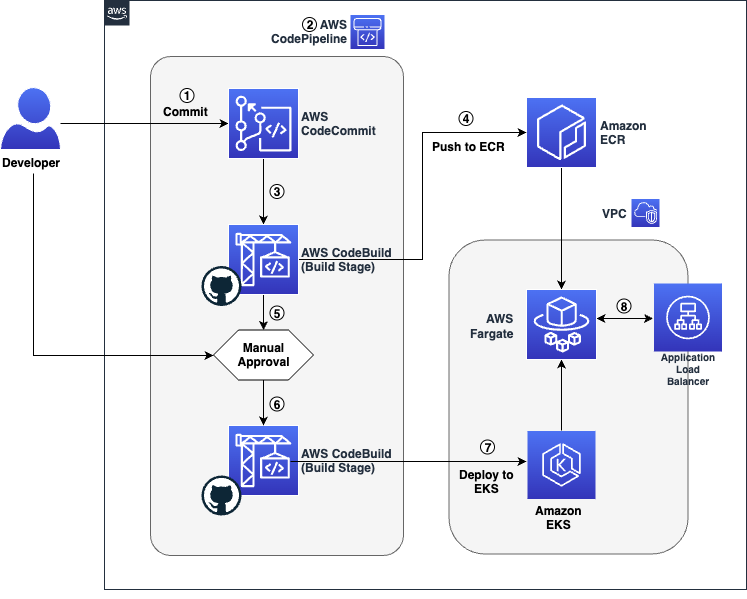
Figure 1 Workflow architecture showing source, build, test, approval and deployment stages
The code’s journey from the developer’s workstation to the final user-facing application is a seamless relay across various AWS services with key build an deploy operations performed via GitHub Actions:
- The developer commits the application’s code to the Source Code Repository. In this post we will leverage a repository created in AWS CodeCommit.
- The commit to the Source Control Management (SCM) system triggers the AWS CodePipeline, which is the orchestration service that manages the CI/CD pipeline.
- AWS CodePipeline proceeds to the Build stage, where AWS CodeBuild, integrated with GitHub Actions, builds the container image from the committed code.
- Once the container image is successfully built, AWS CodeBuild, with GitHub Actions, pushes the image to Amazon Elastic Container Registry (ECR) for storage and versioning.
- An Approval Stage is included in the pipeline, which allows the developer to manually review and approve the build artifacts before they are deployed.
- After receiving approval, AWS CodePipeline advances to the Deploy Stage, where GitHub Actions are used to run helm deployment commands.
- Within this Deploy Stage, AWS CodeBuild uses GitHub Actions to install the Helm application on Amazon Elastic Kubernetes Service (EKS), leveraging Helm charts for deployment.
- The deployed application is now running on Amazon EKS and is accessible via the automatically provisioned Application Load Balancer.
Pre-requisites
If you choose to replicate the steps in this post, you will need the following items:
- Access to an AWS account
- An EKS Cluster with an AWS Fargate Profile and ALB Load Balancer Controller add-on pre-configured. If needed, you can leverage the eksdemo command line utility to spin-up an EKS environment.
- Development Environment with the following utilities pre-installed:
Utilities like awscli and eksctl require access to your AWS account. Please make sure you have the AWS CLI configured with credentials. For instructions on setting up the AWS CLI, refer to this documentation.
Walkthrough
Deploy Baseline Resources
To get started you will first deploy an AWS CloudFormation stack that pre-creates some foundational developer resources such as a CodeCommit repository, CodeBuild projects, a CodePipeline pipeline that orchestrates the release of the application across multiple stages. If you’re interested to learn more about the resources being deployed, you can download the template and review its contents.
Additionally, to make use of GitHub Actions in AWS CodeBuild, it is required to authenticate your AWS CodeBuild project with GitHub using an access token – authentication with GitHub is required to ensure consistent access and avoid being rate-limited by GitHub.
- First, let’s set up the environment variables required to configure the infrastructure:
export CLUSTER_NAME=<cluster-name>
export AWS_REGION=<cluster-region>
export AWS_ACCOUNT_ID=<cluster-account>
export GITHUB_TOKEN=<github-pat>
In the commands above, replace cluster-name with your EKS cluster name, cluster-region with the AWS region of your EKS cluster, cluster-account with your AWS account ID (12-digit number), and github-pat with your GitHub Personal Access Token (PAT).
- Using the AWS CloudFormation template located here, deploy the stack using the AWS CLI:
aws cloudformation create-stack \ --stack-name github-actions-demo-base \ --region $AWS_REGION \ --template-body file://gha.yaml \ --parameters ParameterKey=ClusterName,ParameterValue=$CLUSTER_NAME \ ParameterKey=RepositoryToken,ParameterValue=$GITHUB_TOKEN \ --capabilities CAPABILITY_IAM && \ echo "Waiting for stack to be created..." && \ aws cloudformation wait stack-create-complete \ --stack-name github-actions-demo-base \ --region $AWS_REGION - When you use AWS CodeBuild / GitHub Actions to deploy your application onto Amazon EKS, you’ll need to allow-list the service role associated with the build project(s) by adding the IAM principal to access your Cluster’s
aws-authconfig-map or using EKS Access Entries (recommended). The CodeBuild service role has been pre-created in the previous step and the role ARN can be retrieved using the command below:aws cloudformation describe-stacks --stack-name github-actions-demo-base \ --query "Stacks[0].Outputs[?OutputKey=='CodeBuildServiceRole'].OutputValue" \ --region $AWS_REGION --output text
Clone the CodeCommit Repository
Next, you will create a simple python flask application and the associated helm charts required to deploy the application and commit them to source control repository in AWS CodeCommit. Begin by cloning the CodeCommit repository by following the steps below:
- Configure your git client to use the AWS CLI CodeCommit credential helper. For UNIX based systems follow instructions here, and for Windows based systems follow instructions here.
- Retrieve the repository HTTPS clone URL using the command below:
export CODECOMMIT_CLONE_URL=$(aws cloudformation describe-stacks \ --stack-name github-actions-demo-base \ --query "Stacks[0].Outputs[?OutputKey=='CodeCommitCloneUrl'].OutputValue" \ --region $AWS_REGION \ --output text) - Clone and navigate to your repository:
git clone $CODECOMMIT_CLONE_URL github-actions-demo && cd github-actions-demo
Create the Application
Now that you’ve set up all the required resources, you can begin building your application and its necessary deployment manifests.
- Create the
app.pyfile, which serves as the hello world application using the command below:cat << EOF >app.py from flask import Flask app = Flask(__name__) @app.route('/') def demoapp(): return 'Hello from EKS! This application is built using Github Actions on AWS CodeBuild' if __name__ == '__main__': app.run(port=8080,host='0.0.0.0') EOF - Create a Dockerfile in the same directory as the application using the command below:
cat << EOF > Dockerfile FROM public.ecr.aws/docker/library/python:alpine3.18 WORKDIR /app RUN pip install Flask RUN apk update && apk upgrade --no-cache COPY app.py . CMD [ "python3", "app.py" ] EOF - Initialize the HELM application
helm create demo-app rm -rf demo-app/templates/* - Create the manifest files required for the deployment accordingly:
- deployment.yaml – Contains the blueprint for deploying instances of the application. It includes the desired state and pod template which has the pod specifications like the container image to be used, ports etc.
cat <<EOF > demo-app/templates/deployment.yaml --- apiVersion: apps/v1 kind: Deployment metadata: namespace: {{ default "default" .Values.namespace }} name: {{ .Release.Name }}-deployment spec: selector: matchLabels: app.kubernetes.io/name: {{ .Release.Name }} replicas: 2 template: metadata: labels: app.kubernetes.io/name: {{ .Release.Name }} spec: containers: - image: {{ .Values.image.repository }}:{{ default "latest" .Values.image.tag }} imagePullPolicy: {{ .Values.image.pullPolicy}} name: demoapp ports: - containerPort: 8080 EOF - service.yaml – Describes the service object in Kubernetes and specifies how to access the set of pods running the application. It acts as an internal load balancer to route traffic to pods based on the defined service type (like ClusterIP, NodePort, or LoadBalancer).
cat <<EOF > demo-app/templates/service.yaml --- apiVersion: v1 kind: Service metadata: namespace: {{ default "default" .Values.namespace }} name: {{ .Release.Name }}-service spec: ports: - port: {{ .Values.service.port }} targetPort: 8080 protocol: TCP type: {{ .Values.service.type }} selector: app.kubernetes.io/name: {{ .Release.Name }} EOF - ingress.yaml – Defines the ingress rules for accessing the application from outside the Kubernetes cluster. This file maps HTTP and HTTPS routes to services within the cluster, allowing external traffic to reach the correct services.
cat <<EOF > demo-app/templates/ingress.yaml --- apiVersion: networking.k8s.io/v1 kind: Ingress metadata: namespace: {{ default "default" .Values.namespace }} name: {{ .Release.Name }}-ingress annotations: alb.ingress.kubernetes.io/scheme: internet-facing alb.ingress.kubernetes.io/target-type: ip spec: ingressClassName: alb rules: - http: paths: - path: / pathType: Prefix backend: service: name: {{ .Release.Name }}-service port: number: 8080 EOF - values.yaml – This file provides the default configuration values for the Helm chart. This file is crucial for customizing the chart to fit different environments or deployment scenarios. The manifest below assumes that the
defaultnamespace is configured as the namespace selector for your Fargate profile.cat <<EOF > demo-app/values.yaml --- namespace: default replicaCount: 1 image: pullPolicy: IfNotPresent service: type: NodePort port: 8080 EOF
- deployment.yaml – Contains the blueprint for deploying instances of the application. It includes the desired state and pod template which has the pod specifications like the container image to be used, ports etc.
Overview of the CI/CD Pipeline
- A typical CI/CD pipeline consists of source, build, test, approval, and deploy stages.
- In this post, AWS CodeBuild is used in the build and deploy states. AWS CodeBuild utilizes specification files called buildspec.
- A buildspec is a collection of build phases and relevant settings in YAML format that CodeBuild uses to execute a build.
Below you’ll learn how to define your buildspec(s) to build and deploy your application onto Amazon EKS by leveraging the AWS managed GitHub action runner on AWS CodeBuild.
Defining GitHub Actions in AWS CodeBuild
Each phase in a buildspec can contain multiple steps and each step can run commands or run a GitHub Action. Each step runs in its own process and has access to the build filesystem. A step references a GitHub action by specifying the uses directive and optionally the with directive is used to pass arguments required by the action. Alternatively, a step can specify a series of commands using the run directive. It’s worth noting that, because steps run in their own process, changes to environment variables are not preserved between steps.
To pass environment variables between different steps of a build phase, you will need to assign the value to an existing or new environment variable and then writing this to the GITHUB_ENV environment file. Additionally, these environment variables can also be passed across multiple stage in CodePipeline by leveraging the exported variables directive.
Build Specification (Build Stage)
Here, you will create a file called buildspec-build.yml at the root of the repository – In the following buildspec, we leverage GitHub actions in AWS CodeBuild to build the container image and push the image to ECR. The actions used in this buildspec are:
- aws-actions/configure-aws-credentials: Accessing AWS APIs requires the action to be authenticated using AWS credentials. By default, the permissions granted to the CodeBuild service role can be used to sign API actions executed during a build. However, when using a GitHub action in CodeBuild, the credentials from the CodeBuild service role need to be made available to subsequent actions (e.g., to log in to ECR, push the image). This action allows leveraging the CodeBuild service role credentials for subsequent actions.
- aws-actions/amazon-ecr-login: Logs into the ECR registry using the credentials from the previous step.
version: 0.2
env:
  exported-variables:
    - IMAGE_REPO
    - IMAGE_TAG
phases:
  build:
    steps:
      - name: Get CodeBuild Region
        run: |
          echo "AWS_REGION=$AWS_REGION" >> $GITHUB_ENV
      - name: "Configure AWS credentials"
        id: creds
        uses: aws-actions/configure-aws-credentials@v3
        with:
          aws-region: ${{ env.AWS_REGION }}
          output-credentials: true
      - name: "Login to Amazon ECR"
        id: login-ecr
        uses: aws-actions/amazon-ecr-login@v1
      - name: "Build, tag, and push the image to Amazon ECR"
        run: |
          IMAGE_TAG=$(echo $CODEBUILD_RESOLVED_SOURCE_VERSION | cut -c 1-7)
          docker build -t $IMAGE_REPO:latest .
          docker tag $IMAGE_REPO:latest $IMAGE_REPO:$IMAGE_TAG
          echo "$IMAGE_REPO:$IMAGE_TAG"
          echo "IMAGE_REPO=$IMAGE_REPO" >> $GITHUB_ENV
          echo "IMAGE_TAG=$IMAGE_TAG" >> $GITHUB_ENV
          echo "Pushing image to $REPOSITORY_URI"
          docker push $IMAGE_REPO:latest
          docker push $IMAGE_REPO:$IMAGE_TAG
In the buildspec above the variables IMAGE_REPO and IMAGE_TAG are set as exported-variables that will be used in the subsequent deploy stage.
Build Specification (Deploy Stage)
During the deploy stage, you will utilize AWS CodeBuild to deploy the helm manifests to EKS by leveraging the community provided bitovi/deploy-eks-helm action. Furthermore, the alexellis/arkade-get action is employed to install kubectl, which will be used later to describe the ingress controller and retrieve the application URL.
Create a file called buildspec-deploy.yml at the root of the repository as such:
version: 0.2
env:
  exported-variables:
   - APP_URL
phases:
  build:
    steps:
      - name: "Get Build Region"
        run: |
          echo "AWS_REGION=$AWS_REGION" >> $GITHUB_ENV
      - name: "Configure AWS credentials"
        uses: aws-actions/configure-aws-credentials@v3
        with:
          aws-region: ${{ env.AWS_REGION }}
      - name: "Install Kubectl"
        uses: alexellis/arkade-get@23907b6f8cec5667c9a4ef724adea073d677e221
        with:
          kubectl: latest
      - name: "Configure Kubectl"
        run: aws eks update-kubeconfig --name $CLUSTER_NAME
      - name: Deploy Helm
        uses: bitovi/github-actions-deploy-eks-helm@v1.2.7
        with:
          aws-region: ${{ env.AWS_REGION }}
          cluster-name: ${{ env.CLUSTER_NAME }}
          config-files: demo-app/values.yaml
          chart-path: demo-app/
          values: image.repository=${{ env.IMAGE_REPO }},image.tag=${{ env.IMAGE_TAG }}
          namespace: default
          name: demo-app
      - name: "Fetch Application URL"
        run: |
          while :;do url=$(kubectl get ingress/demo-app-ingress -o jsonpath='{.status.loadBalancer.ingress[0].hostname}' -n default);[ -z "$url" ]&&{ echo "URL is empty, retrying in 5 seconds...";sleep 5;}||{ export APP_URL="$url";echo "APP_URL set to: $APP_URL";break;};done;echo "APP_URL=$APP_URL">>$GITHUB_ENV
At this point your application structure should have the following structure:
Now check these files in to the remote repository by running the below commands
git add -A && git commit -m "Initial Commit"
git push --set-upstream origin main
Now, let’s verify the deployment of our application using the load balancer URL. Navigate to the CodePipeline console. The pipeline incorporates a manual approval stage and requires a pipeline operator to review and approve the release to deploy the application. Following this, the URL for the deployed application can be conveniently retrieved from the outputs of the pipeline execution.
Viewing the application
-
- Click the execution ID. This should take you to a detailed overview of the most recent execution.

Figure 2 CodePipeline Console showing the pipeline (release) execution ID
- Under the Timeline tab, select the ‘Build’ action for the ‘Deploy’ stage.

Figure 3 Navigating to the timeline view and reviewing the details for the deploy stage
- Copy the application load balancer URL from the output variables.

Figure 4 Copy the APP_URL from the Output Variables for the Deploy action
- Paste the URL into a browser of your choice and you should see the message below.

Figure 5 Preview of the application deployed on Amazon EKS
- Click the execution ID. This should take you to a detailed overview of the most recent execution.
You can also review the logs for your build and see the GitHub action at work from the AWS CodeBuild console.
Clean up
To avoid incurring future charges, you should clean up the resources that you created:
-
-
- Delete the application by executing helm, this will remove the ALB that was provisioned
helm uninstall demo-app - Delete the CloudFormation stack (github-actions-demo-base) by executing the below command
aws cloudformation delete-stack \
        --stack-name github-actions-demo-base \
        -–region $AWS_REGION
- Delete the application by executing helm, this will remove the ALB that was provisioned
-
Conclusion
In this walkthrough, you have learned how to leverage the powerful combination of GitHub Actions and AWS CodeBuild to simplify and automate the deployment of a Python application on Amazon EKS. This approach not only streamlines your deployment process but also ensures that your application is built and deployed securely. You can extend this pipeline by incorporating additional stages such as testing and security scanning, depending on your project’s needs. Additionally, this solution can be used for other programming languages.