AWS for Games Blog
Using Autoscaling to Control Costs While Delivering Great Player Experiences
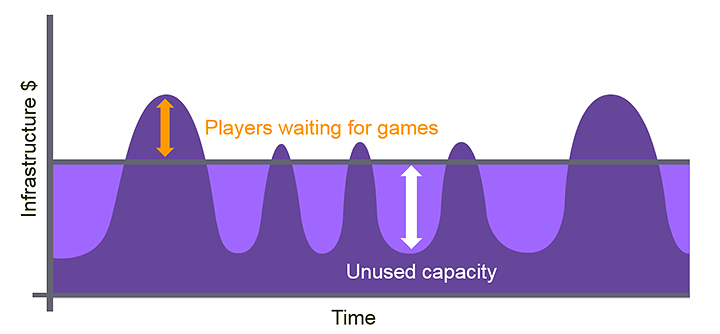
Game developers with real-time multiplayer games tell us they want to spend less on infrastructure expenses while still providing great online experiences for their players. The challenge is that player demand can fluctuate each day, hour, or even minute. When server capacity is fixed, developers run the risk of having too much or too little capacity at any moment. With too much capacity, developers are wasting money, and with too little capacity, players have to wait to play and may quit the game.
Potential consequences of fixed game server capacity
Developers want to be able to rapidly adjust server capacity based on real-time changes in player demand. So we developed a new autoscaling feature for Amazon GameLift that automatically increases server capacity during demand spikes and decreases capacity during lulls. In a few simple clicks, game developers can set Amazon GameLift to automatically raise or lower capacity as player demand changes over time.
Potential results with GameLift autoscaling

In this blog post, we’ll walk through the process of creating autoscaling policies in Amazon GameLift and cover some pro tips to help you get started.
Step 1: Select an Active Fleet
To take advantage of Amazon GameLift autoscaling, we first need an active fleet. To learn more about how to set up a fleet, consult the Working with Fleets section of the Amazon GameLift Developer Guide. You can set up and test fleets for free as part of the Amazon GameLift free tier.
Below is a screenshot of an active fleet in the Amazon GameLift console.

Step 2: Select the Scaling Tab on the Fleet Detail Page
We begin configuring autoscaling policies by clicking on the Fleet ID of the fleet we want to configure. On the fleet’s detail page, we open the Scaling tab. Here we see a graph of the number of instances in our fleet, as well as controls we can use to change our scaling limits. This page helps inform our decisions on when and how to scale this fleet.
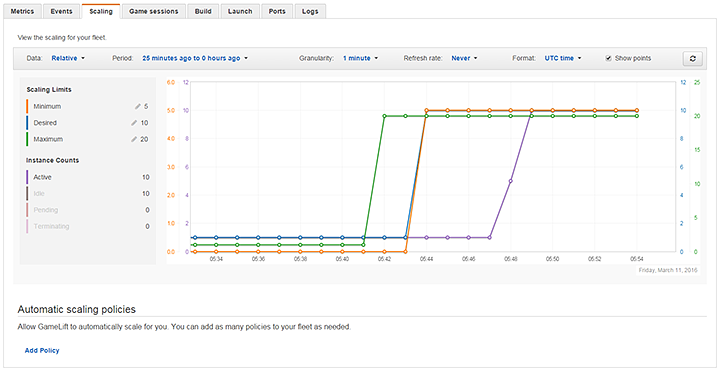
Scaling Limits define the number of instances we want in our fleet. There are three settings:
- Minimum – a threshold to never let our fleet scale below
- Maximum – a threshold to never let our fleet scale above
- Desired – our desired number of instances based on our autoscaling policies
Instance Counts display the number of actual current instances. There are four states:
- Active – total instances running in this fleet
- Idle – active instances without active game sessions
- Pending – instances provisioning but not yet active
- Terminating – instances in the process of terminating
The screenshot above shows that we manually scaled this fleet to ten desired instances when we created the fleet. As shown at the bottom of the Scaling tab, there are no autoscaling policies currently in place.
Step 3: Add an Autoscaling Policy
We open the autoscaling policy tool by clicking on Add Policy. In this walkthrough, we want to create a “scale up” policy – one that detects an increase in player demand and automatically increases capacity.
Amazon GameLift autoscaling policies follow this pattern:
If a certain metric meets or crosses a certain threshold value for a certain length of time, then change fleet capacity a certain amount.
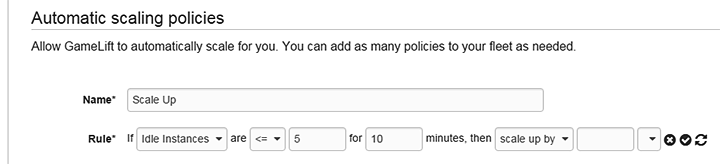
As you can see in the screenshot below, the autoscaling policy tool makes it easy to build a policy statement step by step.

To create our policy, we need to set each of these values:
If [Metric] are [Comparison operator] [Threshold] for [Evaluation period] minutes, then [Adjustment method] [Adjustment value] [Adjustment type].
Step 4: Choose a Metric
The first decision we need to make is which metric to use. Amazon GameLift collects data about fleets automatically and makes the following six metrics available to use with scaling policies:
- Available Player Sessions – Number of player session slots currently available in active game sessions across the fleet
- Idle Instances – Number of instances in the fleet that are not currently running a game session
- Active Game Sessions – Number of active game sessions currently running
- Current Player Sessions – Number of active or reserved player sessions in the fleet
- Active Instances – Number of instances currently running a game session
- Activating Game Sessions – Number of game sessions in the process of being created
We’ll use the Idle Instances metric. With this metric, we can control the number of instances that are available for new games and minimize the time players wait to join.
Step 5: Choose a Threshold
Next we need to set a threshold for our metric that will trigger GameLift to scale up capacity. Thresholds have three settings:
- a comparison operator – either <, <=, > or >=
- a threshold value
- an evaluation period – the number of consecutive minutes that a metric must exceed the threshold value before GameLift will trigger the policy
We want GameLift to scale up when there are too few idle instances, so we’ll choose the <= (less than or equal to) operator and enter five instances for ten minutes. This means that if the number of idle instances remains less than or equal to five instances for at least ten consecutive minutes, the scaling adjustment (which we’ll define in the next step) will be triggered.
Step 6: Choose a Scaling Adjustment
Once we’ve set our threshold, we need to tell GameLift how to adjust capacity. There are three options:
- Scale up or down by a certain number of instances
- Scale up or down by a certain percentage of capacity
- Set capacity to an exact value
In each case, GameLift will add or terminate instances in order to make the specified adjustment.
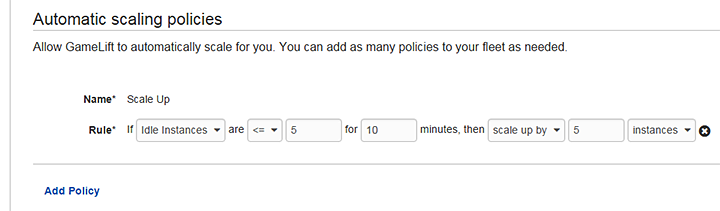
We want to add more instances, so we need to scale up by either a certain number of instances or a percentage of total capacity. For this walk-through, we’ll scale up by five instances each time this policy is triggered.
Step 7: Activate the Scaling Policy
The last step is to save the scaling policy by clicking the checkmark icon to the right of the policy. That’s it! Once you save the policy, Amazon GameLift will begin adjusting capacity using this policy in about ten minutes.
Step 8: Add a Scale Down Policy
Now we need a second policy to scale down our fleet when fewer players are online, which will save us money.
We’ll repeat the process we used for our Scale Up policy to create a Scale Down policy. In this policy, we want GameLift to scale down by five instances if the number of idle instances is greater than or equal to fifteen for more than fifteen minutes.
Our two policies are shown in the screenshot below.

We can monitor the effects of our autoscaling policies using the graphs at the top of the Scaling tab. We can change, delete, or add new policies as needed to optimize our autoscaling approach based on actual player demand patterns.
Tips
Here are some pro tips to consider when setting your own autoscaling policies.
Set minimum and maximum instance values for fleets. Fleet maximums and minimums are important safeguards for autoscaling. It’s possible to set an autoscaling rule that scales your fleet all the way down to zero instances. If this happens, it can take ten or more minutes before a new instance is active, during which any players who want to join your game are left waiting. You may also want to set a fleet maximum that puts a fixed limit on the amount you’re willing to spend or prevents an autoscaling policy from scaling up too much. Keep in mind that fleet capacity is also constrained by on-demand instance availability and your account limits. You can find more information about account limits and requesting limit increases on the AWS Service Limits page.
Use game session protection for production fleets. The game session protection feature ensures that when your autoscaling policy triggers a scale down adjustment, Amazon GameLift will not terminate any instances that are hosting active game sessions. If there are no unprotected instances, GameLift will wait until all players leave the games on a protected instance before terminating the instance. This prevents players from being arbitrarily dropped during gameplay.
Keep in mind that autoscaling policies have ten minute cooldown periods. GameLift will wait ten minutes after a policy triggers an action before evaluating policies again. This allows enough time for GameLift to add or remove instances and begin collecting metrics from the resulting fleet.
Don’t create conflicting policies. Amazon GameLift doesn’t restrict the policies you can create. It is possible to create policies that conflict with each other, potentially creating an infinite loop of scaling up and down. You can also create rules that overlap, such as with multiple scale up policies, that can either exaggerate or nullify their effects.
We’re looking forward to hearing your ideas and feedback on GameLift autoscaling. Please join the conversation in the GameDev Forums.
– Chris
Chris Dury is a Director at Amazon Web Services. He’s responsible for Amazon GameLift and other cloud services for game developers and is currently playing SMITE and Clash Royale.