AWS HPC Blog
Implementing AWS ParallelCluster in a Shared VPC
This post was controbuted by Pedro Gil, Solutions Architect, and Ryan Anderson, Software Engineer HPC Engineering
AWS Shared Virtual Private Cloud (VPC) is a feature that allows multiple AWS accounts to share a single VPC, enabling them to collaborate on resources within the same network. This helps in managing and sharing network resources within an organization, and allows teams to work independently without compromising the security of the VPC.
AWS ParallelCluster is an open source cluster management tool that makes it easy for you to deploy and manage high performance computing (HPC) clusters on AWS.
Installing ParallelCluster in a shared VPC – when using Slurm as the scheduler – is often a challenge because ParallelCluster assumes that the Amazon Route53 Hosted Zone and the VPC belongs to the same account where the cluster is being created.
In this post we’ll show you a solution that gets ParallelCluster up and running in a shared VPC environment where the VPC belongs to one account and it is shared to another account for resource deployment operations.
Overview of our solution
We’ll show you how to deploy ParallelCluster into Account B using a shared VPC from infrastructure in Account A.
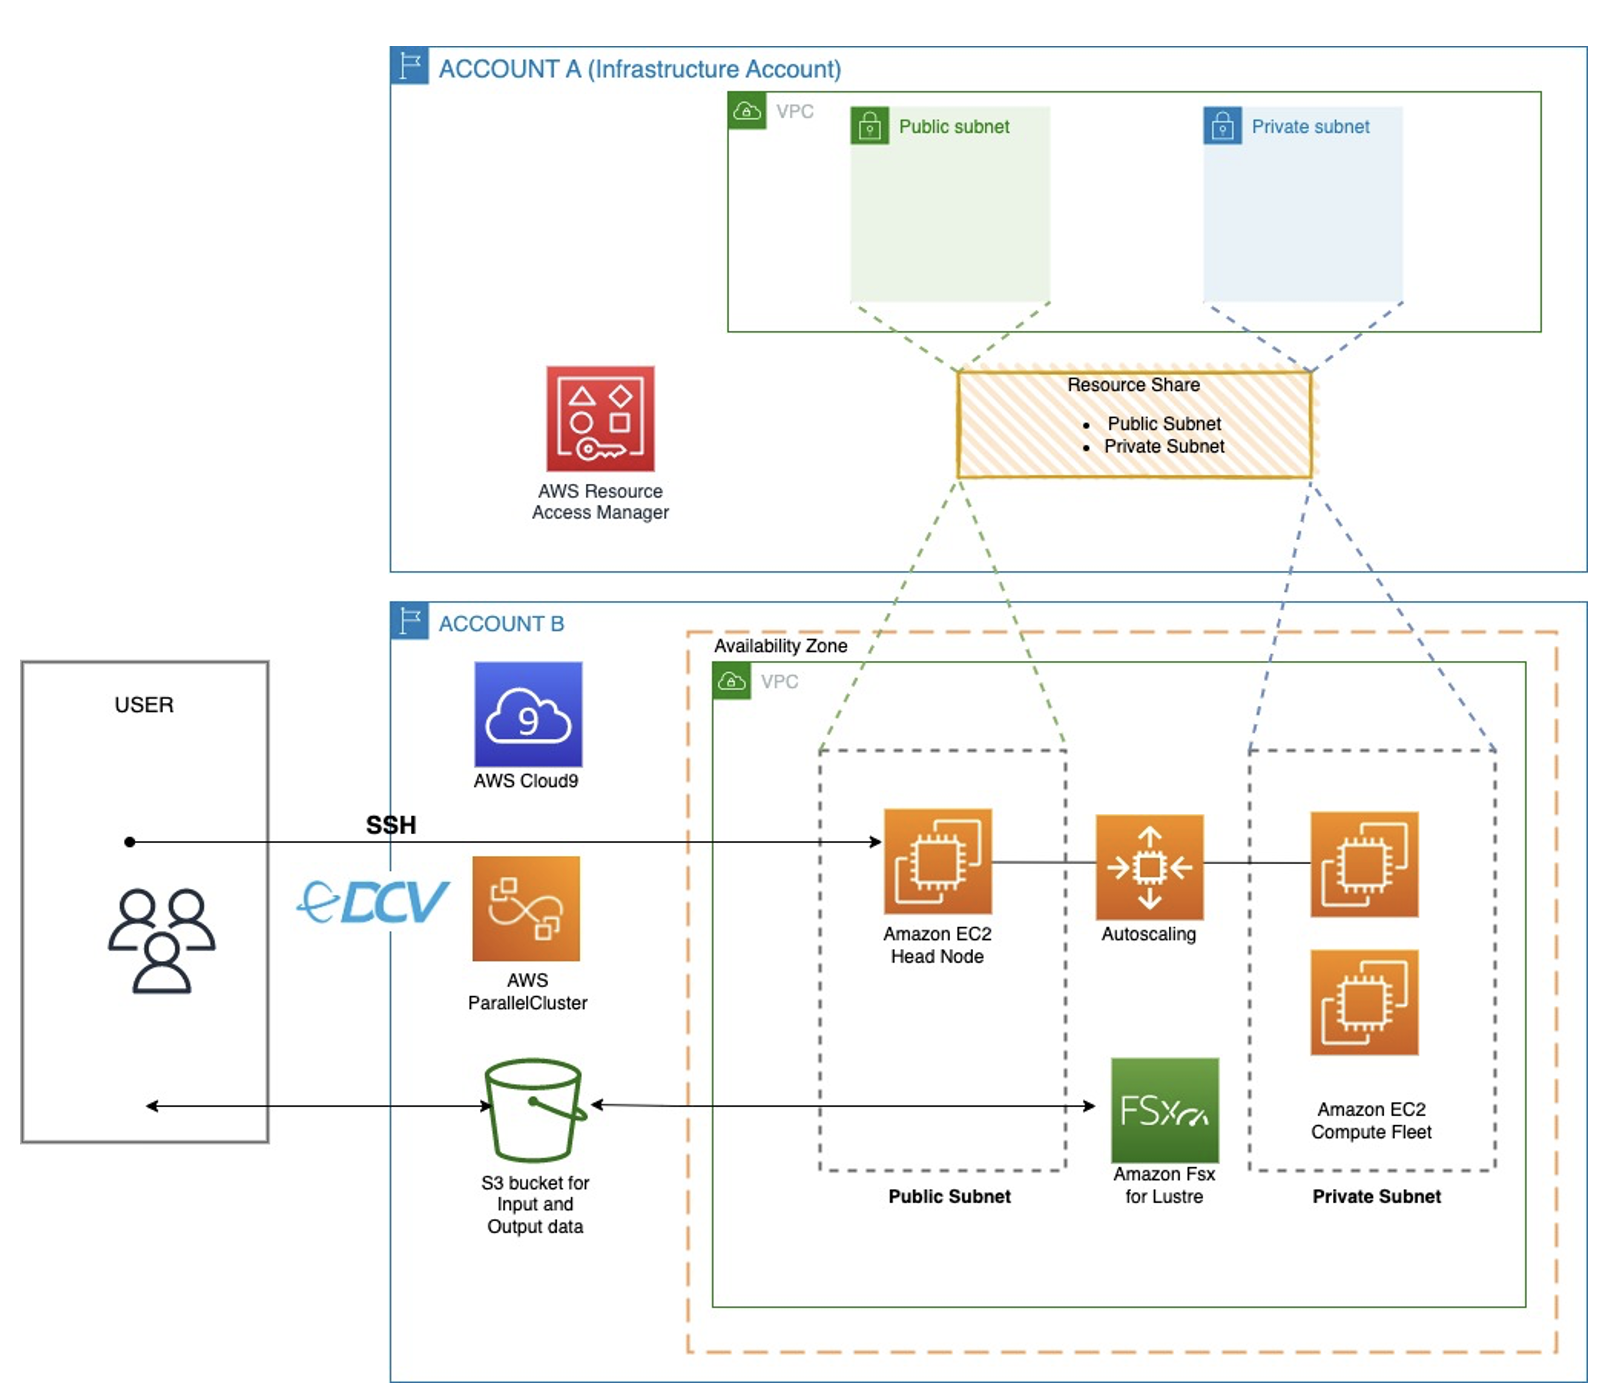
Figure 1 – VPC Resource Share created on Account A (VPC infrastructure account) and shared to Account B (ParallelCluster creation account) using AWS Resource Access Manager.
These are the steps we’ll take for the solution:
- Step 1- Create a Route 53 Private Hosted Zone and associate it with shared VPC
- Step 2- Create an additional AWS Identity and Access Management
- (IAM) Policy
- Step 3- Install AWS ParallelCluster and its configuration file
- Step 4- Modify the configuration file to add the additional policy and to include the
Hosted Zone ID - Step 5- Create a cluster using this configuration file
Prerequisites
For this walkthrough, you should have the following prerequisites:
- An AWS account B (cluster creation account) where the VPC was shared and an AWS account A (VPC account owner) where the VPC was created (like in Figure 1).
- A user with sufficient privileges to create the IAM Policy, Amazon Route53 Private Zone and to install ParallelCluster.
- AWS resources: AWS console access, AWS CLI using AWS Cloud9
Step 1 – Create Amazon Route53 Private Hosted Zone
ParallelCluster uses Amazon Route53 Private Hosted Zone to resolve cluster nodes and creating one across accounts requires the following specific procedure.
First, log in to Account B and create a Private Hosted Zone using the Route53 service console. Associate it with any existing VPC in Account B (you’ll remove this association at the end of this section). Take note of the Private Hosted Zone id you just created.
Next, using AWS Cloud9 in Account B, run the following command:
aws route53 create-vpc-association-authorization --hosted-zone-id <hosted-zone-id> --vpc VPCRegion=<region>,VPCId=<vpc-id> --region <region>This command authorizes the VPC association between the private hosted zone you just created and the VPC from Account A. Use the Hosted Zone ID that you obtained in previous step. Use the AWS region and ID of the shared VPC.
Now, using AWS Cloud9 instance in Account A, run the following command:
aws route53 associate-vpc-with-hosted-zone --hosted-zone-id <hosted-zone-id> --vpc VPCRegion=<region>,VPCId=<vpc-id> --region <region>This command creates the association between the private hosted zone in Account B and the VPC in Account A. Use the Hosted Zone ID from earlier, and the Region and ID of the VPC in Account A.
Finally, go back to the Route 53 service console on Account B and verify that the shared VPC association with the Private Hosted Zone is listed. Delete the association of the local VPC done in step A.
Step 2 – Create the IAM policy
We need to create an additional policy for the head node to have permissions to create cluster nodes in the shared VPC.
First, login to Account B and create a new IAM Policy using the following template. Use ManageHeadnodePermissions as the name of new policy. Use ID for Account A and the subnet ID from the Shared VPC where the compute nodes will be created.
{
    "Version": "2012-10-17",
   "Statement": [
        {
            "Sid": "SharedSubnets",
            "Effect": "Allow",
            "Action": [
                "ec2:CreateTags",
                "ec2:RunInstances",
                "ec2:CreateFleet"
            ],
    "Resource": "arn:aws:ec2:<region>:<Account A ID>:subnet/<Subnet ID>"
        }
    ]
}
Step 3 – Install and configure ParallelCluster
You should follow the steps to install ParallelCluster on a suitable instance or laptop. After doing so, you’ll need to create a config file for ParallelCluster to use. The pcluster configure will step you through this process, asking you some questions, and creating a new config file at the end.
pcluster configure –config config-file.yaml- Choose the AWS region ID where your shared VPC is located.
- Choose your Amazon Elastic Compute Cloud (Amazon EC2) key pair – you’ll need to have one already.
- Choose Slurm as your scheduler
- Choose <n> for VPC creation and select the existing shared VPC
- Choose an appropriate operating system
- Select appropriate instance types and queue configurations for your workload
The next step would usually be to run pcluster create to build the cluster using the choices and parameters you just entered, however before we do that, we need to delve into the configuration file that this process produced and make some changes.
Step 4 – Modify ParallelCluster configuration file
Modify your ParallelCluster configuration file to include the following using your own Hosted Zone ID and the new Policy Name you created in the previous steps ManageHeadnodePermissions
HeadNode:
  Iam:
    AdditionalIamPolicies:
      - Policy: arn:aws:iam::<Account B ID>:policy/ManageHeadnodePermissions
Scheduling:
  Scheduler: slurm
  SlurmSettings:
    Dns:
      HostedZoneId: <hosted-zone-id>
Step 5 – Create your cluster
It’s time to create your cluster. If you need to, you can find more details in our documentation. But for now, you just need to run:
pcluster create-cluster –cluster-name test-cluster –cluster-configuration cluster-config.yamlCongratulations, you have finished the creation of your cluster using AWS ParallelCluster in a shared VPC.
Cleaning up
It is a best practice to delete the association authorization after you create the association. This step prevents you from recreating the same association later and will not prevent you to create new ParallelCluster instances later. To delete the authorization, reconnect to Account A. Then, run the following command:
aws route53 delete-vpc-association-authorization --hosted-zone-id <hosted-zone-id> --vpc VPCRegion=<region>,VPCId=<vpc-id> --region <region> You might also want to delete cluster resources after you are done with your workload by running the following command:
pcluster delete-cluster –region <region> --cluster-name test-clusterConclusion
We’ve shown you how to install AWS ParallelCluster in a shared VPC environment, which means you can use a common VPC between AWS accounts inside an organization, while keeping billing and ownership separate for the users of the cluster.
When creating other clusters all you need to do is include the additional policy in the headnode section of the configuration file and make sure you use the proper Hosted Zone ID. Using AWS batch in ParallelCluster does not require any changes to the cluster configuration or Route53 entry since it relies on its own internal mechanism to resolve hostnames.