Integration & Automation
Building a CI/CD pipeline for Hugo websites
Editor’s note 6/30/2023: The information in this post is outdated. As of April 2023, Amazon S3 automatically enables S3 Block Public Access and disables S3 access control lists (ACLs) for all new S3 buckets in all AWS Regions.
If you use the Hugo framework, you’re probably familiar with the extra steps that it takes to publish your website. Extra steps include generating static HTML files and other assets from your markdown file, syncing content to your hosting platform, and changing the permissions of your content. Performing these steps manually can introduce errors, which becomes a greater concern for websites that span many collaborative projects. Hence, it’s important to automate the publishing process so that it’s consistent and efficient.
In this blog post, I show you how to automate the static file generation and content publishing process of a Hugo website by using a continuous integration (CI) and continuous delivery (CD) pipeline on the Amazon Web Services (AWS) Cloud. I use an AWS CloudFormation template to create a pipeline and Amazon Simple Storage Service (Amazon S3) to host a static website. The result is a highly scalable, reliable, fast, and inexpensive infrastructure for static content.
All the services used here are fully managed, serverless, and you only pay for what you use.
What is Hugo?
Hugo is a general-purpose framework that enables rapid generation of static websites. You write the content for your website in markdown (.md), and Hugo generates the corresponding HTML, JSON, and CSS files. This is great for authors because it allows them to focus on a post’s content without having to worry about code conversions.
Many AWS teams publish workshop content using Hugo because it provides flexible and custom solutions for generating HTML-based websites. And because Hugo websites are static by nature, they are effortlessly hosted on Amazon S3 and work well with Amazon CloudFront. This makes website hosting both effective and serverless.
Prerequisites
This blog post assumes that:
- You use the Hugo framework for your website.
- You have an AWS account.
- You have administrative access to create resources in your AWS account.
Solution overview
The following architecture of the pipeline shows how this solution enables you to automate building and publishing a Hugo website.
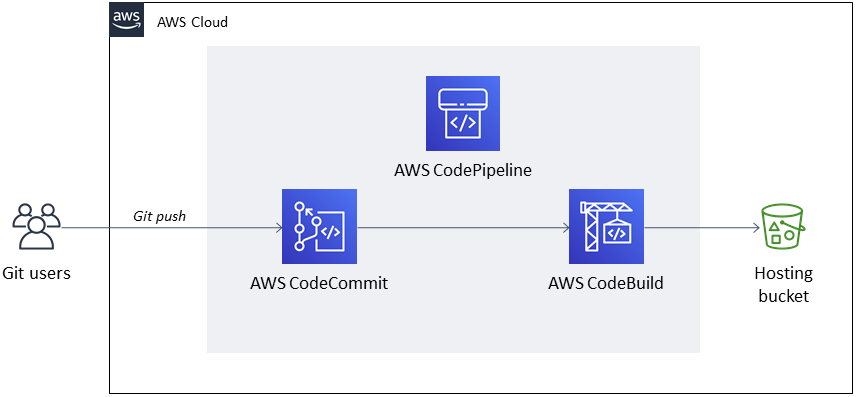
- AWS CodeCommit provides source control for the Hugo website code. It integrates directly with other AWS services that allow users to trigger different actions based on code changes.
- AWS CodePipeline is a fully managed, CI/CD pipeline on the AWS Cloud that allows you to automate the publishing of website content to an S3 bucket.
- AWS CodeBuild generates static HTML, JSON, and CSS files from the Hugo code.
Let’s review each of the components in detail to see how they work together to automate the publishing process.
Source control using AWS CodeCommit
The Hugo project comprises templates, themes, posts, and other artifacts that, when combined, represent the code base of a Hugo website. The code base must be stored in a version-controlled repository so that you can track changes and publish updates. To achieve this, I create a CodeCommit repository and upload my Hugo project to the master branch.
Creating static websites for Hugo
To create static websites for Hugo, you must use an environment with the Hugo framework installed. You then run hugo from the command line interface (CLI). This must happen every time you create and upload new content to the repository. To streamline this process, I use AWS CodePipeline and AWS CodeBuild.
With AWS CodePipeline, I define the deployment stages to create a release pipeline according to my release schedule. The pipeline then gets triggered whenever I push a change to the CodeCommit repository. The following image shows the order of the three pipeline stages: source, build, and deploy.

The source stage tells the pipeline where the source code resides. Because the Hugo project is stored in a CodeCommit repository, this stage uses AWS CodeCommit as a source provider that connects to the repository.
The build stage creates the static website using AWS CodeBuild, which has multiple prepackaged build environments. In this case, I use an Ubuntu Linux environment. To configure it and run commands, I create a build specification file, which is a YAML-based collection of build commands and related settings that CodeBuild uses. The following code block shows the contents of the file.
- Install: Instructs CodeBuild to use a runtime environment with Python 3.8 and runs commands to install the Hugo package.
- Pre-build: Instructs CodeBuild to run commands to ensure that the project’s source code is copied successfully to your environment and that all the files are available.
- Build: Provides commands to create static websites for your Hugo project. In this case, the command is
hugo -v, which creates a public folder in the current working directory for storing all of the generated files and folders.
After CodeBuild finishes executing all of the phases, it creates an output package that it uploads to the output artifact bucket. This package is defined in the build specification file (under artifacts). For a Hugo website, I package all of the contents of the public folder into the root of the output .zip file.
The final deploy stage defines where and how the output package from the build phase is deployed.
Deploying a static website to an Amazon S3 bucket
Because a Hugo website’s content is static, I can host its content in an Amazon S3 bucket (note that the S3 bucket is public). To deploy the output artifact created by CodeBuild into S3, I use the deploy stage and configure it to use a web-hosting S3 bucket as the target.
To simplify resource management, I provide a CloudFormation template that creates the following:
- An AWS CodeCommit repository where the website’s code is stored.
- An AWS CodeBuild project that generates the website’s static files.
- An Amazon S3 bucket that hosts the website’s content.
- An AWS CodePipeline that is triggered when changes are pushed to the master branch of the CodeCommit repository.
Only deploy the pipeline once. When it’s deployed, anytime you push changes to the CodeCommit repository, the changes are automatically published to its corresponding S3 bucket.
Create a deployment pipeline
To create a deployment pipeline stack, follow these steps:
- Sign in to the AWS account where you want to host your website.
- Open the CloudFormation console.
- Provide values for the following parameters.

- On the Configure stack options page, choose Next.
- On the Review page, review all of the information, and then choose Create stack.
- It takes approximately 5 minutes for stack creation to complete.
Upload website content
After the stack is created successfully, I have a CodeCommit repository that I use as source control for the website’s content. To upload your content, follow these steps:
- Clone the repository to your computer by running
git clone <repository-url>. - Copy the contents of your website, and paste them into the local folder you created in step 1.
- Commit your changes locally by running
git add, followed bygit commit -m “initial content”. - Upload the changes to the repository by running
git push.
As shown in the following image, pushing changes to the CodeCommit repository triggers the pipeline. It then runs a CodeBuild job to generate and upload the static files from the repository to the S3 bucket. Your website is now live, and this process can be repeated each time you publish a new page or update an existing page.

Cleanup
Important: Executing the following steps will delete your website permanently.
If you want to delete the pipeline and all of its associated resources, follow these steps:
- Go to the Amazon S3 console.
- Delete both the artifact bucket (where the .zip file is stored) and the website hosting bucket.
- Go to the AWS CloudFormation console, and delete the stack.
Summary
In this blog post, I explained how to use AWS CodePipeline, AWS CodeBuild, and Amazon S3 to automate the content publishing of a Hugo-based website. By using this pipeline with the Hugo framework, you ensure that your static websites are not only built efficiently but also updated consistently.
If you want to dig deeper into the CloudFormation templates that I used in this post, see the GitHub repository.
Please feel free to use the comments section to provide feedback or ask questions.