Integration & Automation
Reduce security risks from IaC drift in multi-Region AWS deployments with Terraform
Are your infrastructure as code (IaC) Terraform deployments on the Amazon Web Services (AWS) Cloud protected against drift? IaC drift, which can leave your data and resources exposed to security risks, is especially difficult to track down and remove in an environment that spans multiple AWS accounts and AWS Regions. You can do it though, and in this post we show you how.
With Terraform, drift is the difference that evolves between your cloud infrastructure and IaC configuration. Drift is most often caused by direct, untracked changes to infrastructure after an IaC environment is in production. Companies can accumulate drift as operational silos form and engineers make changes to infrastructure manually in the AWS Management Console. The more this happens, the more the cloud infrastructure diverges from the IaC configuration.
Driftctl, managed by Snyk, is an open-source tool that tracks IaC drift in production environments. Driftctl was designed with Terraform and AWS Cloud deployments in mind. In this post, we demonstrate how to use Driftctl to detect drift in a multiaccount and multi-Region Terraform deployment of AWS resources. We provide a learning experience in which you use Terraform to deploy resources into a non-production environment. After you complete the walkthrough, you should understand how to use Driftctl to remove drift in multi-Region, multiaccount Terraform IaC deployments to the AWS Cloud.
| About this blog post | |
| Time to read | ~12 min. |
| Time to complete | ~45 min. |
| Cost to complete | ~$0 |
| Learning level | Advanced (300) |
| AWS services | AWS Identity and Access Management (IAM)
Amazon Elastic Compute Cloud (Amazon EC2) |
Prerequisites
Before getting started, ensure that that you have the following.
- Two AWS accounts, named Account A and Account B. If you don’t have an AWS account, sign up at https://aws.amazon.com. Create access keys for both accounts. Download or copy your access keys, because you will need them in the walkthrough.
- An IAM user in each AWS account. Configure both users with
ReadOnlyAccess,AmazonEC2FullAccess, andAmazonS3FullAccesspolicies. - Version 2.2.43 or later of the AWS Command Line Interface (AWS CLI).
- Unix shell or Git bash.
- Python version 3.8 or later.
- Jq version 1.6 or later.
- Terraform version 1.0 or later.
Walkthrough
In the walkthrough, you perform the following steps:
- Step 1: Deploy the infrastructure.
- Step 2: Run a baseline Driftctl scan.
- Step 3: Generate a summary drift report.
- Step 4: Introduce drift.
- Step 5: Scan and report to detect drift.
- Step 6: Generate a detailed summary drift report.
Step 1: Deploy the infrastructure
In this section, you learn how to use Terraform to deploy Amazon Elastic Compute Cloud (Amazon EC2) instances into two Regions in Account A and Account B.
- Run the following commands to configure named profiles for Account A. Substitute access keys from Account A for
<AWS_ACCESS_KEY_ID>and<AWS_SECRET_ACCESS_KEY>.
- Verify Driftctl installation by running the following command.
driftctl -h
If the installation is successful, the command should return the output shown in Figure 1.

Figure 1. Successful driftctl -h output
- Clone the GitHub repository we’ve prepared.
git clone https://github.com/aws-samples/driftctl-cross-account-cross-region.git && cd driftctl-cross-account-cross-region
- Initialize and apply the Terraform configuration in both accounts.
Step 2: Run a baseline Driftctl scan
In this section, you run a baseline scan of the accounts using Driftctl and generate output in JSON and HTML format. Note: If any of the commands return a ThrottlingException: Rate exceeded error, consider requesting a quota increase for account A and account B.
- Run the following commands to scan
us-east-1of Account A and generate JSON and HTML output.
- Run the following commands to scan
us-west-2of Account A and generate JSON and HTML output.
- Run the following commands to scan
us-east-1of Account B and generate JSON and HTML output.
- Run the following commands to scan
us-west-2of Account A and generate JSON and HTML output.
Step 3: Generate a summary drift report
In this section you use a Python script to create a report that combines the Driftctl JSON output of both AWS accounts. To obtain Region and account ID information, the script runs a terraform output command in each location with driftctl-result.json.
Run the following commands to set up Python’s Venv module and generate a summary report.
Figure 2 shows the output of the report. At this point, there is no drift. The number of resources in the Terraform state file matches the resources deployed on AWS.
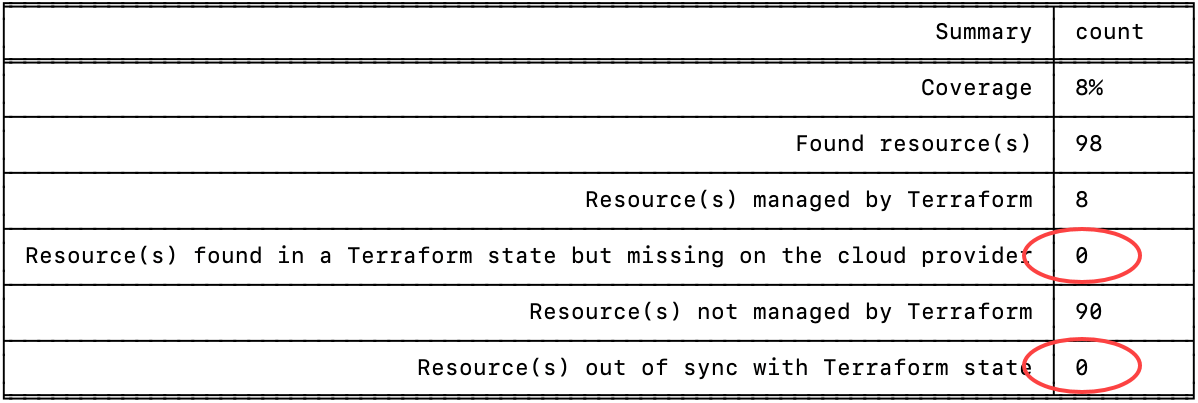
Figure 2. Summary Driftctl report
Note: For a complete list of report options, run python3 driftctl_result.py -h.
Step 4: Introduce drift
In this section you introduce drift by adding tags, stopping instances, and adding unmanaged security groups.
Note: We demonstrate how to introduce drift using the AWS CLI. You could also introduce drift manually using the AWS Management Console.
- Add tags to the EC2 instance running in Account A,
us-east-1Region.
- Stop the EC2 instance running in Account A,
us-west-2Region.
- Add a security group to the EC2 instance running in Account B,
eu-west-1Region.
- Terminate the EC2 instance in Account B,
us-west-2Region.
Step 5: Scan and report to detect drift
Now you’ll run a second set of Driftctl scans of us-east-1 and us-west-2 in both of our AWS accounts.
- Run the following commands to scan
us-east-1of Account A and generate JSON and HTML output.
- Run the following commands to scan
us-west-2of Account A and generate JSON and HTML output.
- Run the following commands to scan
us-east-1of Account B and generate JSON and HTML output.
- Run the following commands to scan
us-west-2of Account B and generate JSON and HTML output.
Step 6: Generate a detailed summary drift report
Run the following command to generate a detailed summary report of the second round of scans.
python3 driftctl_result.py --detailed
The second report, shown in Figure 3, tells a different story than the first. The second report catches the drift you introduced between the Terraform state and the deployment in the AWS Cloud. The detail section of the report correctly identifies the changes you made in Step 4.

Figure 3. Detailed summary report
Cleanup
To avoid incurring future charges, run the following commands to delete the resources you deployed.
Conclusion
In this post, we demonstrated how to reduce security risks from IaC drift using Driftctl. We demonstrated using Driftctl to identify drift in a multi-Region and multiaccount AWS deployment. In the walkthrough, we showed you how to apply a Terraform configuration of Amazon EC2 instances to two AWS accounts and run baseline scans. Then we had you introduce drift using the AWS CLI, and run a second set of scans that detected your manual changes. Also, we showed how to generate a summary report of scan results across multiple AWS accounts using a Python script.
Integrate Driftctl with your DevOps workflow to monitor drifts in your multiaccount and multi-Region deployments with Terraform. For example, you could configure an Amazon EventBridge rule to invoke Driftctl on a regular schedule. If you are already using Synk for static application security testing (SAST), try Synk Infrastructure as Code and Snyk integration with AWS.
Please leave us feedback in the Comments section.
About the authors
 Moiz Sharaf
Moiz Sharaf is a DevOps consultant with AWS Professional Services. He works with AWS Global Financial Services customers to help them deliver highly scalable and performant DevSecOps solutions. He enjoys automating everything and building IaC using the full gamut of IaC tools and technologies. He also enjoys cooking and travelling. To connect, visit Moiz’s LinkedIn profile.
 Arpit Shah
Arpit is a senior cloud infrastructure architect for the AWS Professional Services – Global Financial Services team, based in London. Arpit helps large financial customers accelerate cloud adoption and build secure, resilient, scalable, and high-performance cloud applications. Arpit enjoys cycling, following cricket, and spending time with his family. To connect, visit Arpit’s LinkedIn profile.
 Jaydev Goswami
Jaydev Goswami is a senior cloud infrastructure architect with AWS Professional Services. He helps AWS Global Financial Services customers realize their business and strategic goals using AWS services. To connect, visit Jaydev’s LinkedIn profile.