Integration & Automation
Save time with automated security checks of your Terraform scripts
Looking for a way to automate security checks of your Terraform scripts directly into your continuous integration and continuous delivery (CI/CD) pipeline? How about a way to view the results of those security checks and address issues before deployment, all with built-in notifications? Then check out our solution using Checkov, a static code analysis tool for flagging security and compliance problems.
In our solution, we provide a sample GitHub repository with all the required artifacts code to initiate and run a pipeline using AWS CodePipeline, AWS CodeCommit, and AWS CodeBuild. When you clone the repository and commit updates to the provided Terraform scripts, you trigger a workflow that eventually ends with a Failed status due to security issues with logging and traffic restrictions. You view the results of the check, fix the issues by updating the Terraform scripts, and restart the pipeline workflow until the AWS resources are successfully provisioned. In our solution, the main AWS resource that you provision is a virtual private cloud (VPC).
| About this blog post | |
| Time to read | ~10 min. |
| Time to complete | ~30 min. |
| Cost to complete | $0 |
| Learning level | Advanced (300) |
| AWS services | AWS CodePipeline
AWS CodeCommit AWS CodeBuild Amazon DynamoDB Amazon Simple Storage Service (Amazon S3) Amazon VPC AWS Key Management Service (AWS KMS) AWS Identity and Access Management (IAM) Amazon EventBridge AWS Lambda Amazon Simple Email Service (Amazon SES) AWS Command Line Interface (AWS CLI) |
About the Terraform scripts
The Terraform scripts used in our solution are configured with a Terraform state file and locking mechanism. The Terraform state defines the configuration, maps resources to the configuration, keeps track of metadata, and improves performance. By default, the Terraform state file is named terraform.tfstate and is stored locally, but we have configured it to be stored in an Amazon S3 bucket so that it’s available for team collaboration.
To ensure security of the shared state file, the Terraform scripts configure an Amazon DynamoDB table to store a locking mechanism to prevent concurrent access to the terraform.tfstate file.
Pipeline workflow
Figure 1 shows the stages of the pipeline used in the solution. The steps below the figure provide details about each stage.
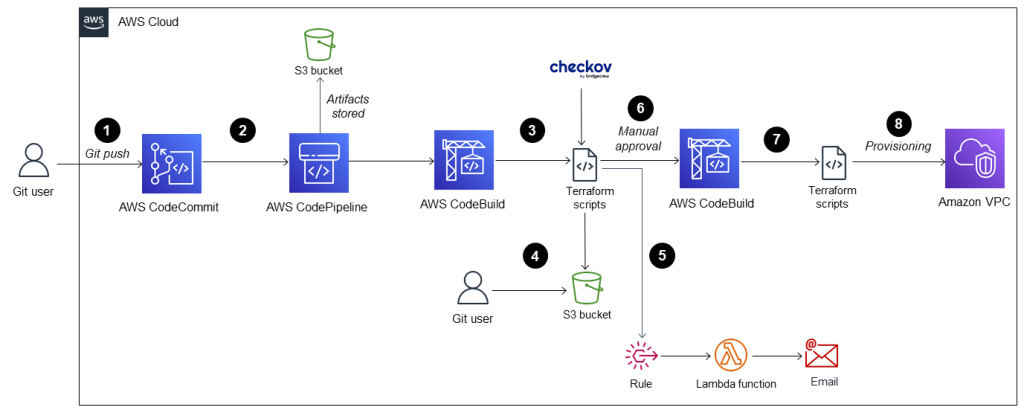
Figure 1: Pipeline workflow
- The user commits and pushes the initial Terraform scripts and pipeline definition to the CodeCommit repository.
- CodePipeline begins running the pipeline and stores the artifacts in an Amazon S3 bucket. Artifacts include the Terraform state and locking mechanism.
- CodeBuild validates and deploys the Terraform scripts in the following stages:
- Configures a compute environment and installs Terraform, Checkov, jq, and other required tools.
- Clones the Terraform scripts from the CodeCommit repository.
- Provisions the build environment with Terraform, Checkov, jq, and other required components.
- Generates the Terraform state file.
- Runs the Terraform scripts against Checkov.
- The Checkov validation results are pushed to a second Amazon S3 bucket that’s provisioned specifically for storing the validation results file. The pipeline is paused while the user checks the results.
- If the results are unsuccessful, an EventBridge rule triggers an AWS Lambda function to fetch the validation results file from the Amazon S3 bucket and send it an email attachment to the user via Amazon SES.
- If the results are successful, the user performs a manual approval.
- CodeBuild validates and deploys the Terraform scripts in the following stages:
- Clones the Terraform scripts from the AWS CodeCommit repository.
- Provisions the build environment with Terraform, Checkov, jq, and other required components.
- Generates the Terraform state file.
- Runs the Terraform scripts against Checkov.
- The Terraform scripts provision the VPC and other AWS infrastructure and resources.
Prerequisites
- An AWS account. If you don’t have an account, sign up at https://aws.amazon.com.
- Basic understanding of Checkov.
- An installation of AWS CLI.
- An installation of Terraform.
- A configuration of CodeCommit credentials. Refer to Setup for HTTP users using Git credentials for more information.
Solution overview
In the sections that follow, you perform the following steps:
- Step 1: Clone the Git Hub repository that contains the tools, artifacts, and scripts used in the walkthrough.
- Step 2: Configure the Terraform state and locking mechanism.
- Step 3: Set up the CI/CD pipeline.
- Step 4: Populate the CodeCommit repository for triggering AWS CodePipeline and provisioning an Amazon S3 bucket to store artifacts.
- Step 5; Retrieve and view the status of the pipeline. The status is in Failed state on purpose to show how Checkov flagged and reported security issues.
- Step 6: Provide a fix to the CodeCommit repository.
- Step 7: Approve the pipeline and verify that the Terraform scripts are correct will successfully provision AWS resources.
Walkthrough
Step 1: Clone the GitHub repository
Clone the GitHub repository to your local machine. This repository contains all the code and pipeline artifacts that you’ll need for the walkthrough.
Step 2: Configure the Terraform state and locking mechanism
To configure the Terraform state, an Amazon DynamoDB table to store the Terraform state locking mechanism, and an Amazon S3 bucket to store them, complete the following steps:
- Using Amazon CLI, navigate to the aws-samples/terraform-checkov-validation-pipeline/code/state folder in your cloned repository.
- Open the terraform.tfvars file in edit mode and define values for your Region, Amazon S3 bucket, and DynamoDB table. Save your updates.
- Run the following commands:
terraform init
terraform plan
terraform apply --auto-approve
Step 3: Configure the CI/CD pipeline
To configure the CI/CD pipeline with the required components, complete the following steps:
- Navigate to the aws-samples/terraform-checkov-validation-pipeline/code/pipeline directory in your cloned repository.
- Open the backend.tfvars file and define the names of the Amazon S3 bucket and the DynamoDB table that you created in step 2. Save your updates.
- Open the terraform.tfvars file and define your parameters to configure the pipeline and its required components. Save your updates.
- To deploy the Terraform scripts, run the following commands:
terraform init -backend-config=backend.tfvars
terraform plan
terraform apply --auto-approve
Step 4: Populate the CodeCommit repository
Complete the following steps:
- Sign in to the Amazon Web Services Management Console, open the IAM console at https://console.aws.amazon.com/iam/, and navigate to your AWS Region.
- Locate the repository that you provisioned using the Terraform script, as shown in Figure 2:

Figure 2: CodeCommit repository
- Choose the clone URL from the list, and copy the HTTPS URL protocol.
- To connect to the repository, open a command prompt and run the Git clone command with the HTTPS URL that you copied in the previous step.
- Navigate to aws-samples/terraform-checkov-validation-pipeline/code/initial_code directory and update both the backend.tfvars and terraform.tfvars files with the values that are specific to your environment.
- Copy the Terraform scripts to the cloned repository.
- To upload the files to CodeCommit, run the following commands:
git add .
git commit -m “added initial code”
git push
Step 5: View the CodePipeline status
Now that the code is updated in the CodeCommit repository, the pipeline is released automatically, and the status moves through the various stages. Checkov analyzes the Terraform scripts and produces a Failed status at the Validate stage, as shown in Figure 3.
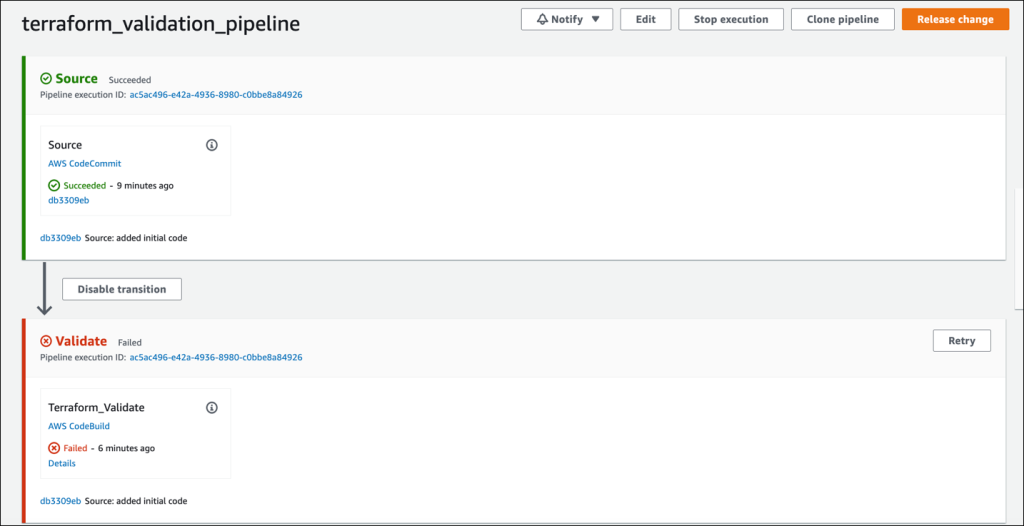
Figure 3: Failed status after Checkov validation
To identify the list of failed checks, access the Amazon S3 bucket that stores the Terraform validation results and download the checkov_output.txt file. As shown in the following code example, the Checkov validation failed because the VPC flow logging isn’t enabled, and the default security group of the VPC is not configured to restrict all traffic. You will fix these issues with an updated Terraform script that we provide to you in the next step.
_ _
___| |__ ___ ___| | _______ __
/ __| '_ \ / _ \/ __| |/ / _ \ \ / /
| (__| | | | __/ (__| < (_) \ V /
\___|_| |_|\___|\___|_|\_\___/ \_/
By bridgecrew.io | version: 2.0.1140
terraform_plan scan results:
Passed checks: 4, Failed checks: 2, Skipped checks: 0
Check: CKV_AWS_130: "Ensure VPC subnets do not assign public IP by default"
PASSED for resource: aws_subnet.private_subnet1
File: /tf.json:19-36
Guide: https://docs.bridgecrew.io/docs/ensure-vpc-subnets-do-not-assign-public-ip-by-default
Check: CKV_AWS_130: "Ensure VPC subnets do not assign public IP by default"
PASSED for resource: aws_subnet.private_subnet2
File: /tf.json:51-68
Guide: https://docs.bridgecrew.io/docs/ensure-vpc-subnets-do-not-assign-public-ip-by-default
Check: CKV_AWS_130: "Ensure VPC subnets do not assign public IP by default"
PASSED for resource: aws_subnet.public_subnet1
File: /tf.json:83-100
Guide: https://docs.bridgecrew.io/docs/ensure-vpc-subnets-do-not-assign-public-ip-by-default
Check: CKV_AWS_130: "Ensure VPC subnets do not assign public IP by default"
PASSED for resource: aws_subnet.public_subnet2
File: /tf.json:115-132
Guide: https://docs.bridgecrew.io/docs/ensure-vpc-subnets-do-not-assign-public-ip-by-default
Check: CKV_AWS_130: "Ensure VPC subnets do not assign public IP by default"
FAILED for resource: aws_subnet.public_subnet1
File: /plan_output.json:100-119
Guide: https://docs.bridgecrew.io/docs/ensure-vpc-subnets-do-not-assign-public-ip-by-default
101 | "values": {
102 | "assign_ipv6_address_on_creation": false,
103 | "cidr_block": "10.0.1.0/24",
104 | "customer_owned_ipv4_pool": null,
105 | "enable_dns64": false,
106 | "enable_resource_name_dns_a_record_on_launch": false,
107 | "enable_resource_name_dns_aaaa_record_on_launch": false,
108 | "ipv6_cidr_block": null,
109 | "ipv6_native": false,
110 | "map_customer_owned_ip_on_launch": null,
111 | "map_public_ip_on_launch": true,
112 | "outpost_arn": null,
113 | "tags": {
114 | "Name": "Public_Subnet1"
115 | },
116 | "tags_all": {
117 | "Name": "Public_Subnet1"
118 | },
119 | "timeouts": null
Check: CKV_AWS_130: "Ensure VPC subnets do not assign public IP by default"
FAILED for resource: aws_subnet.public_subnet2
File: /plan_output.json:132-151
Guide: https://docs.bridgecrew.io/docs/ensure-vpc-subnets-do-not-assign-public-ip-by-default
133 | "values": {
134 | "assign_ipv6_address_on_creation": false,
135 | "cidr_block": "10.0.2.0/24",
136 | "customer_owned_ipv4_pool": null,
137 | "enable_dns64": false,
138 | "enable_resource_name_dns_a_record_on_launch": false,
139 | "enable_resource_name_dns_aaaa_record_on_launch": false,
140 | "ipv6_cidr_block": null,
141 | "ipv6_native": false,
142 | "map_customer_owned_ip_on_launch": null,
143 | "map_public_ip_on_launch": true,
144 | "outpost_arn": null,
145 | "tags": {
146 | "Name": "Public_Subnet2"
147 | },
148 | "tags_all": {
149 | "Name": "Public_Subnet2"
150 | },
151 | "timeouts": null
Check: CKV2_AWS_11: "Ensure VPC flow logging is enabled in all VPCs"
FAILED for resource: aws_vpc.vpc
File: /tf.json:147-161
Guide: https://docs.bridgecrew.io/docs/logging_9-enable-vpc-flow-logging
148 | "assign_generated_ipv6_cidr_block": null,
149 | "cidr_block": "10.0.0.0/16",
150 | "enable_dns_hostnames": true,
151 | "enable_dns_support": true,
152 | "instance_tenancy": "default",
153 | "ipv4_ipam_pool_id": null,
154 | "ipv4_netmask_length": null,
155 | "ipv6_ipam_pool_id": null,
156 | "ipv6_netmask_length": null,
157 | "tags": {
158 | "Name": "myvpc"
159 | },
160 | "tags_all": {
161 | "Name": "myvpc"
Check: CKV2_AWS_12: "Ensure the default security group of every VPC restricts all traffic"
FAILED for resource: aws_vpc.vpc
File: /tf.json:147-161
Guide: https://docs.bridgecrew.io/docs/networking_4
148 | "assign_generated_ipv6_cidr_block": null,
149 | "cidr_block": "10.0.0.0/16",
150 | "enable_dns_hostnames": true,
151 | "enable_dns_support": true,
152 | "instance_tenancy": "default",
153 | "ipv4_ipam_pool_id": null,
154 | "ipv4_netmask_length": null,
155 | "ipv6_ipam_pool_id": null,
156 | "ipv6_netmask_length": null,
157 | "tags": {
158 | "Name": "myvpc"
159 | },
160 | "tags_all": {
161 | "Name": "myvpc"
Step 6: Provide a fix to the CodeCommit repository
To solve the Checkov issues that created the Failed status, use the code fix provided in your cloned repository. Complete the following steps:
- Navigate to the aws-samples/terraform-checkov-validation-pipeline/code/updated_code_with_checkov_recommendation directory.
- Update the backend.tfvars and terraform.tfvars files with values that are specific to your environment.
- Copy the Terraform scripts.
- Navigate to the cloned repository and delete all existing Terraform scripts.
- Paste the Terraform scripts in the cloned repository.
- To upload the script files to CodeCommit, run the following commands:
git add .
git commit -m “added code with checkov remediation”
git push
The pipeline runs again, and the Validate stage now displays Succeeds status. The pipeline waits at the Approve_Reject stage for manual approval.
Step 7: Approve the pipeline and confirm provisioning
Complete the following steps:
- Navigate to the Amazon S3 bucket that stores the Terraform validation results and download the plan_output.json file. This file contains information about the resources that are provisioned by Terraform, including their configurations.
- If the resource configurations are correct, approve the pipeline Approve_Reject stage.The pipeline transitions to the Deploy stage, and control is transferred to Terraform. Terraform provisions the AWS resources according to the configurations that are defined in the scripts.
- To verify that the resources are provisioned as expected, navigate to the Amazon VPC console and confirm that the VPC has been provisioned with flow logs enabled.
The pipeline has now successfully provisioned the VPC and other resources.
Cleanup
To avoid incurring future charges, complete the following steps to delete the resources:
- Navigate to the aws-samples/terraform-checkov-validation-pipeline/code/pipeline directory in your cloned repository.
- Update the buildspec_terraform_validation.yml file by removing the following content:
finally:
- aws s3 cp plan_output.json
$TERRAFORM_VALIDATION_RESULT_BUCKET
- aws s3 cp checkov_output.txt
$TERRAFORM_VALIDATION_RESULT_BUCKET - Commit the changes.
- Update the buildspec_deploy.yml file and replace the
terraform apply --auto-approvecommand with the following command:terraform destroy --auto-approve - Sign in to the AWS Management Console and open the Amazon S3 console at https://console.aws.amazon.com/s3/. Delete all the objects from the Terraform validation result bucket.
- Release the pipeline. Wait for the pipeline to run successfully.
- Back in the Amazon S3 console, delete all the objects in the CodePipeline artifact bucket.
- Navigate to aws-samples/terraform-checkov-validation-pipeline/code/pipeline directory and run following command:
terraform destroy --auto-approve - Back in the Amazon S3 console, delete all the objects of Terraform state bucket.
- Navigate to aws-samples/terraform-checkov-validation-pipeline/code/state directory and run following command:
terraform destroy --auto-approve
Conclusion
In this walkthrough, you learned how to integrate Checkov into CodePipeline with fully automated pre-deployment compliance checks of your Terraform scripts, including built-in notifications. Our solution provides an end-to-end, automated CI/CD pipeline that allows you to stay compliant with AWS best-practices with minimal operational overhead.
As a next step, we invite you to access the following resources:
- Checkov website
- Checkov GitHub repository
- Checkov AWS workshop studio lab
Also, if you have feedback about this walkthrough or the article in general, please leave us a comment on this page.
About the authors
 Anish Kumar
Anish Kumar is a Cloud Architect in the AWS Professional Services team based out of India. Anish works with enterprises to transform their security posture through best practices education and developing security controls and infrastructure automation. Anish has background in infrastructure, DevOps, containers, and management tools.
 Rishabh Yadav
Rishabh Yadav is a Partner Solutions architect at AWS with an extensive background in DevOps and security offerings at AWS. He works with the ASEAN partners to provide guidance on enterprise cloud adoption and architecture reviews along with building AWS practice through the implementation of Well-Architected Framework. Outside of work, he likes to spend his time in the sports field and FPS gaming.