Artificial Intelligence
Accelerate your generative AI distributed training workloads with the NVIDIA NeMo Framework on Amazon EKS
In today’s rapidly evolving landscape of artificial intelligence (AI), training large language models (LLMs) poses significant challenges. These models often require enormous computational resources and sophisticated infrastructure to handle the vast amounts of data and complex algorithms involved. Without a structured framework, the process can become prohibitively time-consuming, costly, and complex. Enterprises struggle with managing distributed training workloads, efficient resource utilization, and model accuracy and performance. This is where the NVIDIA NeMo Framework comes into play. In this post, we present a step-by-step guide to run distributed training workloads on an Amazon Elastic Kubernetes Service (Amazon EKS) cluster.
NVIDIA NeMo Framework
NVIDIA NeMo is an end-to-end cloud-centered framework for training and deploying generative AI models with billions and trillions of parameters at scale. The NVIDIA NeMo Framework provides a comprehensive set of tools, scripts, and recipes to support each stage of the LLM journey, from data preparation to training and deployment. It offers a variety of customization techniques and is optimized for at-scale inference of models for both language and image applications, using multi-GPU and multi-node configurations. NVIDIA NeMo simplifies generative AI model development, making it more cost-effective and efficient for enterprises. By providing end-to-end pipelines, advanced parallelism techniques, memory-saving strategies, and distributed checkpointing, NVIDIA NeMo makes sure AI model training is streamlined, scalable, and high-performing.
The following are benefits of using NVIDIA NeMo for distributed training:
- End-to-end pipelines for different stages such as data preparation, training, and more, which allows for a plug-and-play approach for your custom data
- Parallelism techniques, including the following:
- Data parallelism
- Tensor parallelism
- Pipeline parallelism
- Sequence parallelism
- Expert parallelism
- Context parallelism
- Memory saving techniques, including the following:
- Selective activation recompute
- CPU offloading (activation, weights)
- Attention, including Flash Attention (FA 1/2, FA-cuDNN), Grouped Query Attention, Multi-Query Attention, and Sliding Window Attention
- Distributed optimizers, including Torch FSDP, Distributed Optimizer (zero-1)
- Data loaders for different architectures
- Distributed checkpointing
Solution overview
You can deploy and manage NVIDIA NeMo using either Slurm or Kubernetes orchestration platforms. Amazon EKS is a managed Kubernetes service that makes it straightforward to run Kubernetes clusters on AWS. It manages the availability and scalability of the Kubernetes control plane, and it provides compute node auto scaling and lifecycle management support to help you run highly available container applications.
Amazon EKS is an ideal platform for running distributed training workloads due to its robust integrations with AWS services and performance features. It seamlessly integrates with Amazon FSx for Lustre, a high-throughput file system, enabling fast data access and management using persistent volume claims with the FSx CSI driver. Amazon EKS also integrates with Amazon CloudWatch for comprehensive logging and monitoring, providing insights into cluster performance and resource utilization. It supports Amazon Simple Storage Service (Amazon S3) for scalable and durable data storage and management, providing accessibility for large datasets. Enhanced network performance is achieved with Elastic Fabric Adapter (EFA), which offers low-latency, high-throughput connectivity between nodes. These features collectively make Amazon EKS a powerful and efficient choice for optimizing AI and machine learning (ML) training workflows.
The following diagram shows the solution architecture.
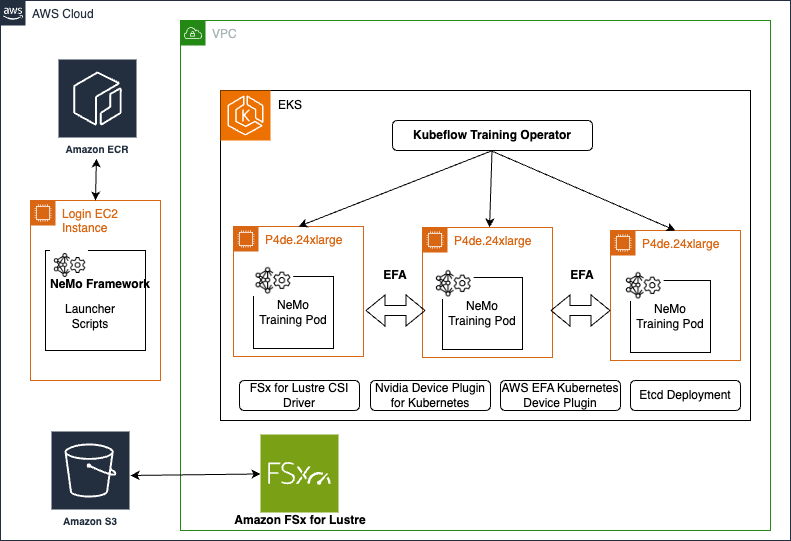
In this post, we present the steps to run distributed training workloads on an EKS cluster. The high-level steps are as follows:
- Set up an EFA enabled 2-node 24xlarge cluster.
- Set up an FSx for Lustre file system so you can have a shared data repository for storing training dataset and model checkpoints.
- Set up an environment for NVIDIA NeMo.
- Modify the NVIDIA NeMo Kubernetes manifests to prepare a dataset and train a model.
Prerequisites
You need to be able to launch a CPU-based Amazon Elastic Compute Cloud (Amazon EC2) instance that you’ll use to create the EKS cluster. When your instance is up and running, SSH into your EC2 instance and install the following CLIs:
- The latest version of the AWS Command Line Interface (AWS CLI)
- kubectl
- eksctl
- helm
These steps may change if you are on a non-Linux platform. Consult the preceding documentation for installing the CLIs on other platforms accordingly. We also require that you have a capacity reservation with p4de.24xlarge instances and have the capacityReservationID.
Launch an EKS cluster
ECR p4de.24xlarge instances have the NVIDIA A100 80GB instances, which are highly popular for distributed training generative AI workloads. For more information, refer to Amazon EC2 Instance Types. In this section, we show how to create an EKS cluster with an On-Demand Capacity Reservation for p4de.24xlarge instances.
- We provide the cluster creation config in p4de-cluster-config.yaml. See the following code:
The following are key points to note when creating this cluster:
- Make sure the kubectl version and the specified Region are correct.
- Update the
capacityReservationIDfield and make sure to specify theavailabilityZoneswithin themanagedNodeGroupssection, which should be the same Availability Zone ID in which your capacity lives. - This configuration will create two managed node groups: one for the system nodes using
c5.2xlargeinstances and another for running distributed training onp4de.24xlargeinstances. Managed node groups will use Amazon EKS optimized AMIs. If you want to provide a custom AMI, you can create a self-managed node group and specify a custom AMI. To find the AMI ID, refer to Retrieving Amazon EKS optimized Amazon Linux AMI IDs. For more details about the Amazon EKS optimized AMI, see the GitHub repo. - Make sure
efaEnabledis set totrue. You can use the same config for creating a cluster with other node groups. For a list of EFA supported instance types, see Supported instance types. - Another popular instance for generative AI distributed training workloads is the
p5.48xlargeinstance with the NVIDIA H100 80 GB GPU. To add a P5 node group to an existing EKS cluster, refer to AWS CLI scripts for EKS management.
- After the cluster is created, you can enable kubectl to communicate with your cluster by adding a new context to the kubectl config file:
- You can confirm communication with your cluster by running the following command:
Next, you can install the AWS EFA Kubernetes Device Plugin. EFA is a network interface for EC2 instances that enhances the performance of inter-node communications, which is critical for distributed training workloads that involve GPUs. This plugin allows Kubernetes to recognize and utilize the EFA device, facilitating high-throughput, low-latency networking necessary for efficient distributed training and deep learning applications.
- Install the plugin with the following code:
The NVIDIA device plugin for Kubernetes enables GPU support within your EKS cluster by exposing the GPUs to the Kubernetes API server through the kubelet. It advertises the available GPU resources, allowing Kubernetes to schedule and manage GPU-accelerated workloads.
- Install the plugin with the following code:
- Run the following command to verify all the pods:

- You can run
kubectl get nodesto verify the nodes.
Alternatively, you can use the EKS node viewer tool to view nodes, their costs, and their status in your cluster. After it’s installed, enter eks-node-viewer to get the following view.

The node viewer displays the IP addresses of our two p4de.24xlarge compute nodes.
- We can choose one of these private IP DNS names to further examine and describe the node as follows:
The preceding command describes a lot of detail of the node. To make sure EFA is installed correctly, make sure you see details as shown in the following screenshot.

For p4 nodes, you will see vpc.amazonaws.com/efa:4 and for p5.48xlarge nodes, you should see vpc.amazonaws.com/efa:32.
If EFA is enabled in the node group, make sure that a security group is attached to the nodes that allows a rule to allow all outgoing traffic originating from the same security group. This is required for EFA to work. For instructions, see Get started with EFA and MPI. This security group is intended for testing purposes only. For your production environments, we recommend that you create an inbound SSH rule that allows traffic only from the IP address from which you are connecting, such as the IP address of your computer, or a range of IP addresses in your local network.
Create an FSx for Lustre file system
For distributed training applications, typically hundreds of GPU instances are used, with each node containing multiple GPUs. It is crucial that all nodes can access a shared file system to train on the same dataset efficiently. For this purpose, a high-performance file system with high throughput and low latency is essential. We recommend using the FSx for Lustre file system for large-scale distributed training, because it meets these requirements and provides seamless data access for all nodes involved in the training process.
To have a FSx for Lustre file system mounted on your EKS cluster, complete the following steps:
- Use the following scripts to create an AWS Identity and Access Management (IAM) role and attach the FSx policy:
- Use the following script to create a security group that allows EKS nodes to access the file system:
- Create a 1.2 TB Persistent_2 FSx for Lustre file system from the FSx for Lustre console in the same Availability Zone as your compute instances (
FSX_SUBNET_ID), VPC of Amazon EKS (VPC_ID), and the security group you created (SECURITY_GROUP_ID). - After the file system is created, note the file system ID, DNS name, and mount name from the file system details page.

Before mounting the file system, you need to install the FSx CSI driver that allows EKS clusters to manage the lifecycle of FSx for Lustre file systems.
- Install the FSx CSI driver as follows:
- Next, to mount the file system, provide scripts in the fsx-storage-class.yaml, fsx-pv.yaml and fsx-pvc.yaml files:
You can check to make sure that the volumes are in Bound state.

Set up the environment for NVIDIA NeMo
For this post, we use the NVIDIA device plugin for Kubernetes, but if you need to install the GPU Operator, you can do so as follows:
To enable distributed training, we use the KubeFlow Training Operator, which is essential for managing and scheduling ML training jobs in a Kubernetes environment. This operator simplifies the process of running distributed training jobs by automating the deployment and scaling of the necessary components. See the following code:
Additionally, we use the KubeFlow MPI Operator for preprocessing training data in parallel. The MPI Operator facilitates running Message Passing Interface (MPI) jobs, which are crucial for parallelizing the preprocessing tasks across multiple nodes, thereby speeding up the training process. See the following code:
The NVIDIA NeMo Framework is available publicly in the image nvcr.io/nvidia/nemo:24.01.framework. We provide an AWS optimized Dockerfile for use with P4 and P5 instances. We recommend the following library versions for optimal performance:
You can build and push the image to Amazon Elastic Container Registry (Amazon ECR) as follows:
The NVIDIA NeMo Framework requires users to provide config files with job and model information. You can copy the launcher scripts from the container as follows:
In a Slurm cluster implementation, the launcher scripts, data, and results folder could reside in the file system that both the head node (node from where jobs are submitted) and compute nodes access. But in this Amazon EKS implementation, the node that you used to create the EKS cluster doesn’t have access to EKS file system. To get around this, you can put the launcher scripts in the head node and the results and data folder in the file system that the compute nodes have access to.
Run NVIDIA NeMo on an EKS cluster
We’re now ready to set up NVIDIA NeMo Kubernetes manifests for data preparation and model training. For more information about running it on premises, see Running NeMo Framework on Kubernetes. There are some modifications to be done for it to run on Amazon EKS, as shown in the following steps. We provide the launcher scripts in the GitHub repo.
- Modify the launcher_scripts/conf/cluster/k8s.yaml file as follows. The
subPathfield is the path where FSx for Lustre is mounted, which is/fsx-sharedin this case. - Install the required Python packages; this is required so that NeMo Launcher can submit jobs to the Kubernetes cluster:
Next, we copy the following folders from the container to the /fsx-shared/data folder:
NeMo-Megatron-Launcher/launcher_scripts/data/bpeNeMo-Megatron-Launcher/launcher_scripts/data/nsfw
- To copy files from EKS pods, you can start a pod just for this purpose. Create a file
fsx-share-test.yamlas follows: - Run this pod and copy the files:
A few files need to be updated for data preparation for it to work with the EKS cluster.
- Modify the launcher_scripts/conf/config.yaml file:
- For cluster, use
k8s. - For training, use
gpt3/126m. - For stages, this should be just
data_preparationand no other stages. - For
launcher_scripts_path, use the path to the NeMo Megatron launch scripts, which should end with/launcher_scripts. - For
data_dir, use/fsx-shared/data(the location to store and read the data). - For
base_results_dir, use/fsx-shared/results(the location to store the results, checkpoints, and logs). - For container, use
${REPOSITORY}${IMAGE}${TAG}
- For cluster, use
- Modify the conf/data_preparation/gpt3/download_gpt3_pile.yaml file:
- Set
node_array_sizeto 2. - Set
file_numbersto “0-5”. With five files, it should be around 350 GB of data
- Set
- Modify the nemo_launcher/core/k8s_templates/data_preparation/data-prep.yaml file:
- If you get the error that
mpirun is not found, add the full path to the executable/opt/amazon/openmpi/bin/mpirun. - Add
/fsx-sharedin the container volume mount path. - Add the volume:
- If you get the error that
- Launch the data preparation job:
python3 main.py
This script creates a Helm chart for the selected stage (in this case, data_preparation) and runs the Helm chart automatically. Refer to Run NeMo Framework on Kubernetes for an explanation of the data preparation process. Make sure python3 is installed.
- You can monitor your job status and logs using three commands:
helm list, kubectl get pods, and kubectl logs --follow).


- When the job is finished, you can remove the Helm chart:
helm uninstall download-gpt3-pile
You can see the downloaded the data in the /fsx-shared folder by running in one of the pods as kubectl exec -it nlp-worker-0 bash.

Training
Now that our data preparation is complete, we’re ready to train our model with the created dataset. Complete the following steps:
- Modify a parameter in the
conf/config.yamlfile:- Set
stagestotrainingand no other stages.
- Set
- Modify parameters in
conf/training/gpt3/126m.yaml:- Set
num_nodesto 2. - Set
devicesto 1. - On line 18, change
use_distributed_sampler:Falsetoreplace_sampler_ddp:False.
- Set
Optionally, if you want to use a mock dataset instead of real dataset for testing purposes, you can modify the data section as follows. You are essentially changing data_impl: mmap to data_impl: mock and assigning an empty list to data_prefix.
- Modify the parameters in the
nemo_launcher/core/k8s_templates/training/training.yamlfile: - Run
python3 main.pyto start training and you should see the training pods by runningkubectl get podsas follows:
In addition to monitoring your job using helm list, kubectl get pods, and kubectl logs –follow, you can also SSH into your pod with kubectl exec and use nvidia-smi to check GPU status.
- When the job is finished, you can delete the helm chart:
helm uninstall gpt3-126m
Model checkpoints are saved at /fsx-shared/results/checkpoints along with other training logs and TensorBoard events. By default, checkpoints are saved at every 2,000 steps. You can modify the conf/training/gpt3/126m.yaml file to make changes in the training setup.
Troubleshooting deployment failures
If deployment fails due to incorrect setup or configuration, complete the following debug steps:
- Find the error message by running
kubectl logs --follow PODNAME and kubectl describe pod PODNAME. - Stop any running jobs by removing the Helm chart. This can be done by running
helm uninstall CHARTNAME.
Pods should be spun down after removing the Helm chart.
- You can double-check by running
kubectl get pods. - If pods are not spun down, you can manually stop them by running
kubectl delete PODNAME.
Based on the error message, you may find errors from:
- Unready nodes.
- Missing Operators or CRDs. In this case, make sure your
kubectl get pods -Aoutput looks like that shown earlier. If errors exist, try reinstalling Operators and CRDs. - NeMo Framework scripts or Kubernetes manifests. This is more likely a bug or wrong setup on the NeMo side. Errors can vary.
Clean up
It’s important to spin down resources after model training in order to avoid costs associated with running idle instances. To clean up our setup, we must delete the FSx for Lustre file system before deleting the cluster because it’s associated with a subnet in the cluster’s VPC.
- To delete the file system integration with the EKS cluster, run the following command:
Not only will this delete the persistent volume, it will also delete the EFS file system and all the data on the file system will be lost.
- When Step 1 is complete, delete the cluster by using the following script:
This will delete all the existing pods, remove the cluster, and delete the VPC you created in the beginning.
Conclusion
In this post, we demonstrated how to train generative AI models at scale using the NeMo Framework within an EKS cluster. We covered the challenges of training LLMs and how NeMo’s comprehensive tools and optimizations address these challenges, making the process more efficient and cost-effective. With NeMo, you can manage and scale distributed training workloads effectively. This post works with P4de instances. Another popular instance for generative AI distributed training workloads is the p5.48xlarge instance with the NVIDIA H100 80 GB GPU. To add a P5 node group to an existing EKS cluster, refer to AWS CLI scripts for EKS management.
To help you get started, we have published a GitHub repository that provides step-by-step instructions for creating an EKS cluster with P4de instances, mounting an FSx for Lustre file system, and running distributed training workloads with NeMo. This guide empowers you to harness the full potential of NeMo and Amazon EKS for your AI model training needs.
About the authors
 Ankur Srivastava is a Sr. Solutions Architect in the ML Frameworks Team. He focuses on helping customers with self-managed distributed training and inference at scale on AWS. His experience includes industrial predictive maintenance, digital twins, probabilistic design optimization and has completed his doctoral studies from Mechanical Engineering at Rice University and post-doctoral research from Massachusetts Institute of Technology.
 Akshit Arora is a senior data scientist at NVIDIA, where he works on deploying conversational AI models on GPUs at scale. He’s a graduate of University of Colorado at Boulder, where he applied deep learning to improve knowledge tracking on a K-12 online tutoring platform. His work spans multilingual text-to-speech, time series classification, ed-tech, and practical applications of deep learning.
 Eliuth Triana Isaza is a Developer Relations Manager at NVIDIA empowering Amazon’s AI MLOps, DevOps, Scientists and AWS technical experts to master the NVIDIA computing stack for accelerating and optimizing Generative AI Foundation models spanning from data curation, GPU training, model inference and production deployment on AWS GPU instances. In addition, Eliuth is a passionate mountain biker, skier, tennis and poker player.
 Wenhan Tan is a Solutions Architect at Nvidia assisting customers to adopt Nvidia AI solutions at large-scale. His work focuses on accelerating deep learning applications and addressing inference and training challenges.