AWS for M&E Blog
Getting started with Open Job Description from “Hello World” to FFmpeg
Go from “Hello World” to a chained and configurable set of FFmpeg instructions using the Open Job Description specification and newly released tools and libraries to create and configure compute jobs.
Introduction
In January and February of 2024, the Amazon Web Services (AWS) Thinkbox Deadline team released specification, tooling, and sample templates for the open-source project Open Job Description (OpenJD). OpenJD is a human-readable and expressive way of describing compute jobs, using AWS Thinkbox’s experience in the areas of visual effects (VFX), animation, games, and more to solve common problems in those spaces. OpenJD aims to simplify pipelines and maintenance by creating a standard that can be used running various computation jobs. While OpenJD was born from the problems of rendering VFX, care has been taken to avoid limiting the solution, and OpenJD allows for increased interoperability and modularity across a wide range of compute jobs.
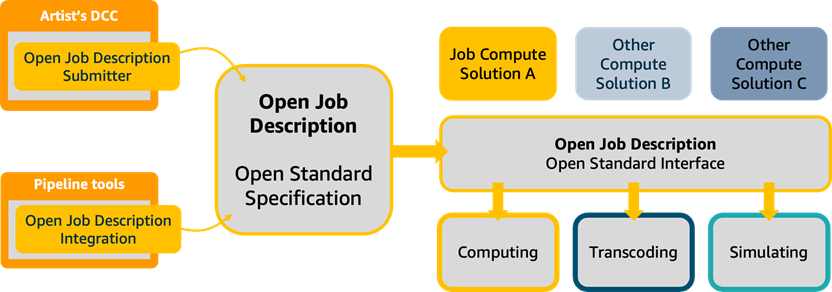
Figure 1: By integrating Open Job Description into the pipeline, compute jobs such as render can be submitted to a variety of Open Job Description compatible compute solutions, such as render farms, batch compute tools, or even the CLI tool, openjd, on the local machine.
With these releases, users can start using OpenJD in their own pipelines to more easily describe units of work. This reduces the requirements for maintenance of pipeline code, lowers the complexity of the pipeline, and increases the ability for pipelines to interact with other tooling. OpenJD does not need to be adopted across entire pipelines at once, and instead can be used only where appropriate.
In this walkthrough, we start by writing a “Hello World” OpenJD template, and gradually increase the complexity until it’s able to encode videos with FFmpeg.
Prerequisites
If you’re interested in following along, it’s easy to install the OpenJD tooling into your Python 3.9+ environment:
$> pip install openjd-cli
Installing openjd-cli also installs the required libraries, openjd-sessions and openjd-model. OpenJD runs the same across Linux, OSX, and Windows, provided your commands run the same across those platforms. This walkthrough will give commands formatted for Linux and OSX. Users on Windows will have to adjust the commands for the Windows environment. For more information on path remapping support for that workflow, please see this part of the OpenJD specification wiki on how Jobs are run.
Following the optional FFmpeg sections requires the installation of FFmpeg.
Walkthrough
Hello World
An OpenJD template is a JSON or YAML document, and the tools and libraries released work with both formats. For the purposes of this demonstration, we use YAML as it allows for comments while JSON does not.
A Job template minimally only needs 3 things: A specification version, so the tools know which version to work with; a name to identify Jobs; and a step, so there’s something to run. Thus, our “Hello World” can be as simple as:
We have our specification version, 2023-09; our name, “Hello World”; and a step, named “Hello World Step”. Within that Step, we have an action that runs a single command with a list of arguments, although there is only one argument so far.
$> openjd check ./hello-world.yaml
Template at 'hello-world.yaml' passes validation checks
To run it, we use openjd run and specify the step to run:
You can see the “Hello World” result where it specifies the “Output:”, along with some statistics about how the session ran.
Job Parameters
To get more elaborate, we add our first parameter to the template, our name. This requires adding a top-level item named parameterDefinitions, and then a parameter with a STRING type:
To make use of our new parameter, we refer to it in our “Hello World Step” by using two curly brackets on either side of the parameter name prepended with Param.. Here the “Name” parameter would be referenced by Param.Name.
Now that we have this field, we must provide a value for it when running the job. We can do this with either --job-param or -p, then providing the value in the form of key=value:
We can get some basic information about our expanded “Hello World” template with the summary command:
Tasks and Task Parameters
Tasks are invoked when a step breaks out work into multiple parts as a result of its Task parameters. To add Tasks to our “Hello World” example, we will add a taskParameterDefinition. This is similar to parameterDefinition, except that you don’t directly provide these parameter values when you run the template, and its position in the template is within the definition of the parameterized step in the template doc.
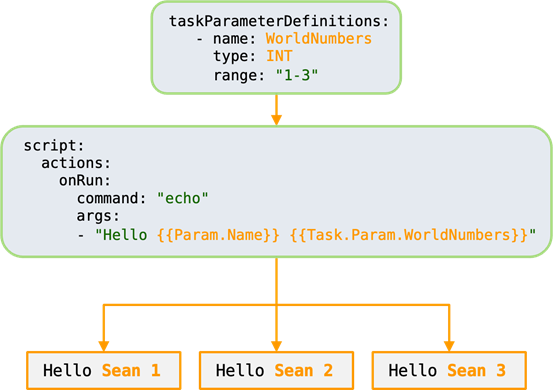
Figure 2: When a taskParameterDefinition is defined in a Step, the Step understands that there’s multiple units of work that must be iterated on in order to complete all work. These units of work are called Tasks, and you define what they iterate over in the taskParameterDefinition.
When one or more Task parameters are present, it indicates to OpenJD that the Step should be broken into multiple Tasks.
Running summary for this template now reports that it will kick off 5 total Tasks. Running the Job results in 5 Tasks running, each with a single line repeating the same “Hello Sean”. To differentiate these outputs, we need to reference our new Task parameter in our command, this time prepending Param with Task. as the parameter is in the Task.
Running it results in:
FFmpeg
We can now apply these basics to create a template for a common workflow in VFX using the popular open-source software FFmpeg to encode multiple video files from image sequence render output. We reference the Academy Software Foundation’s (ASWF) published Encoding Guidelines to save time. ASWF’s mission is to increase the quality and quantity of open-source contributions for and from the Film and Television industries, and AWS is proud to be a premier member.
A quick translation of our “Hello World” Job template to FFmpeg using the quickstart results in:
The biggest changes occurred in the parameterDefinitions, where we added a parameter for the output directory called “OutputDir”, and changed some parameter values. The specifics of these keys and the possible values are fully documented in the specification, but they all have to do with working with file and directory paths.
We needed “OutputDir” because when the openjd tool runs a template against parameters provided by the user, it creates a new script in temp space. If we had just specified “./output.mp4” as our movie output in the OpenJD template, that movie would have ended up in temp space, as that’s the local directory the script is running from, and then our output would be immediately deleted when OpenJD cleans up the environment.
Debugging Tip
To keep temporary files around for debugging, you can pass --preserve to openjd run, and to get more verbose output, you can use --verbose. These options only work for the openjd tool, and will not necessarily translate to other OpenJD runtime environments.
Embedded Files
Instead of using a command with an args list, we can instead use a bash script, and embed it within our step:
An embedded or companion script is the only way of running comparisons or changing input values in the Job template. If you have those requirements, you should either handle them before running the Job template, or you’ll need to use an embedded file script as described here.
The tenets of OpenJD emphasize portability, readability, and parse-ability, so while using an embedded file for scripting will technically allow you to do anything you want, we think the system works better if the results for a specific set of inputs are consistent and predictable. We won’t continue to demonstrate embedded files in this post, but please use that style if desired.
Chaining Steps
We can increase the complexity by creating a dependency link between a high-quality h264 movie to be used as an input in the following step for the creation of a WebM movie. This is a common workflow in VFX workflows, where the first step might bake in color transformations or media information, and later steps generate lower resolution and different quality proxies for web review, editorial, or production tracking.
To create a new step named “webm” and have it depend on our existing “h264” step, we specify a dependencies list in the “webm” step:
Each list item in dependencies is a single key/value pair, where the key is dependsOn and the value is the name of the step this step should wait on. Multiple list entries with multiple dependsOn keys will result in this step waiting for all of those steps to complete before executing. Steps without any dependencies can run concurrently, if the execution engine allows for concurrent operations, such as on different workers in a batch compute farm. This allows for ProRes encoding on one machine, while the WebM encode happens on a different machine:
Using a Task parameter, we can even create an additional proxy version of the ProRes encode and a high-quality 10-bit version:
Cleaning Up
If you’ve installed the python libraries to follow along, they can be easily uninstalled with:
pip uninstall openjd-cli openjd-sessions openjd-model
Conclusion
This post shows how to describe, validate, and run complex compute jobs with OpenJD. The OpenJD specification repository includes a full sample file of the template we created in this blog post. Please take the time to read further about how Jobs are constructed, and how Jobs are run to get a better understanding of what’s going on under the hood with these templates. Further information on media encoding with FFmpeg for use within the film and television industries can be found at the ASWF Encoding Guidelines repository. If you have comments on the specification itself, we invite you to participate in the RFC process or the discussion forums.