AWS Media Blog
How to: Hands-free interaction for AR/VR with Amazon Lex and Babylon.js
It’s common to wonder how the cloud helps with developing a spatial computing application. Most of the effort within spatial computing/augmented reality (AR)/virtual reality (VR)/3D is focused on frontend design and hardware optimizations. As applications become more integrated and easier to develop, the cloud plays a critical role in a complete spatial application. DevOps principles like Continuous Integration/Continuous Deployment, and application-layer machine learning services like Amazon Lex, help enable new and streamlined methods of interaction and engagement for spatial computing workloads.
In this post, I go over the steps to create a simple application that uses AWS Cloud for Continuous Integration / Continuous Deployment (CI/CD) pipeline management. I also show how to use Amazon Lex to control interaction and engagement with your own voice. The end product is a voice-controlled web application that walks you through a digital house. You are able to either click buttons or use their voice to control preset views and colors of the house.

Using web developer tools for 3D/AR/VR
Software engineering and DevOps practitioners require a CI/CD pipeline for their applications to assist with collaboration and version control of their work. For AR/VR developers, this may be a new concept—especially when working with web assets. The principle is simple; create a central repository for your code, allow trusted teammates (or the public) to contribute to the project, approve the changes, and automatically deploy an updated version on the web for immediate consumption. There are no servers to manage during this process.
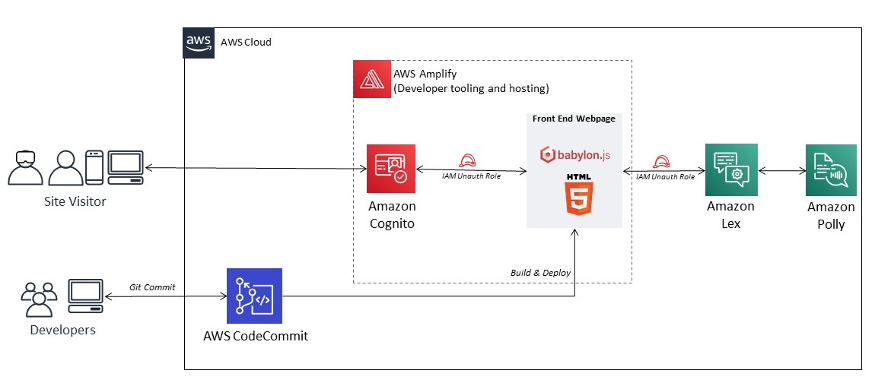
AWS reference architecture integrating Amazon Cognito, AWS Amplify, and Amazon Lex
Initial requirements and setup
First, I used AWS CodeCommit to create a place for the code. Creating a repository requires a name and cloning the repository to my local workstation. AWS CodeCommit released the credential helper git-remote-codecommit to clone a AWS CodeCommit repository without requiring separate credentials. This helps reduce number of credentials.

Amplify it up!
Now that I have a repository for my code, I need a place to publish and deploy my web application. There are many ways to do this, but I use AWS Amplify’s integration into AWS CodeCommit and AWS CodePipeline. Whenever I commit a change to my project, a build job is automatically launched and the result is deployed globally.
- I create an AWS Amplify project and am sure to select AWS CodeCommit as the source repository for my project. I select the only branch I have, but could have created additional git branches if I wanted to operate a test or backup environment.
- I leave the build instructions alone because the 3D web application is written and delivered in pure HTML/JavaScript and doesn’t require building.

- When Amplify finishes, it provides a unique URL for my site, plus notes from my latest AWS CodeCommit comment. This is all I need for the purposes of my test. I can always assign a fully qualified domain name (FQDN) with Amazon Route 53 in the future.
Speaking to a chatbot
Amazon Lex is a service that uses natural language processing (NLP) to drive a directed conversation with a chatbot. If you haven’t built an Amazon Lex chatbot before, it’s important to build a bot that has a purpose. Amazon Lex works best when end users have targeted requests or questions. In my demo application, I want the Amazon Lex chatbot to activate whenever a user asks to move the camera to a preset position or change the color of the house.
- I navigate to Amazon Lex and select a new custom bot. After indicating the voice profile I want, timeout, and COPPA requirement, I have a blank bot ready to be configured.
Create the Amazon Lex chatbot
- Since I want the chatbot to do two things, I create two new intents called ChangeColor and ChangeView. Within each intent, I define a few utterances to help infer what users may say in order to identify and invoke the intent. I also create a single slot value—cameraViewPosition for the ChangeView intent and houseColor for the ChangeColor intent—and provide proper prompting if the value is empty. I also create a custom slot type for the camera view because it is not defined within the provided AMAZON.* values.
- I create some prompting as a reply, including referencing the value of the captured slot. Within the utterances, I also configure the utterance to support the user uttering the slot value within their initial request.
- I then build the bot with the alias prod and publish it. Now the chatbot is ready for use within my 3D web application.

Access granted
There is one more thing I need before digging into my 3D application. When users navigate to the web application, they use the Amazon Lex chatbot I just created for their requests. This requires them to make reference to the bot within my AWS Account and I don’t want to give out credentials for this exchange. This is where an Amazon Cognito ID comes in.
- I create an Amazon Cognito ID by navigating to the Amazon Cognito service and create a new identity pool. This handle two kinds of users – authenticated users and unauthenticated users. Since this application does not have users logging in, they are classified as unauthenticated users.
- The Amazon Cognito ID creation process also creates a new IAM Role. I navigate to IAM and search for the role attached to the unauthenticated token and add the policies AmazonPollyReadOnlyAccess and AmazonLexFullAccess. I give users full access to Amazon Lex because they send and receive replies to and from the bot. However, they only need ReadOnlyAccess to Amazon Polly because it’s used to convert the Amazon Lex reply—which is text—into audible speech.
Creating the interactive site
Now to get creative! I use Babylon.js because it’s open-source and easy get started working with 3D content. I don’t go over the details of how to use Babylon.js as there’s some great documentation already available from the community. However, there are a few important details I use in the project. Before I dive right into writing code, I need to understand what I’m doing. This is called the Interaction Design phase and it includes outlining some high-level interactivity objectives before diving deep into the technology. Some of the goals I outlined for the project include:
- Have a scene that works on any device.
- Include elements of interactivity that do not depend on Amazon Lex. This explores how Babylon.js’s interaction methods work.
- Once better understood, expand the interaction by adding voice controls to the scene.
With these goals set, I begin by cloning the empty repository I created on AWS CodeCommit. I start by including the CDN for Babylon.js and laying out my environment. I import a model of a Victorian House and clean up the mesh hierarchy. Normally 3D models are large and 3D scenes contain many instances of them. Since we’re using only one small model, it clones properly within the AWS CodeCommit repository.
I add other elements to the scene like a grass plane with bumpy heightmap for the ground, HDRI world skybox, HDRI environment reflections, and textures. The scene now looks like I want (without taxing my PC). I then add UI elements like buttons for camera control and debugging, plus a color-picker using the Babylon.js GUI extension. Before connecting Amazon Lex into the scene, I code the interactivity desired with each button. Satisfied, I move to integrating the AWS SDK and Amazon Lex.
There are a few methods to integrate the AWS JavaScript SDK into a webpage, but I use the discrete Amazon Cognito token created earlier. I first include the AWS SDK CDN and use the Amazon Cognito ID created for my AWS object. This token allows guests to make requests to AWS without requiring discrete login credentials.
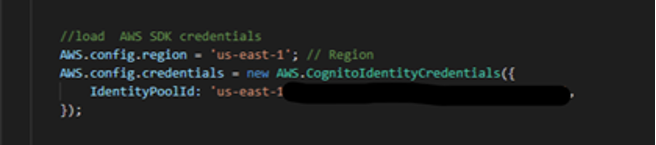
Inserting the Amazon Cognito ID for use
Now that the user has rights to send and receive data from AWS and Amazon Lex, I have two options. I could send requests to the Amazon Lex PostContent API call. However, this requires that I define and encode uttered messages, pack them into blobs, send them for processing using PostContent, decode the reply blob, and play it back in the browser. Since I’m creating a webpage that uses Babylon.js, it behaves exactly like a web asset. This means I can use third-party libraries in the project.

Sending the audio blob to Amazon Lex using the PostContent request and playing back the reply–the hard way
The aws-lex-browser-audio-capture project from the AWSLabs repo https://github.com/awslabs/aws-lex-browser-audio-capture provides a method to package and send messages to Amazon Lex without requiring manual encoding and packaging. It creates an abstraction object called conversation. This library also supports moving a conversation from passive to listening, sending, and speaking automatically with silence detection. This means users don’t have to indicate when they are finished talking each time.
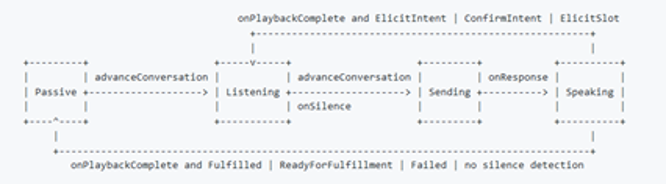
Signal Flow of the aws-lex-browser-audio-capture helper library
In order to achieve interactivity in Babylon.js, I use Actions or Observables. Actions react to discrete events assigned to a 3D entity. An observable is synonymous with an event trigger on the DOM and runs across the Babylon.js scene. In this scene, I use the built-in in Observable onPoterUpObservable, but you can also create custom Observables. I attach the onPointerUpObservable to a button that a user clicks to start conversing with the chatbot. A config object is created and assigned a lexConfig object indicating which Amazon Lex bot I want to talk to—in this case HouseTour.

Easier method: Sending and playing-back the audio blob to Amazon Lex using the helper library
Next, a conversation object is created the config object is passed in. The conversation object is an abstraction of the PostContent API request and it handles the encoding, packaging, and sending of the utterance to Amazon Lex. When Amazon Lex replies, a callback is performed, passing the reply payload from Amazon Lex into the function. I check the payload for which Amazon Lex intent was invoked since our speaker can ask to change camera or change colors of the house. If both the intent and slot are filled with values, the appropriate case conditional directs the scene to what happens in the scene. To make things easier, I create a helper function moveCamera and helper arrays containing coordinates for each view.
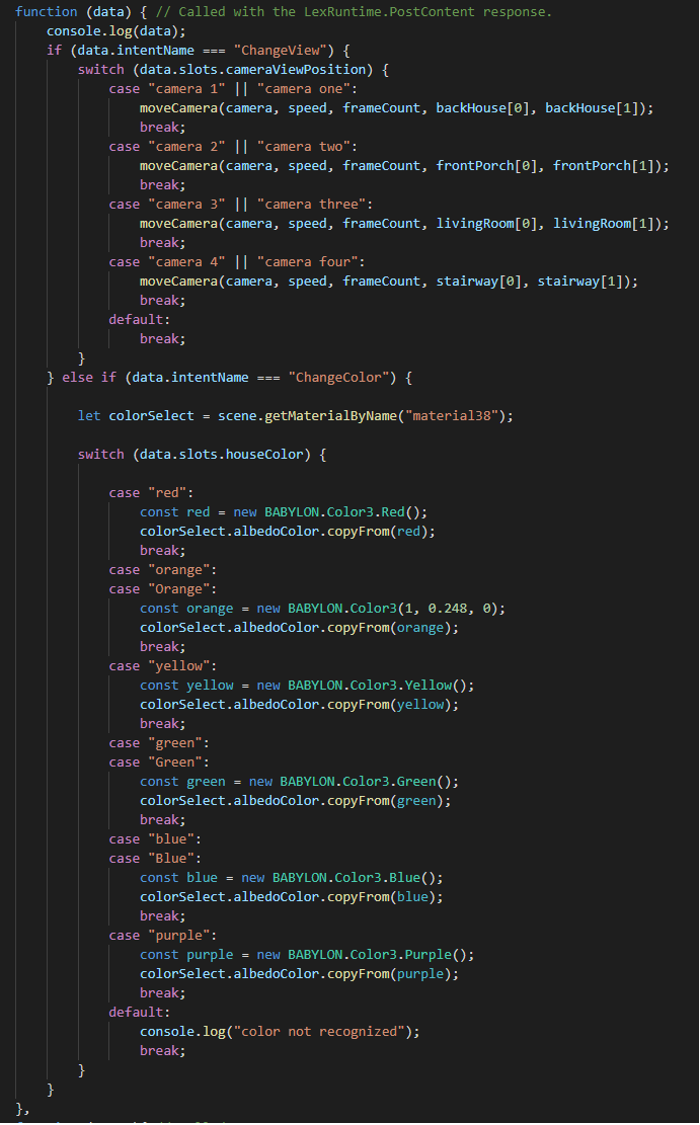
The slot value returned determines the action to do within the scene (move camera/change color)
Finally, I add in an indicator that notifies the user if the chatbot is listening to their conversation. To do this, I log state of the Amazon Lex chatbot to the button text the user clicks to when they start talking. This should help answer the question, “did the bot hear me?”
Try it out!

If you want to give the final scene a try, make sure you are in a room without much background noise and navigate to https://master.d3dn2h4ioek1dc.amplifyapp.com/. Ask to change the camera by saying “Move the Camera” and tell it which camera (1, 2, 3, or 4) you’d like. There are some nuggets of data I’ve logged to the console that you can review if you’re curious what payload looks like when Amazon Lex replies. This brings the benefits of cloud computing to a project through the initial development requirements and conclude using machine learning application services such as AWS Amplify Lex to component the experience. Since Babylon.js runs within the browser, using Amazon makes it easy to distribute and share the project.
What next?
This project is a starting point for many more interactions you can do. Babylon.js also integrates the WebXR stack with a single line of code. That means it is easy to take this project and turn it into a virtual reality or augmented reality experience (it requires some GUI adjustments). Babylon.js has a clip-plane feature that lets you slice a mesh and see what’s inside. There are also additional things you can do now that it’s integrated into AWS, such as logging user interaction metrics into a database, or pulling in metadata about the house—like price and age—from a database like Amazon DynamoDB. I hope this project helps inspire you to consider how the cloud helps both the development process and the final interaction result. The limit really is your imagination — so get creative and share with the world!