AWS for M&E Blog
Setting up for streaming with Amazon Interactive Video Service
Amazon Interactive Video Service (IVS) is a managed, live-video streaming service. In this post we show you how to:
- Set up live streaming on your PC with OBS Studio.
- Set up live streaming on your cell phone with Streamlabs.
Prerequisites
Before you begin setting up your stream, follow the steps in Getting Started with Amazon IVS in the Amazon IVS User Guide to do the following:
- Create an AWS account.
- Set up an AWS Identity and Access Management (IAM) user and policy.
- Create an Amazon IVS channel to feed your video into. We recommend doing this is with the Amazon IVS console.
When you create an Amazon IVS channel, you get an Ingest server and Stream key. You use these to set up streaming. (You also get a Playback URL, to use later to play back your stream.)
The Getting Started document also describes OBS Studio setup, specifically a setup using the OBS auto-configuration wizard. Here, we describe a more advanced setup with several manually specified options.
Setting up live streaming with OBS Studio
OBS Studio is free, open-source software for recording and live streaming. OBS provides real-time source and device capture, scene composition, encoding, recording, and streaming.
Follow these steps to get up and running quickly with OBS Studio:
- Download and install OBS: https://obsproject.com/download.
- Run OBS Studio. On the main screen, click Settings (bottom right).
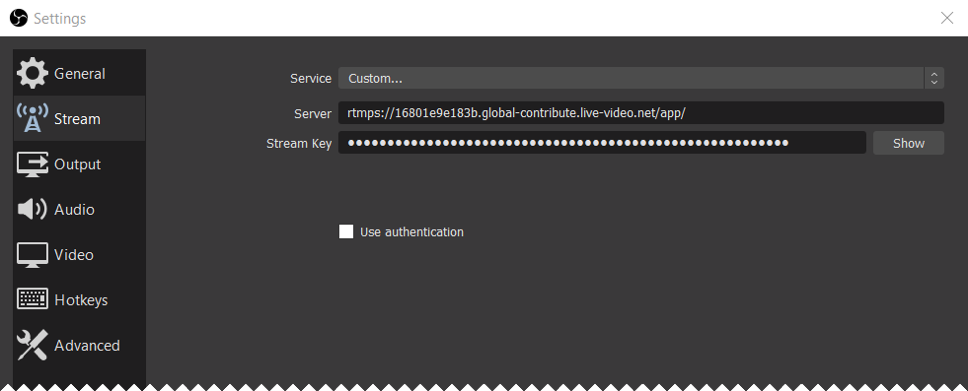
- In the Settings window, click Stream on the left.
- In the Service box, select Custom… Then, enter the Server and Stream Key:
If you created your channel with the IVS console:
-
-
- The Server you enter is the Ingest server returned by the IVS console after you created a channel.
- The Stream Key you enter is the Stream key returned by the IVS console after you created a channel.
-
If you created your channel with the AWS CLI:
-
-
- The Server you enter is a combination of three things:
- An ingestion protocol:
rtmps:// - The ingestEndpoint returned by the AWS CLI after you created a channel.
- A path:
/app/
- An ingestion protocol:
- The Stream Key you enter is the streamKey value returned by the AWS CLI after you created a channel.
- The Server you enter is a combination of three things:
-
5. In the Settings window, click Video on the left.
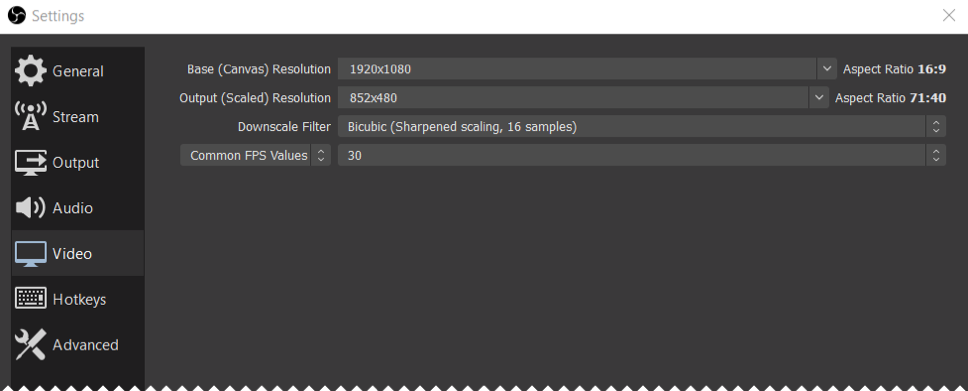
6. Configure the Output (Scaled) Resolution and Common FPS Values (frame rate). We recommend 852×480 and 30 (480p30), respectively. Later, in step 13, you can adjust these settings, if necessary.
7. In the Settings window, click Output on the left. In the Output Mode field, select Advanced, then click the Streaming tab.
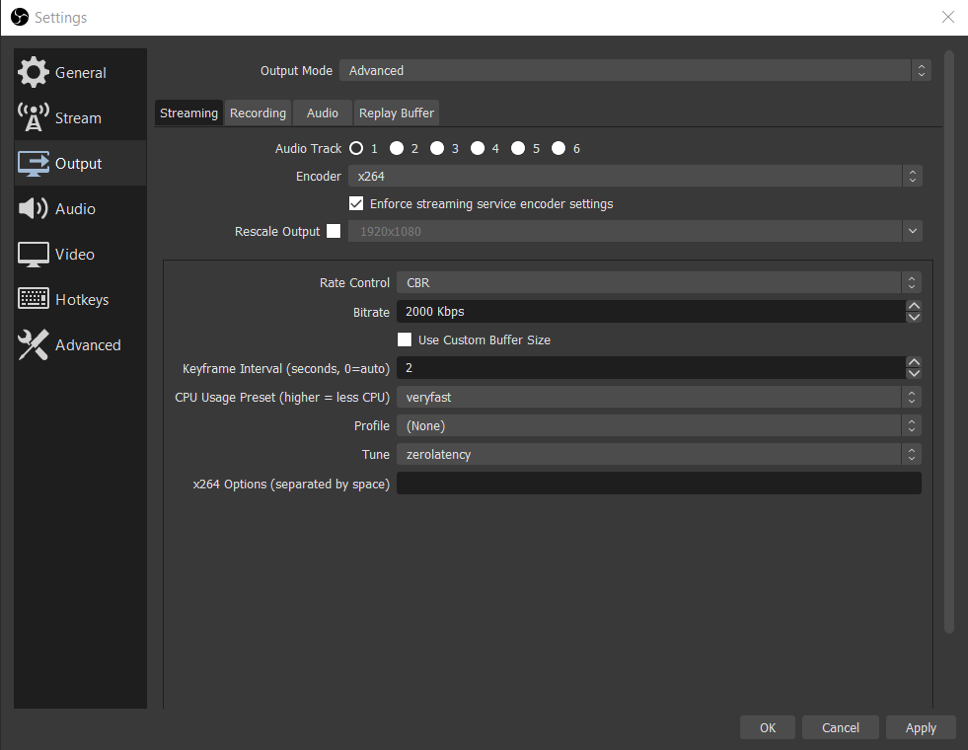
8. Specify the following values:
| Field | Value |
| Encoder | x264 |
| Rate Control | CBR |
| Bitrate | 1500 Kbps (later, in step 13, you can adjust this setting, if necessary.) |
| Keyframe Interval | 2 (seconds). Set to either 1 or 2, otherwise the end-to-end latency is >5 seconds. |
| CPU Usage Preset | veryfast |
| Tune | zerolatency |
9. Click OK to close the Settings window.
10. In the OBS main window, go to the Sources area, right-click, select Add, and add the following sources:
-
- Video Capture Device, which is your webcam.
- Text, if you want to add a title to your streaming session.
- Browser, with a URL of https://www.clocktab.com/, which you can use to observe the end-to-end latency of your stream.
11. Click Start Streaming at the bottom right to start the live stream.

Note: The square in the bottom-right corner should be green during the streaming session: this means that the video encoder is sending the stream to the video backend successfully. If the status is orange or red, go to step 13 to lower your bitrate and/or adjust your video settings.
12. Click Stop Streaming to end your live video stream.
13. To improve performance, you can adjust your video settings and bitrate according to your estimated network connection speed. The settings used earlier in steps 6 and 8 assumed a medium network connection speed. The following table provides a starting point for making adjustments.
-
- Set Output (Scaled) Resolution and Common FPS Values, as in step 6.
- Set Bitrate, as in step 8.
| Network Connection Speed | Output (Scaled) Resolution / Common FPS Values (step 6) | Bitrate (step 8) |
| Acceptable (SD) | 852×480 / 30 | 1500 Kbps |
| Good (HD) | 1280×720 / 30 or 60 | 4500 Kbps |
| High (full HD) | 1920×1080 / 30 or 60 | 8500 Kbps |
Setting up live streaming on your cell phone
Setting up Amazon IVS for streaming on your cell phone is as straightforward as setting up on your PC. Follow these steps to set up cell phone streaming using the Streamlabs app.
- Install Streamlabs from either the Google Play or Apple App Store.
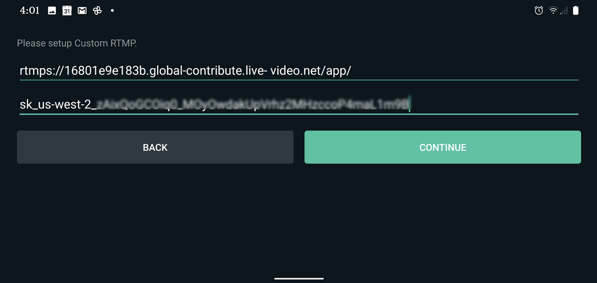
- Open Streamlabs on your cell phone and select Other Platforms.

3. Enter the Server and Stream Key:
If you created your channel with the IVS console:
-
-
- The Server you enter is the Ingest server returned by the IVS console after you created a channel, with outbound port number (
:443) added. For example:rtmps://16801e9e183b.global-contribute.live-video.net:443/app/ - The Stream Key you enter is the Stream key returned by the IVS console after you created a channel.
- The Server you enter is the Ingest server returned by the IVS console after you created a channel, with outbound port number (
-
If you created your channel with the AWS CLI:
-
-
- The Server you enter is a combination of four things:
- An ingestion protocol:
rtmps:// - The ingestEndpoint returned by the AWS CLI after you created a channel.
- An outbound port:
:443 - A path:
/app/
- An ingestion protocol:
- For example:
rtmps://16801e9e183b.global-contribute.live-video.net:443/app/ - The Stream Key you enter is the streamKey value returned by the AWS CLI after you created a channel.
- The Server you enter is a combination of four things:
-
When you are done, click Continue.
4. Click through the next three screens to give Streamlabs permissions to access your camera and microphone, take pictures, and record video and audio,
5. Click the 3-bar (hamburger) icon in the top-left corner, then click Editor. Click the plus button (+) in Add a Layer, then Add Camera.

6. Click the check mark at the top-left to return to the main screen.
7. Click the camera icon in the bottom-left corner to toggle between front and rear cameras.

8. Click the 3-bar (hamburger) icon in the top-left corner to return to the main menu, then click Settings.
9. From the Settings page, click Broadcast.
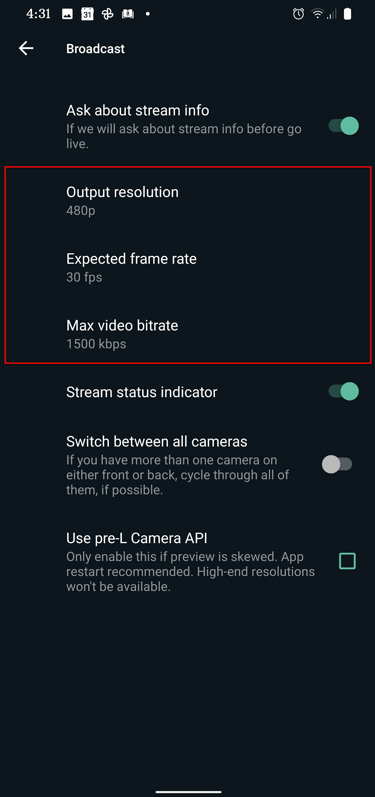
10. Specify the following values:
| Network Connection Speed | Output resolution / Expected frame rate | Max video bitrate |
| Acceptable (SD) | 852×480 / 30 | 1500 Kbps |
| Good (HD) | 1280×720 / 30 or 60 | 4500 Kbps |
11. After you return to the main menu, click the red circle in the bottom center of the screen to begin streaming.

Note: If your network bandwidth is too low to support your selected video bitrate, a warning will appear, as in the example image (“poor connection”). Go back to step 10 and lower the Max video bitrate.
12. Tap your screen and click the stop button in the bottom center of the screen to stop streaming.
Verifying your live stream
To verify that your OBS Studio or Streamlabs video stream is live and working properly, do the following:
- Open the Amazon IVS Console.
- Click the 3-bar (hamburger) icon in the top-left corner, and select Live channels.
- Find your channel, and click its name.
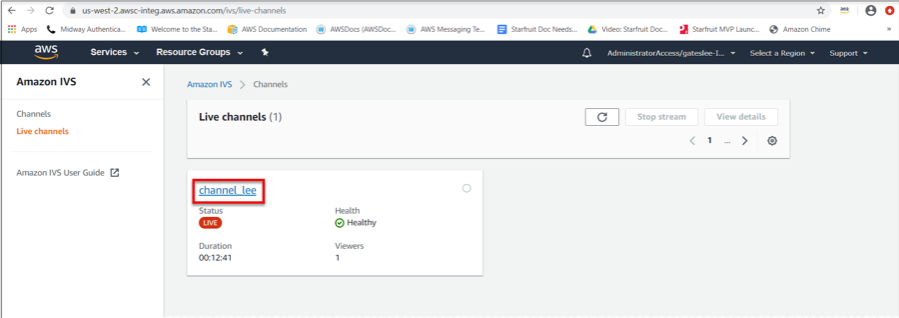
4. The channel detail page shows your live stream and provides other useful information.

For more information
- Amazon IVS documentation
- IAM information in Amazon IVS Security — for details on IAM users and policies, how to attach a policy to a user, and how to constrain what users can do with Amazon IVS).
- Amazon AWS CLI User Guide
- OBS Studio Quickstart
- Streamlabs