Microsoft Workloads on AWS
Deploying SQL Server Always Encrypted with secure enclaves on Amazon EC2 instances
Always Encrypted with secure enclaves is an encryption technology available in SQL Server 2019, which allows rich computations on encrypted data. With increased focus on data protection, this feature helps customers to protect sensitive data, such as credit card numbers or national identification numbers (for example, U.S. social security numbers) stored in SQL Server databases.
Always Encrypted allows clients to encrypt sensitive data inside client applications and never reveal the encryption keys to the Database Engine (SQL Database or SQL Server). By using this feature, it protects the confidentiality of data from high-privileged users like DBA’s or system admins.
Always Encrypted with secure enclaves feature is dependent on Virtualization-based security (VBS). You can use the following link to discover and launch instances with compatible Amazon provided AMIs in the Amazon EC2 console.
In this tutorial, we implement Always Encrypted with secure enclaves on Amazon EC2 Windows instances.
1. Prerequisites
- Amazon EC2 Windows instance to run Host Guardian Service, which is required for enclave attestation.
- Launch Amazon EC2 instance that supports VBS. Install SQL Server in the launched instance.
2. Tutorial
Host Guardian Service (HGS) is a Windows Server role introduced in Windows Server 2016 for configuration of guarded hosts and shielded VM’s. This role provides Attestation and Key Protection services. Key Protection service is used to provide the transport key to unlock and run shielded VM’s.
Now let us set up Always Encrypted with secure enclaves on AWS. For this scenario, I’m using an Amazon EC2 m5.xlarge instance type for deploying the Host Guardian Service and an Amazon EC2 m5n.xl instance for deploying SQL Server.
2.1. Configure the Host Guardian Service on Amazon EC2 HGS instance
Log into the Amazon EC2 HGS instance as an administrator and run the following steps using an elevated Windows PowerShell console:
- Install HostGuardianServiceRole by running the following command. This will restart the instance.
Install-WindowsFeature -Name HostGuardianServiceRole -IncludeManagementTools -Restart
- After the reboot, log back into Amazon EC2 HGS instance as an administrator. Configure Host guardian service and its domain by running the following command using appropriate Password and Domain Name. This will restart the instance.
$adminPassword = ConvertTo-SecureString -AsPlainText 'Password' -Force Install-HgsServer -HgsDomainName 'Domain Name' -SafeModeAdministratorPassword $adminPassword -Restart - After the reboot, log back into Amazon EC2 HGS instance as an administrator. Configure host key attestation by running the following command.
Initialize-HgsAttestation -HgsServiceName 'hgs' -TrustHostKey
2.2. Set up Amazon EC2 SQL Server instance
Login to the Amazon EC2 SQL Server instance as an administrator. Run the following steps using an elevated Windows PowerShell console:
- Install Windows feature HostGuardian by running the following command. This will install HostGuardian feature and bring up dialog presented in Figure 1; click Yes to restart the computer
Enable-WindowsOptionalFeature -Online -FeatureName HostGuardian -All
Figure 1. Restart Computer
- After the reboot, log back into Amazon EC2 SQL Server instance as an administrator. Run the following command to create hostkey certificate which will be used for attestation between Amazon EC2 HGS instance and Amazon EC2 SQL Server instance. Create hostkey certificate in your desired location.
Set-HgsClientHostKey Get-HgsClientHostKey -Path $HOME\Desktop\hostkey.cer - After running the above commands, as shown in Figure 2 hostkey certificate is created in the location specified.

Figure 2. Creation of Host Key certificate
- Copy and paste the hostkey certificate from Amazon EC2 SQL Server instance to desktop on the Amazon EC2 HGS instance.
- Run the following command to initialize the attestation on Amazon EC2 HGS instance.
Initialize-HgsAttestation -HgsServiceName 'hgs' -TrustHostKey - Log back into Amazon EC2 SQL Server instance and run the following command to set up attestation between Amazon EC2 SQL Server instance and Amazon EC2 HGS instance.10.50.3.43 is the IP address of my Amazon EC2 HGS instance.
Set-HgsClientConfiguration -AttestationServerUrl http://10.50.3.43/Attestation -KeyProtectionServerUrl http://10.50.3.43/KeyProtection/
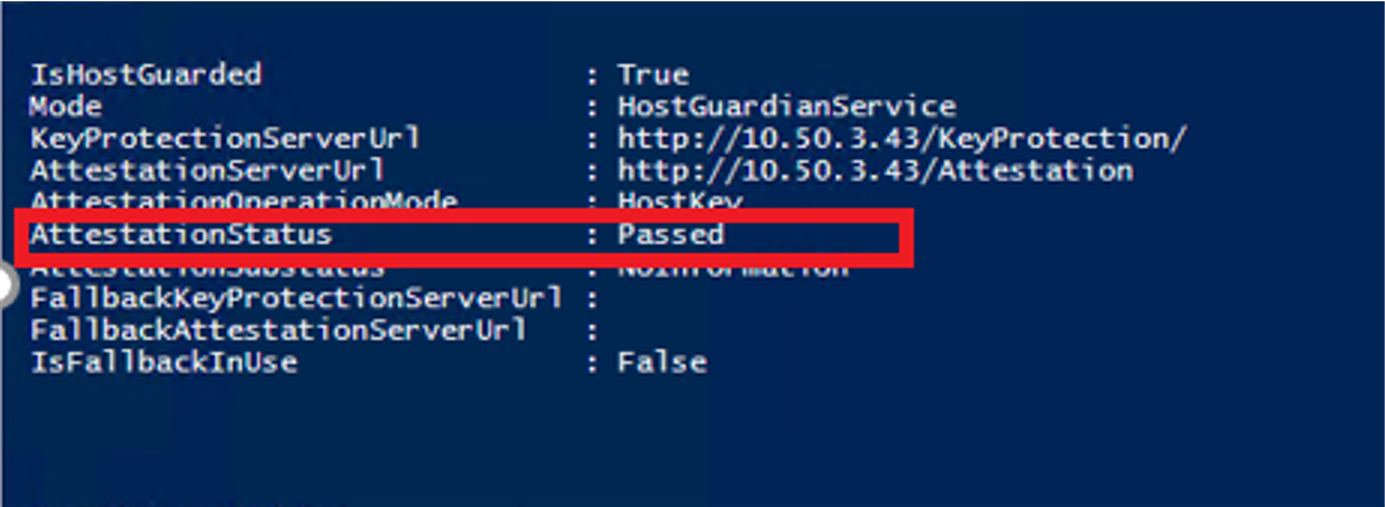
Figure 3. Attestation Status
After executing the above command, as shown in Figure 3, the attestation status should be passed. That signifies trust between SQL EC2 instance and HGS EC2 instance is successfully established.
2.3. Configure Always Encrypted with Secure Enclaves on SQL Server Database
- Log into Amazon EC2 SQL Server instance and connect to SQL Database Engine using SQL Server Management Studio(SSMS). Open a new query window and execute the following script to set enclave type to Virtualization Based Security (VBS), which is needed for Secure Enclaves:
EXEC sys.sp_configure 'column encryption enclave type', 1; RECONFIGURE; - Restart SQL Server instance by right-clicking on SQL instance name in Object Explorer and select Restart for the previous configuration change to take effect. Once the instance restarts, reconnect to it.
- Open new query window in SSMS and execute the following script to create a database named AESEDemo with test records to encrypt later.
CREATE DATABASE [AESEDemo] Go USE [AESEDemo] GO CREATE TABLE [dbo].[AESETest] ( [AESETestID] [int] IDENTITY(1,1) NOT NULL, [SSN] [char](11) NOT NULL, FullName] [nvarchar](50) NOT NULL ) USE [AESEDemo] GO INSERT INTO [dbo].[AESETest] ([SSN],[FullName]) VALUES('123-45-6789', N'Vikas'), ('145-93-3242', N'Steve'), ('134-12-4356', N'John'); - To use Always Encrypted, Column Master Key (CMK) and Column Encryption Key (CEK) needs to be created. Users who have access to these certificates can decrypt the data. CMK is used to protect one or more CEK’s, which are used to protect and encrypt data in the columns.
- To create CMK, expand the Security tab in database AESEDemo and navigate to option called Always Encrypted Keys.
- As shown in Figure 4, right-click on Always Encrypted Keys and select New Column Master Key
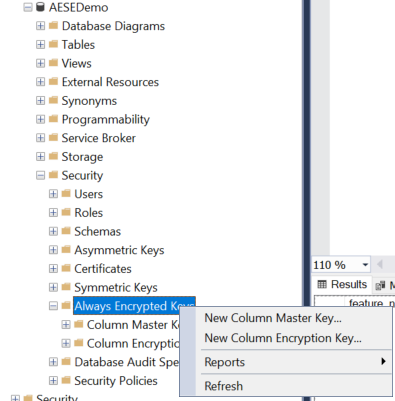
Figure 4. SSMS Always Encrypted Keys option
- After selecting New Column Master Key, a new dialog will appear with an option to enter the name of the master key and option to select Key store as shown in Figure 5. For this tutorial we defined Master Key name as CMK and selected Windows Certificate Store – Current User as Key Store. Enable Allow enclave computations. Select Generate certificate and then choose Ok.
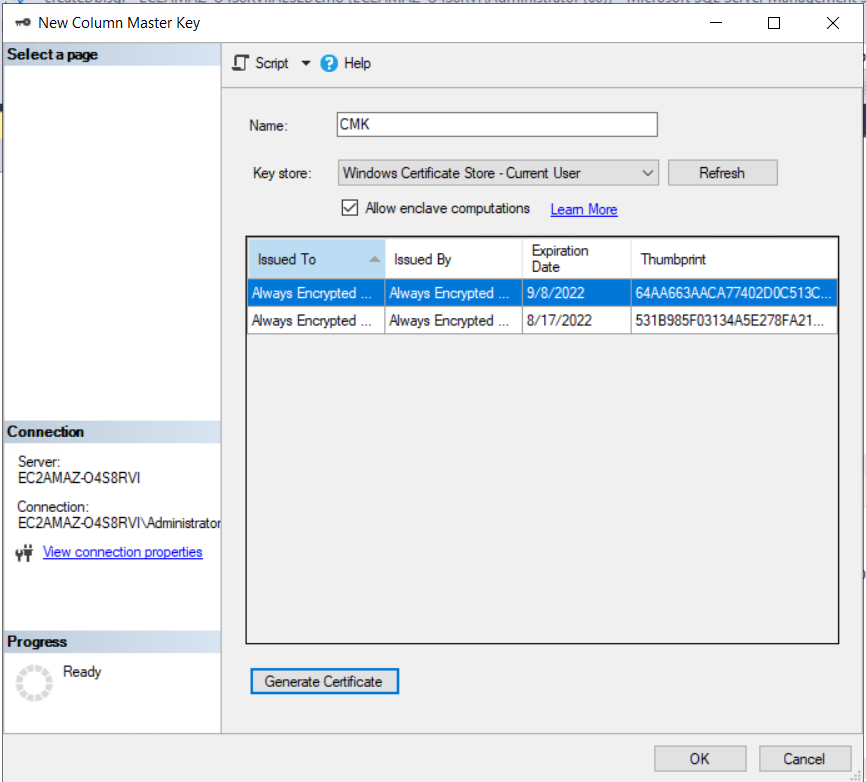
Figure 5. Creation of Column Master Key
Note: If you are unable to enable Allow enclave computations , make sure you are using the correct EC2 AMI listed here.
- Next step is to create Column Encryption Key. Expand the Security tab in database AESEDemo and navigate to option called Always Encrypted Keys. Under Always Encrypted option right-click on Column Encryption Keys to create CEK as shown in Figure 6.
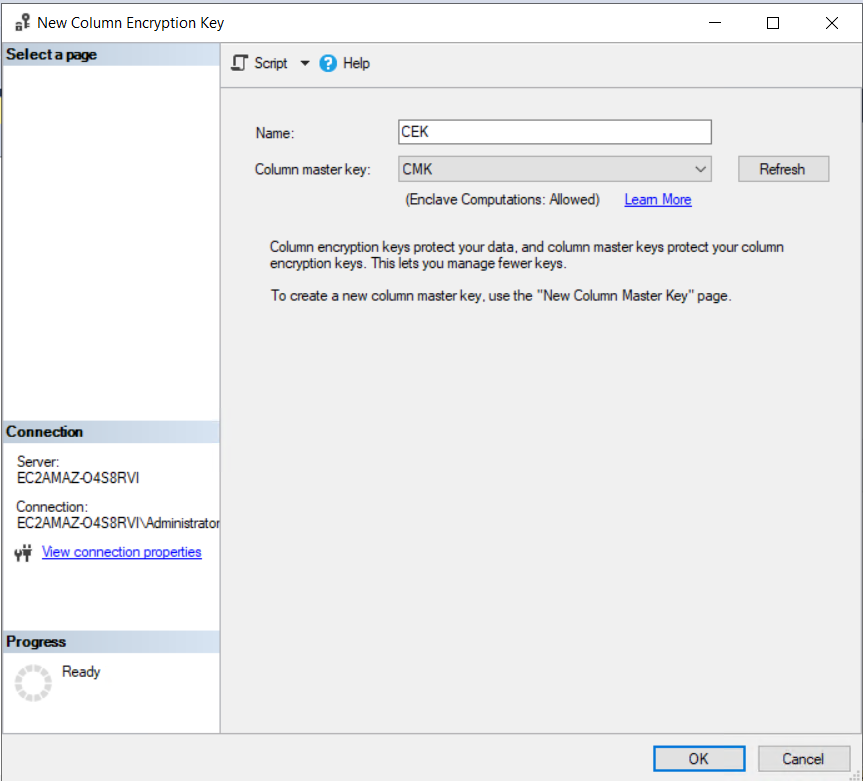
Figure 6. Creation of Column Encryption Key
After creating CMK and CEK’s successfully, it’s time to encrypt the data in the database using these keys.
- To encrypt the column data in a table, connect to new SSMS instance and connect to SQL server Database Engine with Always Encrypted option selected as shown in Figure 7.
 Figure 7. Enable Always Encrypted Option on SSMS
- After connecting to SQL server instance, open a new query window and execute the following SQL statements to encrypt the SSN column. There are two encryption types - Deterministic and Randomized. Deterministic encryption will generate the same cipher-text value for the same clear-text value every time. Randomized will generate different cipher-text value every time we run a select statement. For this tutorial, I used Randomized encryption type.
USE AESEDemo; GO ALTER TABLE [dbo].[AESETest] ALTER COLUMN [SSN] [char] (11) COLLATE Latin1_General_BIN2 ENCRYPTED WITH (COLUMN_ENCRYPTION_KEY = [CEK], ENCRYPTION_TYPE = Randomized, ALGORITHM = 'AEAD_AES_256_CBC_HMAC_SHA_256') NOT NULL; - To test whether data is encrypted or not, open a new SSMS instance and connect to SQL Database Engine without Always Encrypted option selected and execute the following query. As shown in Figure 8, the information in SSN Column is encrypted.
select [AESETestID], [SSN], [FullName] from AESETest
 Figure 8. Enable Always Encrypted Attestation Option on SSMS
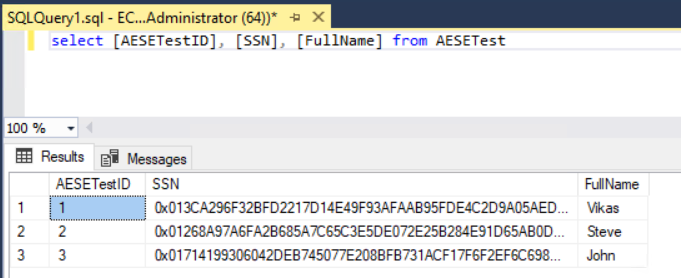
Figure 9. Select Encrypted Data
- Execute the same query in SSMS instance with Always Encrypted option selected. As shown in Figure 9, the information in SSN Column is decrypted.
select [AESETestID], [SSN], [FullName] from AESETest

Figure 10. Select Encrypted Data with Always Encrypted Option
Conclusion
In this tutorial, we have seen how to set up Always Encrypted with secure enclaves in Amazon EC2 instances. Always Encrypted protects the confidentiality of sensitive data and Always Encrypted with secure enclaves expands confidential computing capabilities of Always Encrypted by enabling in-place encryption and richer confidential queries.
AWS can help you assess how your company can get the most out of cloud. Join the millions of AWS customers that trust us to migrate and modernize their most important applications in the cloud. To learn more on modernizing Windows Server or SQL Server, visit Windows on AWS. Contact us to start your migration journey today.