AWS Cloud Operations Blog
AWS Resources Lifecycle Management Via ServiceNow and AWS Service Management Connector
Customers deploy series of AWS resources to support their workloads in the cloud. These organizations, as part of their maturity journey, must help managing the lifecycle of their AWS Resources using existing IT Service Management tool, such as ServiceNow. Manually executing these tasks via both consoles (ServiceNow and AWS Console) is inefficient and time-tasking. With the recent release of the AWS Service Management Connector (AWS SMC) 4.5.x, this integration has become much easier.
In this post, I’ll show you how to cover common use cases, including resources provisioning, incident/request management, cost optimization, and asset management audits in the CMDB. The use case will be the lifecycle management of Amazon WorkSpace.
The following high-level architecture diagram shows core solution components:
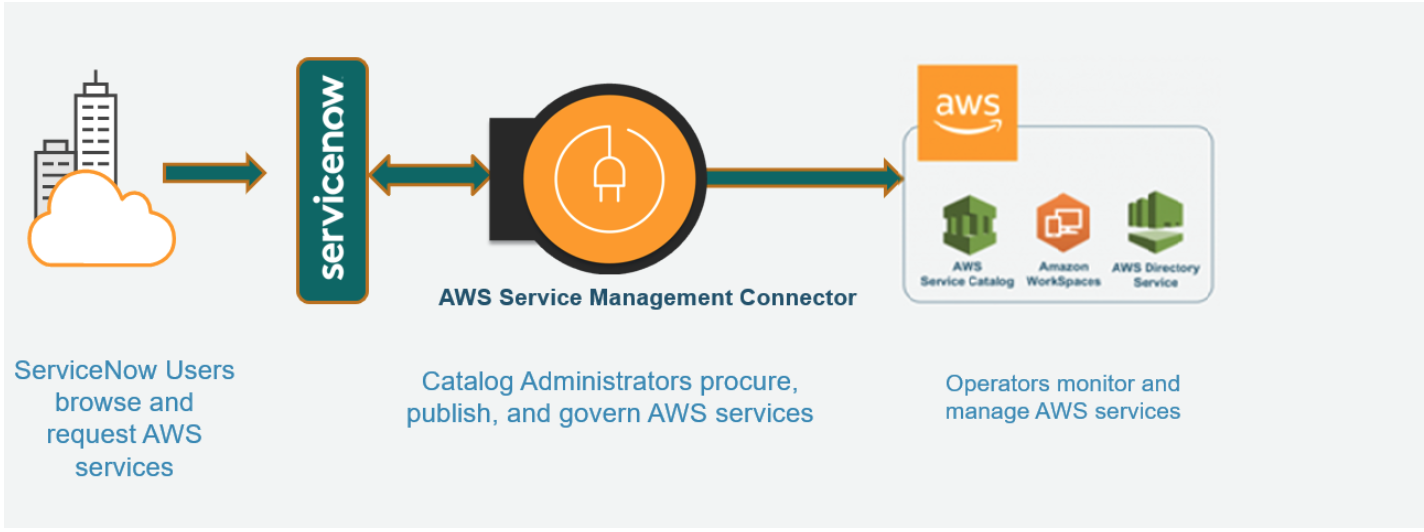
Fig 1.0: High-level architecture diagram of core components
All of the steps to setup the solution are broken down into four major sections:
- Configure AWS
-
- Make sure that the Support Plan is at a minimum of Business Plan
- Complete ServiceNow instance set up with required plugin (Discovery and Service Mapping Patterns)
- Establish integration between AWS and ServiceNow via Systems Management Connector v4.5.x
- Perform lifecycle management of an Amazon WorkSpaces
-
- Provision new WorkSpaces
- Incident/Event Management on WorkSpaces
- Termination of a WorkSpaces via Change Request
Background
AWS SMC for ServiceNow enables ServiceNow end users to provision, manage and operate AWS resources natively through ServiceNow. The connector provides different features which minimize direct AWS console access, simplifying AWS product request and operational actions for ServiceNow end users. The same applies to ServiceNow administrators by streamlining Service Management governance and oversight over AWS resources and services.
ServiceNow is an enterprise service management tool that places a service-oriented lens on the activities, tasks, and processes that enable day-to-day work life and a modern work environment.
Getting started
To deploy this solution, make sure that the following prerequisites have been completed.
AWS prerequisites
- An AWS Account with administrative access
- Support Plan: Business (Minimum)
- Make sure that Amazon WorkSpaces is available in your region (For this Blog’s Use case)
AWS SMC and ServiceNow prerequisites
- Admin level access to a ServiceNow Personal Developer instance (PDI) or Organization ServiceNow Instance
- Complete integration between the AWS SMC for ServiceNow and ServiceNow by following this guide
Set up Amazon WorkSpaces directory
Amazon WorkSpaces use a directory to store and manage information, such as users, groups, and devices data for your WorkSpaces. If you have an existing directory (AWS Managed Microsoft AD, Simple AD, AD Connector, or Amazon Cognito user Pools), then note the “Directory ID” which is required in the upcoming AWS CloudFormation template.
If you don’t have any directory, then follow the steps in this guide, and then note the “Directory ID”. This is a requirement before proceeding with this post’s content.
Installing a Workspace portfolio stack
In this section, you’ll launch the Amazon WorkSpaces portfolio stack, which requires you having a ‘Directory ID’ as stated earlier in the post.
Select “Launch Stack” to launch the WorkSpaces portfolio stack.
- Accept default parameters, including stack name “SC-RA-Workspaces-Portfolio”
- Within the Stack properties form, under Product Settings, enter your ‘DirectoryId’ as shown in the following
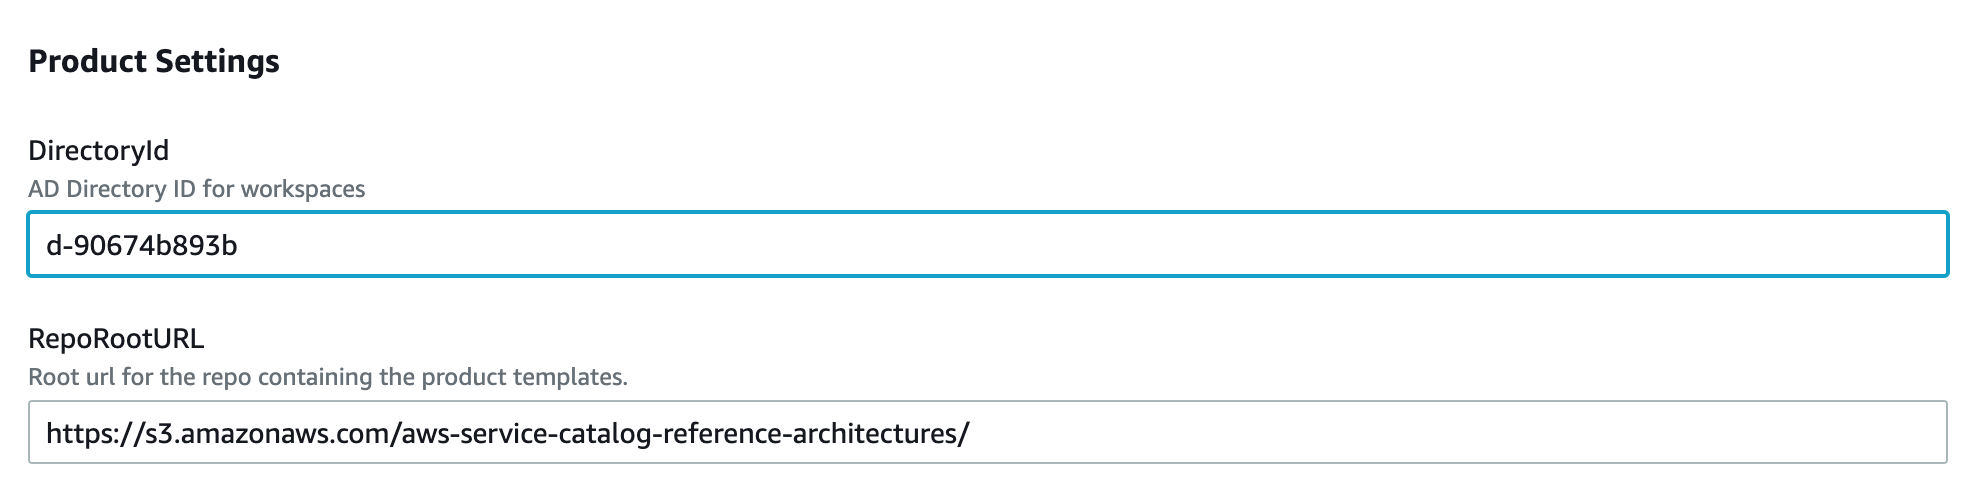
Fig 1.1: Product Settings during Stack creation.
c. Accept both acknowledgement under “Capabilities”
- Select “Create Stack”
a. This creates a new “AWS WorkSpaces portfolio” with a single product and a launch constraint - Grant users access to the portfolio and allow them to view and launch the product from ServiceNow. This means adding the ‘SCEndUser’ as an allowed user to launch the request from ServiceNow service catalog.
a. From the new service catalog portfolio, select “Groups, roles, and users” tab.
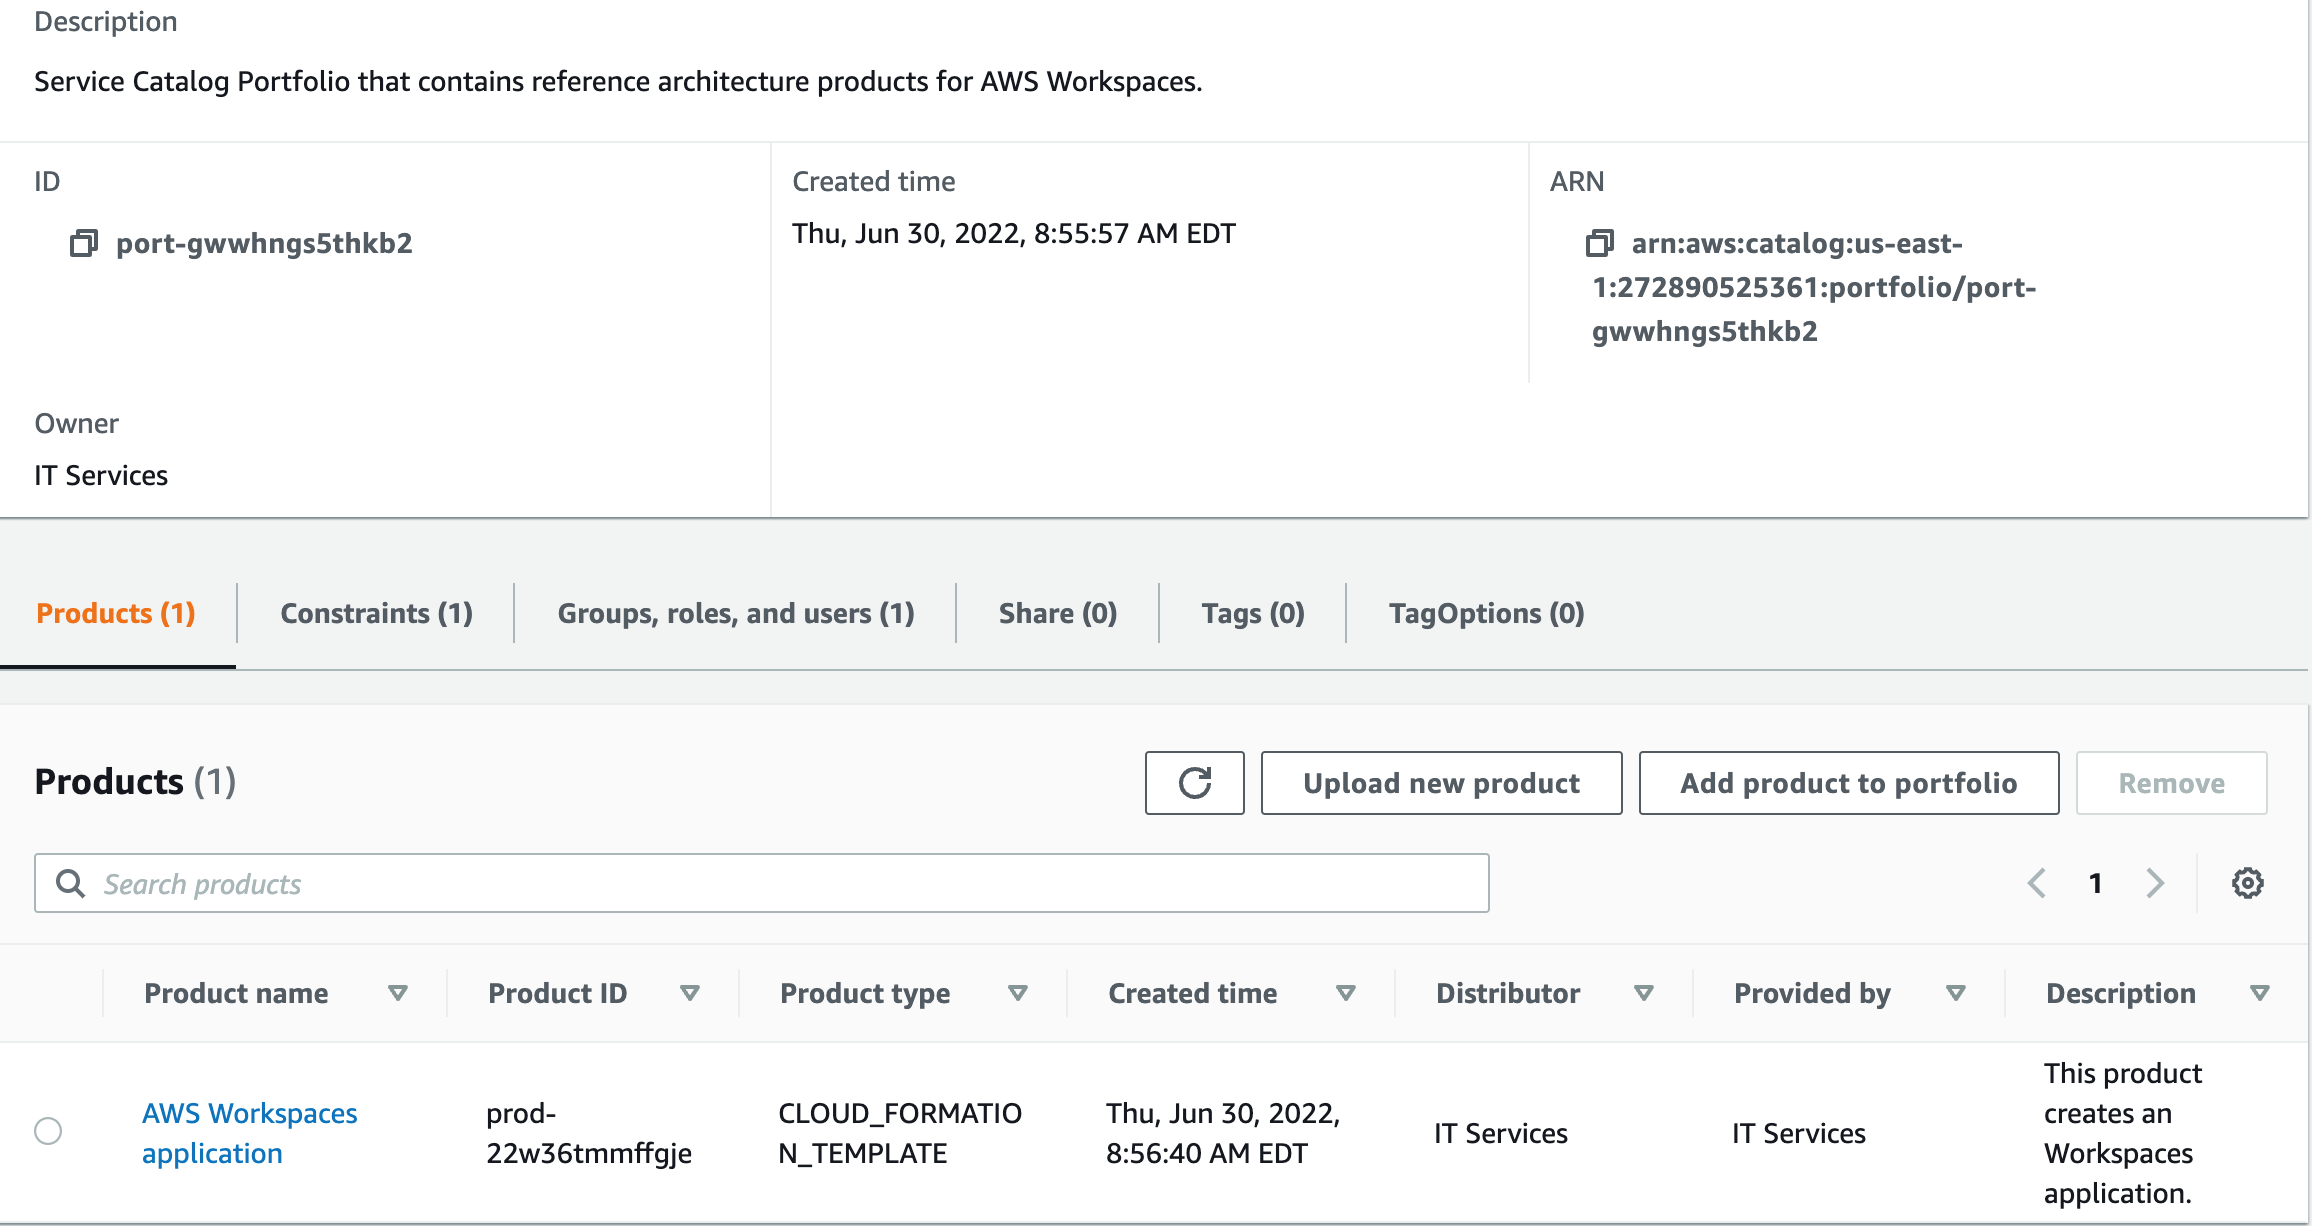
Fig 1.2: Grant users’ access to deployed AWS Service Catalog Portfolio
b. Select “Add groups, roles, users” tab > Users and select ‘SCEndUser’ user name
c. Select “Add Access”
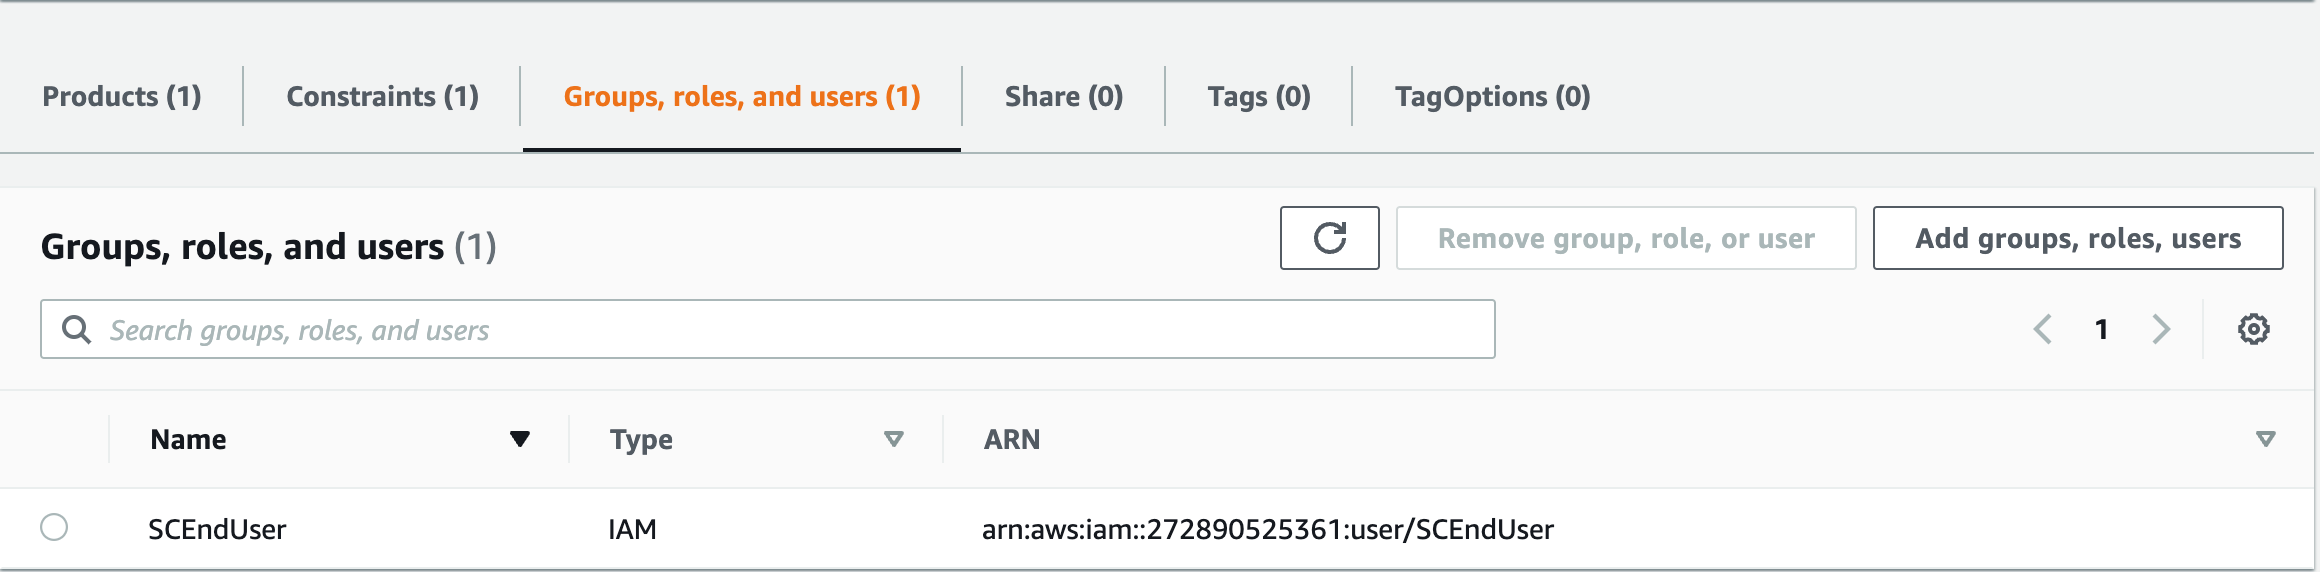
Fig 1.3: Confirmation of granted IAM User in specific Portfolio
Sync between AWS SMC and ServiceNow
Prior to starting with the following use case, run the sync job for the AWS Accounts in ServiceNow:
- From ServiceNow, go to Scheduled Jobs and manually execute the “Synchronize changes to all AWS accounts”.
-
- By default, it runs daily at midnight. This will make sure that all Service Catalog changes are synced with ServiceNow for the next use cases.
Authorize ServiceNow user to request an AWS Resource
- From your ServiceNow instance, browse to AWS Service Catalog > Portfolio
- Select portfolio from list: “Service Catalog – AWS Workspaces Reference Architecture”
- Select Allowed Groups
a. Click New.
b. Type in the user group that will be provisioning the Amazon WorkSpaces.

Fig 1.4: Sample of authorized group “Order_AWS_Products” used by the end user in this blog
Step #1: Provisioning an Amazon WorkSpaces
- From your ServiceNow instance as an end user, launch Service Catalog and choose AWS Service Catalog
- Select from the product list: “AWS Workspaces application”
- Fill in the required fields as follows:
a. Product Name:
b. Product Version: Select “Easy Launch v1.0
c. Parameters:
i. User Name: specify known user name: e.g., smctest
ii. Workstation Type: choose from choice list; e.g., Standard-Win10-Desktop
- Select “Order Now” to submit the request. This starts the provisioning of your WorkSpaces in the Console.
- Select ‘Home’ to launch “My Assets” which lists your asset requests and additional information.
- Select the configuration item “value= name of requested workspaces” and wait till product status=Provisioned and Status= Available
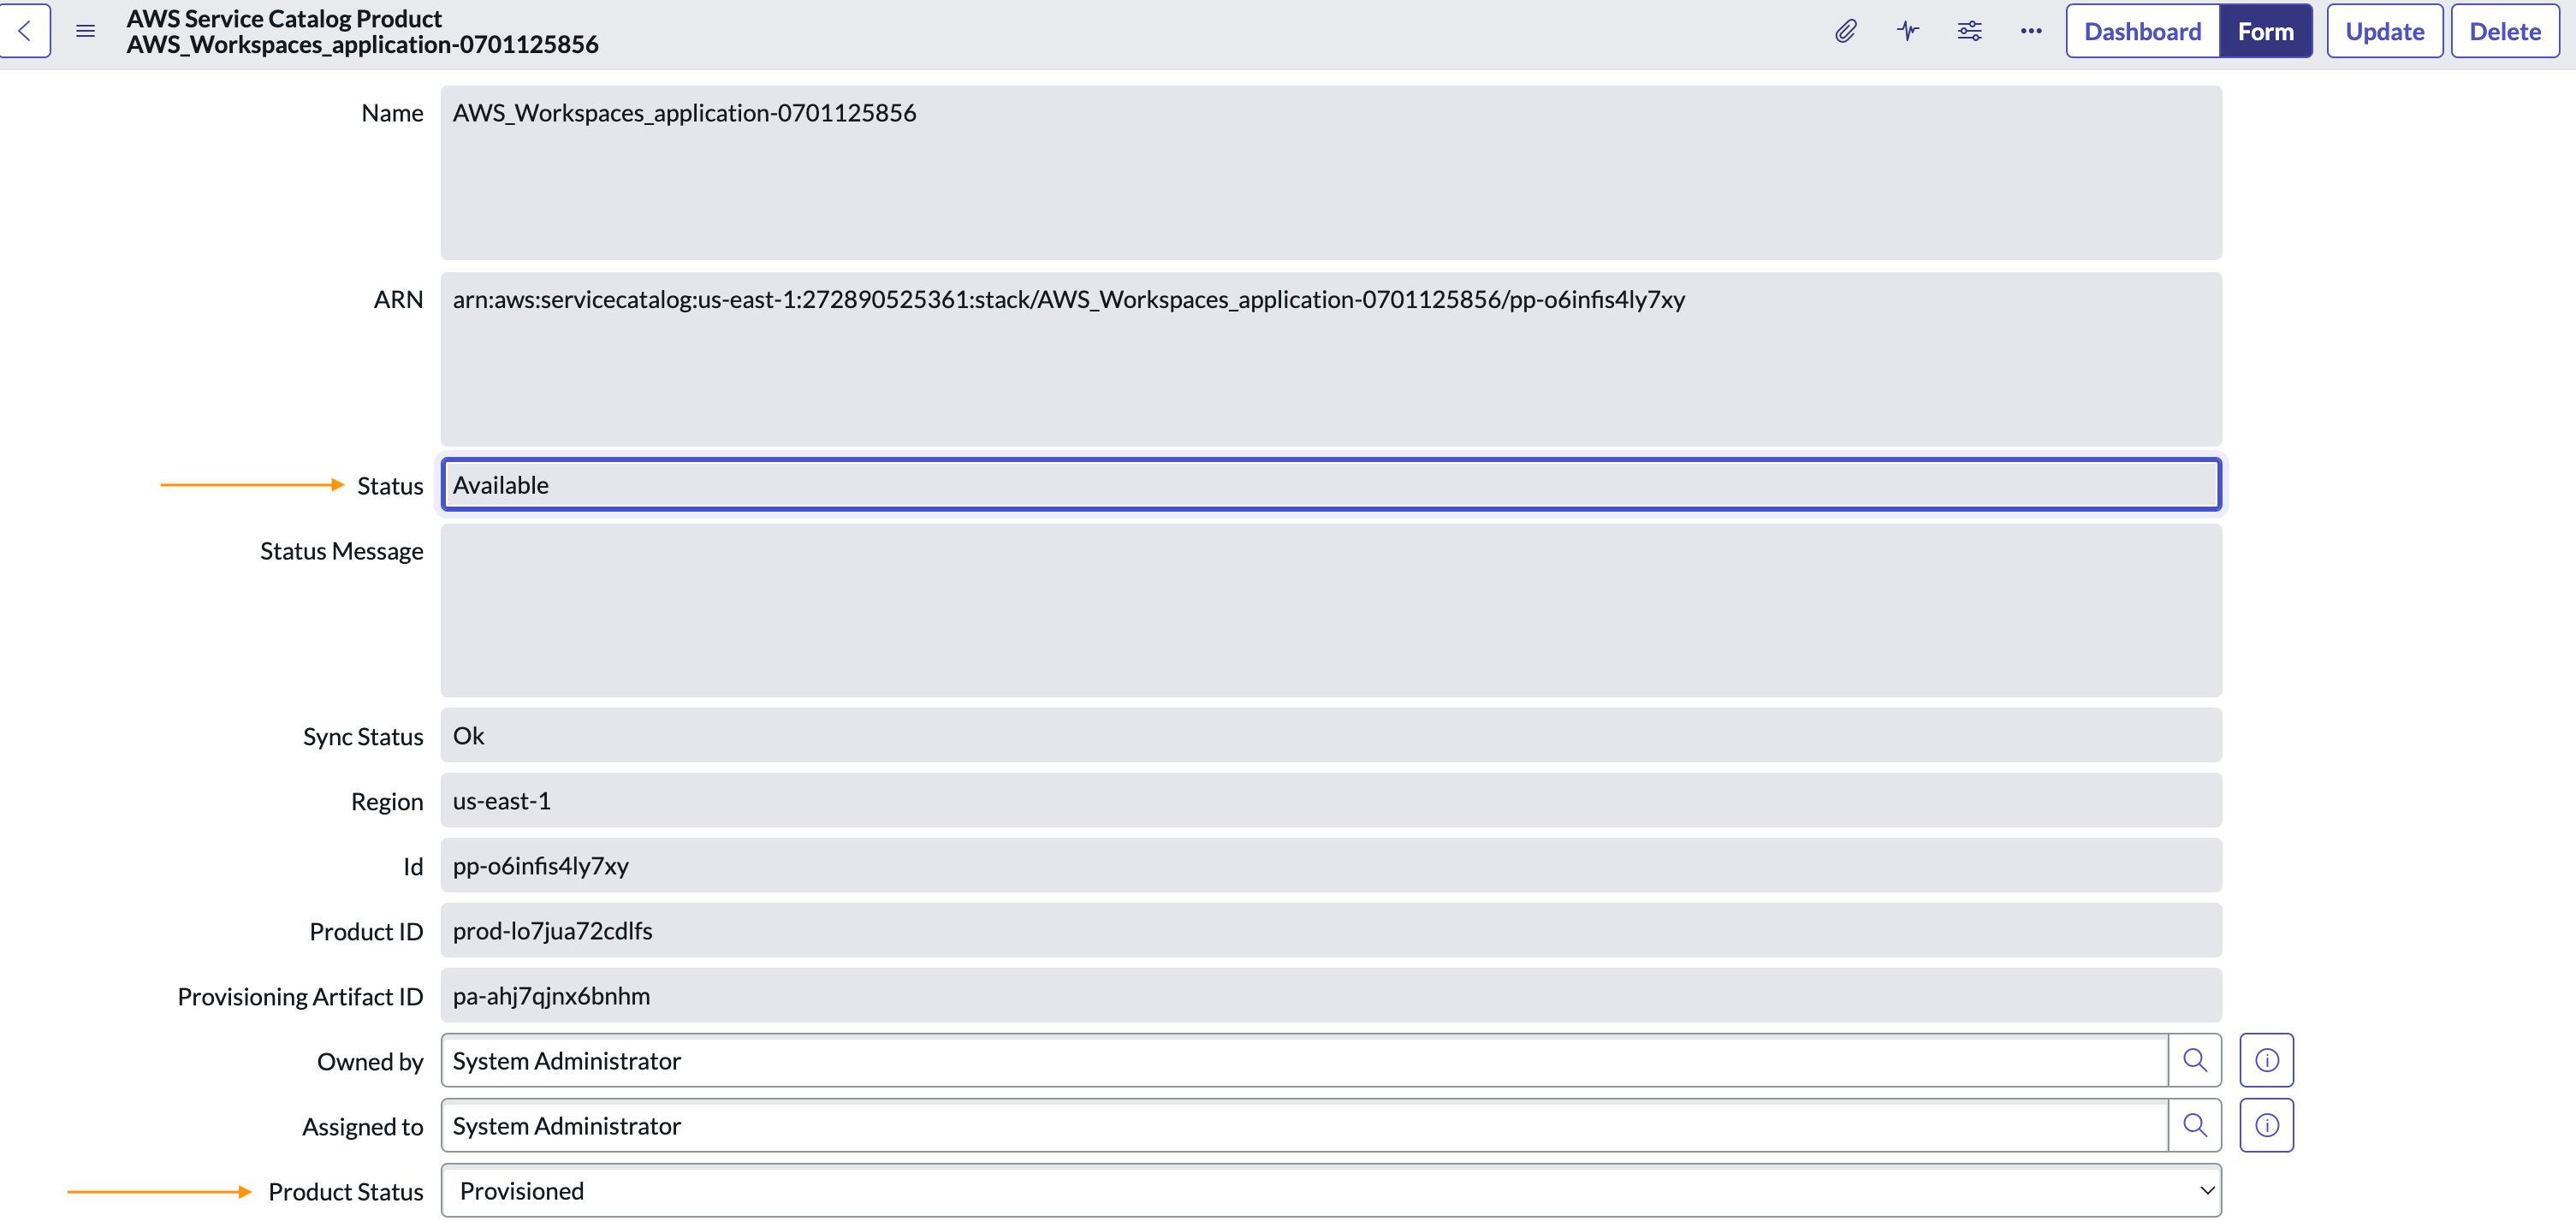
Fig 1.5: Results of a successfully provisioned Amazon WorkSpaces from ServiceNow Console
- Optionally, you can log in to the Amazon WorkSpaces console to view the status.
Step #2: Incident management on a WorkSpaces
Process an incident created from an event that occurred on the WorkSpaces.
- Stop the listed services to trigger RDP disconnection (triggers Unhealthy Status in Amazon WorkSpaces console) for the logged in user:
a. WorkSpaces required services:
i. SkyLightWorkspaceConfigService
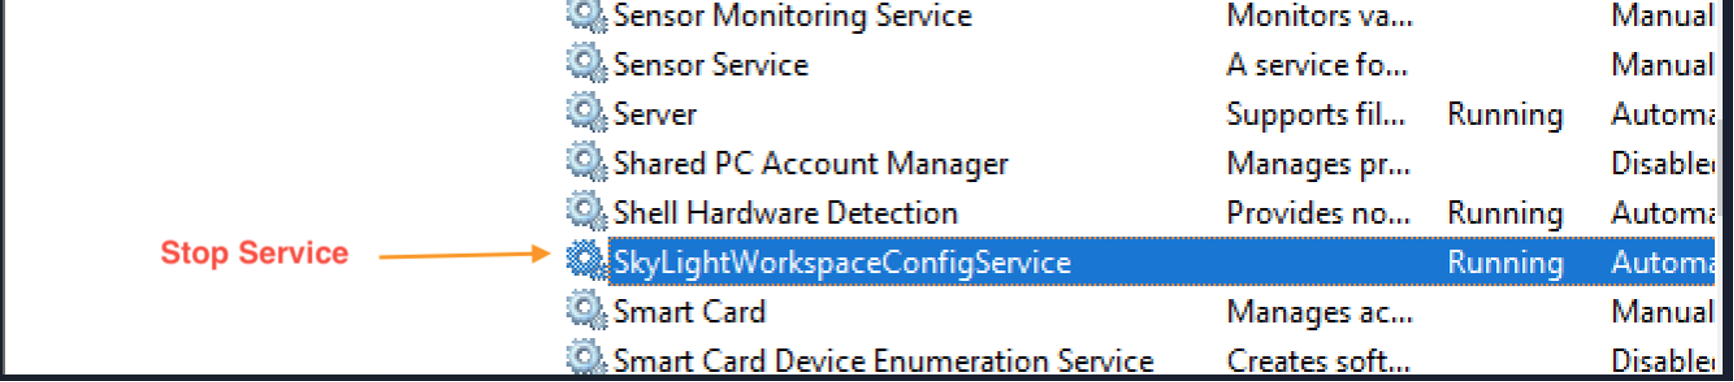
Fig 1.7: Sample of SkyLightWorkspaceConfigService Service in Amazon WorkSpaces control services panel
ii. PCoIP Standard Agent for Windows: Stop this last as it instantly drops the RDP Session.

Fig 1.8: Sample of PCoIP Standard Agent Service in Amazon WorkSpaces control services panel
NOTE: It will take approximately 25-30mins before the status shows “Unhealthy”. Amazon WorkSpace reachability checks are performed every 30mins.
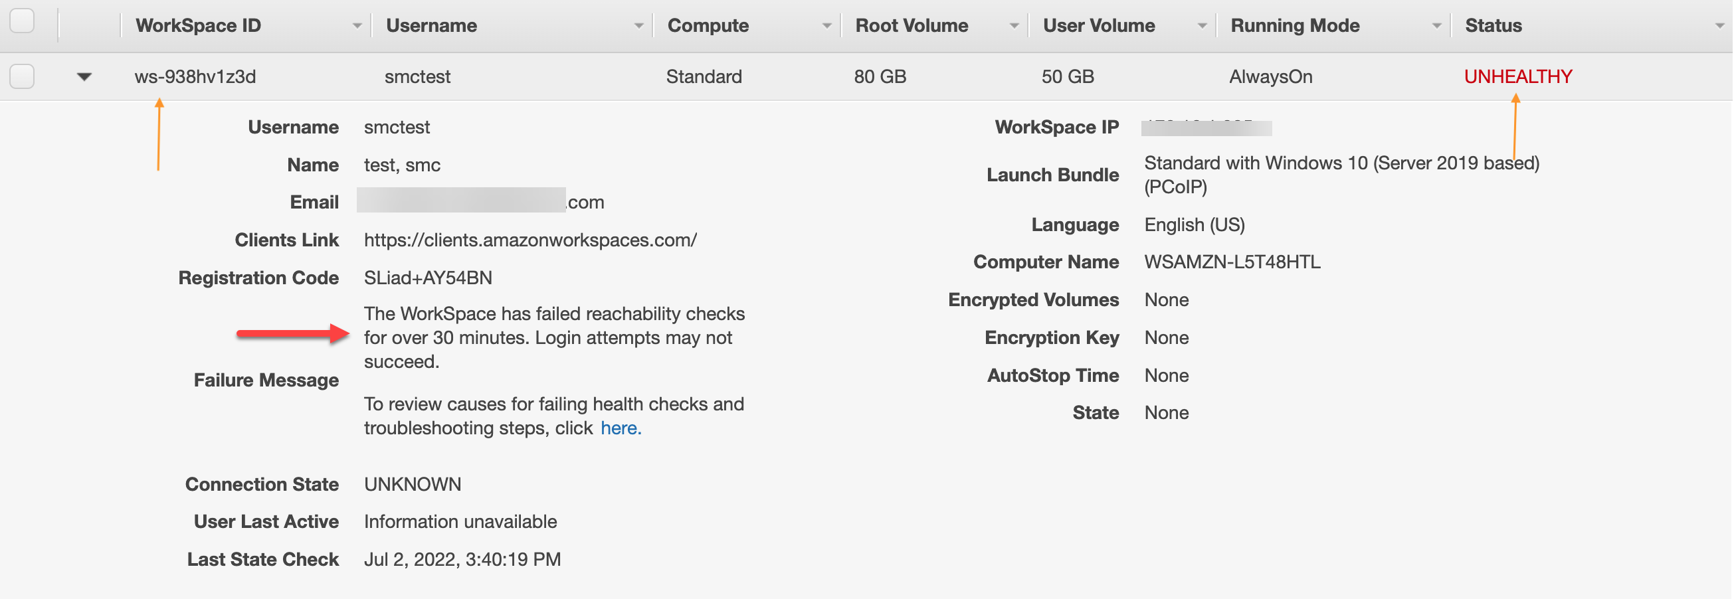
Fig 1.9: Status of Amazon WorkSpaces as ‘Unhealthy” due to stopped services
2. Create an incident in ServiceNow.
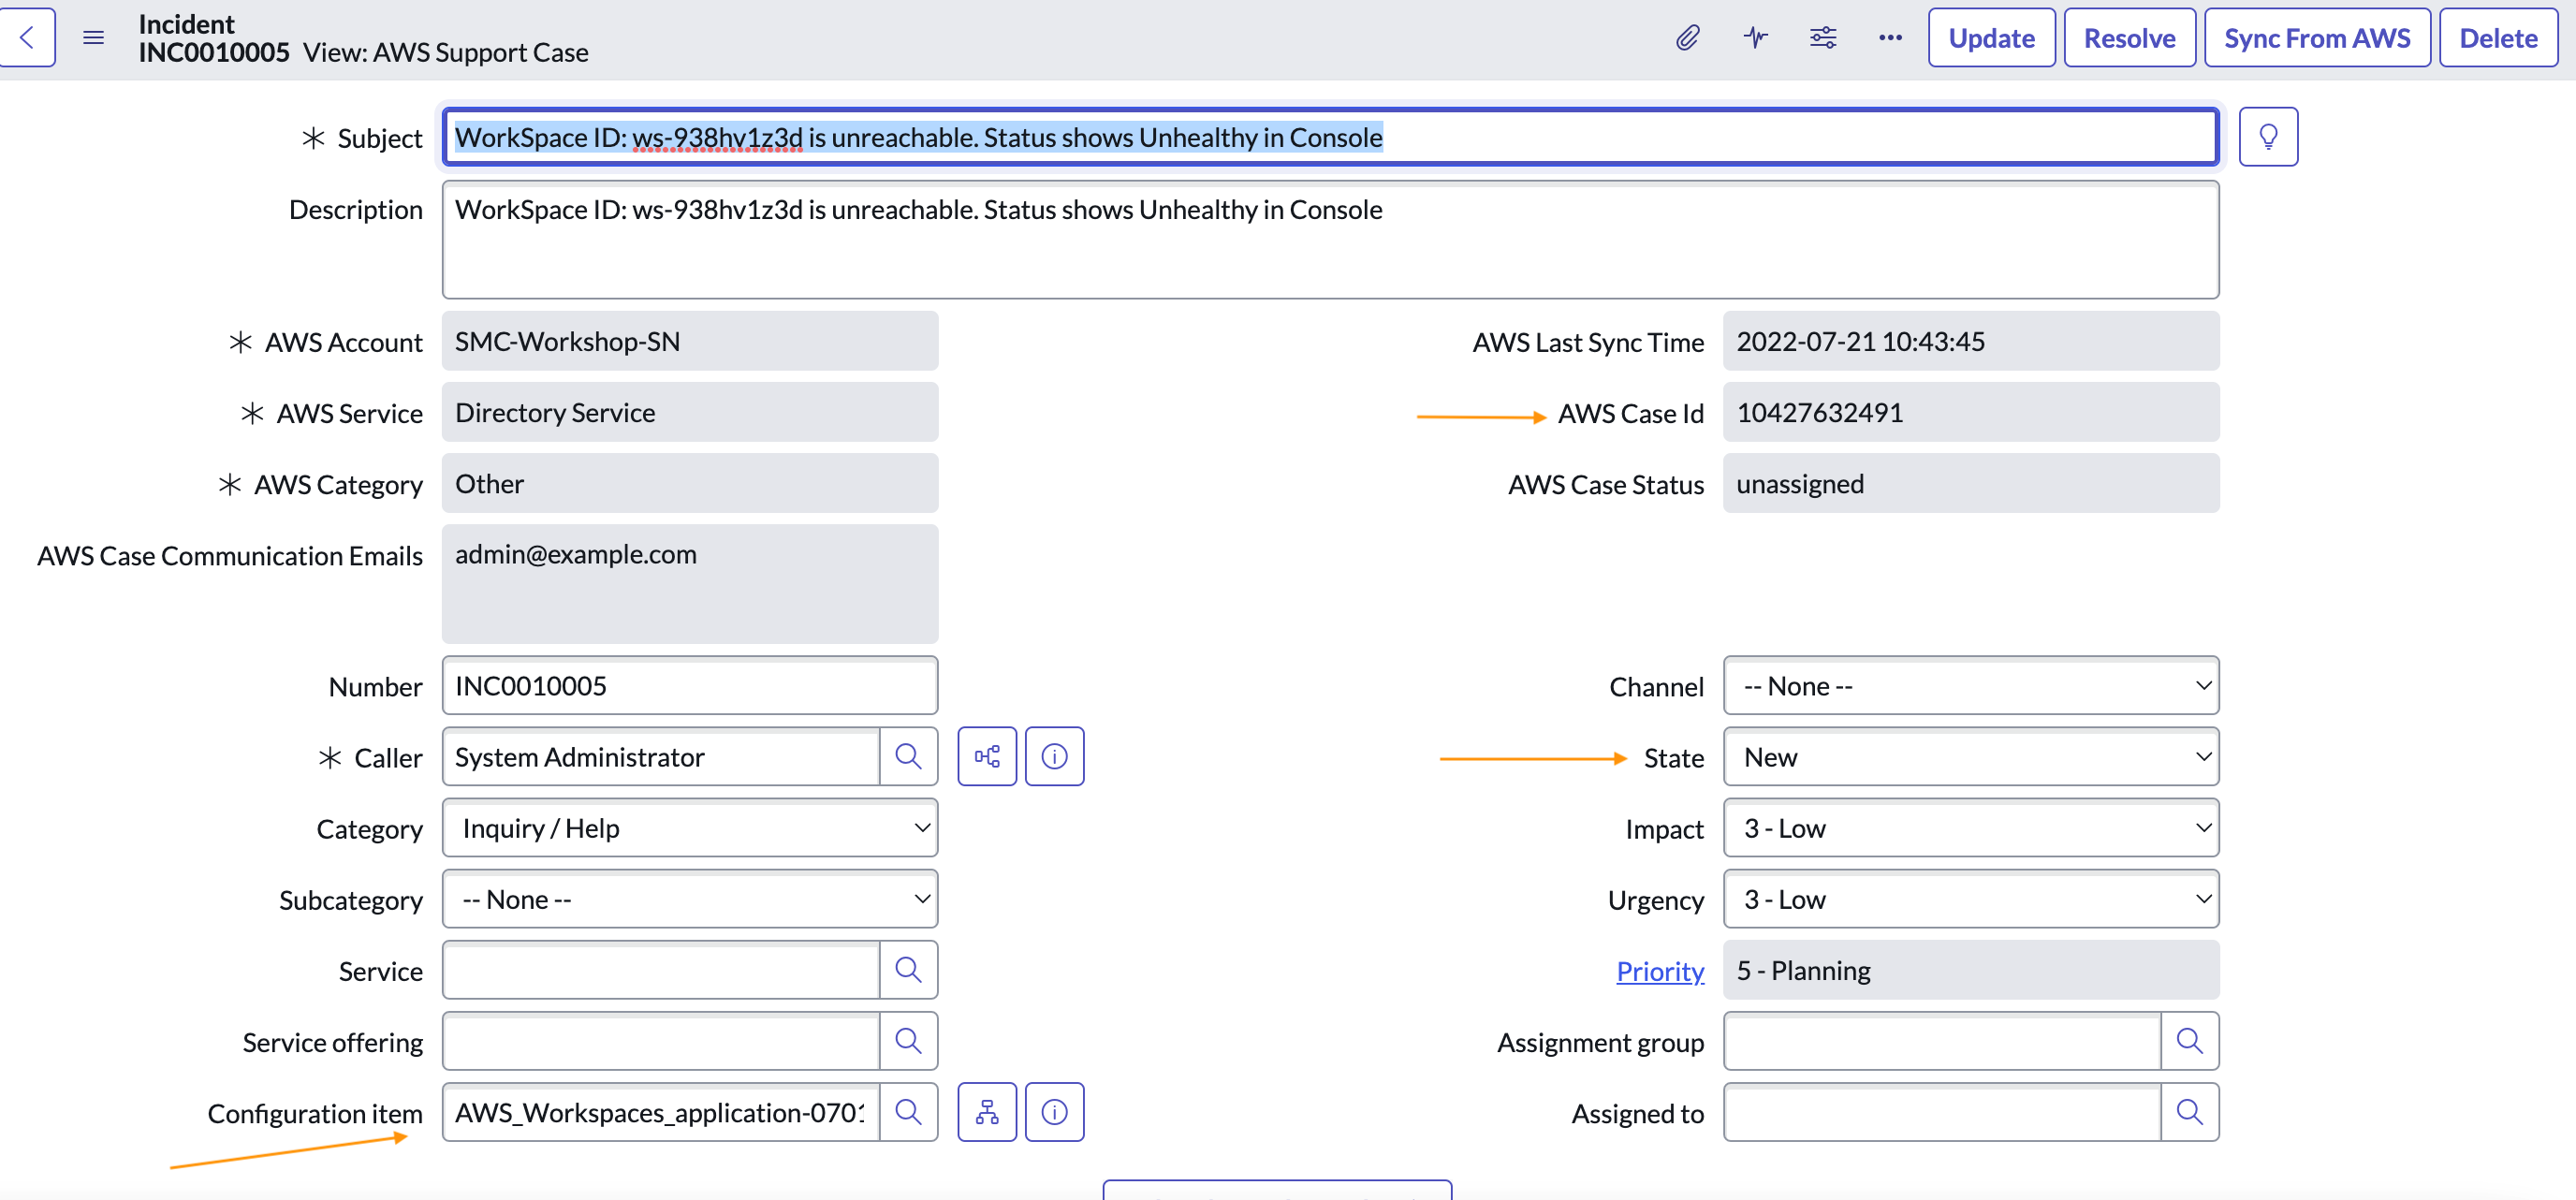
Fig 1.10: Incident record stating Amazon WorkSpaces is unreachable
- Within incident form, select or search applicable automation document to fix incident “AWSSupport-RecoverWorkSpace”.

Fig 1.11: Related Search Results to recover Amazon WorkSpaces within incident record
a. Reboots affected WorkSpaces using the specified WorkSpaceID.
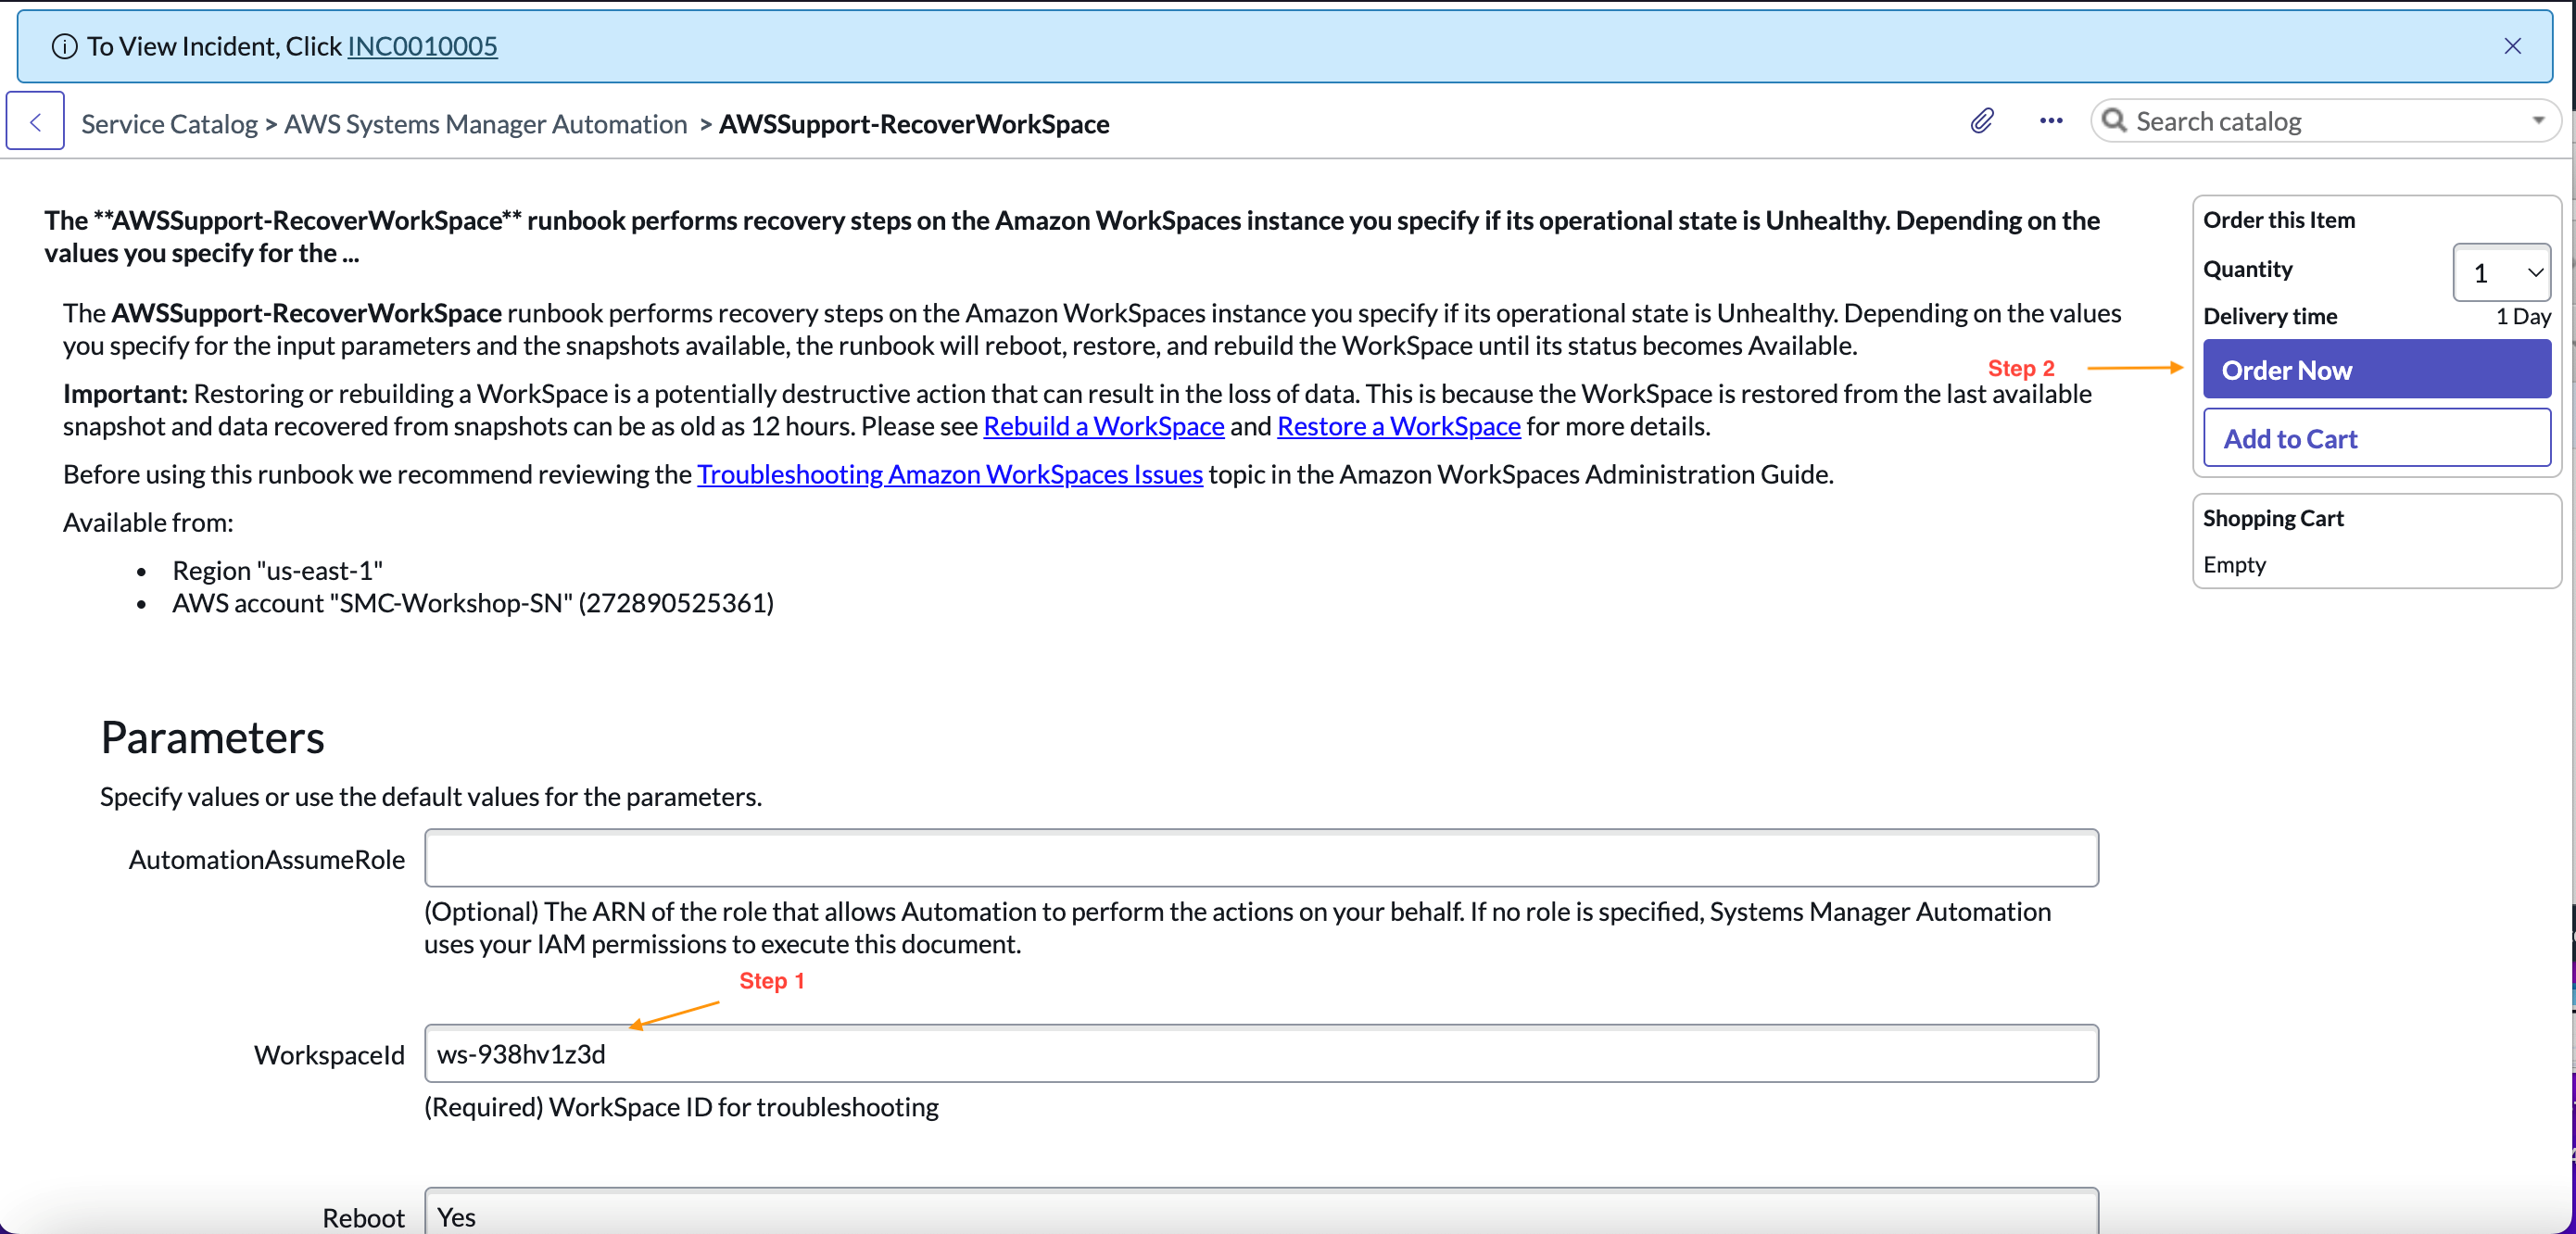
Fig 1.12: AWS Systems Manager Automation Catalog item “AWSSupport-RecoverWorkSpace” order form
b. View the Automation Execution status in ServiceNow.
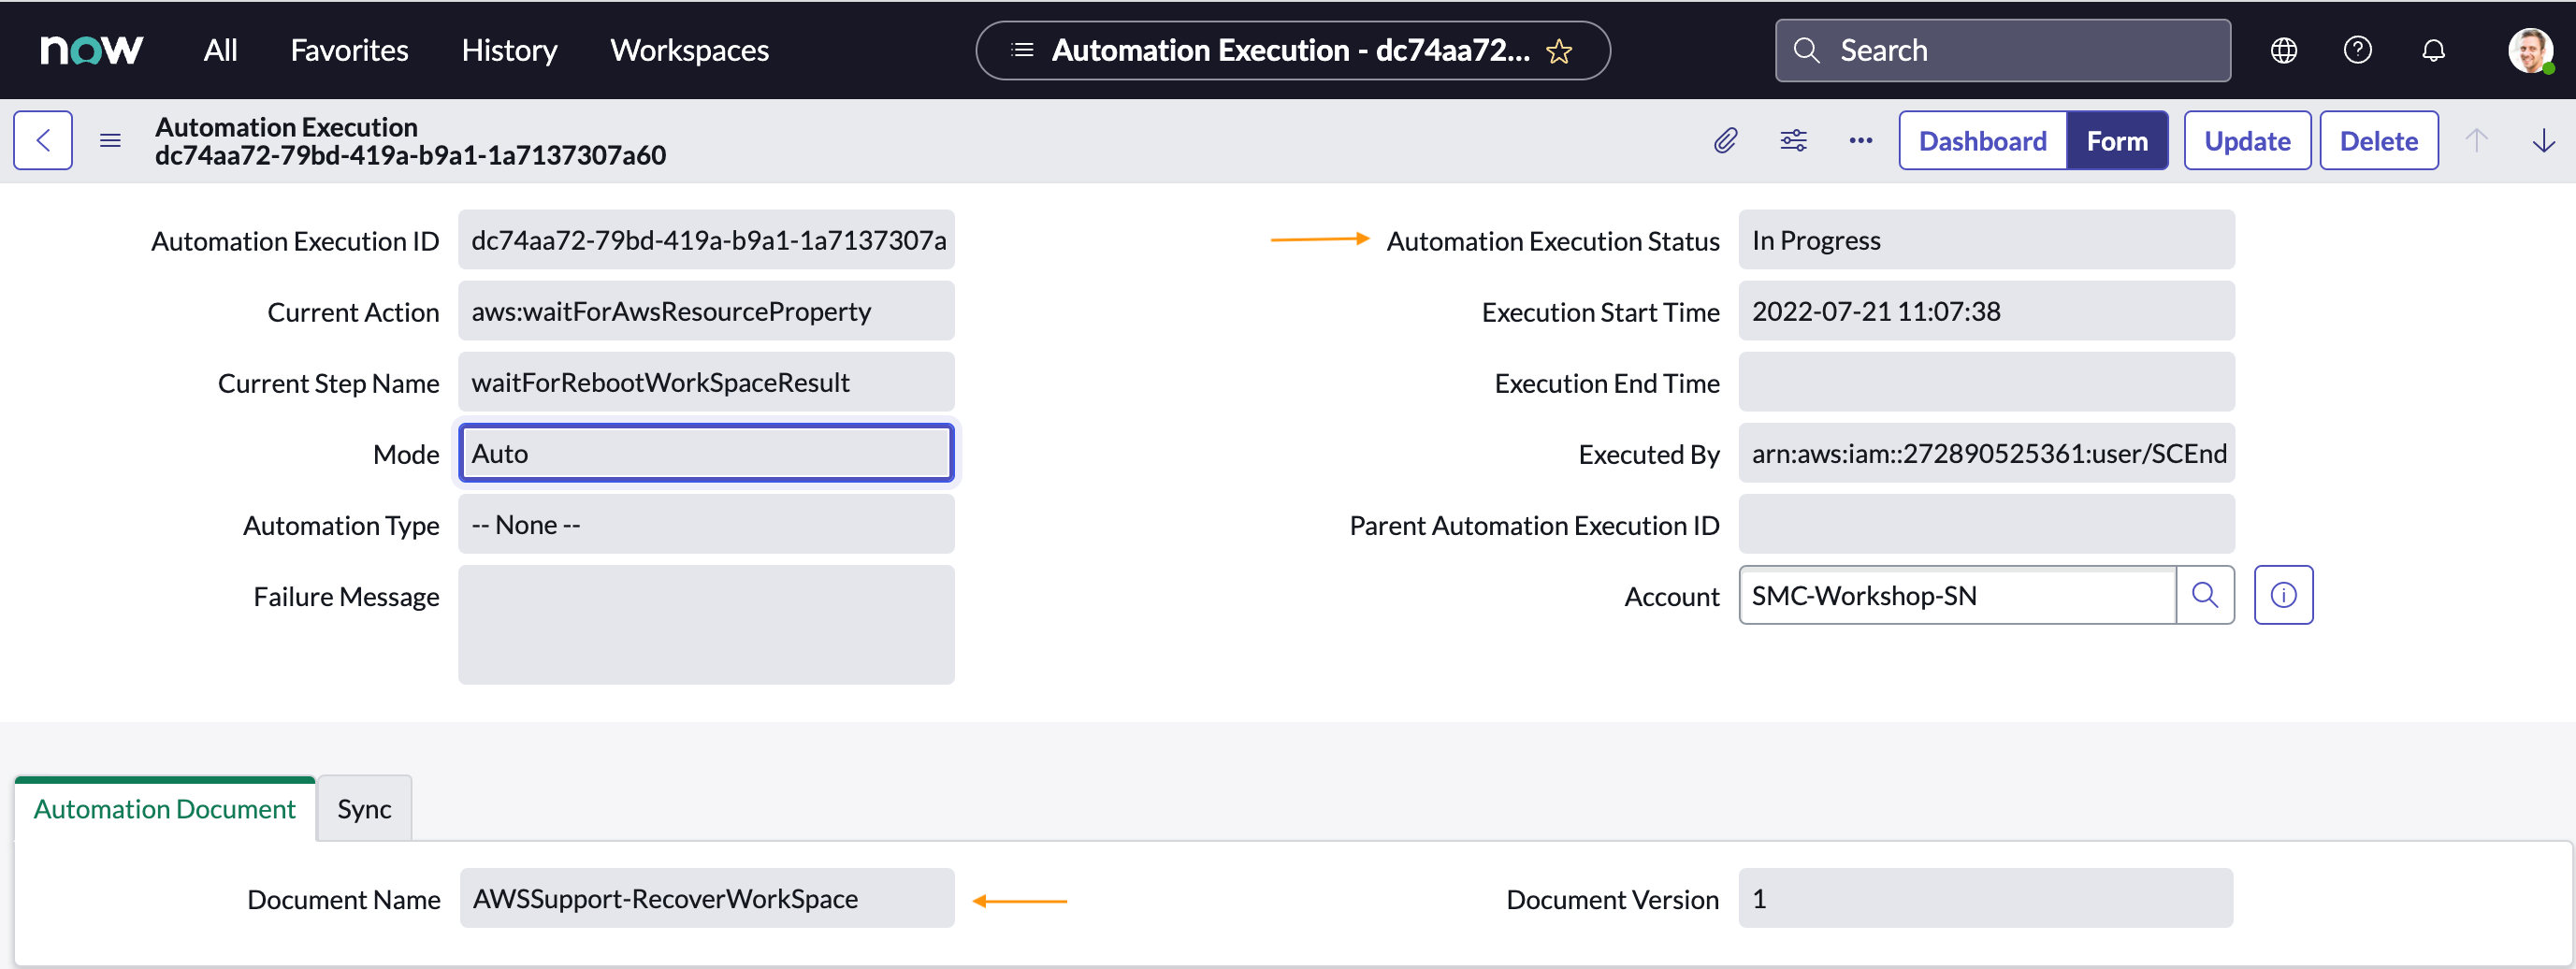
Fig 1.13: Automation Document Execution status in ServiceNow
c. View the status in Amazon WorkSpaces console.
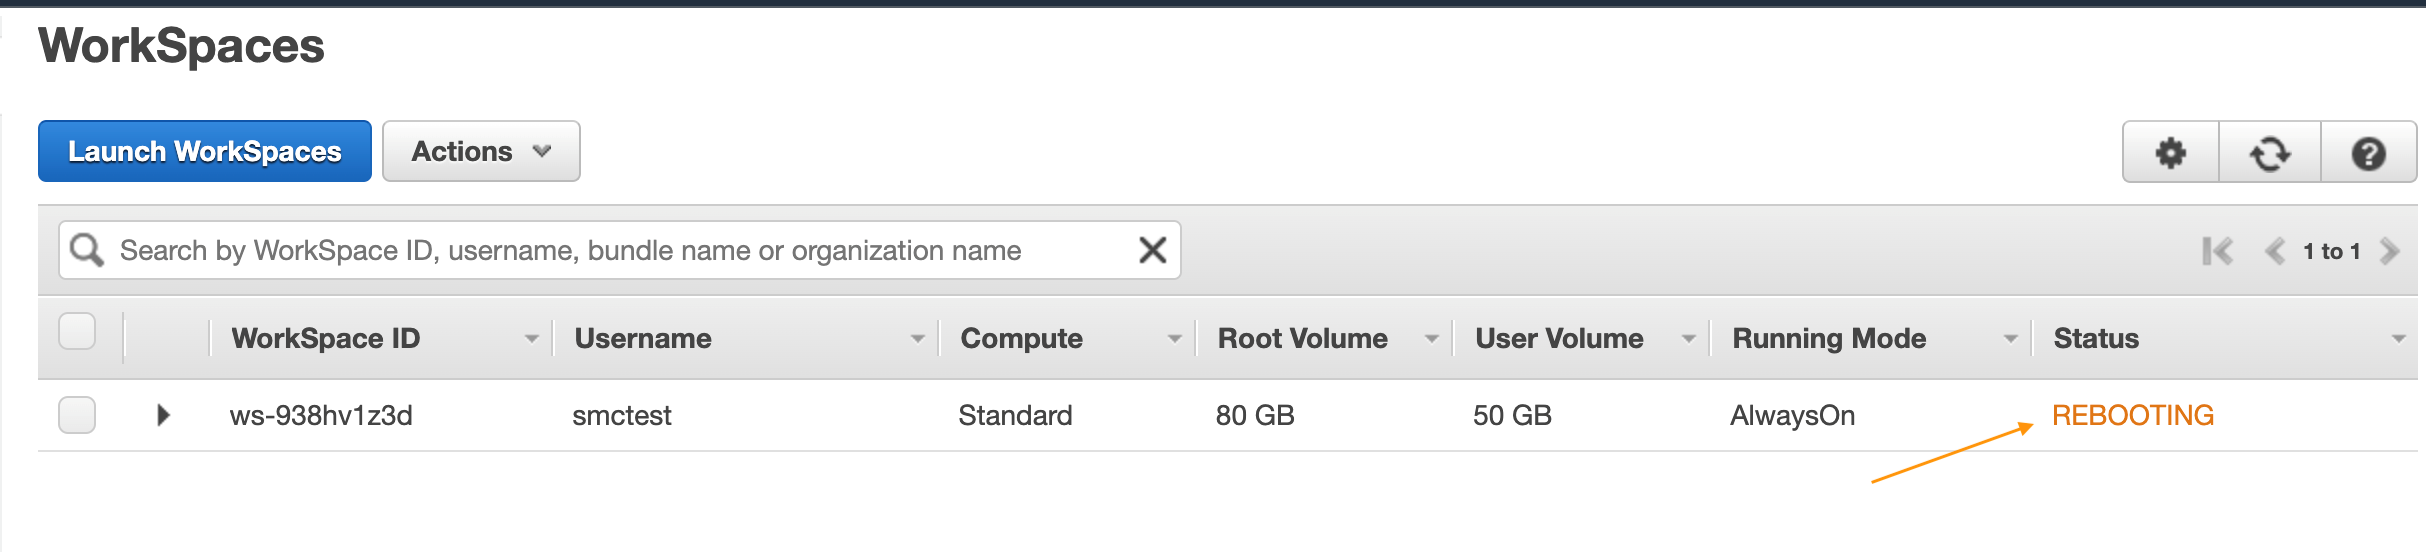
Fig 1.14: Rebooting Status based on Automation Document request from ServiceNow
d. The WorkSpaces becomes available once it is fully rebooted.
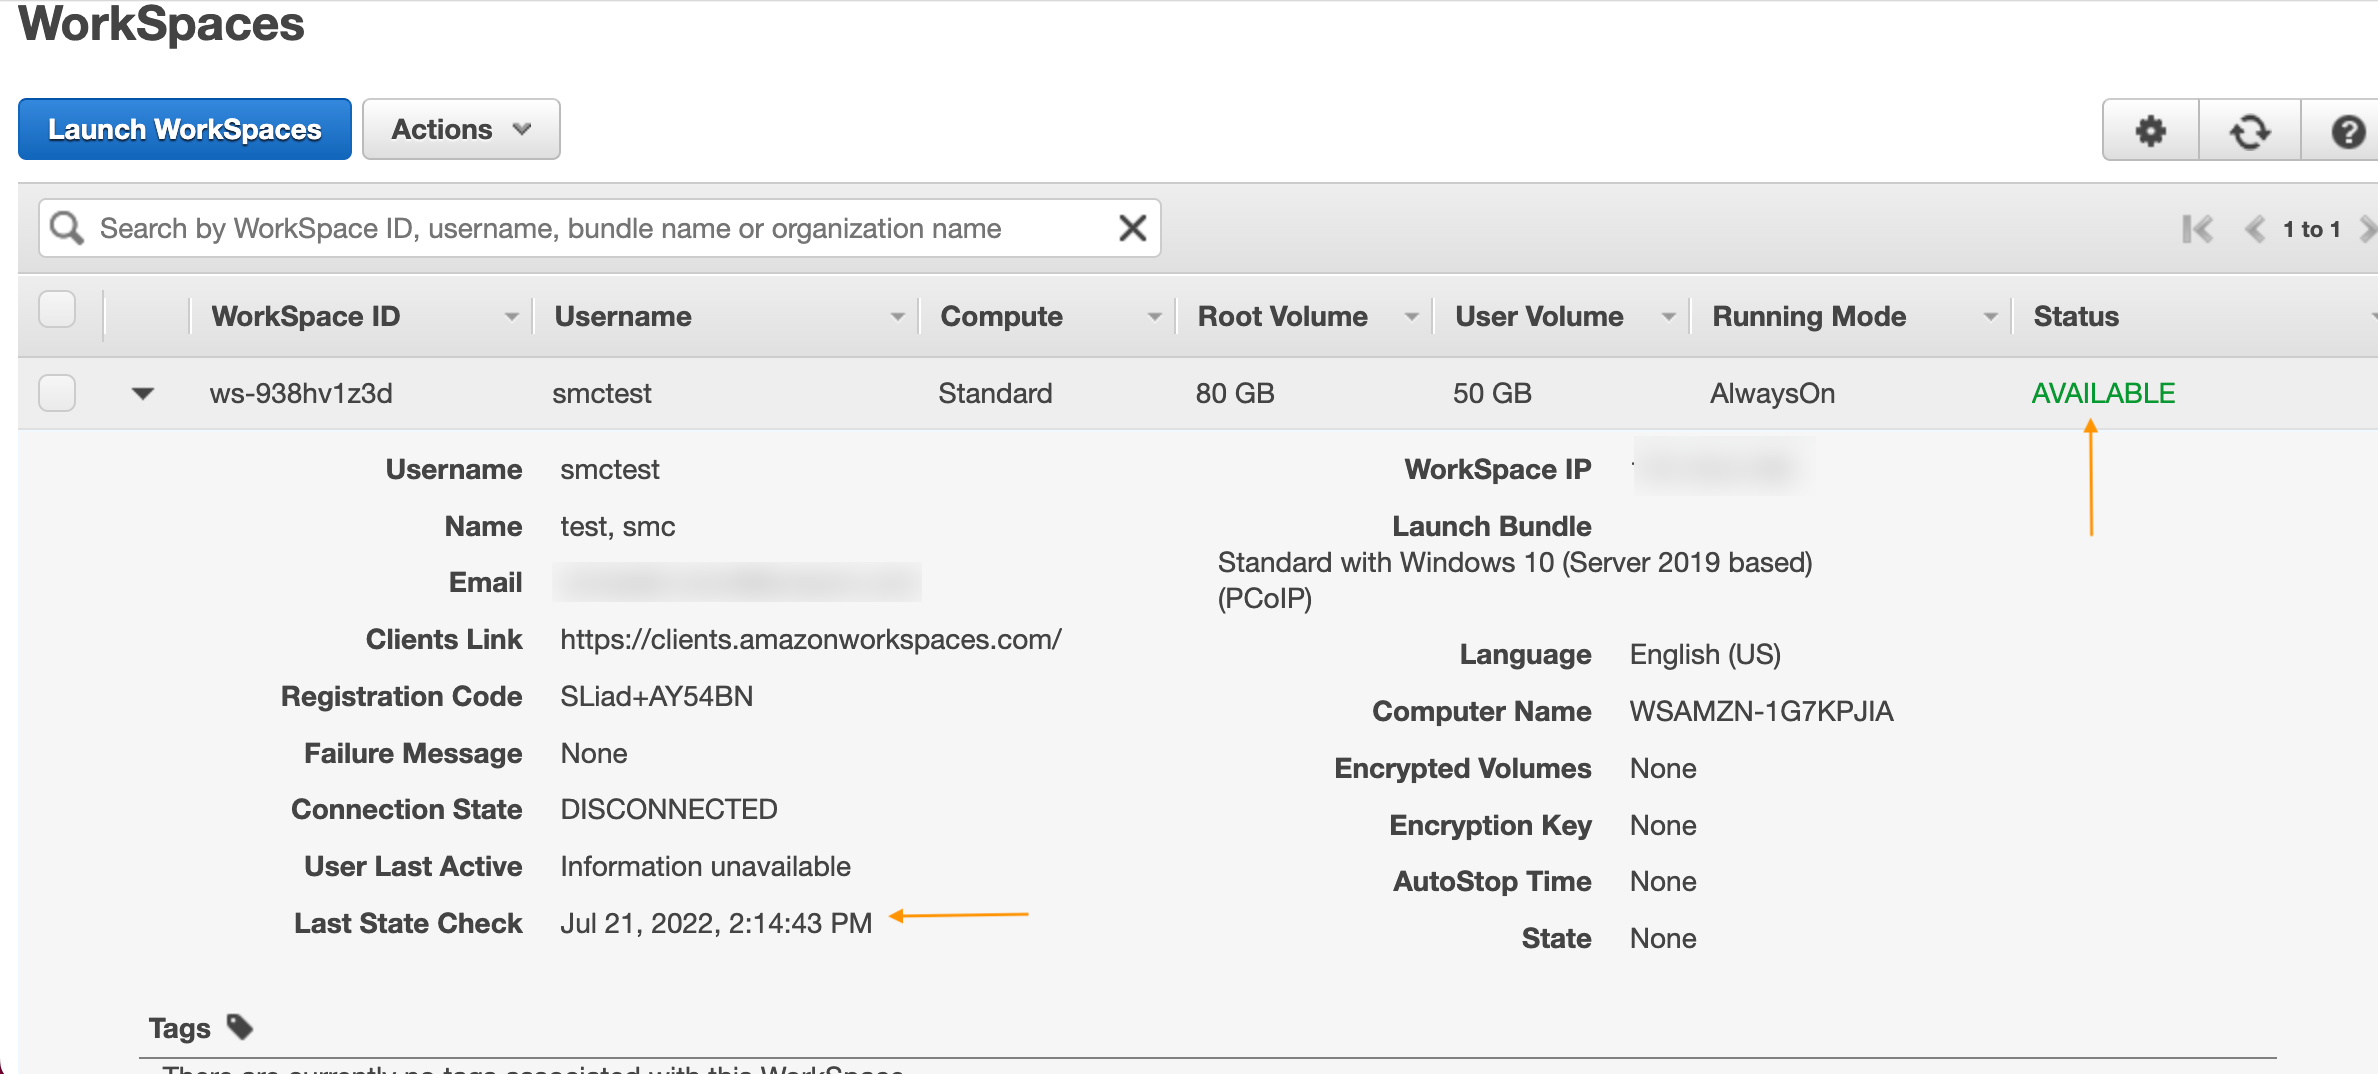
Fig 1.15: Status after full recovery in Amazon WorkSpaces Console
e. Resolve the incident once the workspace Status =Available in CMDB, or in Amazon WorkSpaces console
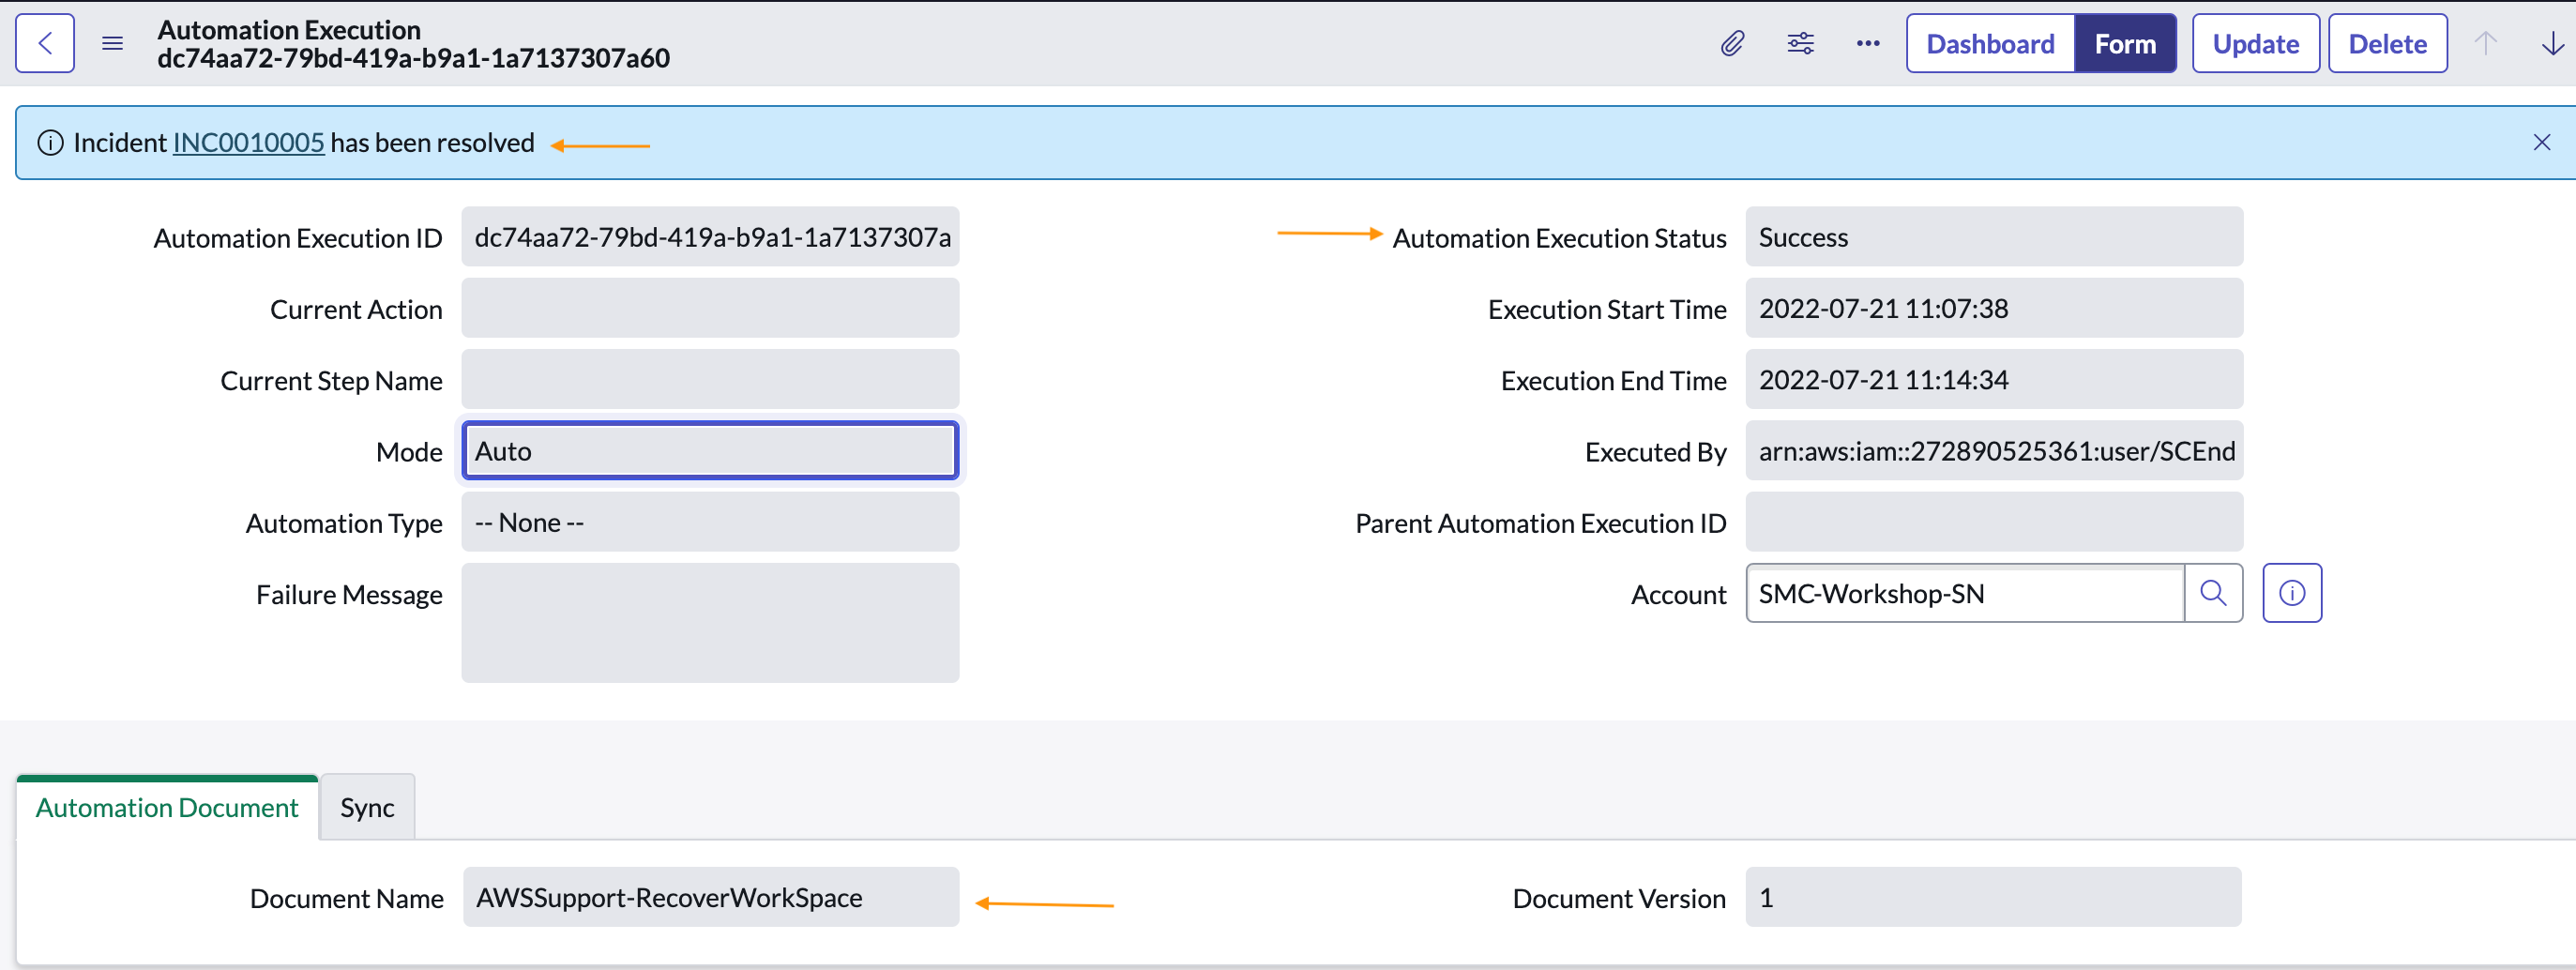
Fig 1.16: Final Incident record status and Automation Execution in ServiceNow
Step #3: Change request to “Terminate/Remove WorkSpaces”
For Cost Optimization purpose, any AWS resources that are underutilized or no longer needed must be terminated once the required data is backed up. For this use case, a request for termination is triggered as follows from ServiceNow:
- From “My Assets” dashboard in ServiceNow, select specific CI “AWS_Workspaces_application-0701125856”
a. Make sure that the WorkSpaceID matches the ID of the target WorkSpaces in the Console - Scroll down to “Related Links” and select “Request Termination”
a. This triggers the termination workflow of the specific WorkSpaces in the Console
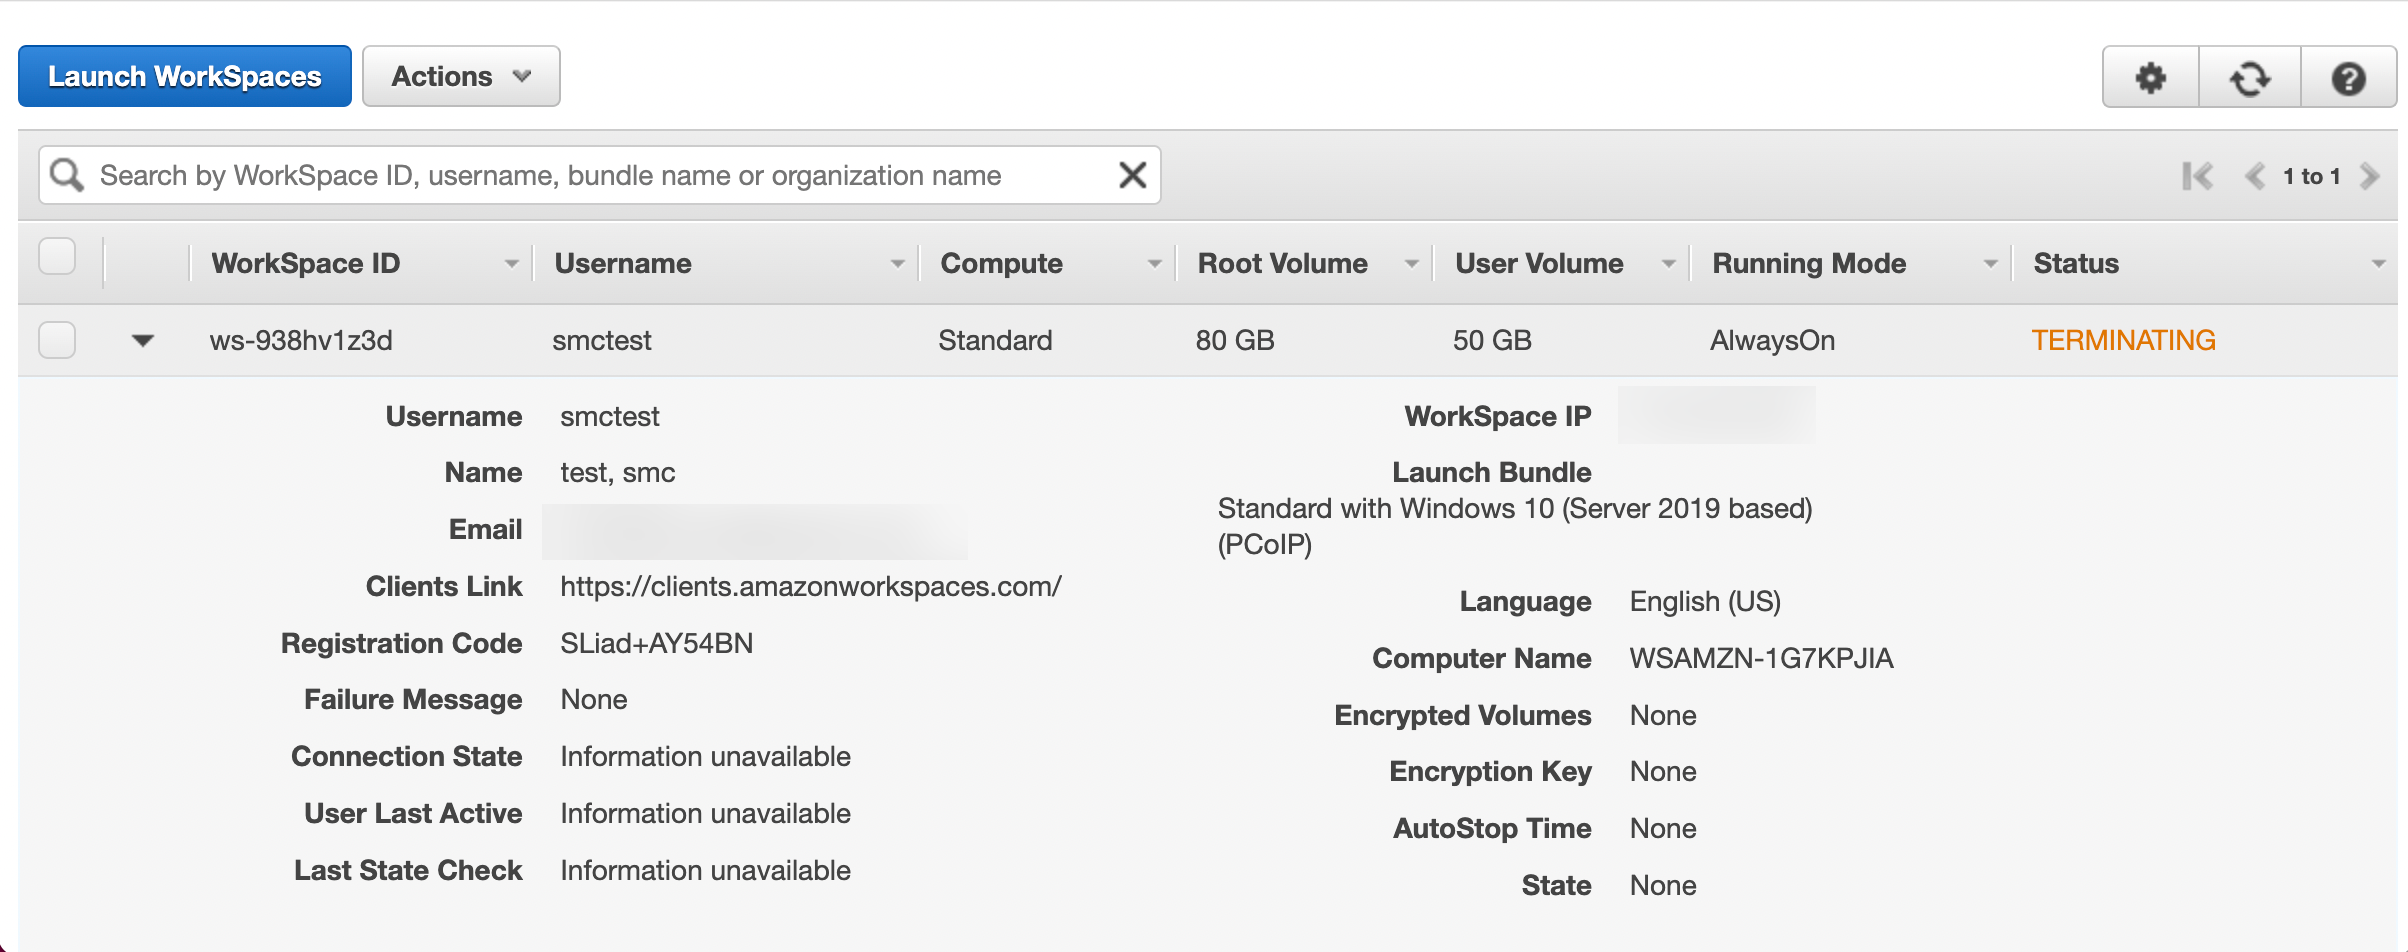
Fig 1.17: Status in Amazon WorkSpaces Console based on Termination Request from ServiceNow
b. The field ‘Product Status’=> Terminated once the termination process is completed, thereby removing it completely from the Amazon WorkSpaces console.
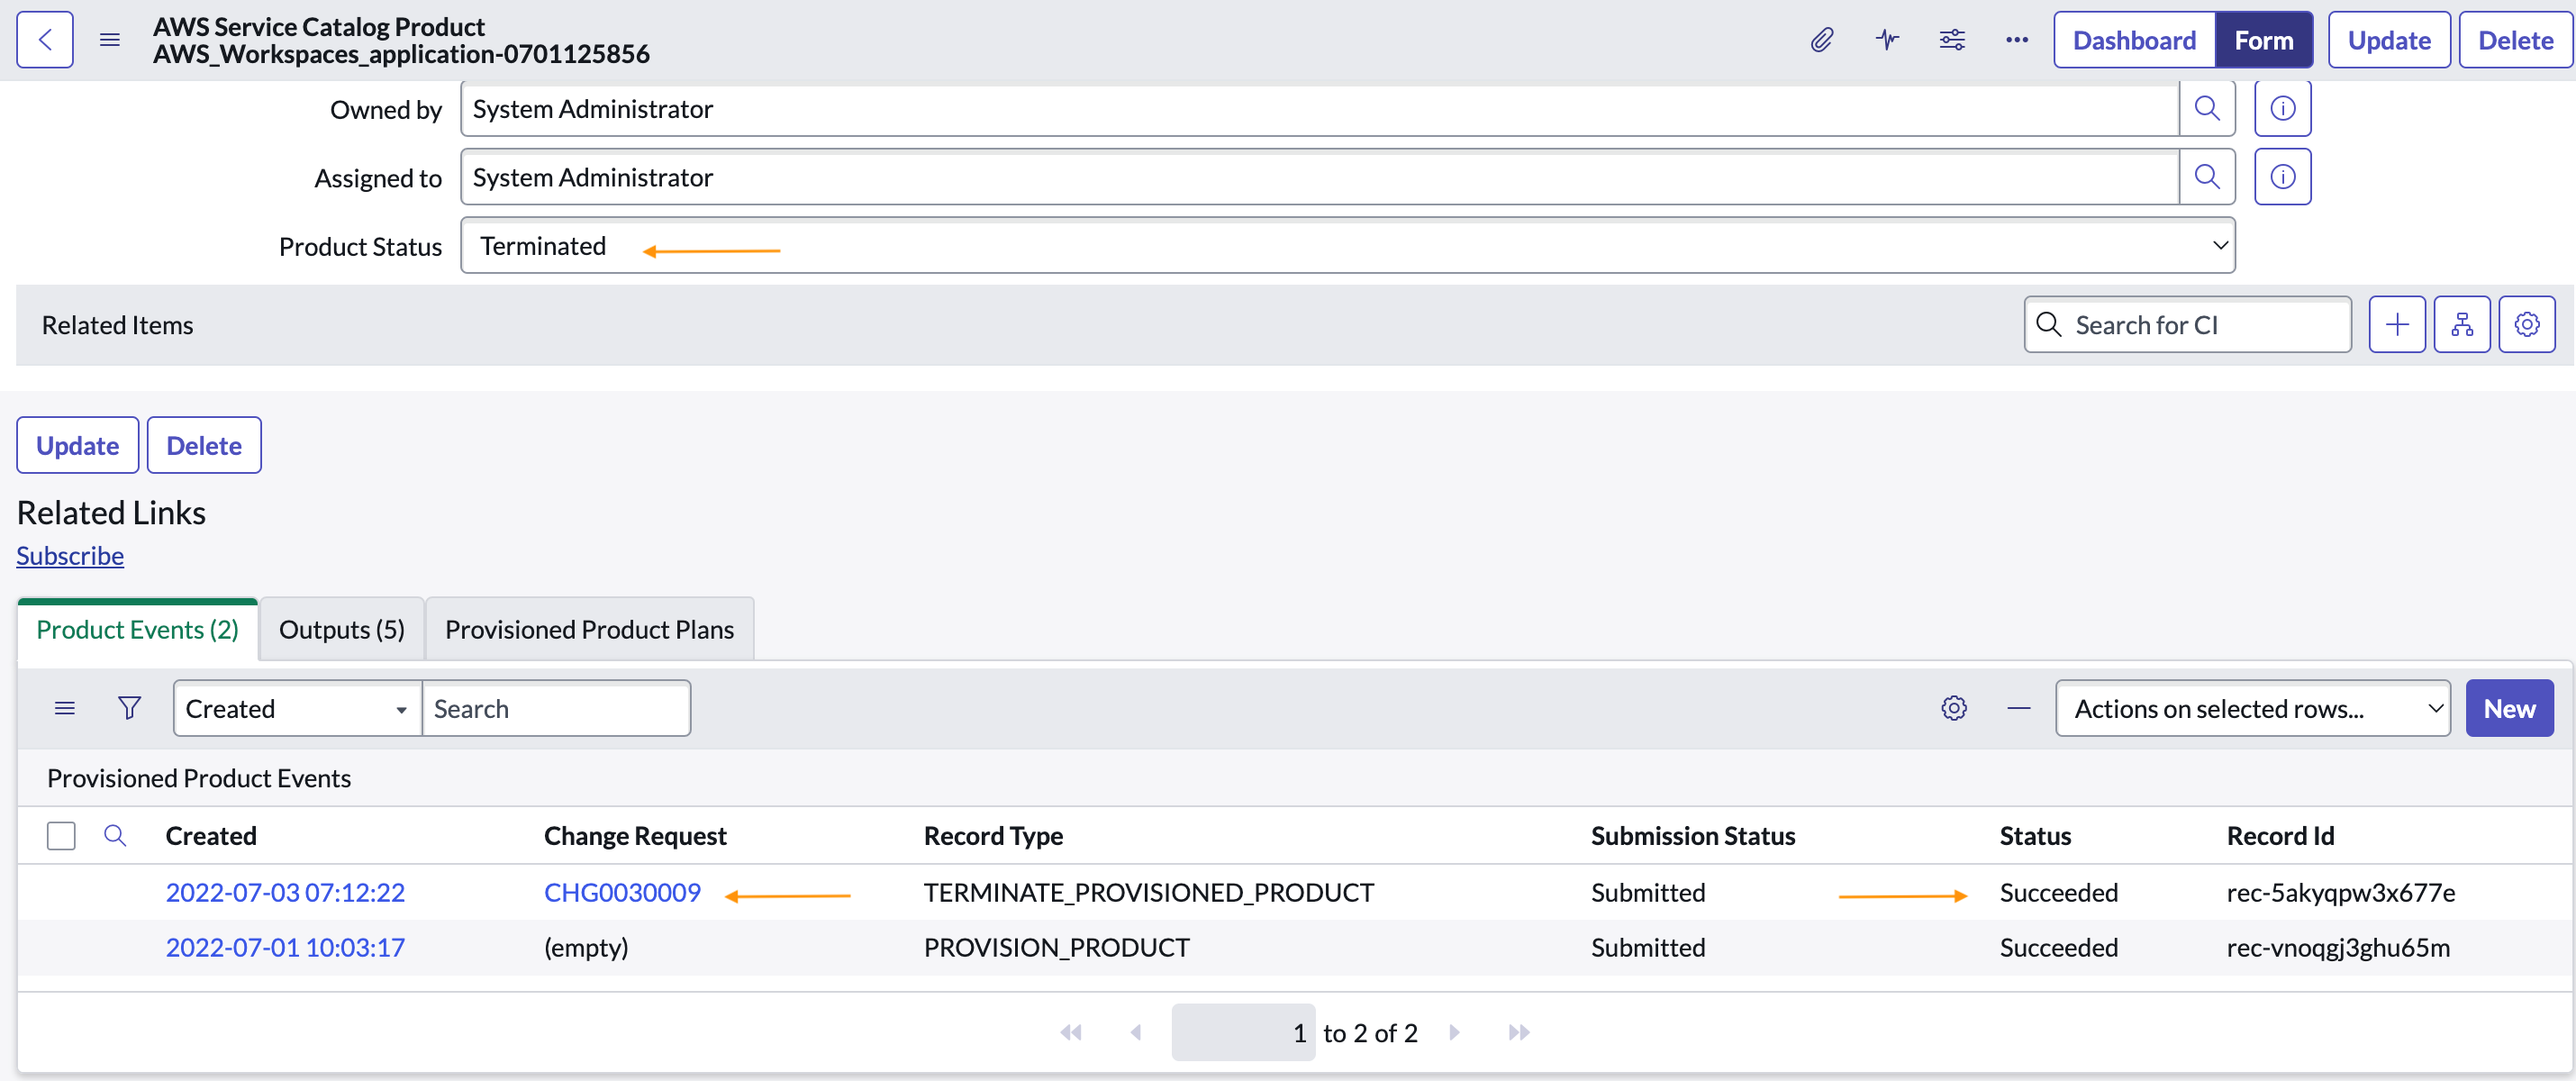
Fig 1.18: Amazon WorkSpaces product status in ServiceNow CMDB as Terminated
c. The change request can be closed per process once WorkSpace is fully terminated.
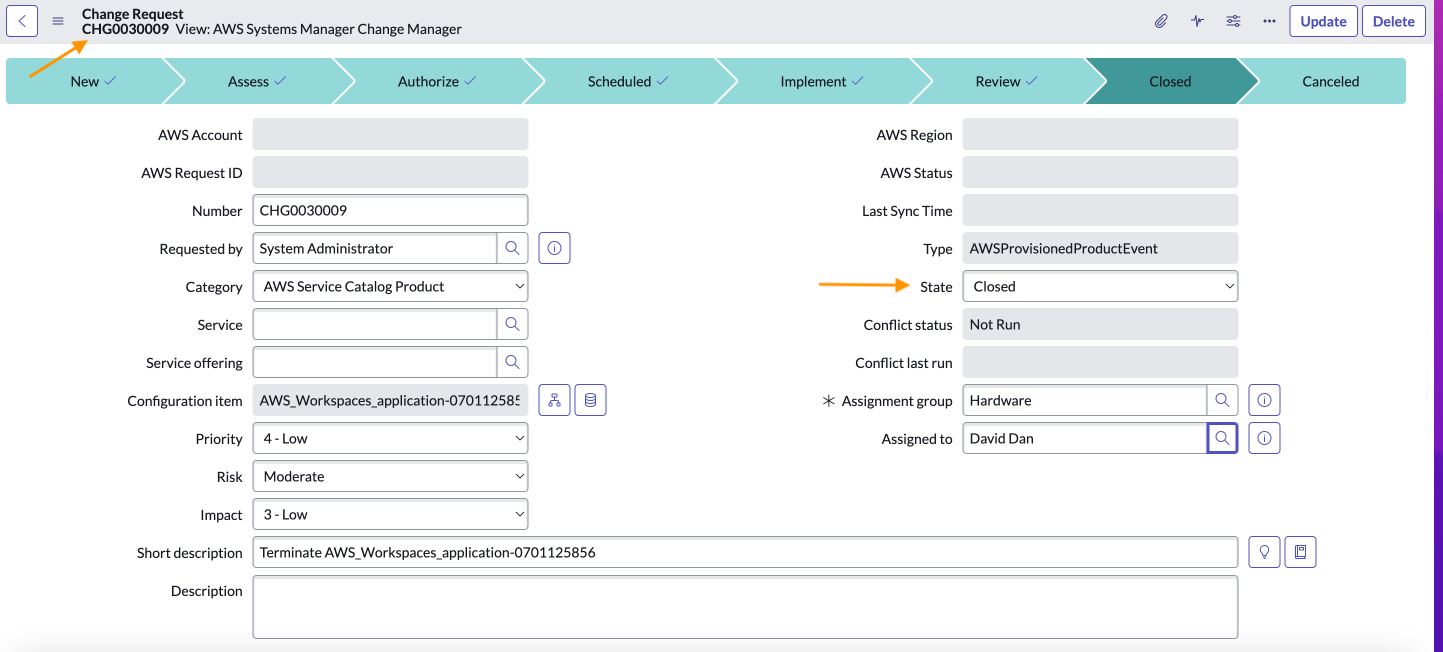
Fig 1.19: Closed Change Request ticket for the Amazon WorkSpaces termination in ServiceNow
Step #4: Configuration audits/inventory management
For audits trail purposes, the record for the terminated resource (WorkSpaces) will remain in ServiceNow CMDB until archived/deleted based on the organization retention policy. This allows the CI owner or business unit to audit the history of any provisioned AWS Resources via ServiceNow integration.
- From “AWS Service Catalog” in ServiceNow, select Provisioned Products
- Filter using specific CI “AWS_Workspaces_application-0701125856”

Fig 1.20: Amazon WorkSpaces Configuration Item (CI) inventory record in ServiceNow CMDB for audit purposes
Conclusion
In closing this post, I have showed you a typical lifecycle management of an AWS Resource (Amazon WorkSpaces) using AWS CloudFormation, AWS Service Catalog, AWS Directory Services and ServiceNow. These services can be used to provision AWS Resources in your portfolio, manage incident and change requests, reduce cost on underutilized resources, and conduct inventory audits in the CMDB at scale.
Cleanup
NOTE: The Amazon WorkSpace was terminated in the step #3.
This step removes all resources deployed during creation of the stack. This includes the AWS Service Catalog portfolio, product and launch constraint role.
- Delete the created Stack “SC-RA-Workspaces-Portfolio”
a. Go to CloudFormation Service in your AWS Console
b. Click on Stacks
c. Select the stack name “SC-RA-Workspaces-Portfolio”; created at the beginning of this blog.
d. Click Delete from the available option.
Next Steps
I encourage you to follow the provided steps in your environment as a workshop.
You can reach out to the team for support by signing up for SMC Activation Day via
aws-servicemanagement-connector@amazon.com
About the author: