AWS Cloud Operations Blog
Bootstrapping multiple AWS accounts for AWS CDK using CloudFormation StackSets
The AWS CDK makes it easy to deploy an application to the AWS Cloud. But first you must “bootstrap” the target AWS account. You can bootstrap an AWS account by using the AWS CDK CLI and running cdk bootstrap. This is great for teams that have access to AWS accounts, or only need to bootstrap a small number of accounts. However, for organizations that manage a large number of accounts, it can be difficult to make sure that each account is bootstrapped. In this post, you’ll learn how to bootstrap many AWS accounts in an automated and consistent manner using CloudFormation StackSets.
The AWS Cloud Development Kit (AWS CDK) is an open-source software development framework for defining cloud infrastructure in familiar programming languages and provisioning it through AWS CloudFormation. The AWS CDK consists of three major components:
- The core framework for modeling reusable infrastructure components
- A CLI for deploying AWS CDK applications
- The AWS Construct Library , a set of high-level components that abstract cloud resources and encapsulate proven defaults
Concepts
AWS CDK Bootstrap
Deploying AWS CDK apps into an AWS environment (a combination of an AWS account and Region) requires that you provision resources that the AWS CDK needs to perform the deployment. These resources include an Amazon Simple Storage Service (Amazon S3) bucket for storing files and AWS Identity and Access Management (IAM) roles that grant permissions needed to perform deployments. The process of provisioning these initial resources is called bootstrapping. Environments are independent, so if you want to deploy to multiple environments (different AWS accounts or different Regions in the same account), each environment must be bootstrapped separately. For a more detailed guide on AWS CDK bootstrap, see the AWS CDK Developer Guide.
AWS Organizations
AWS Organizations is an AWS service that enables you to centrally manage and govern multiple accounts. Organizations lets you define organizational units (OUs), which are logical groupings of AWS accounts. OUs enable you to organize your accounts into a hierarchy and make it easier for you to apply management controls. For a deep-dive on OU best practices, you can read the Best Practices for Organizational Units with AWS Organizations post.
CloudFormation StackSets
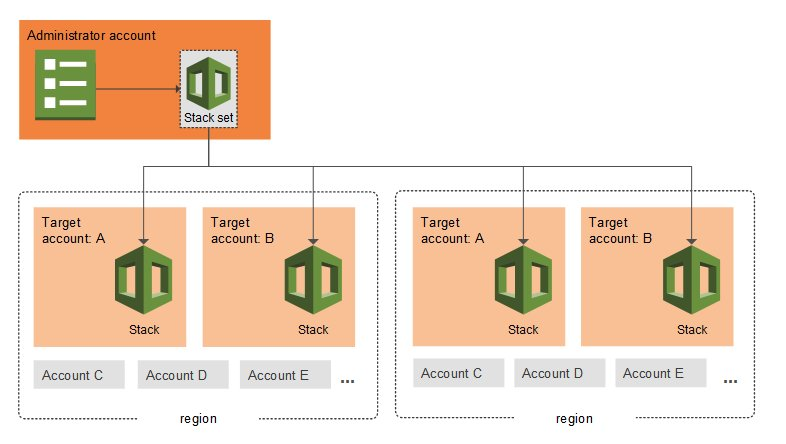
Figure 1. Stackset deployment model from an admin account to multiple target accounts and regions
CloudFormation StackSets enable you to create, update, or delete stacks across multiple accounts and AWS Regions with a single operation. Using an administrator account, you define and manage a CloudFormation template, and use the template as the basis for provisioning stacks into selected target accounts across specific AWS Regions. Every deployment of a Stack Set to an account and Region is called a Stack Instance.
StackSets let you automatically deploy Stack Instances into new accounts when they’re added to an organization or OU. This means that as new AWS accounts are created in an organization, StackSets can be used to automatically bootstrap them as soon as they are created.
Note that when you choose to automatically deploy a StackSet to a new account to an OU, you decide on all of the Regions to deploy them in beforehand. This feature is appropriate if you generally use the same Region (or small set of Regions) for all of your accounts. If you typically use a different account per Region, then it’s better not to use this feature and add new Stack Instances to new accounts individually as they’re created.
Prerequisites
The following tutorial uses version 2.25.0 of the AWS CDK, but the same method works for any version of the AWS CDK. To completely follow this tutorial, you should have an Organization with at least one other AWS account, and you should have administrator access to either the Organizations management account or the Organizations delegated admin account. To create multiple AWS accounts, you can use AWS Control Tower. For instructions, see Control Tower – Set up & Govern a Multi-Account AWS Environment.
Setup
Before creating a StackSet it’s necessary to setup the required permissions that allow the StackSet account to deploy stacks into target accounts. StackSets can use either self-managed or service-managed permissions:
- Self-managed permissions: for each account, you must create a Role that gives CloudFormation access to deploy into that account.
- Service-managed permissions: as a one-time operation, CloudFormation will create Roles in your organization management account that lets it deploy to all of the accounts in the organization.
The rest of this walkthrough will utilize service-managed permissions. However, if you would like to use the self-managed model, then you can follow the CloudFormation user guide that walks through setting up the required permissions.
To create a StackSet using the service-managed permissions model, you must first verify that you have enabled all features in Organizations and enabled trusted access with Organizations for CloudFormation. For a detailed guide on how to enable these features, see the CloudFormation user guide. Once the integration has been configured, the Organizations management account will have access to deploy StackSet stacks to any account that exists in the Organization.
Walkthrough
In this post, you’ll perform the following steps to deploy the AWS CDK bootstrap template:
- Extract the AWS CDK bootstrap CloudFormation template from the AWS CDK CLI
- Customize the bootstrap template by adding an IAM permission boundary
- Create a CloudFormation StackSet targeting an OU
- (Optionally) Update the bootstrap template everywhere
- (Optionally) Add and bootstrap a new AWS Account
Extract the AWS CDK bootstrap template from the CLI
First you must extract the AWS CDK bootstrap CloudFormation template from the AWS CDK CLI. Make sure that the CLI is installed:
Then, run the following command to generate the template in the current directory:
At this point it’s also possible to customize the template, but for this walkthrough the default template will be used. To learn more about customizing the bootstrap template, read the customizing bootstrapping section of the CDK Developer Guide.
Create the StackSet
Once you’ve generated and (optionally) updated the template, log in to the Organizations management account and navigate to the CloudFormation console.
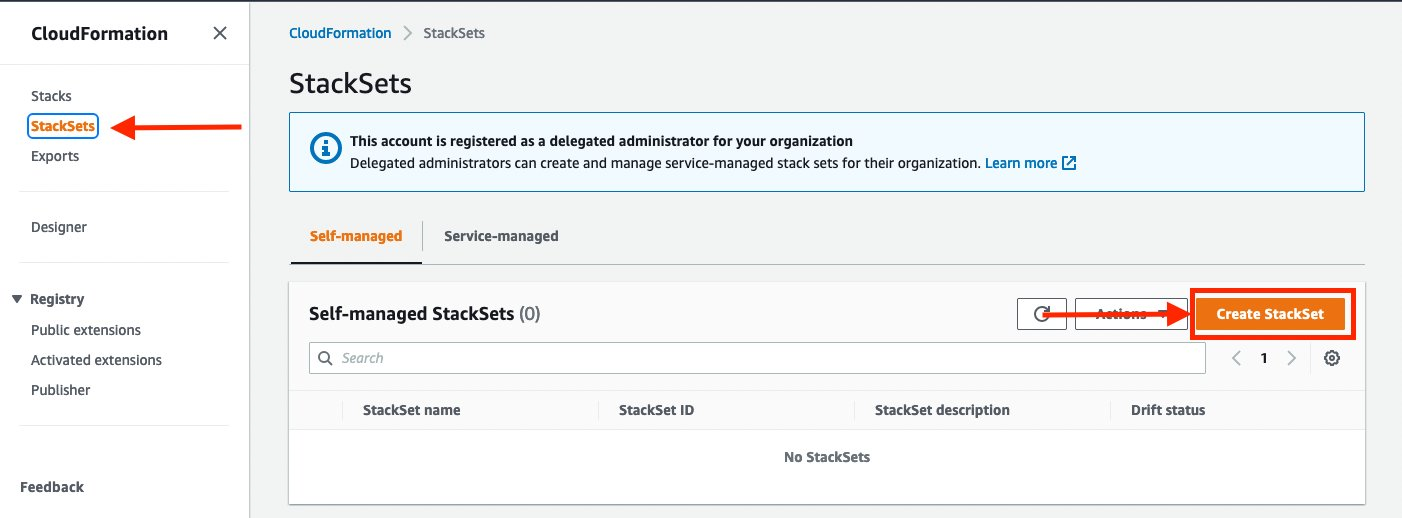
Figure 2. AWS CloudFormation console page highlighting location of Create StackSet button
Once there, select StackSets on the left, and then select the Create StackSet button.
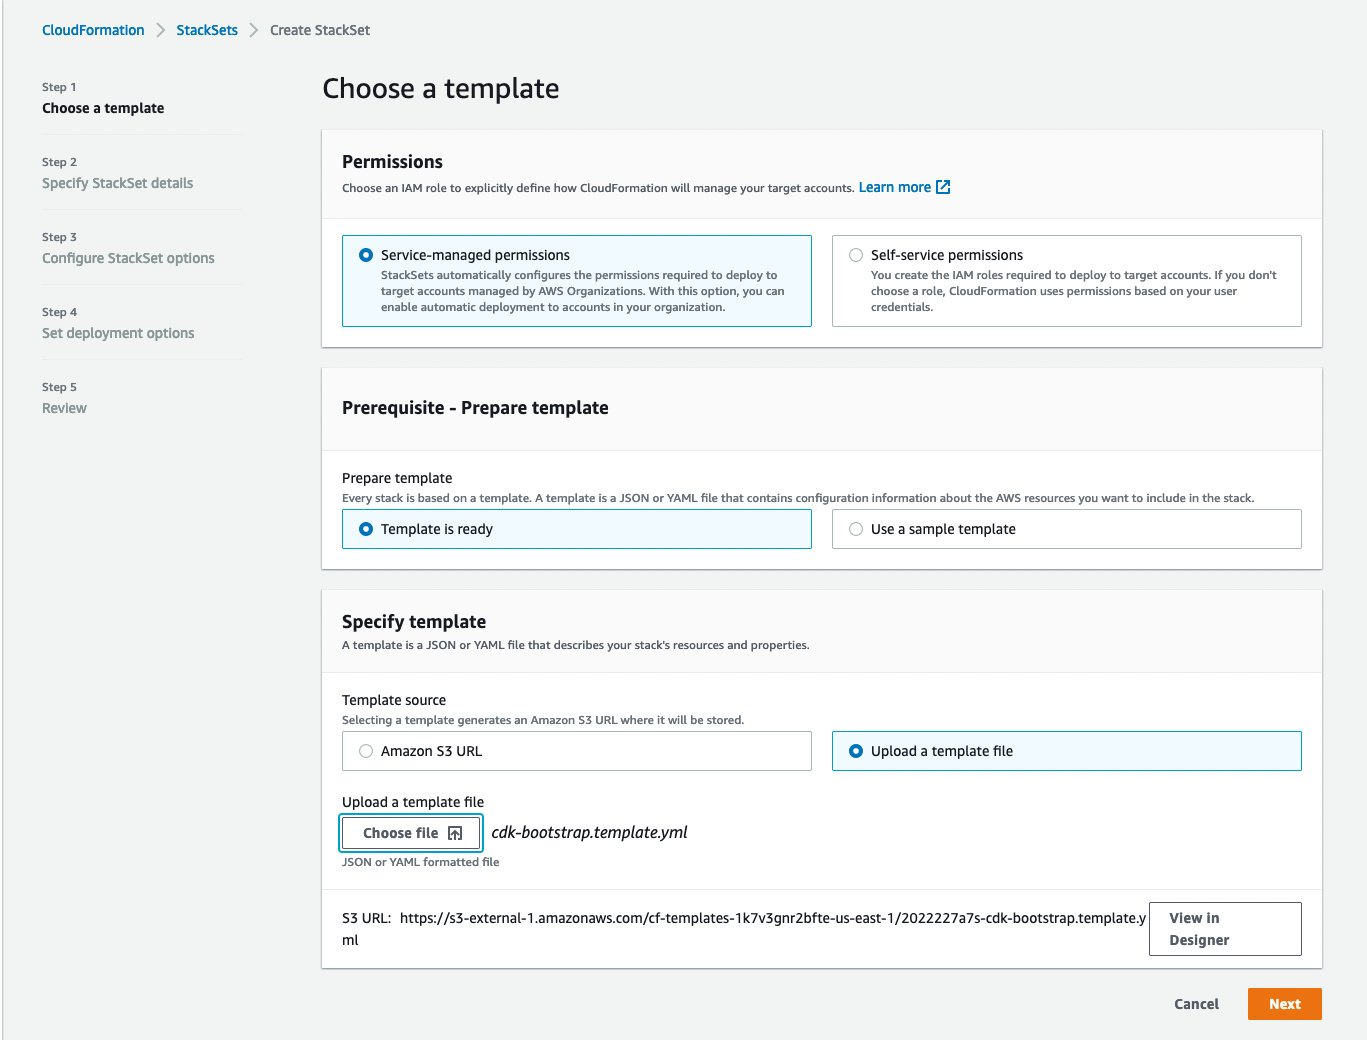
Figure 3. Create StackSet step1 – Choose a template
On the Create StackSet page, select Service-managed permissions and then choose Upload a template file and select the cdk-bootstrap.template.yml file that was generated in the previous step. Then select Next.
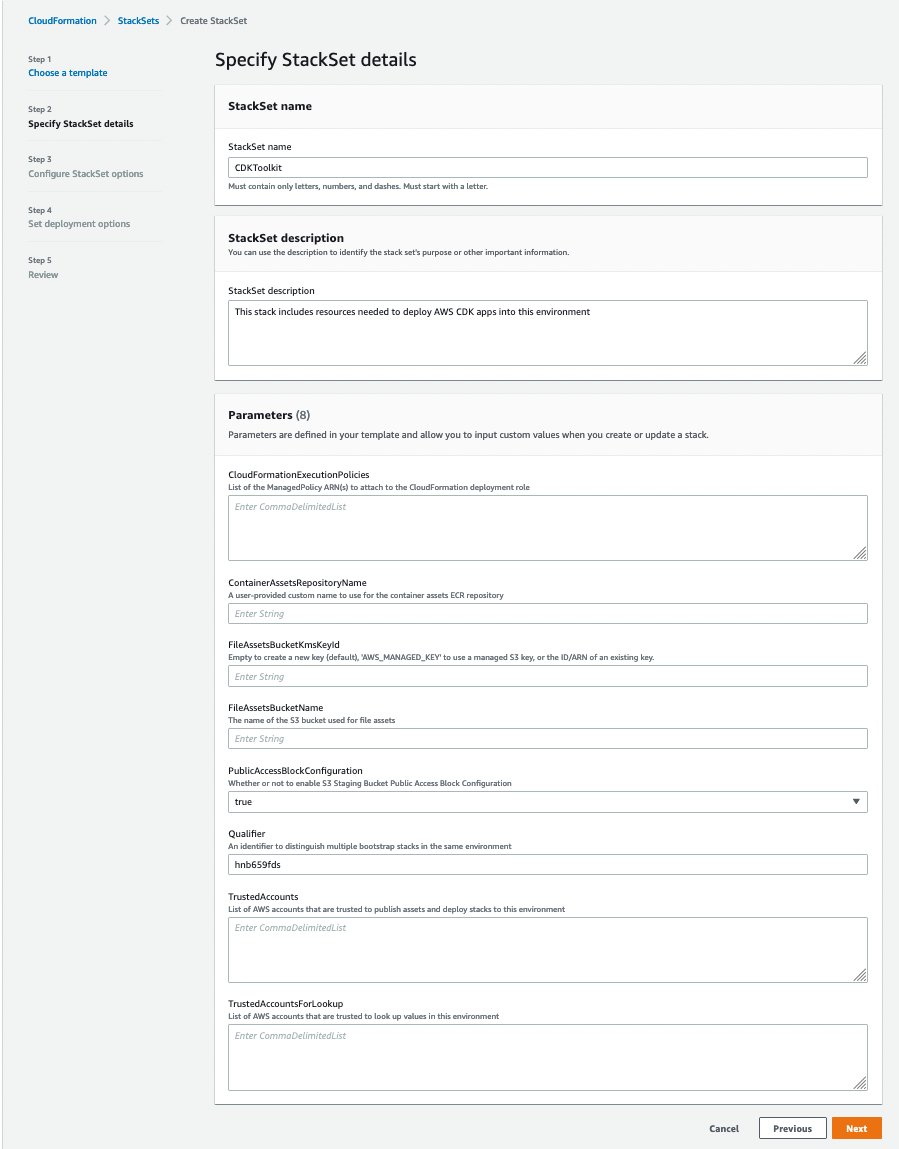
Figure 4. On the Create StackSet page, select Service-managed permissions and then choose Upload a template file and select the cdk-bootstrap.template.yml file that was generated in the previous step. Then select Next
On the next page, enter a name for the StackSet. This is the name that will appear on the StackSet page and each individual stack that is created will have a name that begins with this name.
On this page you also have the ability to overwrite any of the bootstrap Parameters. You can find out more about the function of each parameter in the AWS CDK developer guide. Worth mentioning is the TrustedAccounts parameter: if you’re using a continuous integration/continuous development (CI/CD) solution (such as AWS CDK Pipelines), this is where you would put the account ID of your pipeline account. For the purposes of this walkthrough, you’ll leave the default values.
After you’re done filling in this page, select Next.

Figure 5. Create StackSet step3 – Configure StackSet options
On the next page, you can enter any additional tags to apply to the resources in the template. In this case, you’ll leave this blank.
Enable Managed execution, which allows CloudFormation to perform non-conflicting operations concurrently. This means that you can submit more than one operation per StackSet, for example updating existing instances and creating new ones, and CloudFormation will execute them concurrently.
Once you’re done with this page, select Next.

Figure 6. Create StackSet step4 – specify regions and deployment options
Next select which AWS Regions in which you would like to deploy the StackSet. This applies to all of the accounts that are specified in the Deployment targets section on the previous page. If you want to specify different Regions per account, then you must either create separate StackSets or add additional stack instances to this StackSet after it’s created.
In Deployment options, you can control how CloudFormation will perform the deployment. For this walkthrough, you will deploy sequentially and only deploy one account at a time. If a single deployment fails, then it will roll back the entire deployment. In production scenarios you may want to create one StackSet that is deployed slowly to test updates, and a second StackSet that is deployed in parallel/concurrently once the first StackSet succeeds.
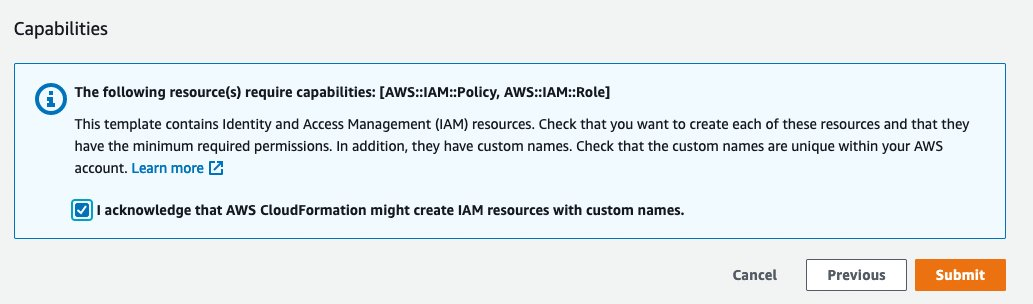
Figure 7. Create StackSet – acknowledge IAM capabilities
On the next page you can review all of your selections, and then make sure that you check the box to acknowledge that CloudFormation will create IAM resources with custom names. Select Submit.
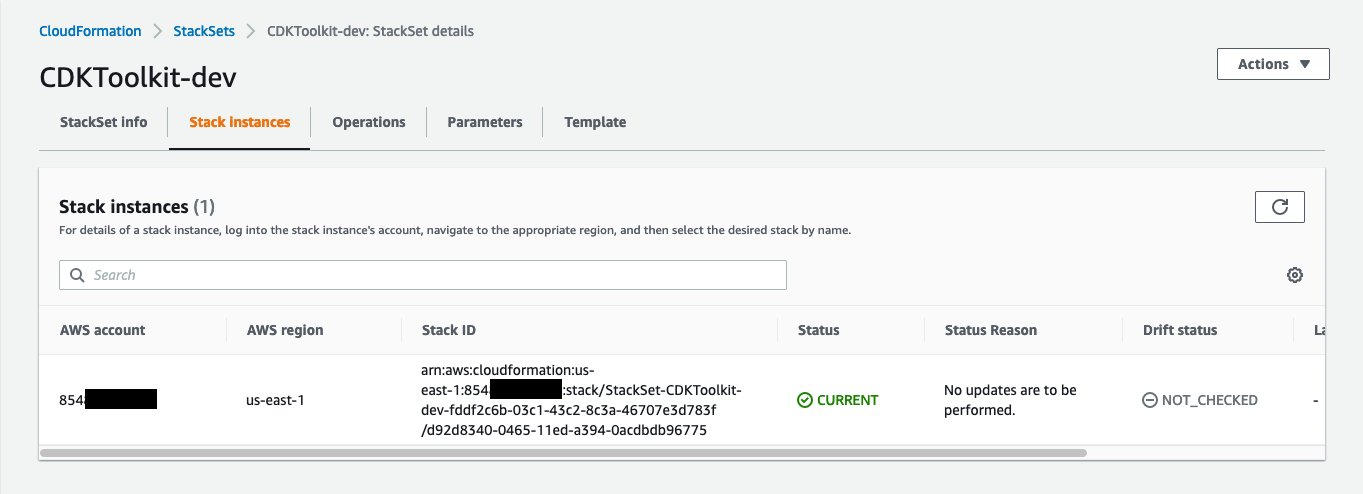
Figure 8. Created StackSet – list of stack instances showing single account and region
CloudFormation will begin creating your stacks in each account in the OU that you specified in the deployment target. If you select Stack Instances, then you can see that you had a single AWS account to which you deployed the StackSet.
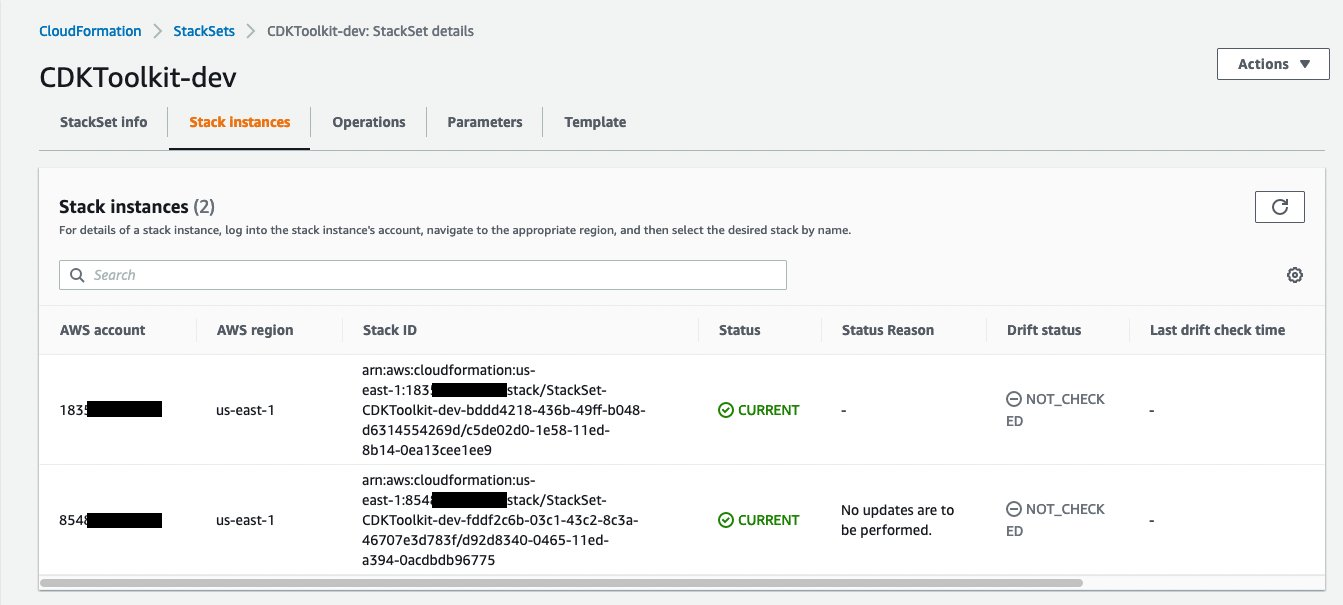
Figure 9. Created StackSet stack instances showing 2 accounts
If you want to see how automatic deployments work, then you can either create a new AWS account in the OU that you specified, or you can move an existing AWS account into that OU. In my case there’s an existing AWS account that is moved to the target OU. Once the move is complete, if you look at Stack Instances again then you can see that there is an additional instance for the new account.
Updating the bootstrap StackSet
Sometimes new versions of the bootstrap template are released that contain new resources, or updates to existing resources. When this happens, you must first install the new version of the AWS CDK CLI by running the following command:
Once the latest version is installed, you can extract the bootstrap CloudFormation template again. You must also reapply any modifications that you made to the template each time you extract it from the CLI.

Figure 10. StackSet Service-managed page highlighting Actions to Edit StackSet details button
To deploy this new version, go to the CloudFormation console and select StackSets. Select the Stack Set that you want to update and select Actions → Edit StackSet details. Then you can upload the new template and follow the same steps outlined above to deploy the updated template.
Adding a new AWS account
If you’ve configured automatic deployments for your StackSet in the previous step, then creating a new account in an OU will automatically deploy the bootstrap stack into the account.
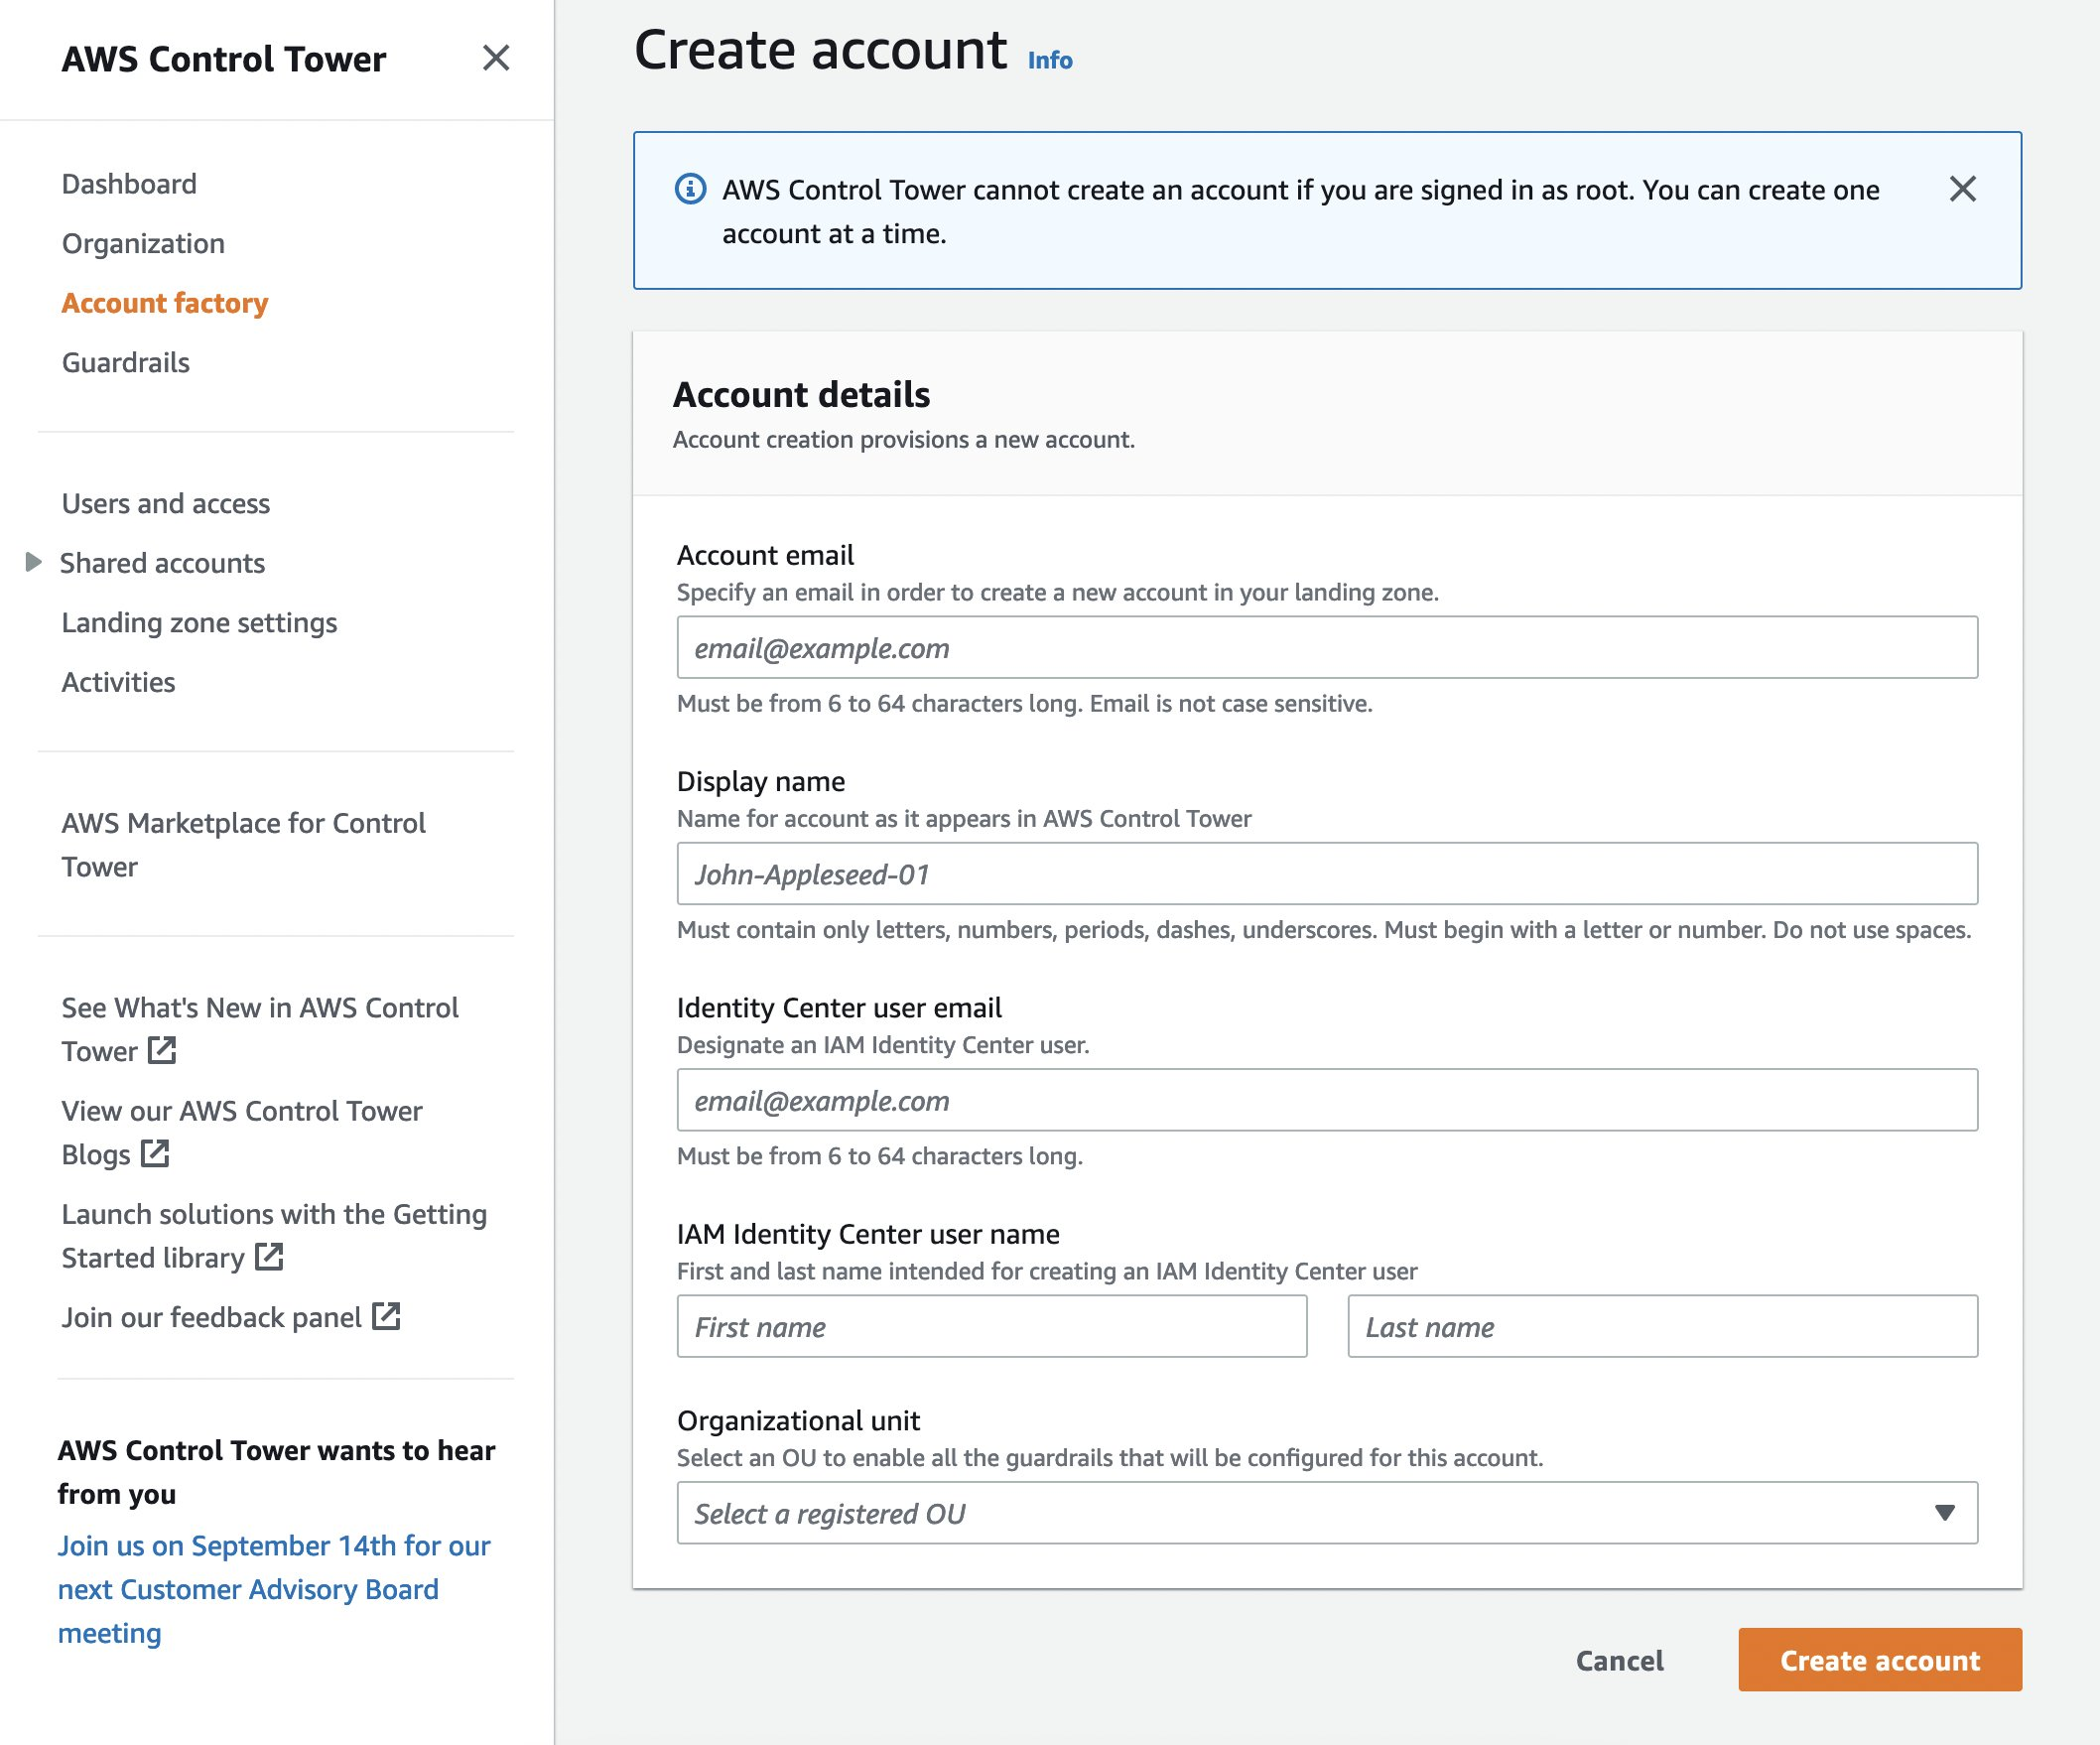
Figure 11. AWS Control Tower Account Factory console page
For this walkthrough, Control Tower will be used to create a new account. However, if your organization uses a different method to create accounts, then you can use that here instead. Navigate to the Control Tower → Account Factory console and fill in the details to create a new account.
If you’ve decided to not use automatic deployments, either because you would like more control over when and where the StackSet is deployed or because you’re using self-managed permissions, then you must add a new Stack Instance to the Stack Set every time that you create a new account.
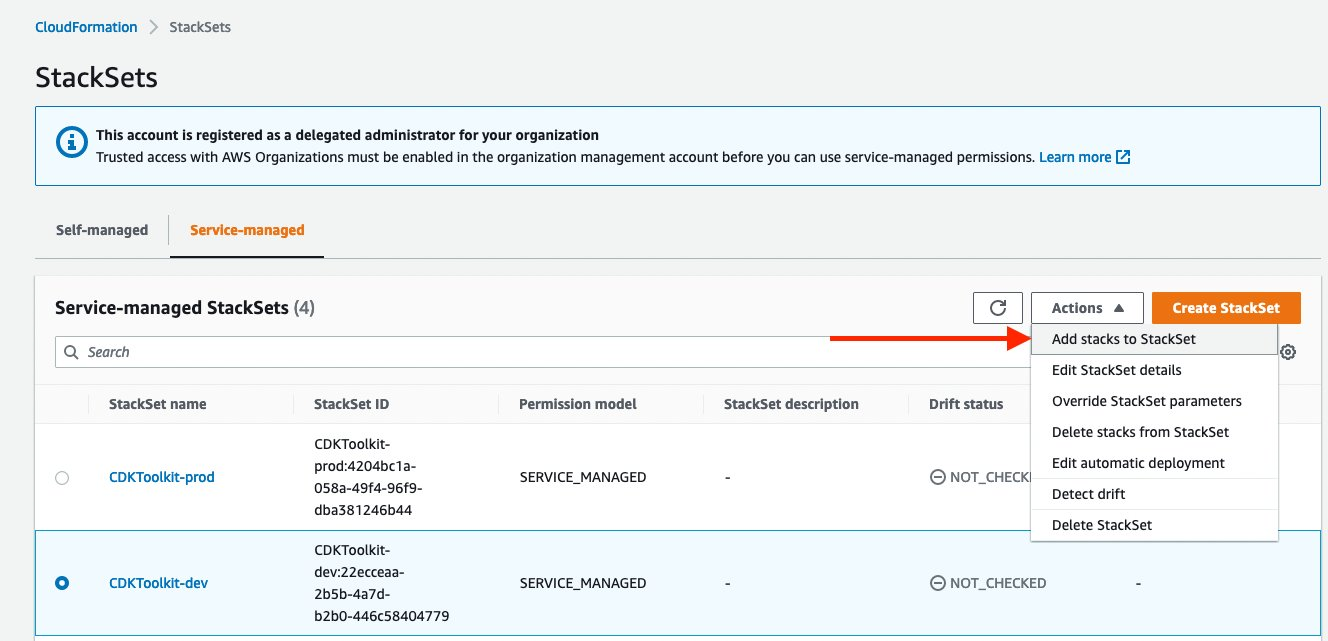
Figure 12. StackSet service-managed page highlighting Actions to Add stacks to StackSet button
To bootstrap a new account, select the StackSet, and then select Actions → Add stacks to StackSet. Follow the same steps outlined above to deploy to the new account.
Cleanup
To clean up after this tutorial, log in to the AWS console of the different accounts that you used, go to the CloudFormation console of the Region(s) where you chose to deploy, and select Delete on the stacks that begin with the name of the StackSet.
Conclusion
In this post, I walked through our recommended method for bootstrapping many AWS accounts across an organization by using CloudFormation StackSets. You now know how to generate the AWS CDK bootstrap CloudFormation template, apply optional customizations, and finally use CloudFormation StackSets to deploy the bootstrap template into targeted AWS accounts and Regions. In Part 2 of this series, I’ll walk you through a method for managing this process in an automated way using the AWS CDK.
I hope I’ve made the process as direct and enjoyable as possible. If you’ve tried out this solution, and especially if you think I’ve missed something or you have a use case that I didn’t cover, then I would love to hear from you! Let us know your progress on our GitHub project page.
About the author: