How to validate authentication using Amazon CloudWatch Synthetics – Part 2
In the second post of this two-part series, I will demonstrate how to utilize the Amazon CloudWatch Synthetics canary that uses the multiple HTTP endpoints blueprint in order to monitor an application requiring an authentication certificate. The first post Multi-step API monitoring using Amazon CloudWatch Synthetics provided steps to create an Amazon CloudWatch Synthetics script for executing a multi-step API verification. I also provide an additional reading section in this blog post that discusses certificate validation methods in the context of canaries.
Solution Overview
In the solution, I demonstrate the steps to create an API canary blueprint by using the HTTP Steps feature that incorporates a certificate to test an HTTP endpoint.
Creating the HTTP steps
CloudWatch Synthetics lets you utilize blueprint scripts that are ready to be consumed. However, we must utilize the editor in the console to add the extra code snippets in order to authenticate with a certificate.
To simulate how CloudWatch Synthetics handles authentication we will use the client.badssl.com website. You can also use your own HTTP endpoint to simulate the same output. The first call will return a failure response, as the certificate has not yet been added. However, the error will be fixed in the next steps.
To create an HTTP steps script:
Open the Synthetics menu of the CloudWatch console.
Choose Create Canary.
Choose API canary from the blueprints list.
Under Name, enter a name for your canary – for example, http-steps-test.
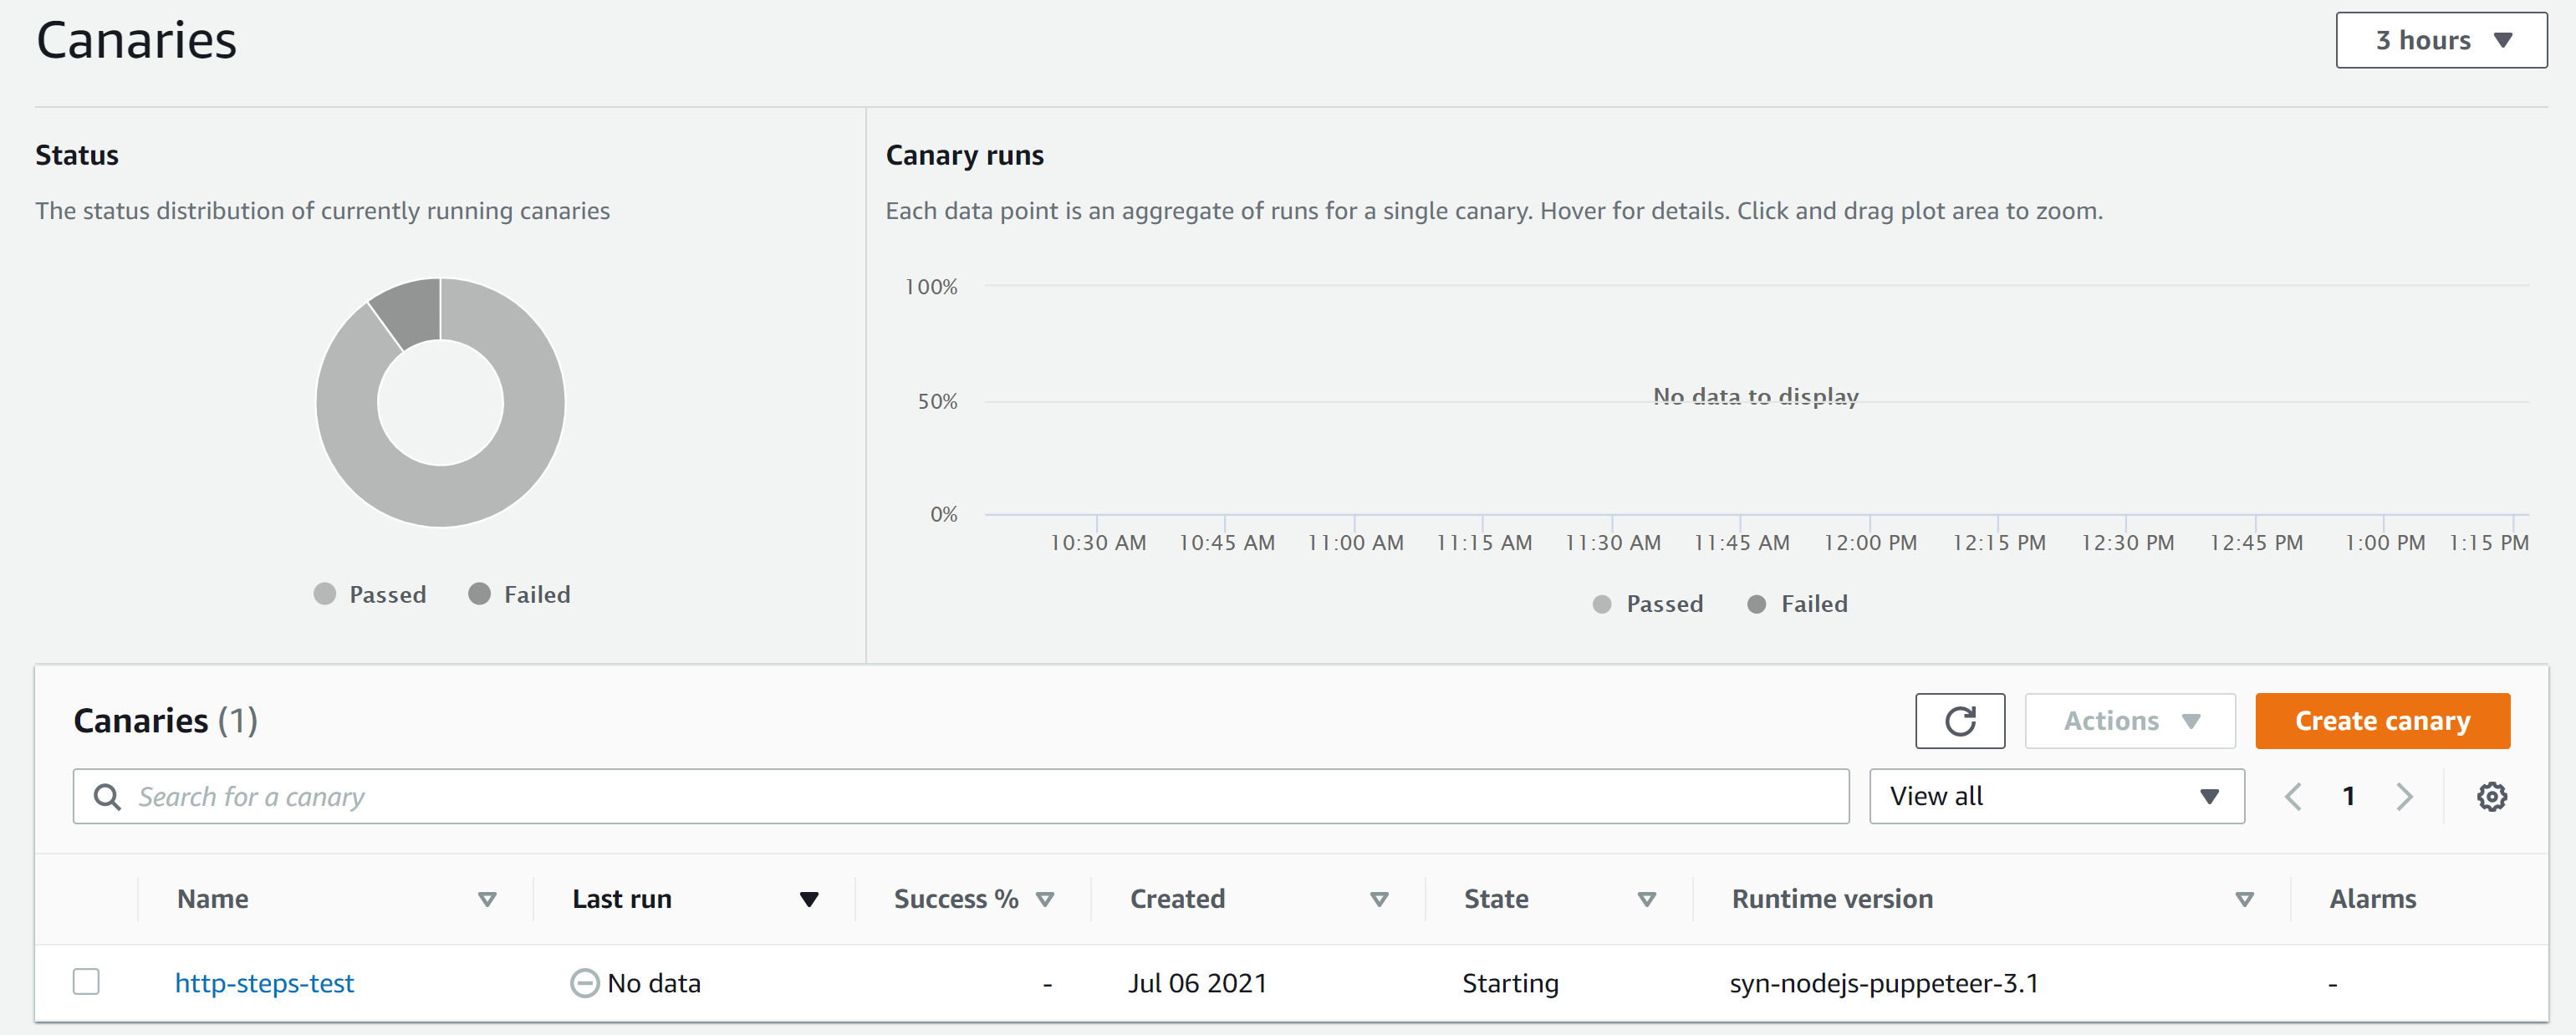
On the Canaries page, choose Create canary. When the canary is created, it will be displayed in the Canaries list, as shown in Figure 1. For information about utilizing the API canary blueprint, see API canary in the Amazon CloudWatch User Guide.
Figure 1: Canaries page of the CloudWatch console
Checking reports
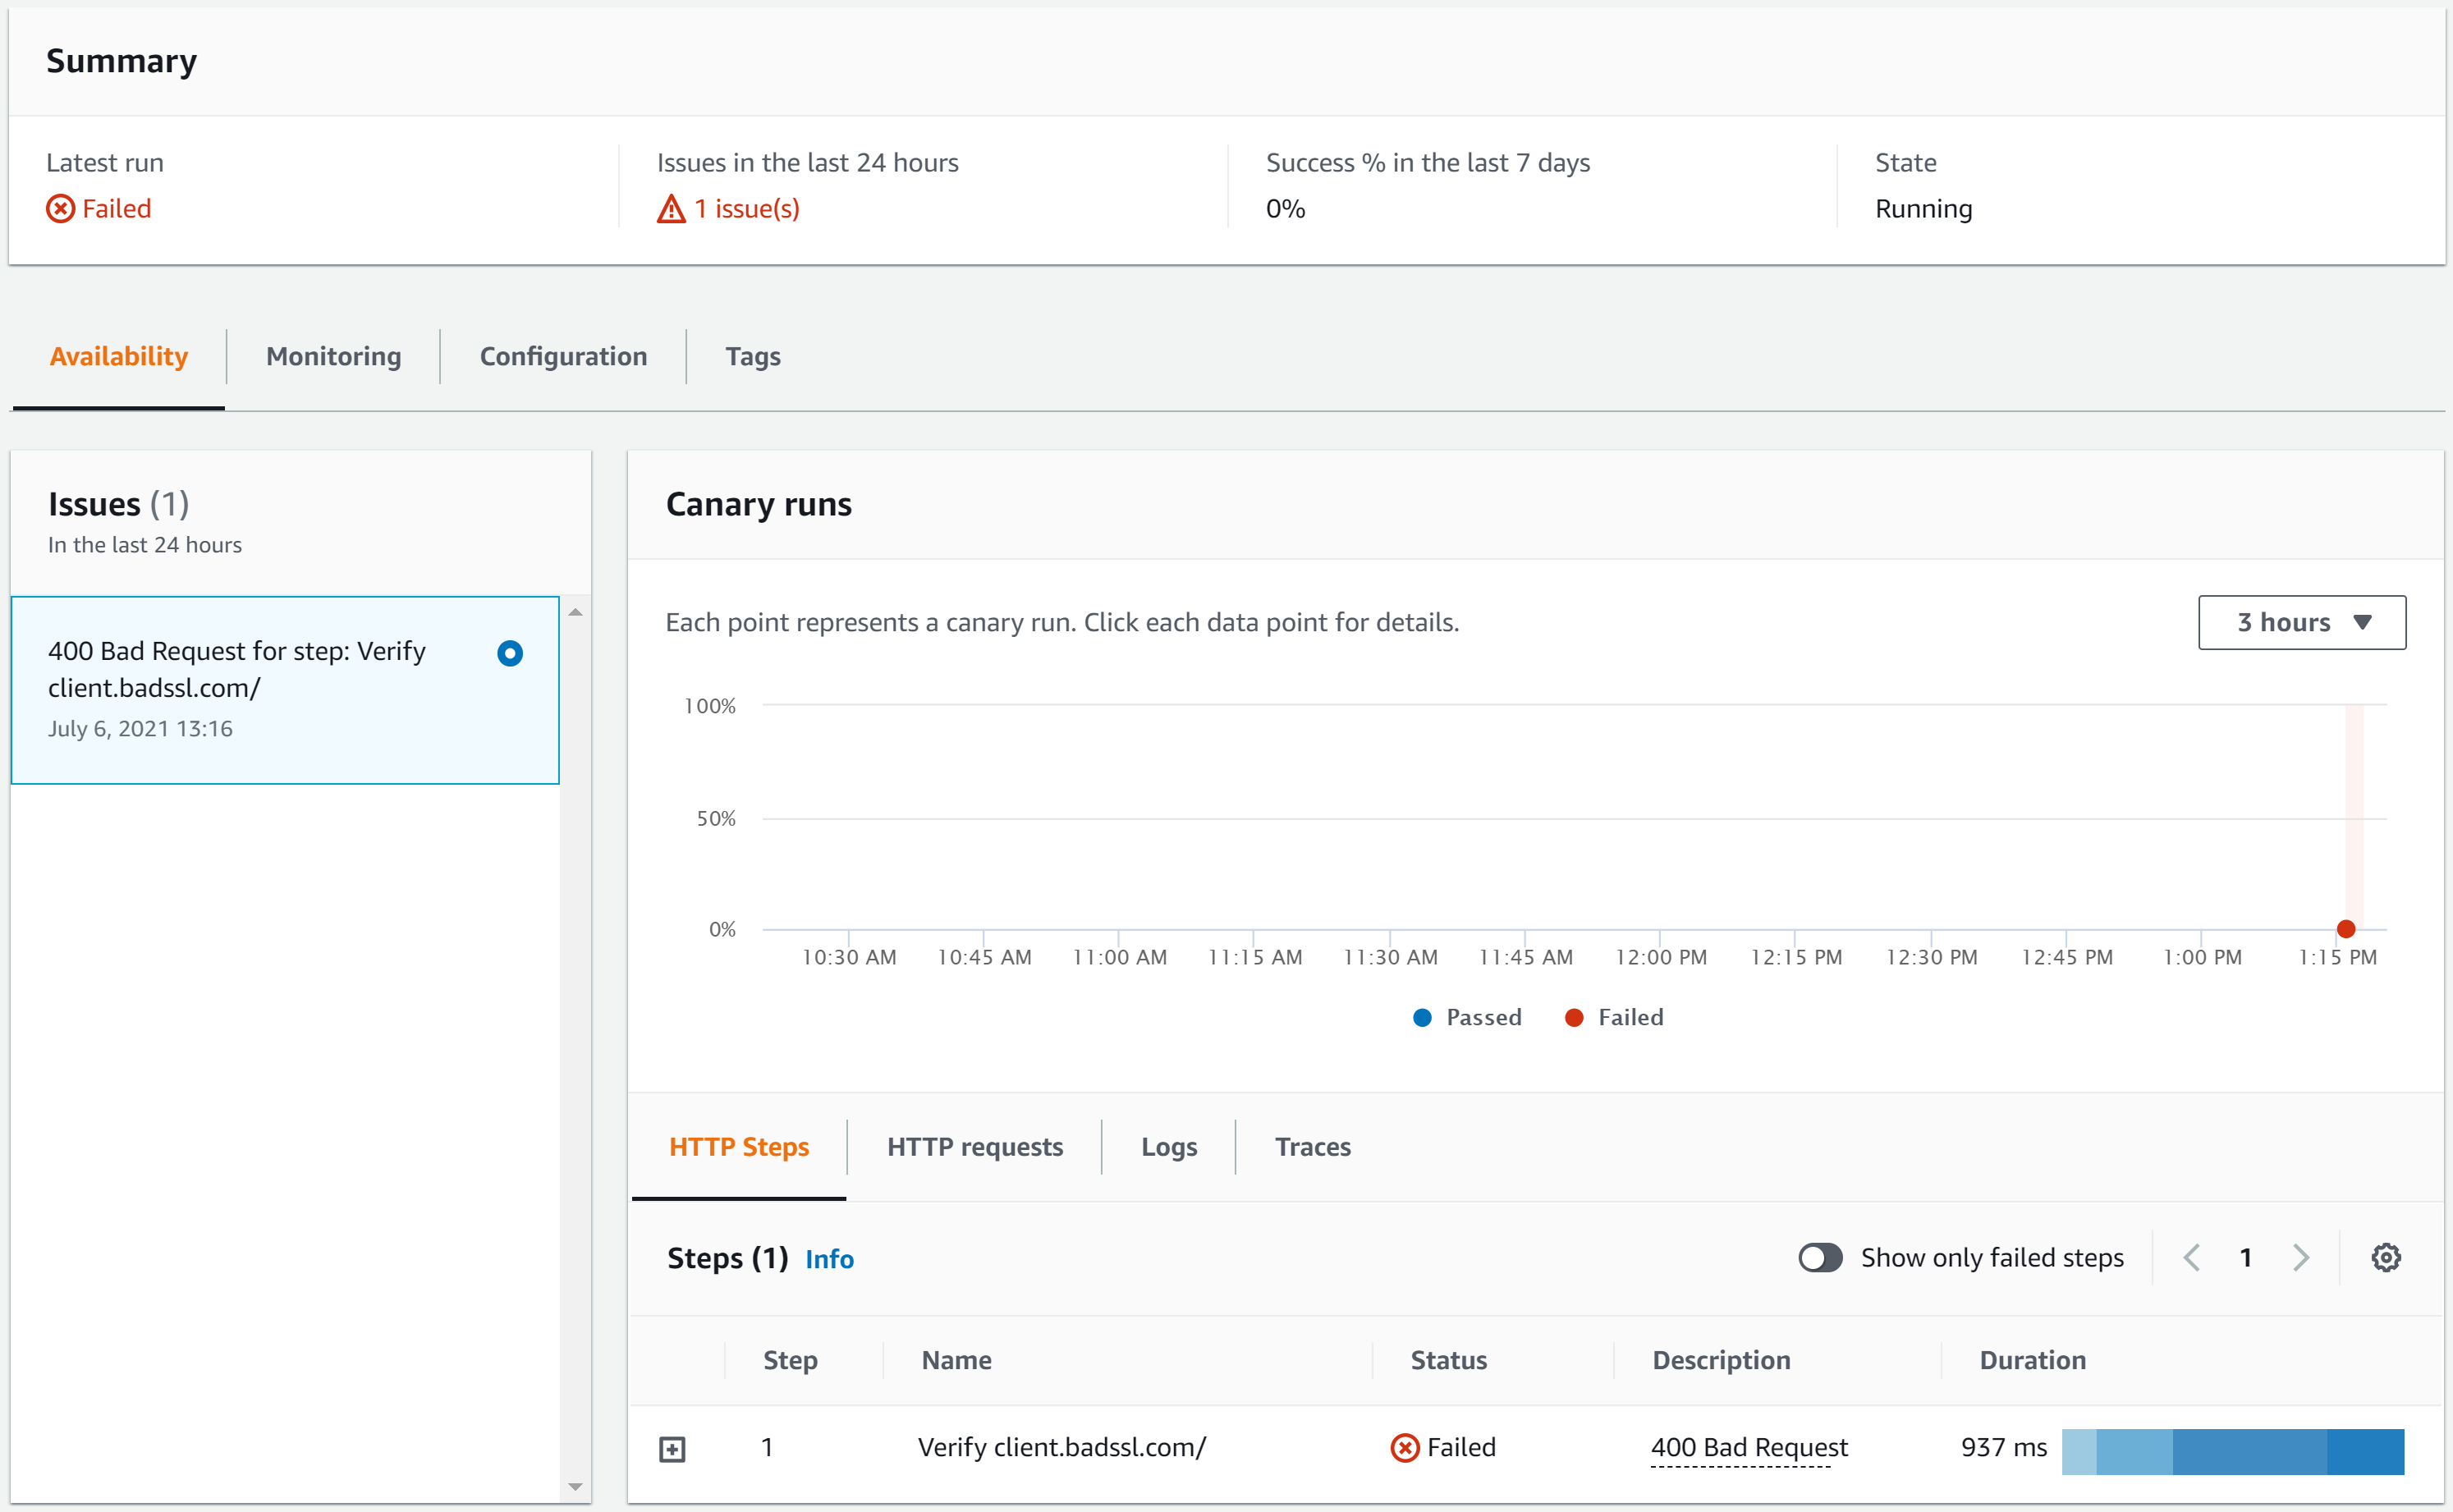
The canary reports show every step and result of the calls. In this case, the canary returned the 400 Bad Request error as shown in Figure 1. This error is expected, as the endpoint requires a certificate in order to return a valid response.
Figure 2: http-steps-test report
Adding the certificate
To solve the 400 Bad Request issue, the client key and certificate must be safely stored using AWS Secrets Manager. This will be utilized by the canary to authenticate the API request that calls the client.badssl.com. These certificates can be downloaded here and manually uploaded by using the AWS Management Console. However, it can also be done programmatically, as provided in the steps below.
I use AWS CloudShell, a browser-based shell that makes it easy to securely manage, explore, and interact with your AWS resources. We recommend CloudShell to run the scripts below. However, you can use your own command line for the same output.
CloudShell isn’t available in every region, but the environment variable AWS_REGION lets the commands be executed in the region where you are creating your canary. See Supported AWS Regions for AWS CloudShell for more information about the regions supported by the CloudShell.
The script below downloads the .pem file from badssl.com, creates a secret for the key and cert generated out of the .pem file, adds environment variables, and then lets the IAM role for the canary read the secret. Ensure the user is running the script has permissions to create a secret, get and update a canary, and attach policies to the canary role.
Copy and paste the script below – ensure that you adjust the AWS_REGION if needed.
# Variables
# Set the aws region, name of the canary and the name of the secrets
export AWS_REGION=us-east-2 //ATTENTION - change to region where your canary was create
export SYN_NAME="http-steps-test"
export SECRETBADSSLKEYNAME=badsslkey
export SECRETBADSSLCERTNAME=badsslcert
export THRESOLDCERTDAYEXP=5

# Updating the AWS CLI v2
curl "https://awscli.amazonaws.com/awscli-exe-linux-x86_64.zip" -o "awscliv2.zip"
unzip awscliv2.zip
sudo ./aws/install --bin-dir /usr/local/bin --install-dir /usr/local/aws-cli --update

# Install openssl if you don't have that installed
# Ubuntu users -> sudo apt-get install openssl
sudo yum install openssl -y

# Download the client.badssl.com certificate
mkdir badsslcert
cd badsslcert
wget https://badssl.com/certs/badssl.com-client.pem

# Export the key and cert from the .pem file
# Based on the badssl.com, the key is encrypted using the pass badssl.com
# The password is in plain text for the purposes of this lab; however, it is not recommended
# You can use a secret manager or any other service that would encrypt the password in real-life scenarios, so avoiding clear text passwords.
openssl rsa -in badssl.com-client.pem -out badssl.com-client.key -passin pass:badssl.com
openssl x509 -in badssl.com-client.pem -trustout -out badssl.com-client.cert

# Create a secret for the key and cert generate above
badsslkeyarn=$(aws secretsmanager create-secret --name $SECRETBADSSLKEYNAME --secret-string file://badssl.com-client.key --output text --query ARN)
badsslcertarn=$(aws secretsmanager create-secret --name $SECRETBADSSLCERTNAME --secret-string file://badssl.com-client.cert --output text --query ARN)

# Get the role name used by the canary
synrole=$(aws synthetics get-canary --name $SYN_NAME --query Canary.ExecutionRoleArn --output text)
synrole=$(echo $synrole | cut -d "/" -f3)

# Create a policy to allow the canary role to access the secrets
# The policy use the least privilege concep, allowing only the key and cert secrets
echo "{
    \""Version\"": \""2012-10-17\"",
    \""Statement\"": [
        {
            \""Effect\"": \""Allow\"",
            \""Action\"": \""secretsmanager:GetSecretValue\"",
            \""Resource\"": [
                \""$badsslkeyarn\"",
                \""$badsslcertarn\""
             ]
        }
    ]
}" >> inline-policy.json

# Add an inline policy to the canary role, allowing the script to read the key and cert
aws iam put-role-policy --role-name $synrole --policy-name "allow-get-secrets-certs" --policy-document file://inline-policy.json

# Load the fingerprint of the certificate issued to httpbin.org
badsslsha256=$(openssl s_client -connect client.badssl.com:443 < /dev/null 2>/dev/null | openssl x509 -fingerprint -sha256 -noout -in /dev/stdin)
badsslsha256=$(echo $badsslsha256 | cut -d "=" -f2)

# Updating the Canary Environment Variables
# The update-canary call can also be done via console while editing the script
# CERTSHA256 - used to check if the certificate is correct
# BADSSLKEY & BADSSLCERT - key and cert used to connect to the client.badssl.org
# THRESOLDCERTDAYEXP - thresold to flag the certificate as close to expire
aws synthetics update-canary --name $SYN_NAME --run-config 'EnvironmentVariables={BADSSLKEY='$SECRETBADSSLKEYNAME',BADSSLCERT='$SECRETBADSSLCERTNAME',CERTSHA256='$badsslsha256',THRESOLDCERTDAYEXP='$THRESOLDCERTDAYEXP'}'

# Delete the badsslfolder
cd ..
rm -r badsslcert/
echo "Script finished"
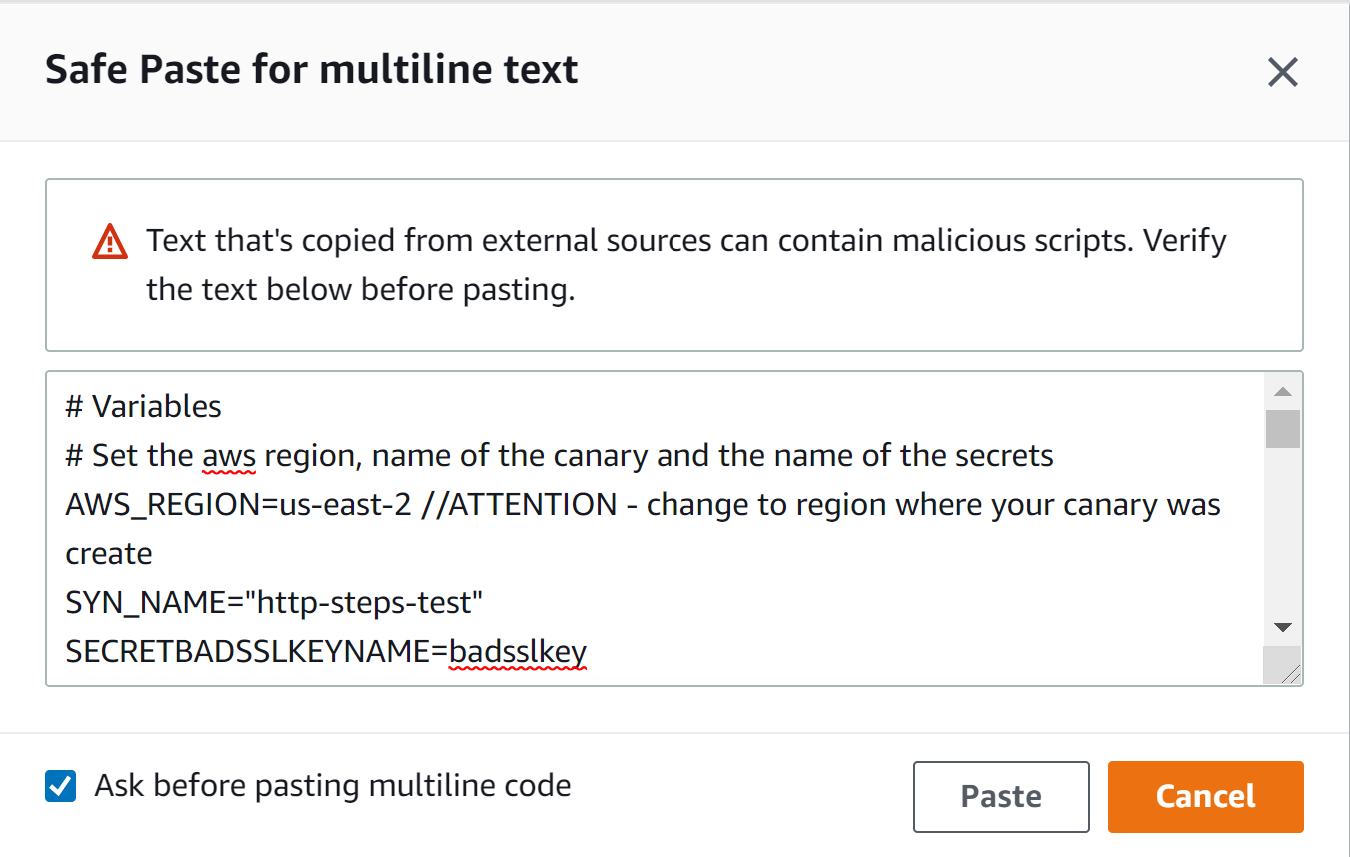
Choose Paste, and wait for the script to finish.
Figure 3: CloudShell popup to paste multiline text
Updating the script to collect key and certificate from Secrets Manager
The blueprint provided by the CloudWatch Synthetics must be updated in order to load the secrets from Secrets Manager and then connect using the client.badssl.com key and certificate.
To edit the code, follow these steps:
Open the Synthetics menu of the CloudWatch console.
Choose the canary created above – for example, http-steps-test.
Choose Actions.
Choose Edit.
Using the Script Editor box, paste thecode snippet below at the beginning of the script.
In short, this snippet loads the Secrets Manager client and defines the getKeyCert() in order to collect the secrets.
// Load the AWS SDK and the Secrets Manager client.
const AWS = require('aws-sdk');
const secretsManager = new AWS.SecretsManager();

// Connect to the Secrets Manager the load the Key and Cert
// These are the secrets created previously
// The code is dynamic and load the secrets name via environment vars
const getKeyCert = async () => {

    var params = {
        SecretId: process.env.BADSSLKEY
    };
    const key = await secretsManager.getSecretValue(params).promise();

    var params = {
        SecretId: process.env.BADSSLCERT
    };
    const cert = await secretsManager.getSecretValue(params).promise();

    // returning Key and Cert
    return [ key.SecretString, cert.SecretString ]
}
To collect the secrets, call the function getKeyCert() inside of the canary function apiCanaryBlueprint().
...

const apiCanaryBlueprint = async function () {

    // Add the line below to load the key and cert from the function getKeyCert()
    const [ key, cert ] = await getKeyCert();

...
Lastly, the key and cert must be added to the requestOptions of the client.badssl.com request.
...
    // Set request option for Verify client.badssl.com
    let requestOptionsStep1 = {
        hostname: 'client.badssl.com',
        method: 'GET',
        path: '',
        port: '443',
        protocol: 'https:',
        body: "",
        headers: {}, //don't forget to add the comma
        key: key, //client.badssl.com key from Secrets Manager
        cert: cert //client.badssl.com cert from Secrets Manager
    };
...
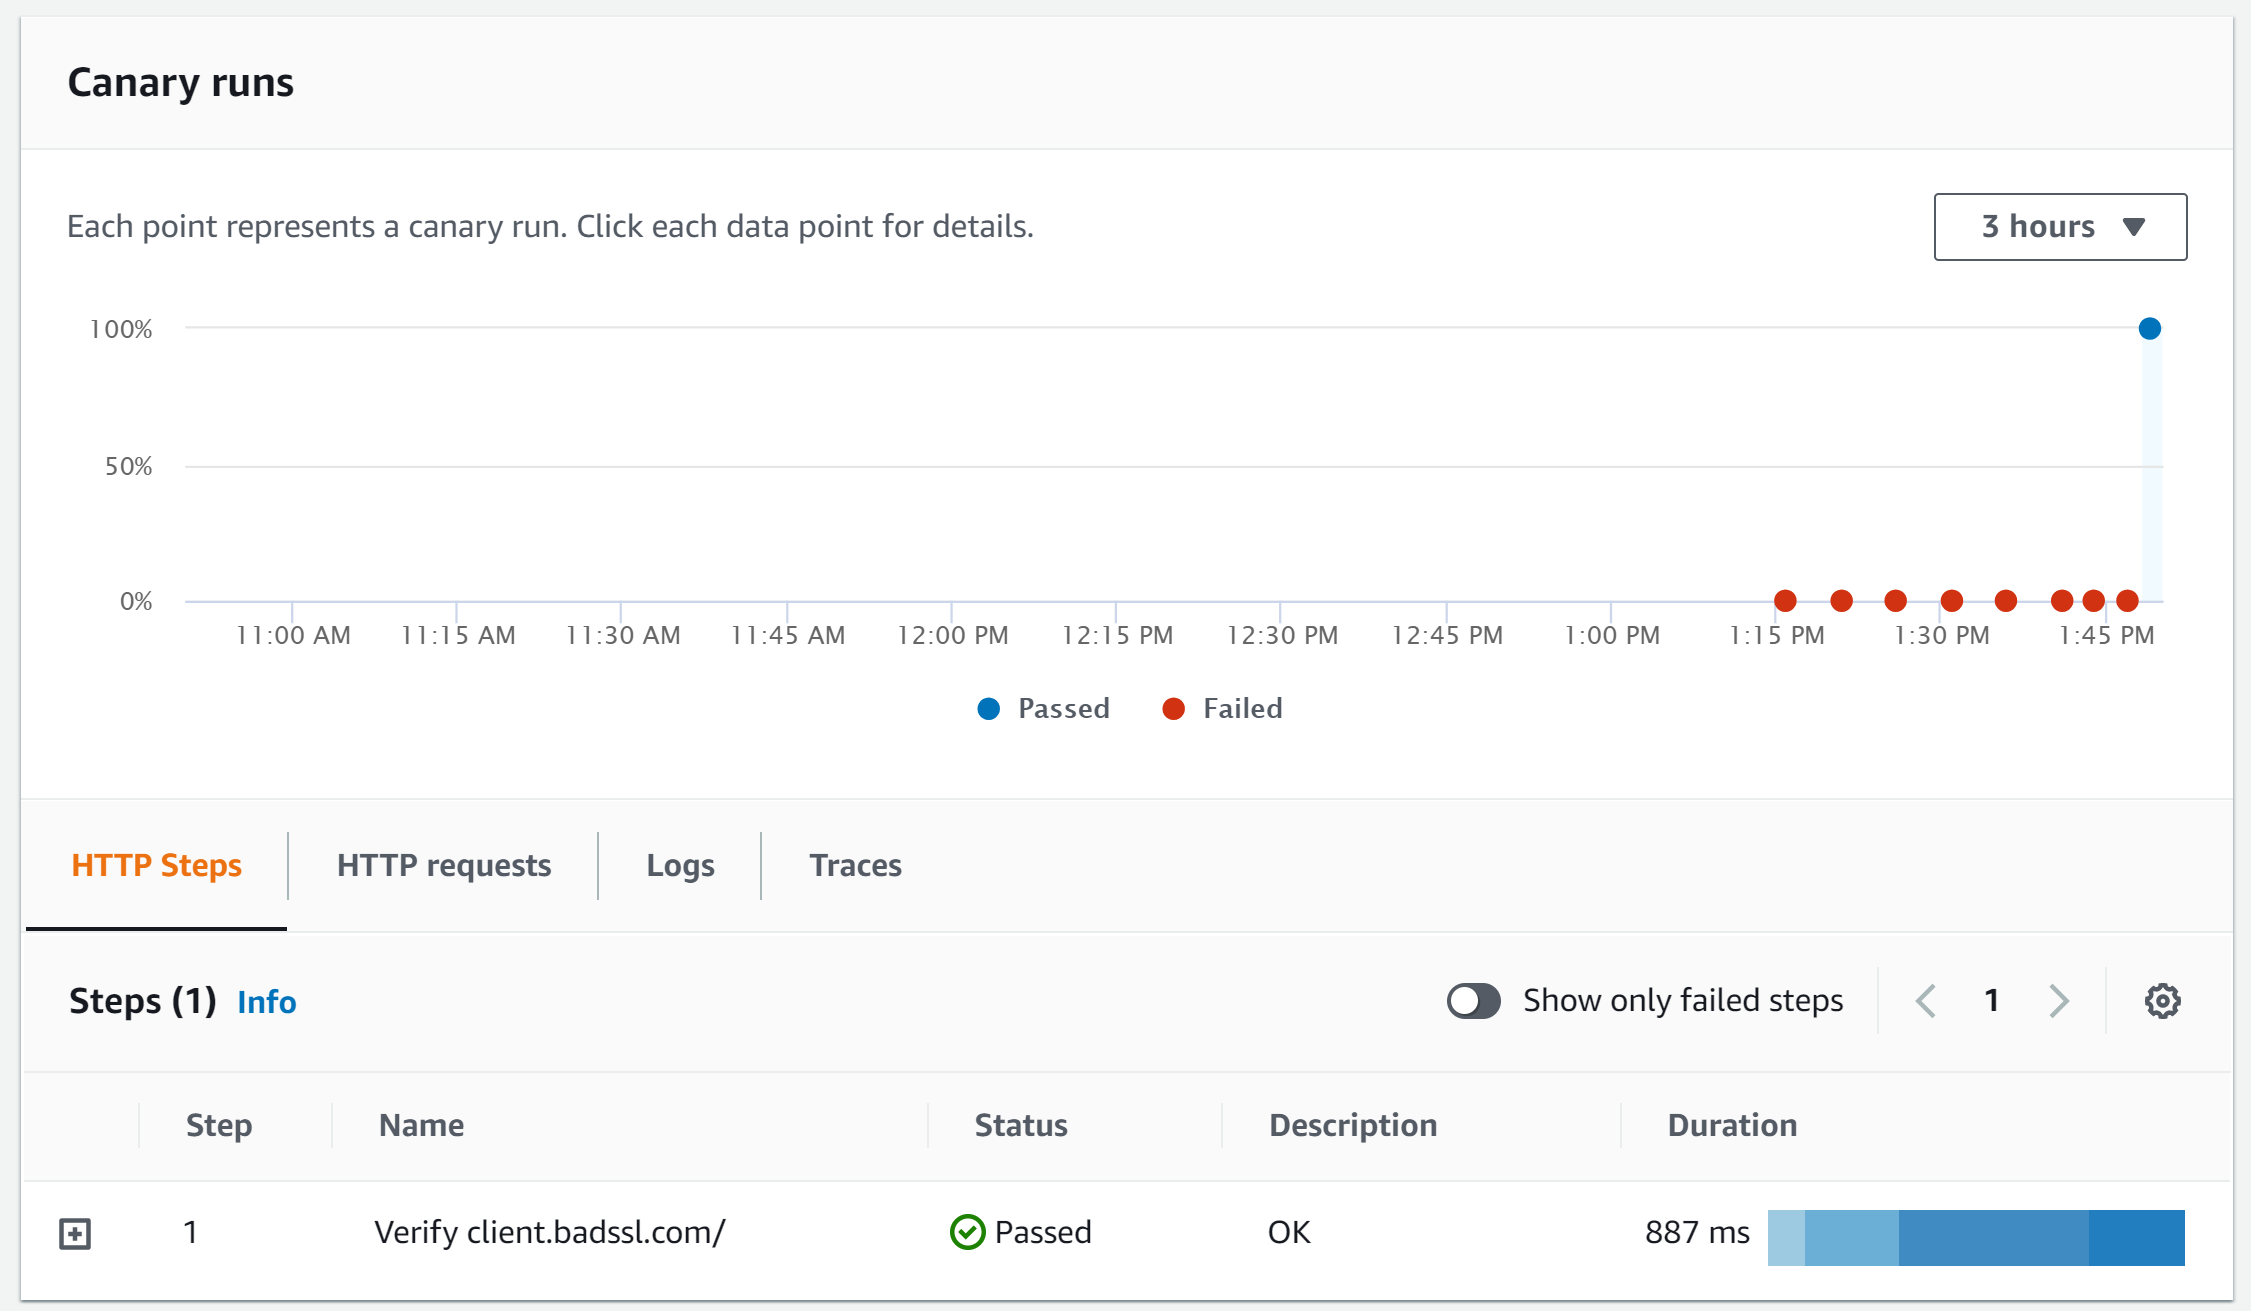
After modifying the code, save and wait for the canary to run again. Next, canary run should be PASSED with the steps tab showing the request status as PASSED.
Figure 4: http-steps-test report showing the status as Passed
Additional Reading
NodeJS library options can be extended to check the server identity. Moreover, the function can also be utilized to check if the certificate is about to expire or check any other validation to the endpoint certificate properties.
The code below shows how to check if the certificate is issued to the host that the script is connecting. It also checks if the certificate is not close to its expiry date.
To edit the code, follow these steps:
Open the Synthetics menu of the CloudWatch console.
Choose the canary created above – for example, http-steps-test.
Choose Actions.
Choose Edit.
Using the Script Editor box, paste the code snippet below at the beginning of the script.
...
const tls = require('tls');
...
Add the highlighted checkServerIdentity to the requestOptionStep1 variable.
...
// Set request option for Verify httpbin.org/status/500
    let requestOptionsStep1 = {
        hostname: 'client.badssl.com',
        method: 'GET',
        path: '/',
        port: '443',
        protocol: 'https:',
        body: "",
        headers: {},
        key: key,
        cert: cert,
        checkServerIdentity: function(host, cert) {

            // Make sure the certificate is issued to the host we are connected to
            const err = tls.checkServerIdentity(host, cert);
            if (err) {
                throw msg;
            }

            // Calculate how many days left to expire the certificate
            const validTo = new Date(cert.valid_to);
            const now = new Date();

            const utc1 = Date.UTC(now.getFullYear(), now.getMonth(), now.getDate());
            const utc2 = Date.UTC(validTo.getFullYear(), validTo.getMonth(), validTo.getDate());

            const _MS_PER_DAY = 1000 * 60 * 60 * 24;
            const diffDays = Math.floor((utc2 - utc1) / _MS_PER_DAY);

            // You can also emit a CloudWatch metric with the time remaining and set and alarm on the metric.
            if (diffDays <= process.env.THRESOLDCERTDAYEXP){
                throw `The certificate ${cert.subject.CN} is about to expire - threshold ${process.env.THRESOLDCERTDAYEXP} days.`;
            }

            // Pin the exact certificate, rather than the pub key
            if (cert.fingerprint256 !== process.env.CERTSHA256) {
                const msg = 'Error: ' +
                  `Certificate of '${cert.subject.CN}' with the fingerprint '${cert.fingerprint256}' ` +
                  `does not correspond to the fingerprint provided '${process.env.CERTSHA256}'`;
              throw msg;
            }
            else {
                const msg = 'OK: ' +
                `Certificate of '${cert.subject.CN}' with the fingerprint '${cert.fingerprint256}' ` +
                `correspond to the fingerprint provided '${process.env.CERTSHA256}'`;
                log.info(msg);
            }
        }
...
Save the canary and check the report after running the script.
The script utilizes the environment variables created earlier to check that the certificate was issued to the correct hostname, the expiry date is not close, and sh256, which throws an exception if any of these checks fail. See TLS (SSL) documentation for more information about how the TLS library works.
Cleanup
After finishing this lab, I recommend removing the canary and the resources created by the canary in order to avoid unnecessary charges. The following script deletes the CloudWatch Synthetic script, the secrets manager, lambda, and IAM role. These steps can also be conducted via console. For future reference, read the page Editing or deleting a canary in order to learn how to delete a canary.
# Variables
# Set the aws region, name of the canary and the name of the secrets
export AWS_REGION=us-east-2 //ATTENTION - change to region where your canary was created
export SYN_NAME="http-steps-test"
export SECRETBADSSLKEYNAME=badsslkey
export SECRETBADSSLCERTNAME=badsslcert

# Collect details about the canary before deleting
synCode=$(aws synthetics get-canary --name $SYN_NAME --output text --query Canary.Code.SourceLocationArn | cut -d ":" -f7)
synRole=$(aws synthetics get-canary --name $SYN_NAME --output text --query Canary.ExecutionRoleArn | cut -d "/" -f3)
synS3=$(aws synthetics get-canary --name $SYN_NAME --output text --query Canary.ArtifactS3Location)

# Stop and delete the canary
# Added a sleep to wait for the API to complete the deletion
aws synthetics stop-canary --name $SYN_NAME
sleep 30
aws synthetics delete-canary --name $SYN_NAME

# Delete the secret
aws secretsmanager delete-secret --secret-id $SECRETBADSSLKEYNAME --recovery-window-in-days 7
aws secretsmanager delete-secret --secret-id $SECRETBADSSLCERTNAME --recovery-window-in-days 7

# Delete the lambda and layers
aws lambda delete-function --function-name $synCode
for layerVersion in $(aws lambda list-layer-versions --layer-name $synCode --query 'LayerVersions[*].Version' --output text) ;do aws lambda delete-layer-version --layer-name $synCode --version-number $layerVersion ;done

# Delete the policies and role
for policyName in $(aws iam list-attached-role-policies --role-name $synRole --query AttachedPolicies[*].PolicyArn --output text) ;do aws iam detach-role-policy --role-name $synRole --policy-arn $policyName ;done
for policyName in $(aws iam list-role-policies --role-name $synRole --output text --query PolicyNames[*]) ;do aws iam delete-role-policy --role-name $synRole --policy-name $policyName ;done
aws iam delete-role --role-name $synRole

# To avoid mistakes, the S3 bucket won't be deleted via code, but you can do it manually
# It is because you may have used a pre-existing bucket that may contain files that cannot be deleted
echo "S3 bucket $synS3"
Conclusion
This post walked you through an example of how to monitor an endpoint requiring a client certificate authentication by using the tool badssl.com.
To learn more about how to use this feature and all other capabilities, read the CloudWatch Synthetics documentation. Also, the AWS Command Line Interface (CLI) documentation for Synthetics can be found here.