AWS Cloud Operations Blog
Visualizing Resources with Workload Discovery on AWS
Operations Teams (Ops Teams) across enterprises typically rely on documented architecture diagrams to understand the dependencies of various workloads deployed on AWS. As enterprises continue to deploy large-scale multi-tiered workloads, it can become challenging for Ops Teams to track the ever changing relationships between the deployed resources, often meaning that documentation can’t keep up with the pace of the changes deployed. The Workload Discovery on AWS (formerly called AWS Perspective) solution can help with this, as it can be used to quickly generate architecture diagrams of the deployed workloads.
Workload Discovery on AWS can be used to build, customize, and share detailed visualizations of the resources in your AWS accounts based on near real time data. The solution works by maintaining an inventory of the AWS resources across your accounts and various Regions, mapping relationships between them, and displaying them in an easy-to-use web user interface. For supported resources, Workload Discovery on AWS also provides a link to the deployed AWS resource, so it can be easily reached on the AWS Management Console.
In this post, we demonstrate how to use the Workload Discovery on AWS solution to visualize the architecture of a sample web application deployed in AWS. The following is a high-level diagram of the resources being created: AWS CloudFormation Stacks in Workload Discovery on AWS and target accounts.
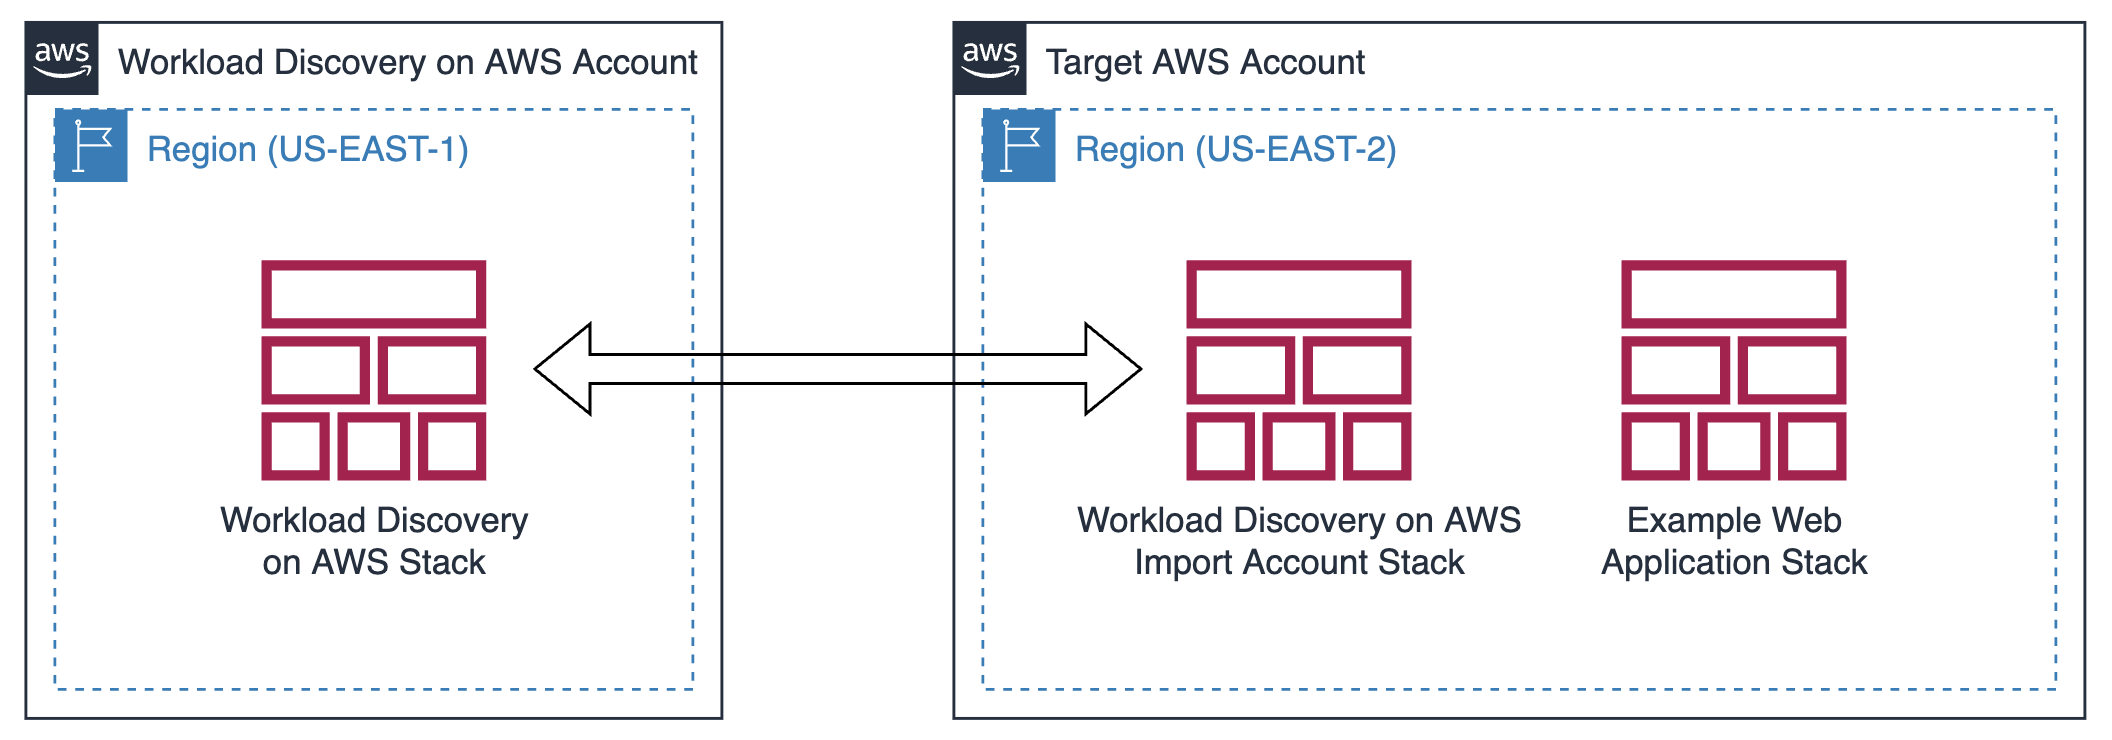
Figure 1. High-level diagram of the resources in this blog post: AWS CloudFormation Stacks in Workload Discovery on AWS and target accounts.
Provisioning a sample web application
To demonstrate how Workload Discovery on AWS discovers resources in the target AWS account, we’ll use the Deploying Microservices with Amazon ECS, AWS CloudFormation, and an Application Load Balancer reference architecture as a sample to create a web application in this account. The following diagram shows the resources that this reference architecture will automatically provision in the Workload Discovery on the AWS target account.
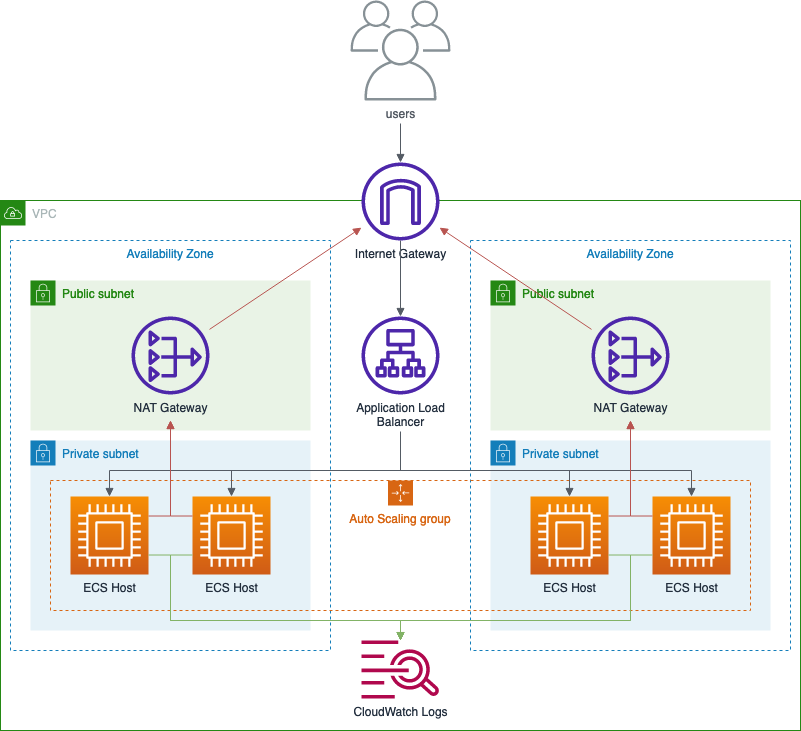
Figure 2. Diagram showing the resources that the example web application reference architecture will automatically provision in the target account.
Provisioning Workload Discovery on AWS
Workload Discovery on AWS is deployed in a dedicated AWS account using the Automated deployment guide provided in the Workload Discovery on AWS Implementation Guide.
Step 1. Launch the Workload Discovery on AWS stack
Most of this process has been automated using CloudFormation. Therefore, the solution can be launched simply by logging in to your Workload Discovery on AWS account and selecting Launch Solution. The CloudFormation Templates accept a few configurations, which are described in detail in the deployment guide. However, the only required fields are StackName and AdminUserEmailAddress. The stack creation process takes approximately 20 minutes to complete.

Figure 3. Screenshot of the AWS CloudFormation console showing the Workload Discovery on AWS stack being created.
Step 2. Create Cognito users
Once the Workload Discovery on AWS stack creation is complete, a user can be created in the related Amazon Cognito user pool. Alternatively, you can use the username automatically created during the solution deployment for which a temporary password is sent to the email provided.

Figure 4. Screenshot of the Amazon Cognito user pool console screen while creating a new user.
Importing target account assets to Workload Discovery on AWS
After this solution stack is successfully deployed and a user was created in Cognito, you can find the Amazon CloudFront distribution URL by selecting Outputs in the main stack. Alternatively, the URL can be found in the email sent with the temporary password for the username automatically created during the solution deployment.
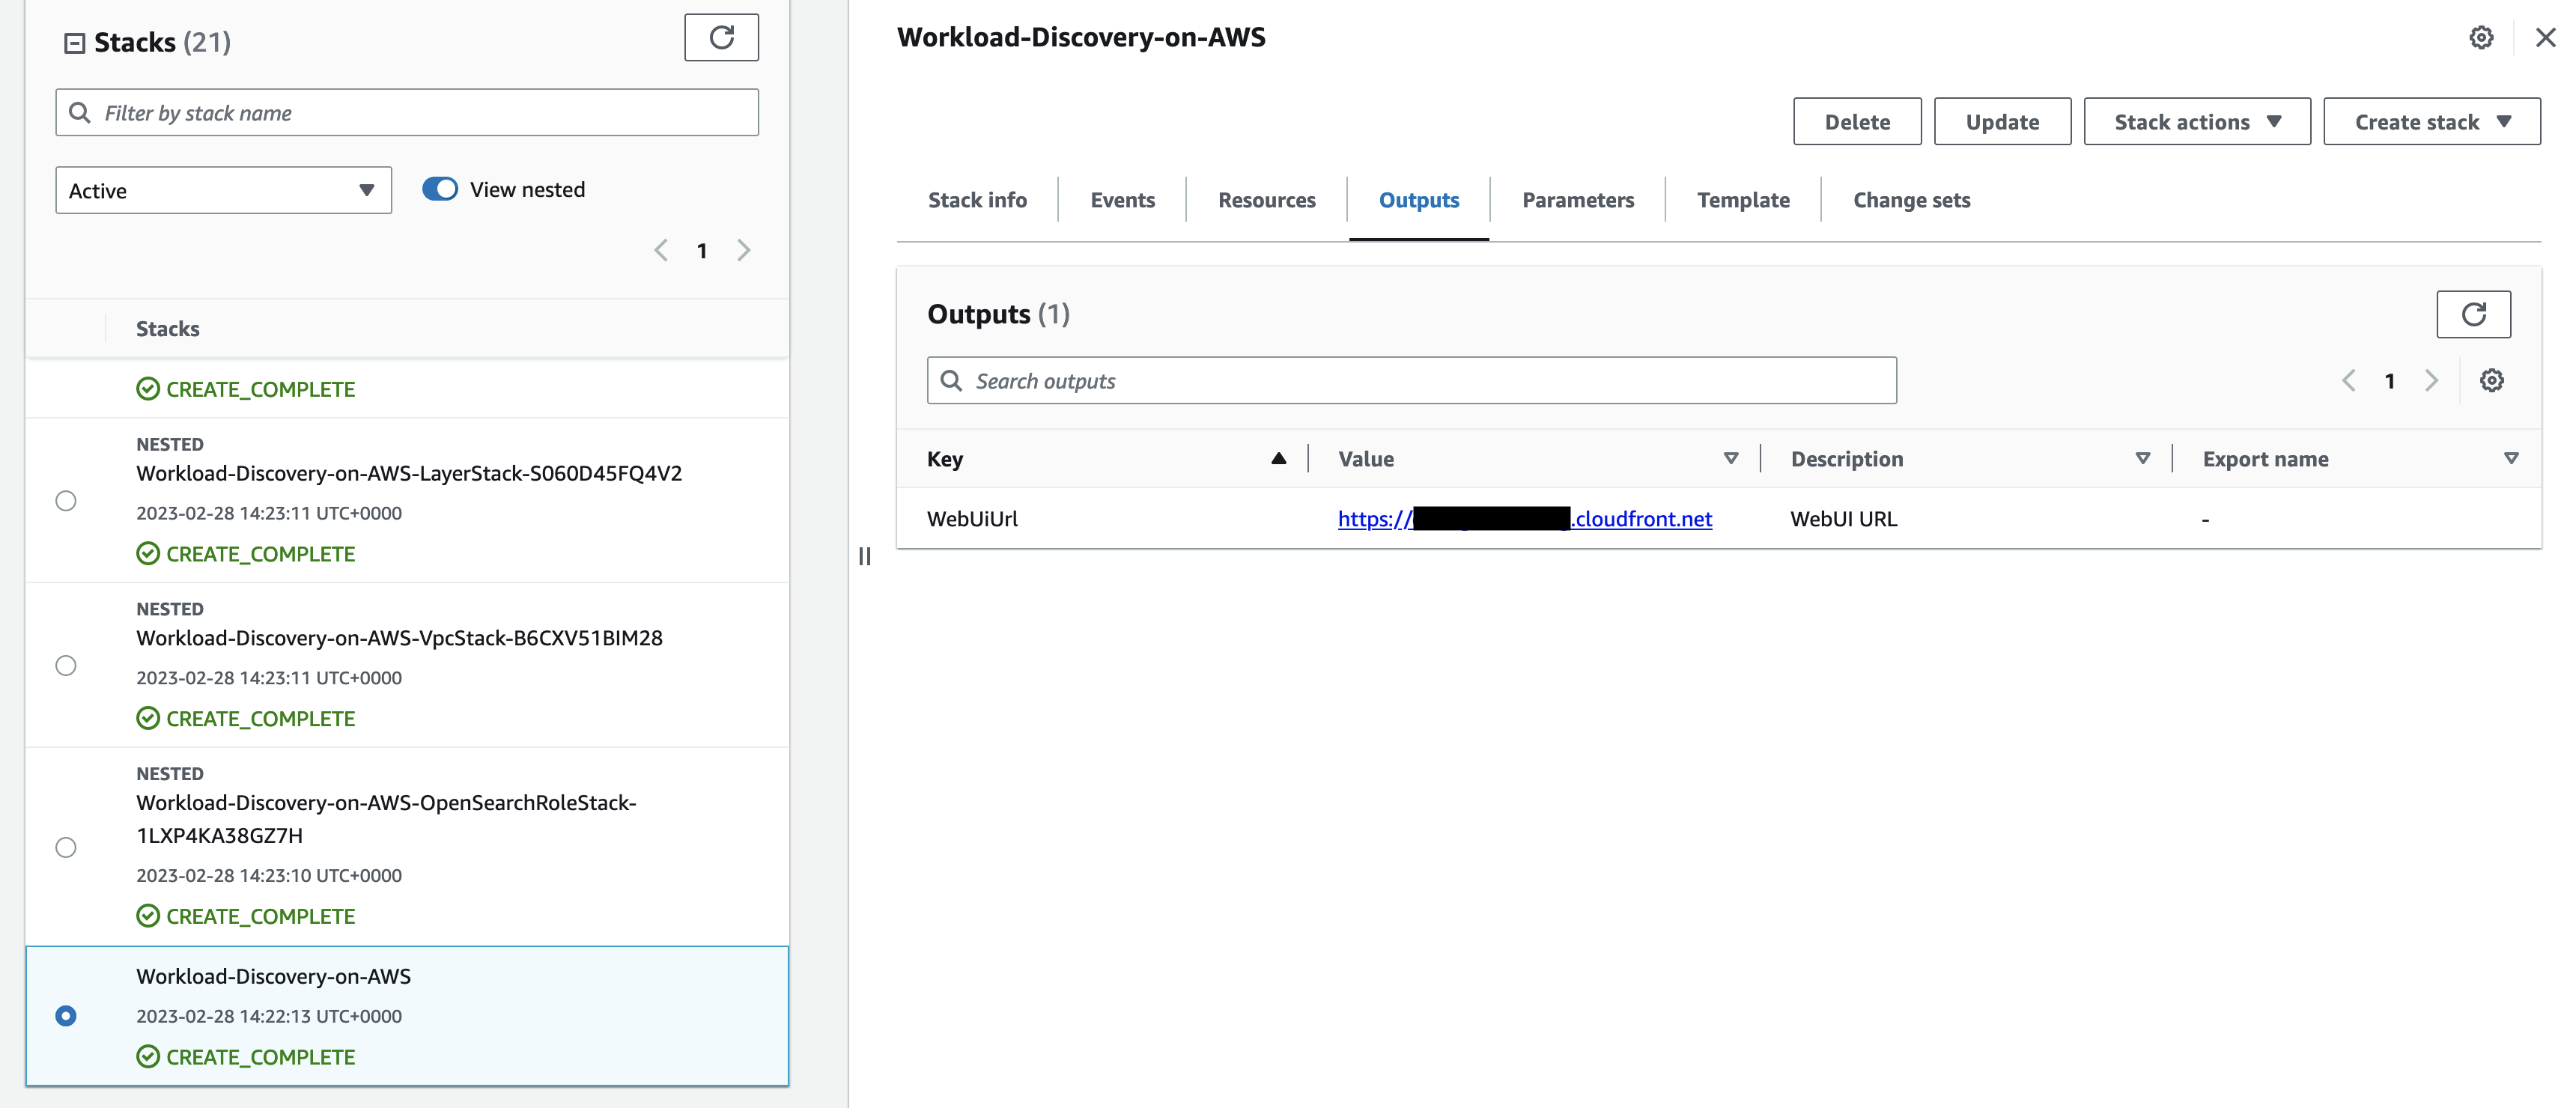
Figure 5. Screenshot of the AWS CloudFormation console showing the Workload Discovery on AWS web URL.
Navigate to the CloudFront distribution URL and log in to Workload Discovery on AWS using the Cognito user credentials created in Step 2 of the previous section. The temporary password created in the previous step must be redefined, but you may skip the email verification step.
Now, you can import the resources in the target account by selecting Accounts from the sidebar and choosing the Import button
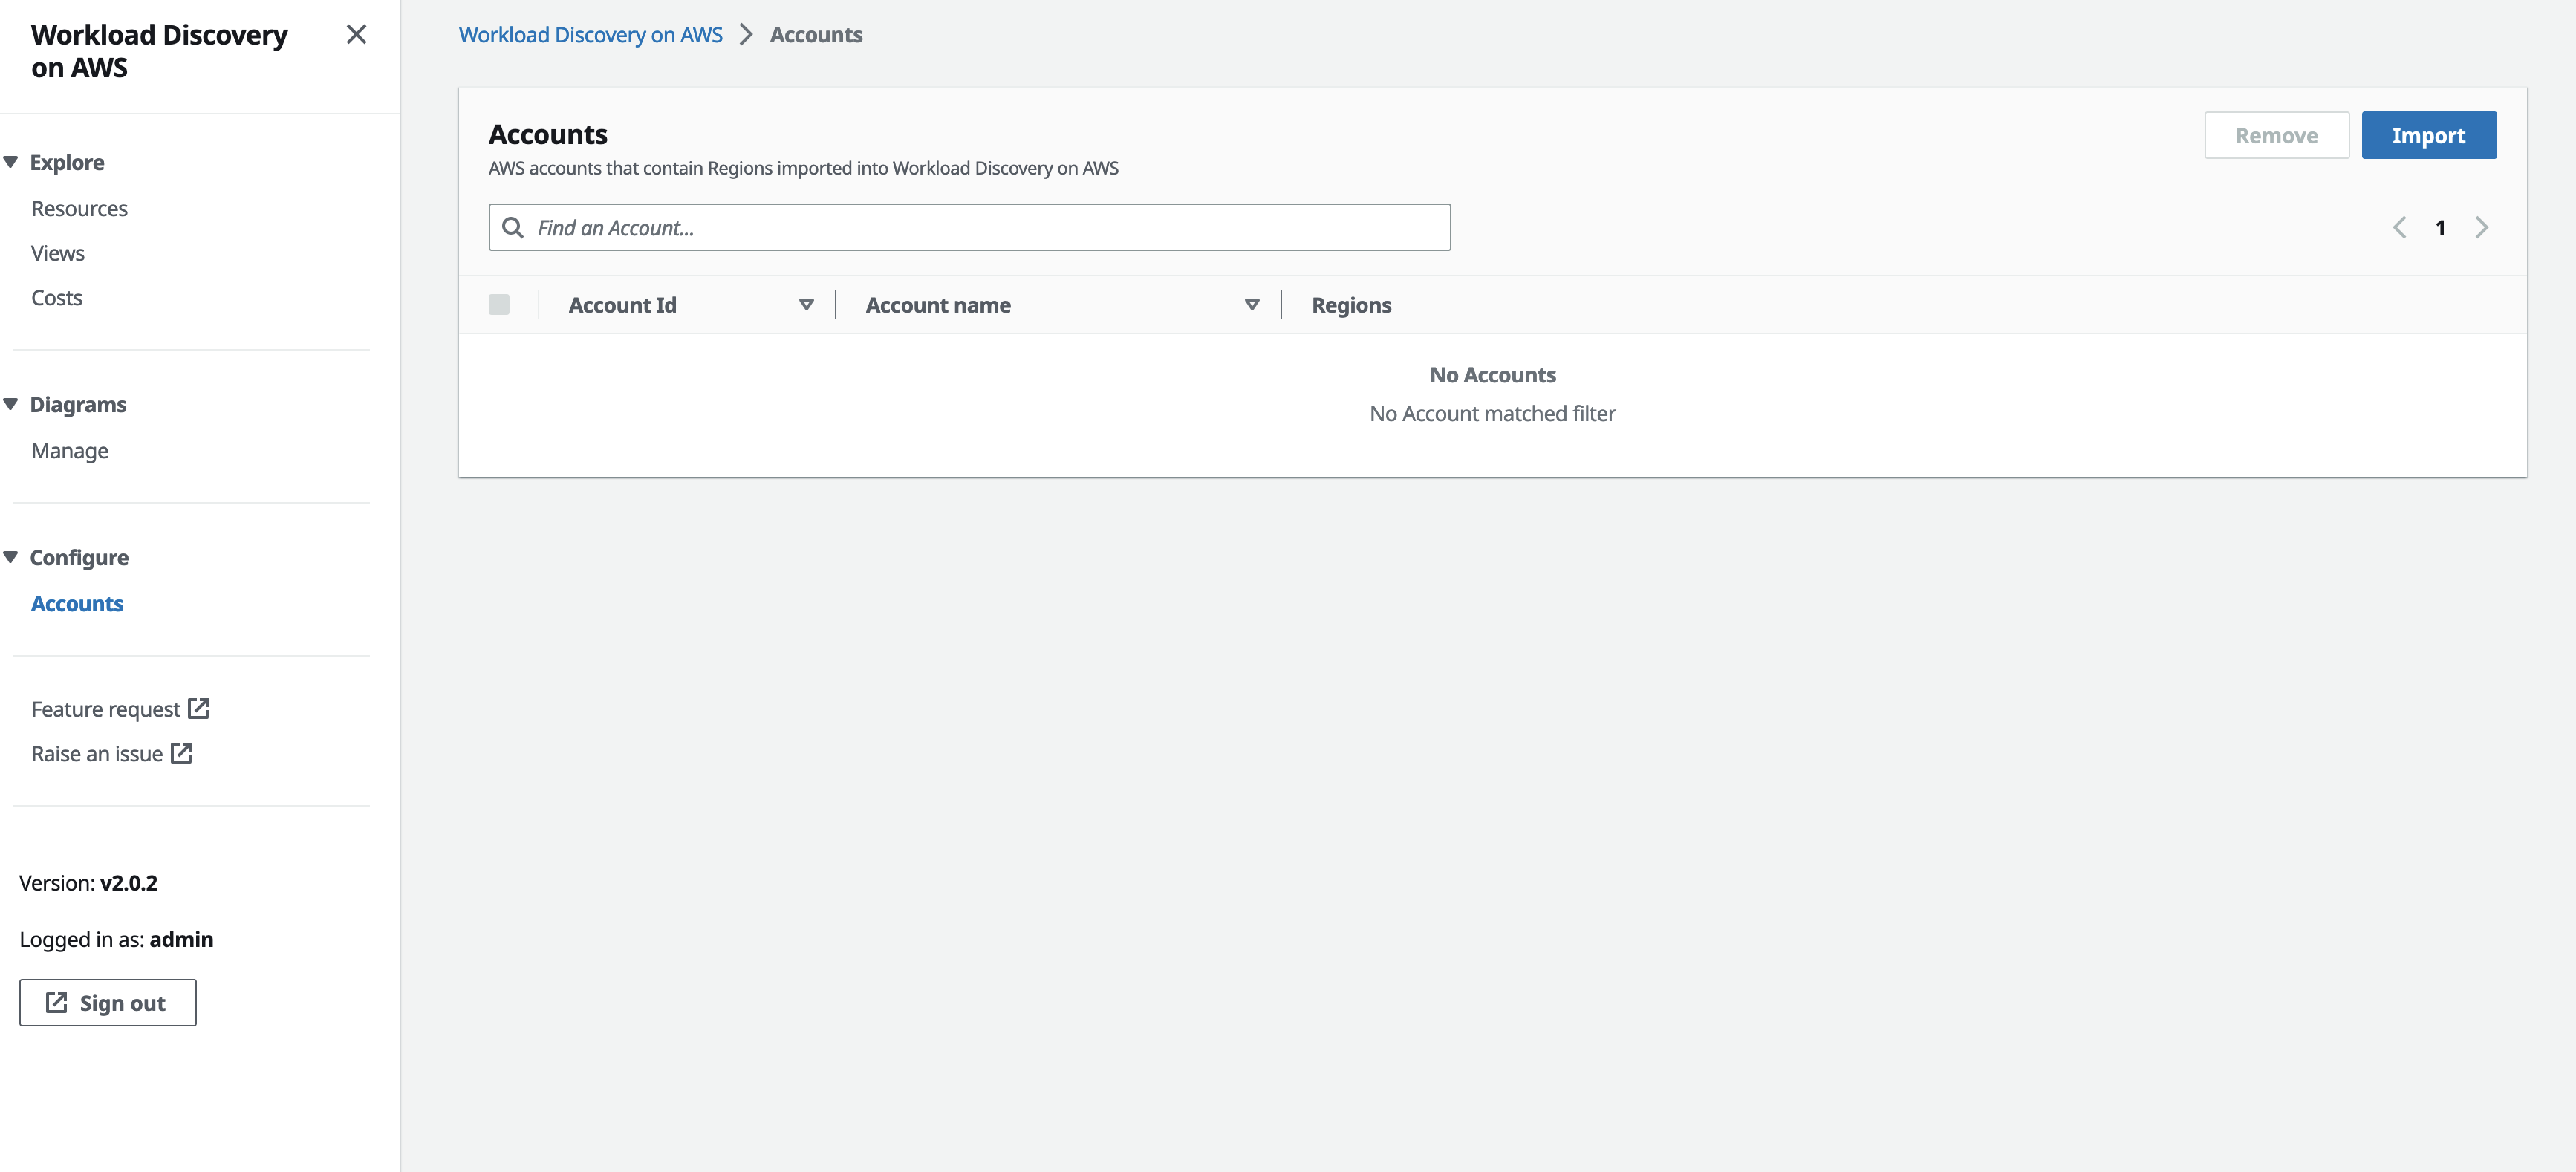
Figure 6. Screenshot of the Workload Discovery on AWS Account page.
In the Import Method pane, select the Add Accounts & Regions using a form radio button and enter the Account ID and Region of the target account and a name to describe the account. Choose the Add button. In this example, the target account and region would be the one containing the sample web application described earlier.
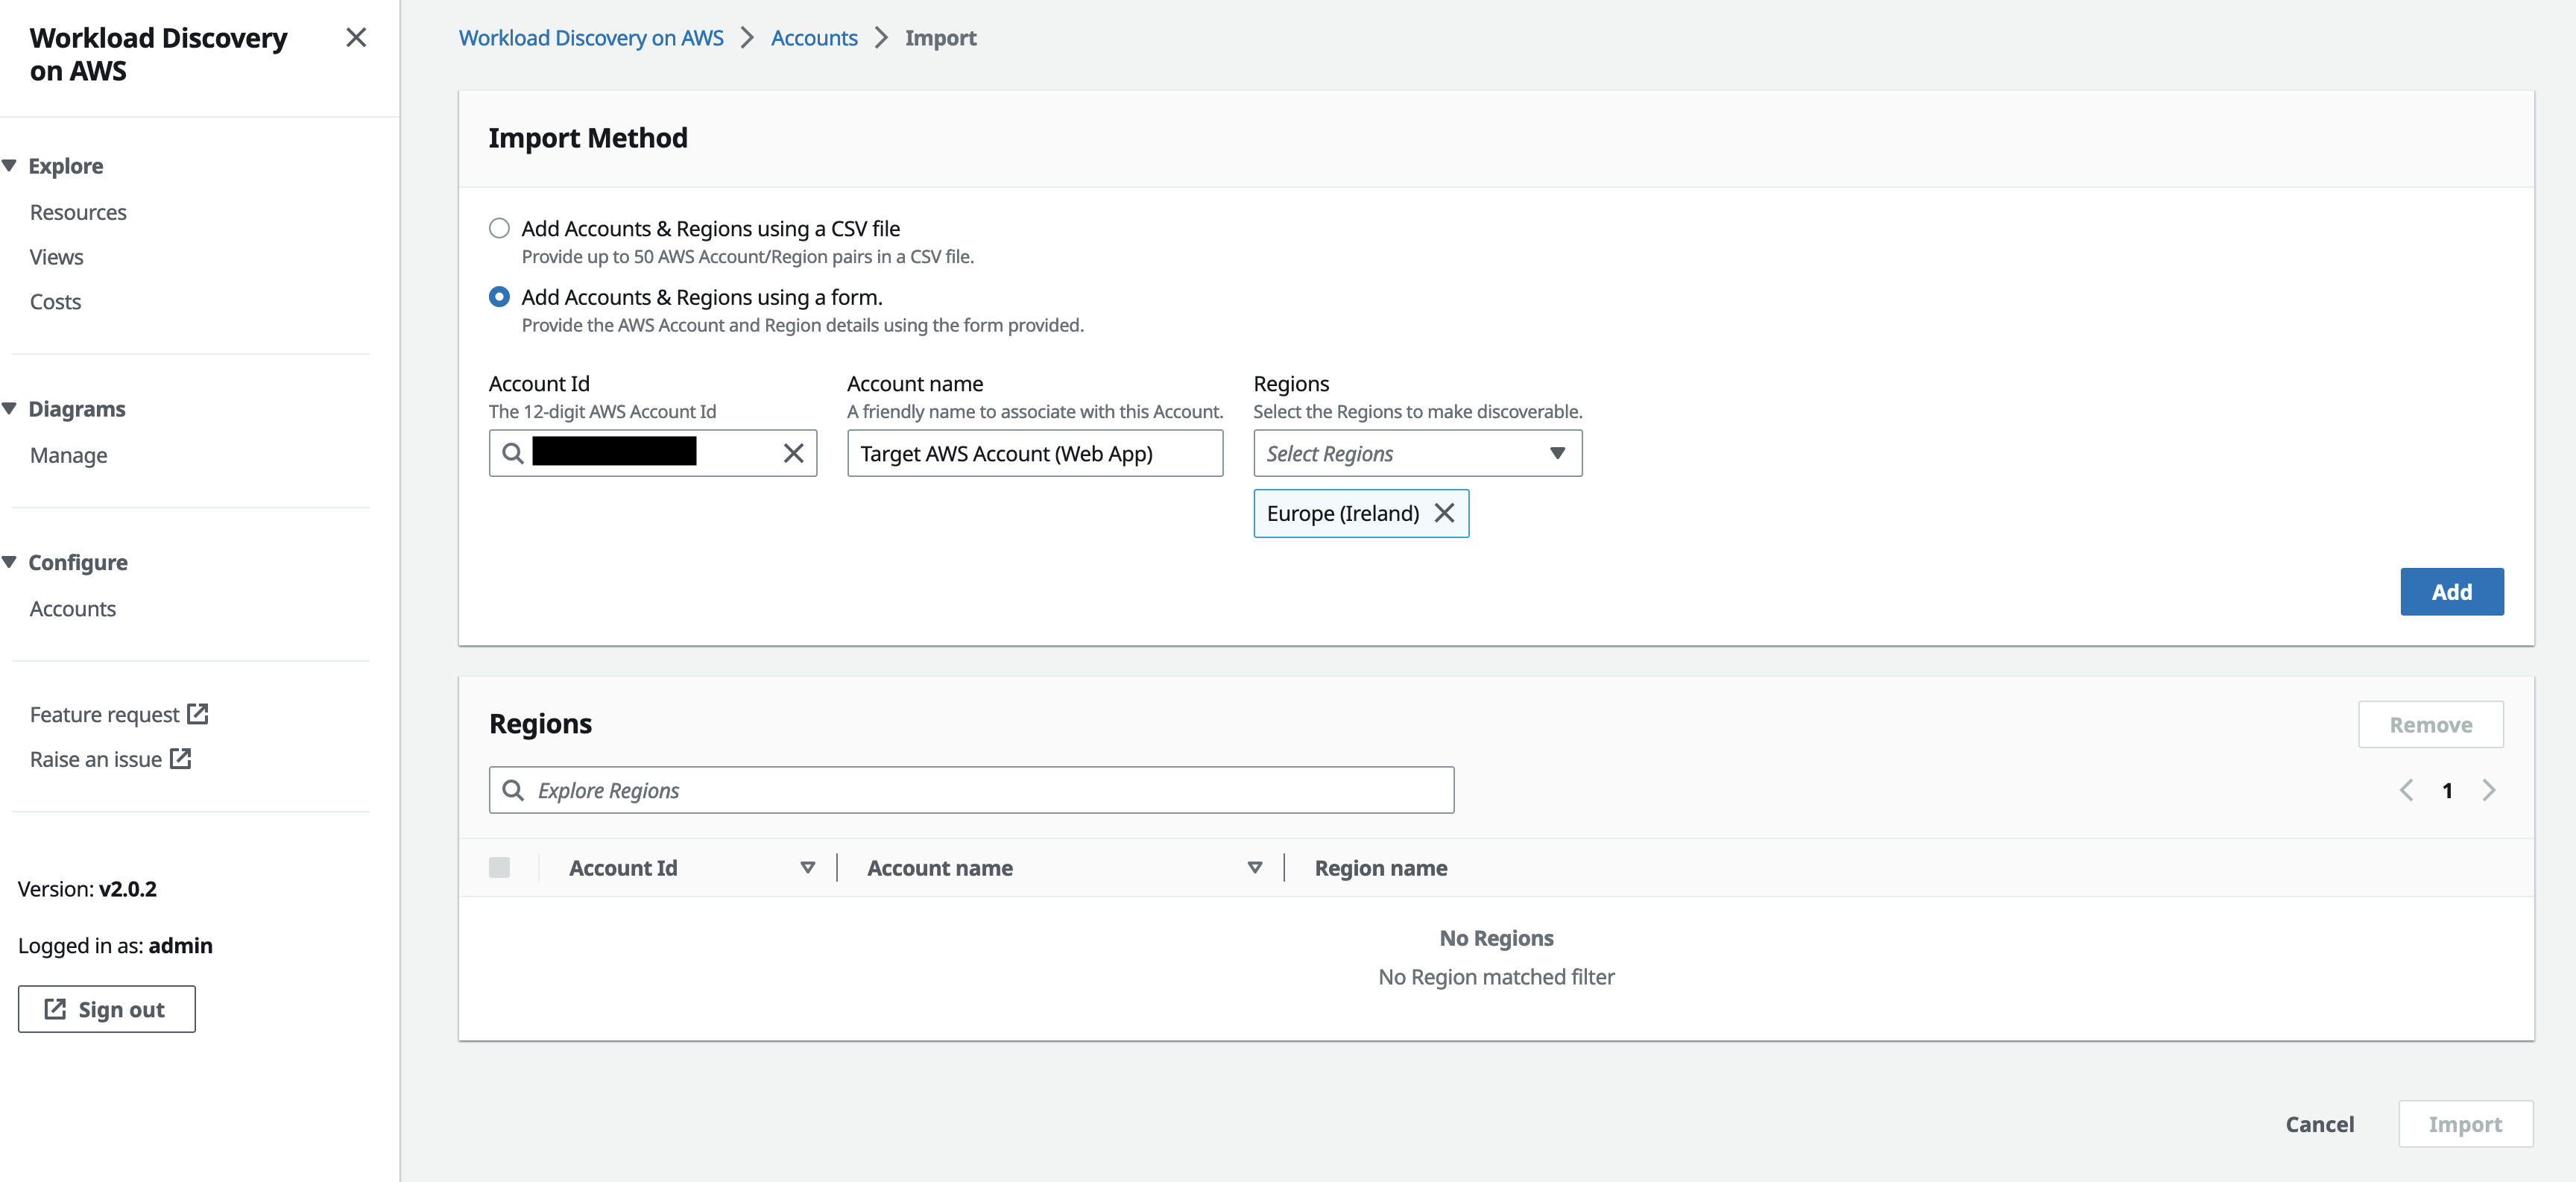
Figure 7. Screenshot of entering the account details in the Import Method panel of the Account Import page.
In the Regions pane, verify that the account details are correct and choose the Import button.
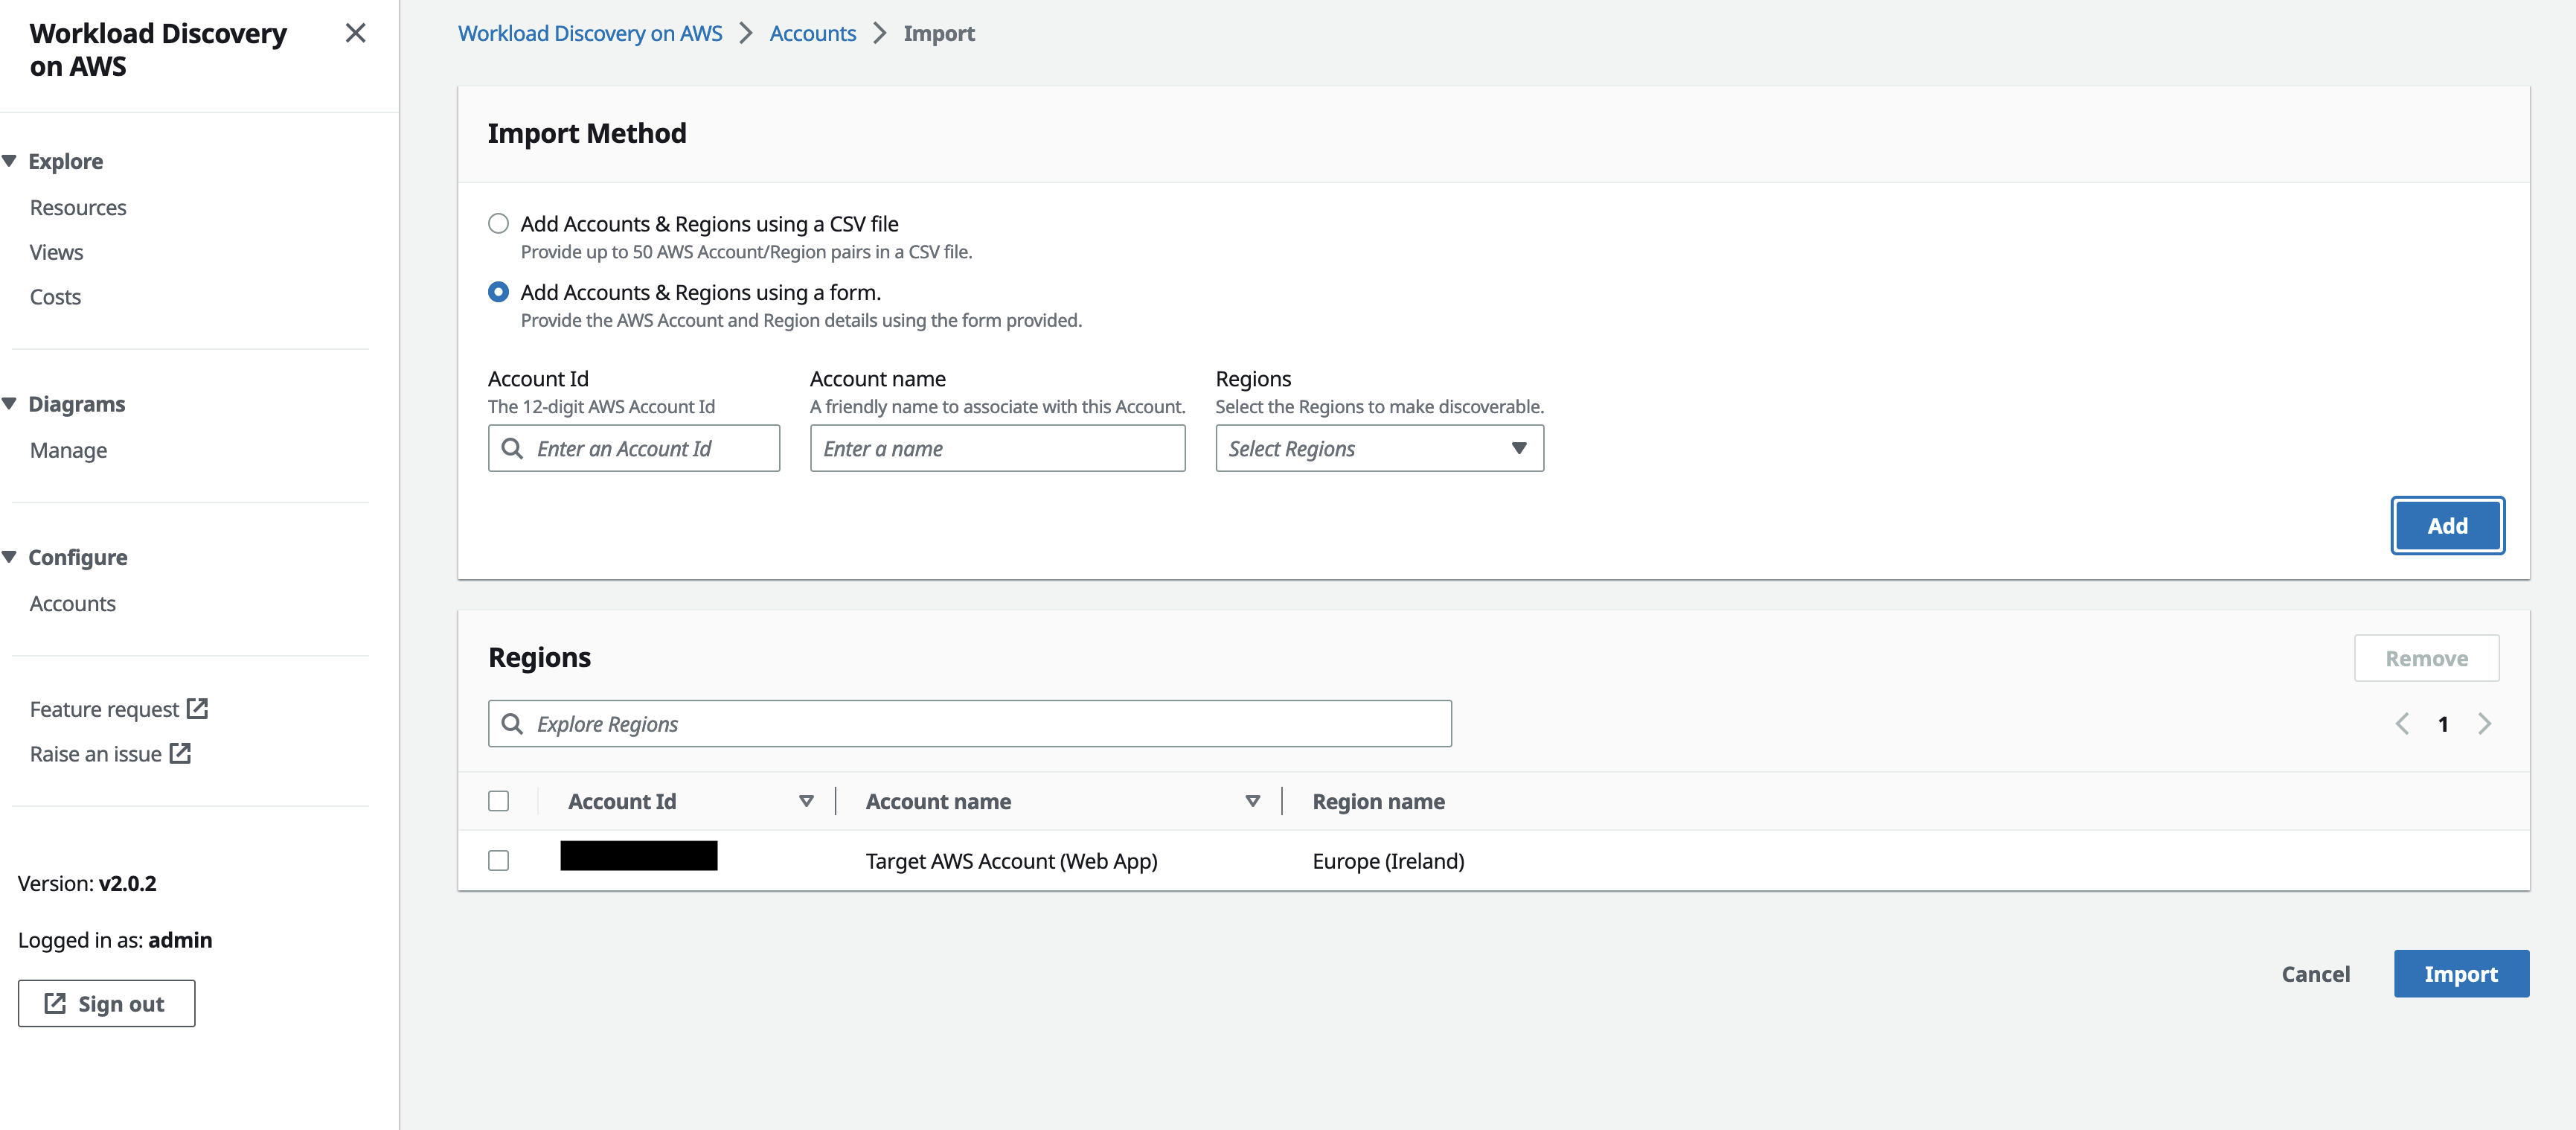
Figure 8. Screenshot of importing accounts and regions in the Regions panel of the Account Import page.
Once you select the Import button, a modal dialog will appear where you can download the regional and global CloudFormation templates to be deployed in the target account to capture and replicate resources configurations to Workload Discovery on AWS.
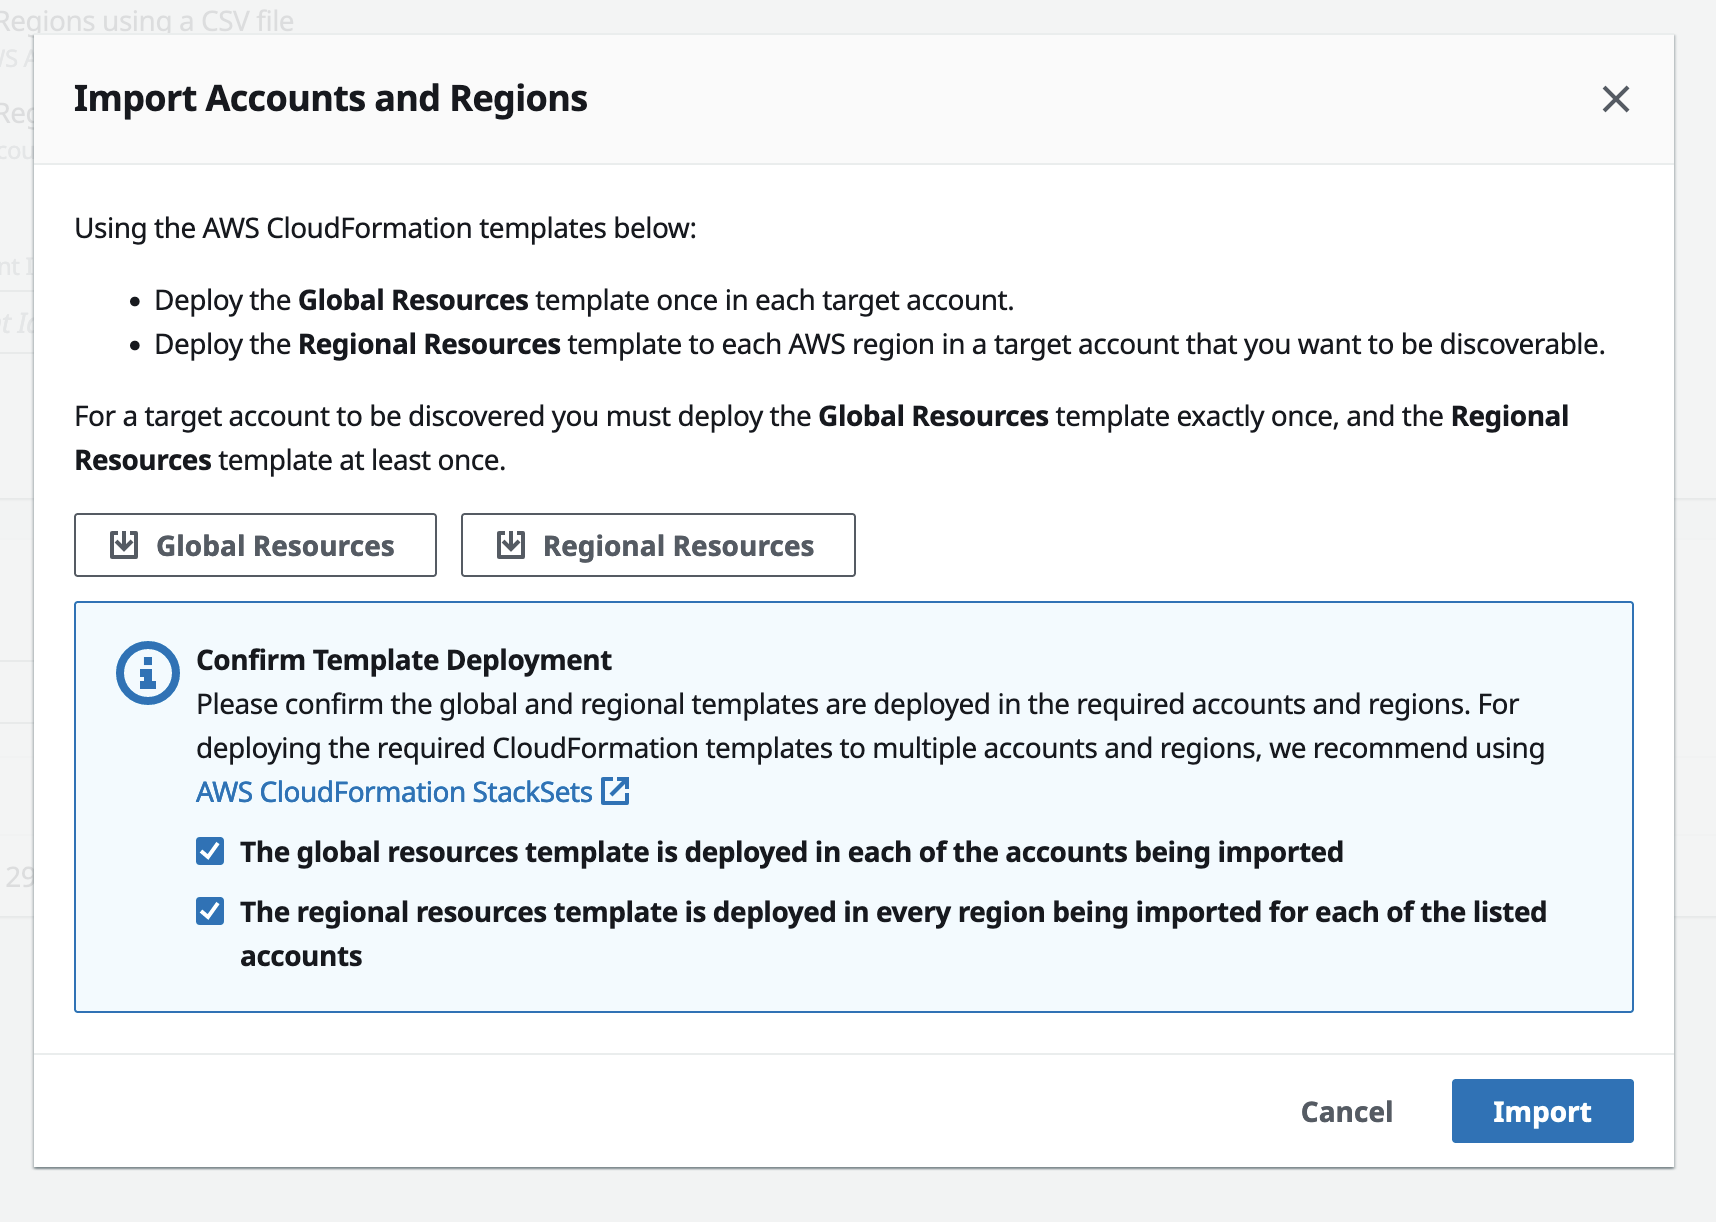
Figure 9. Screenshot of the confirmatory Import Accounts and Regions modal dialog.
After you deploy the CloudFormation templates in the target account as shown below, and select Import in the dialog, the stack takes only a few minutes to deploy. Workload Discovery on AWS takes approximately 15 minutes to start showing the resources in the dashboard.
The global resources CloudFormation template must be deployed exactly once in the target account.
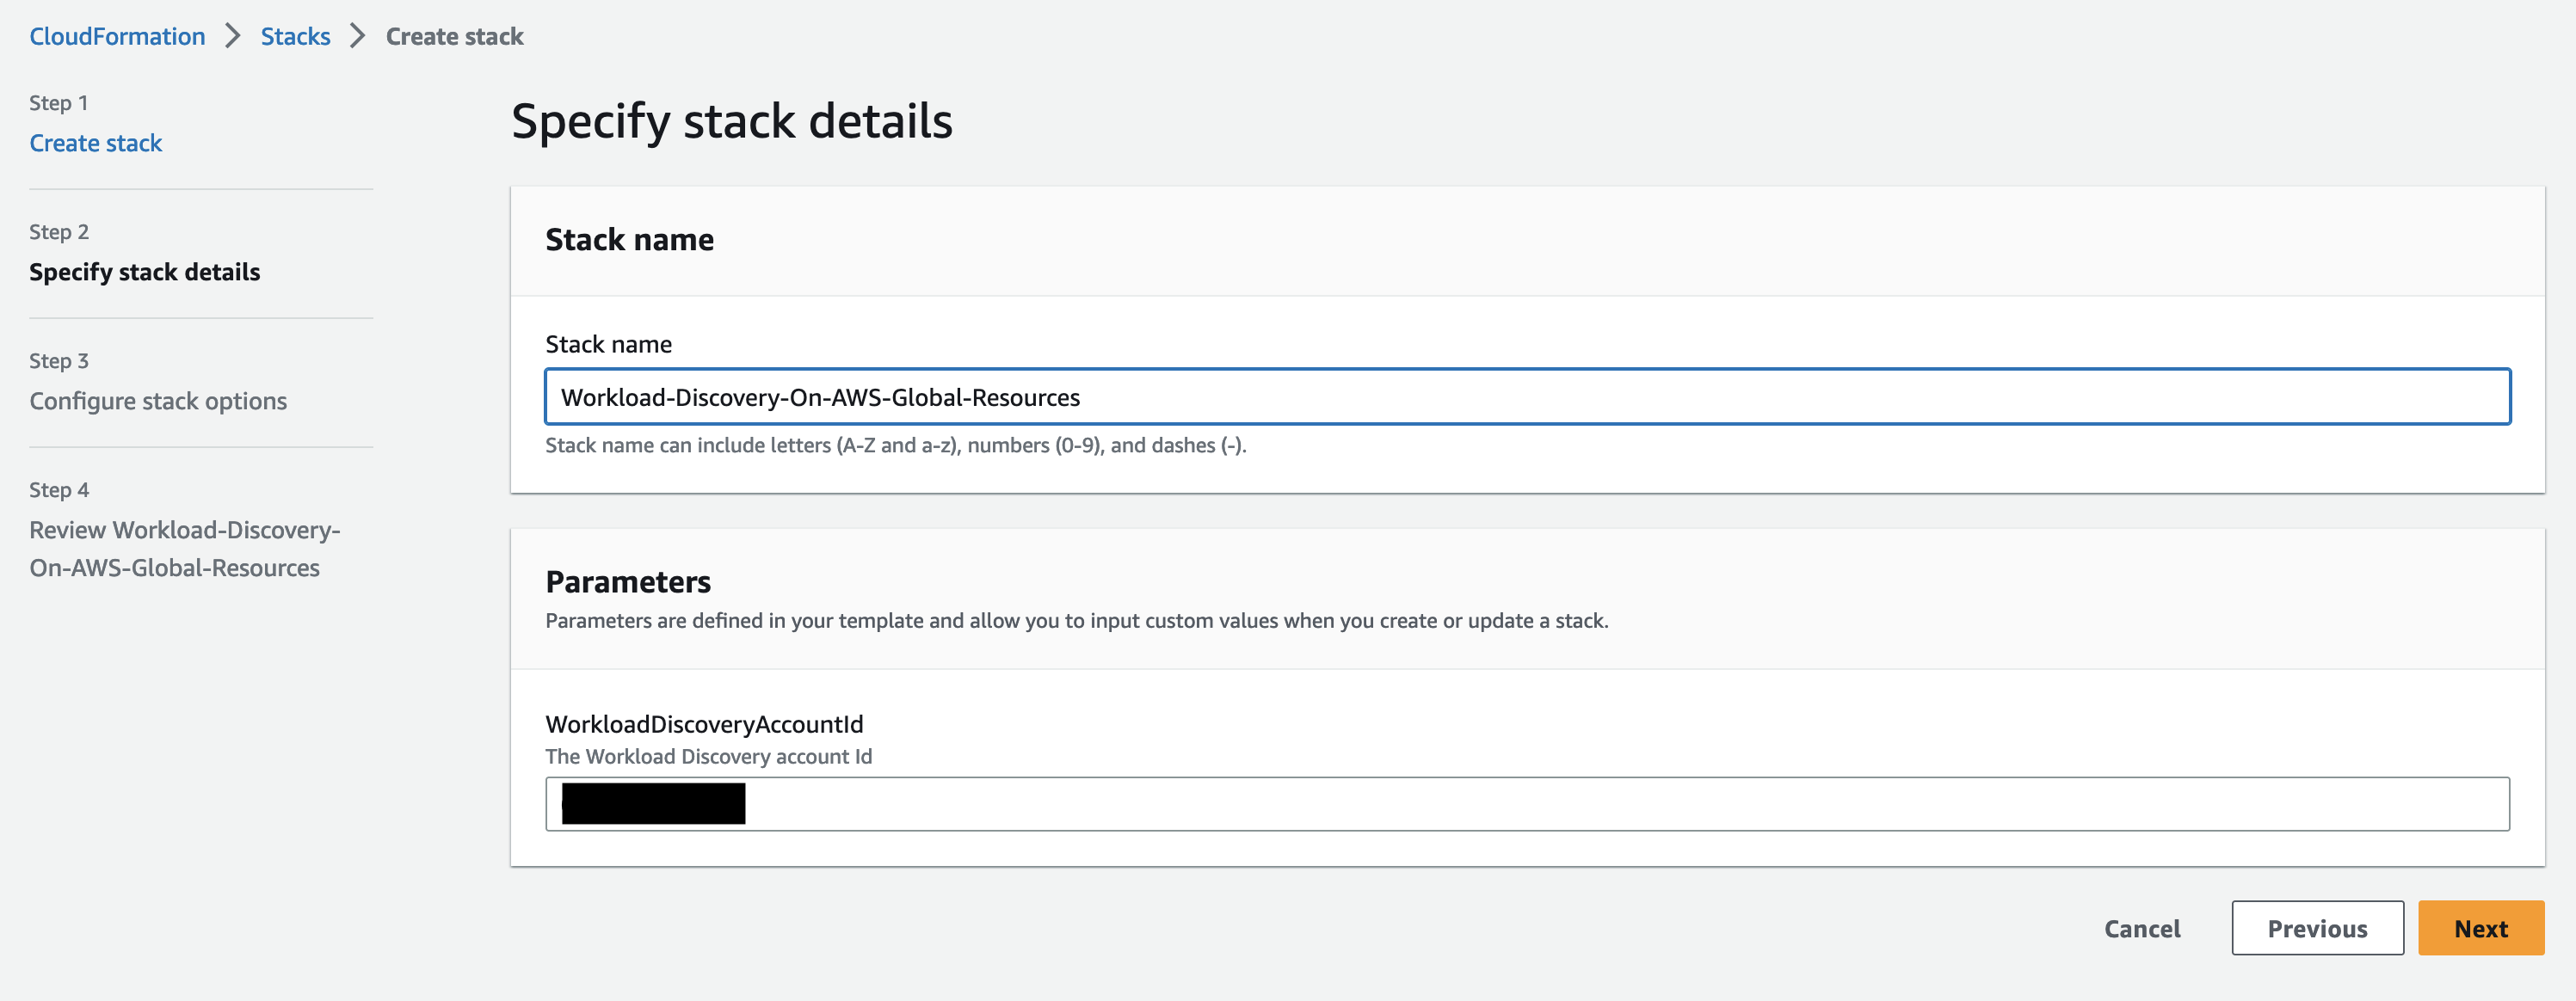
Figure 10. Screenshot of the AWS CloudFormation console in the target account while preparing to create the stack ‘Workload-Discovery-on-AWS-Global-Resources’.
The regional template must be deployed in each Region you wish to import in an account. In this example, the regional template will be deployed only in the Region where the sample web application has been provisioned. If AWS Config has been enabled in the Region to be imported, you must set the AlreadyHaveConfigSetup parameter to Yes.
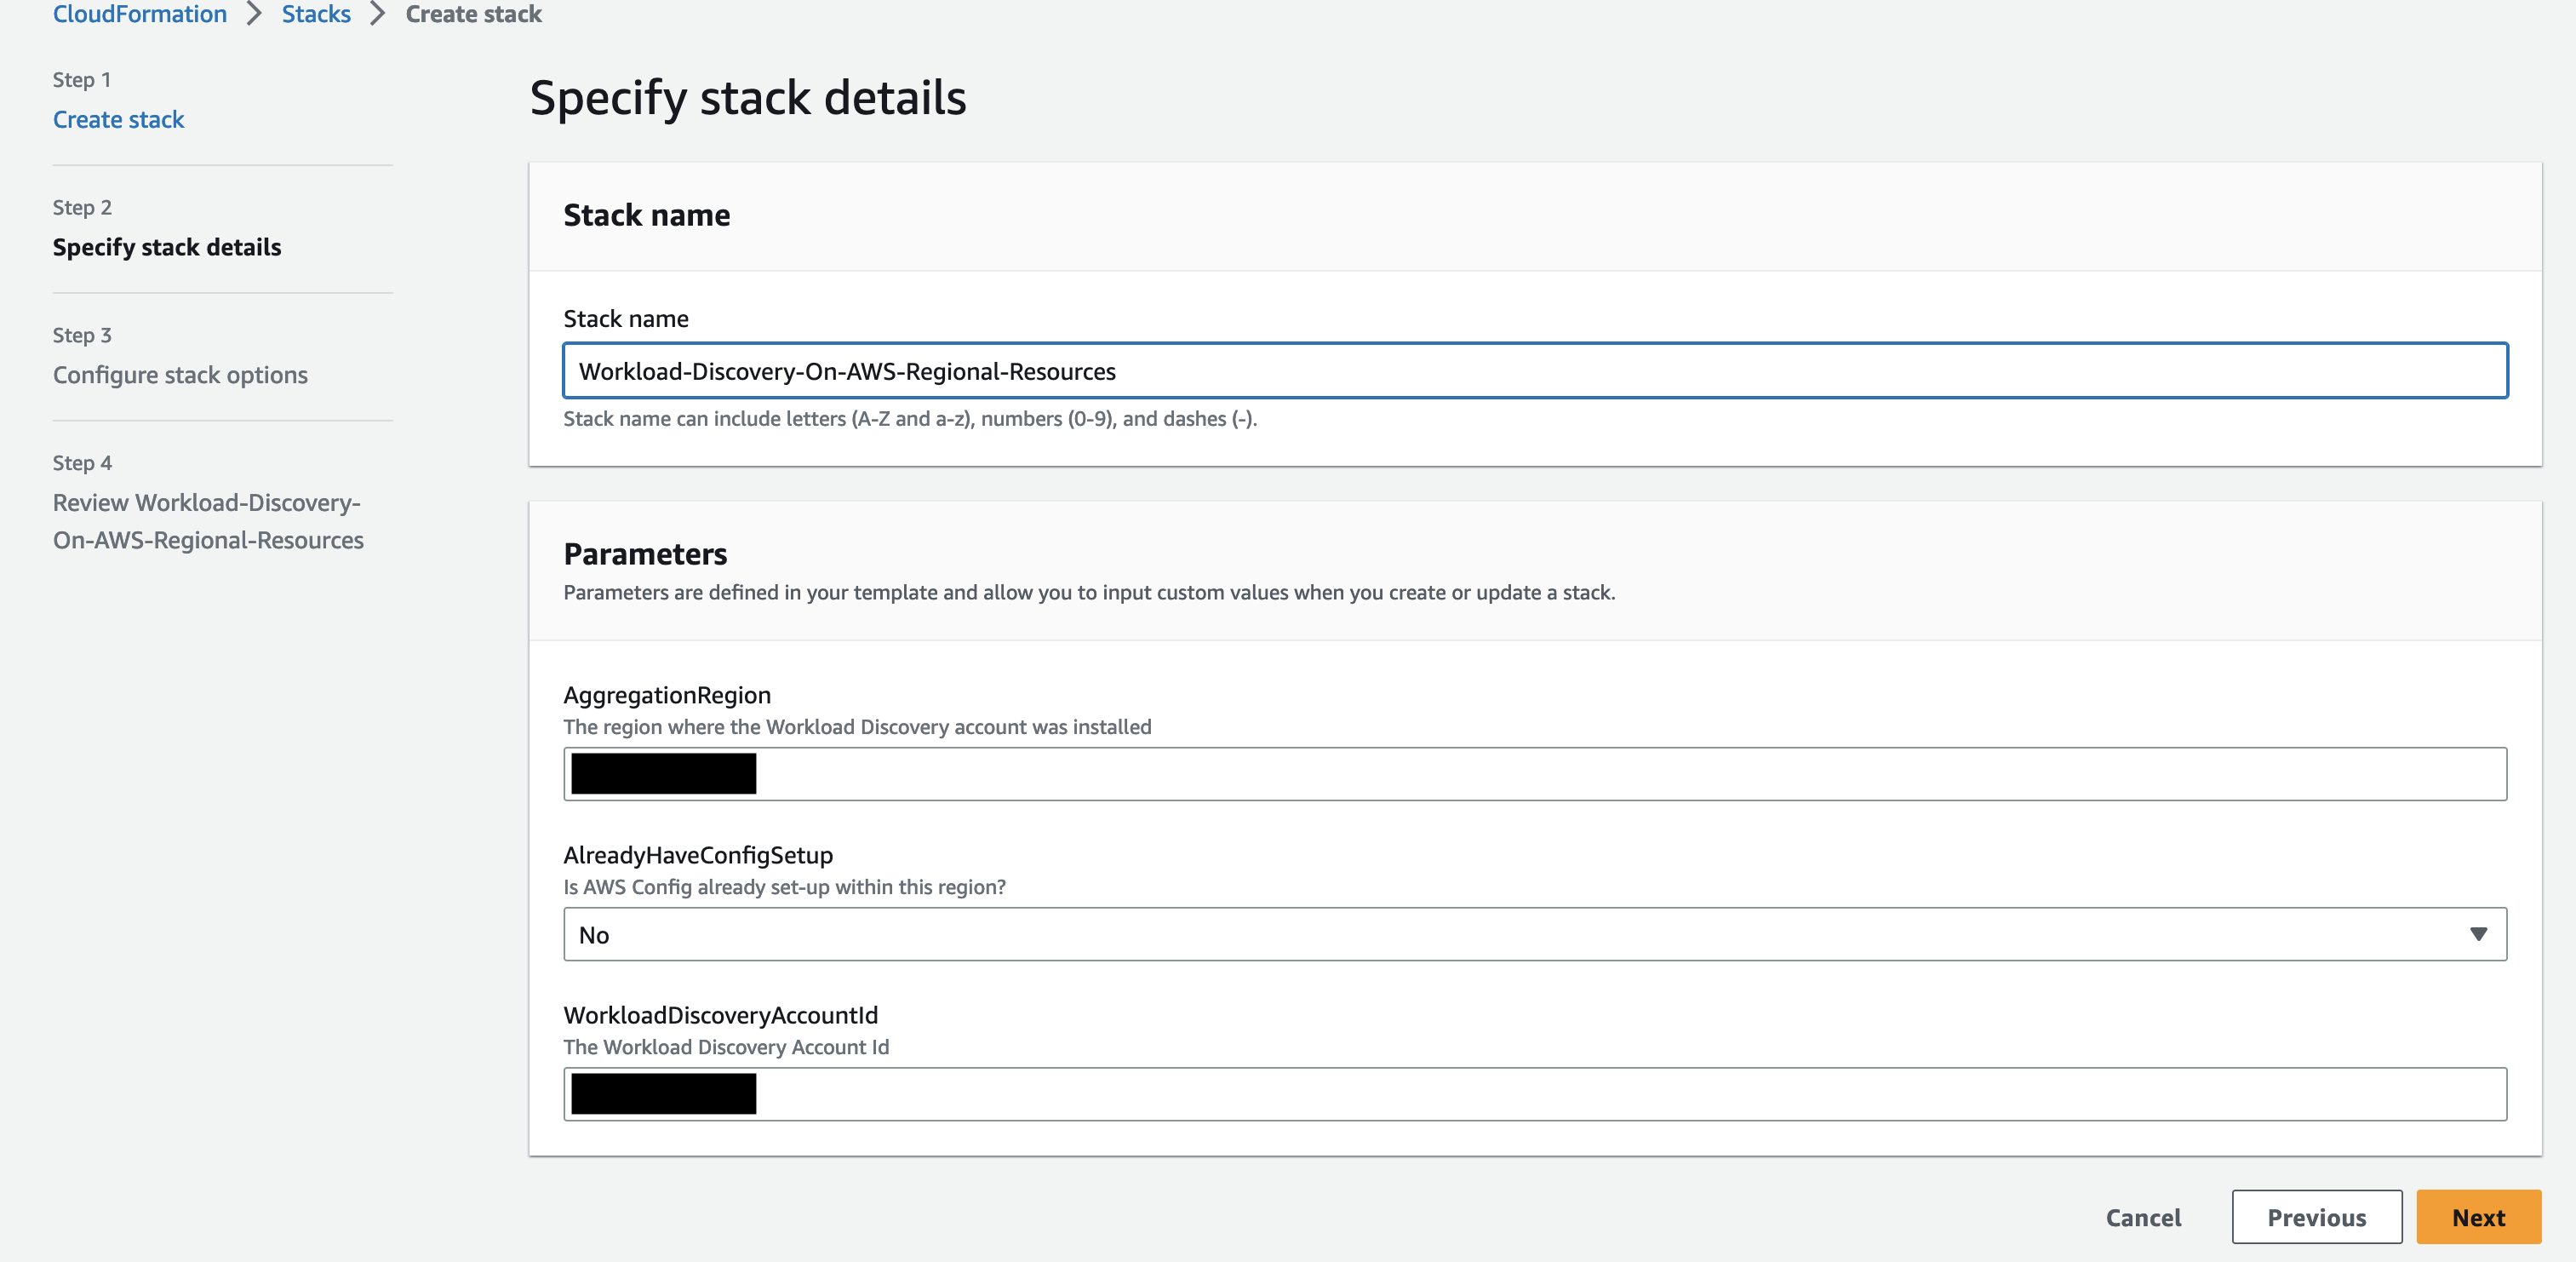
Figure 11. Screenshot of the AWS CloudFormation console in the target account while preparing to create the stack ‘Workload-Discovery-on-AWS-Regional-Resources’.
Select resources and edit visualization
Now we’ll see an example of how Workload Discovery on AWS can be used to select and visualize specific AWS resources, details of the selected resources, and their relationship to other AWS resources. When you first open the Workload Discovery on AWS application, you’ll be presented with a left-side navigation menu that lists the following options: Explore, Diagrams, Configure, Feature Request, Raise an issue, Sign out.
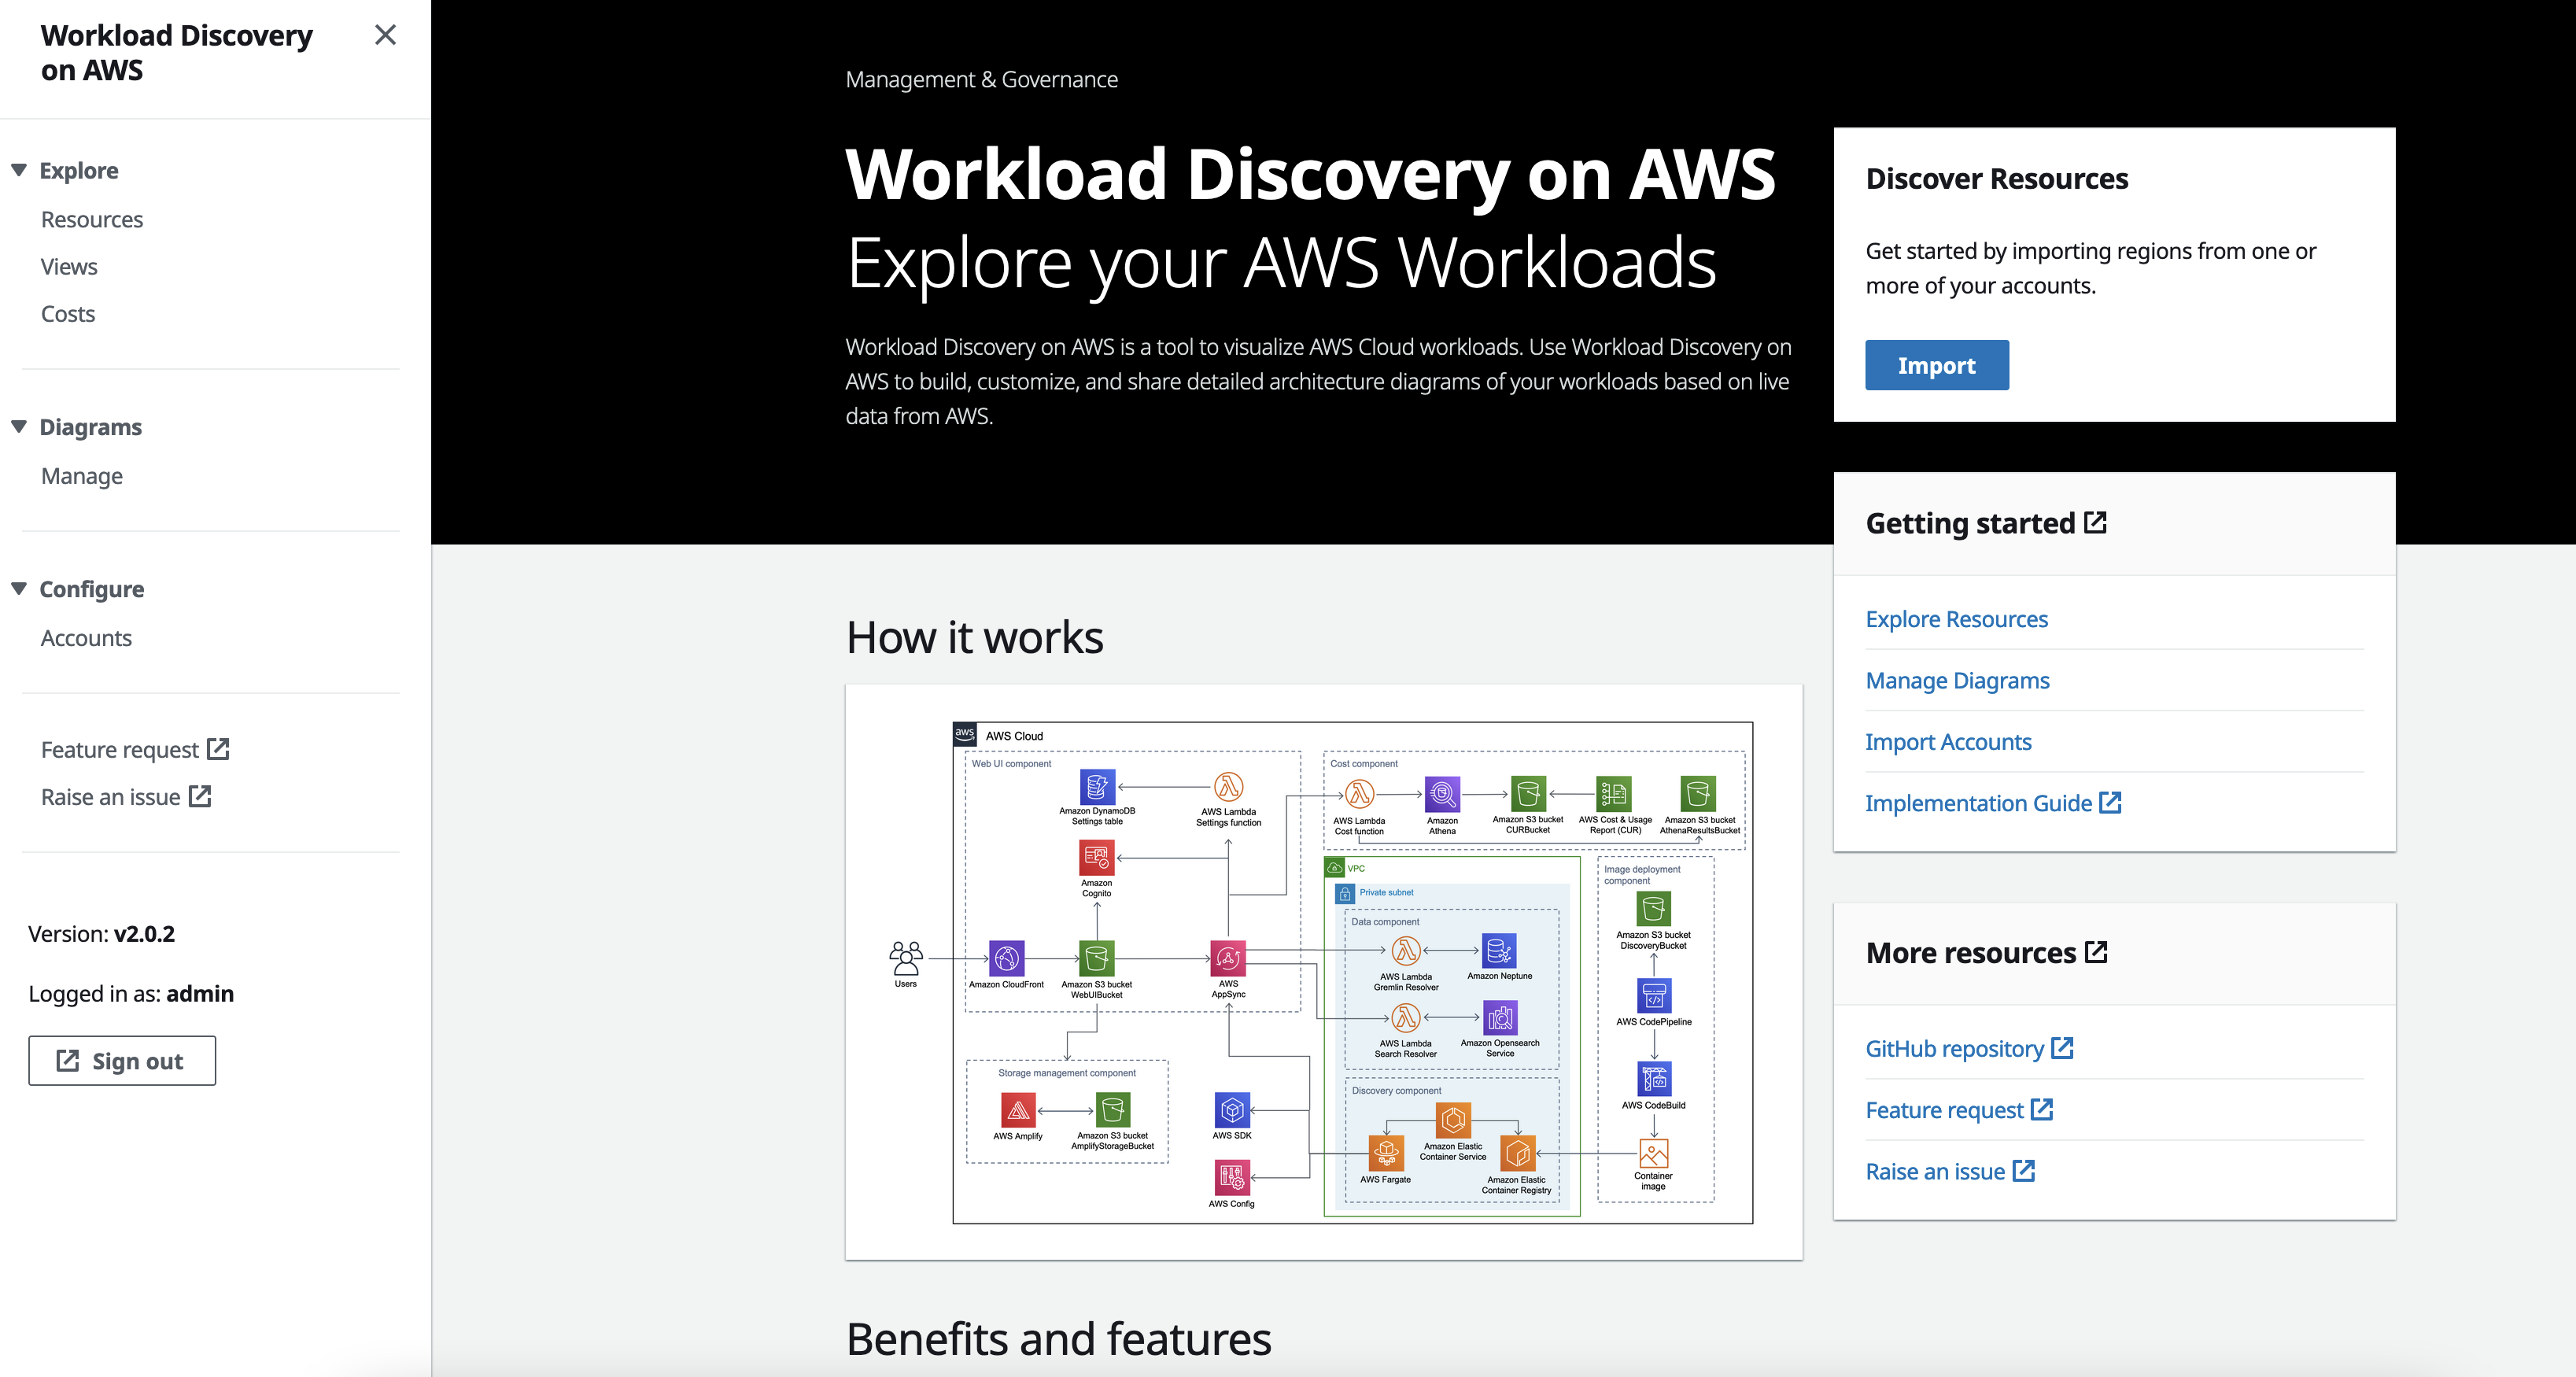
Figure 12. Screenshot of the Workload Discovery on AWS landing page.
From Explore,Resources, you can filter resources by Account ID, Region and resource type. In this example, resource types are filtered using the string vpc as a search term. With the returned results, the Virtual Private Cloud (VPC) provisioned by the sample web application CloudFormation template previously referenced can be explored. Select the radio button for the VPC with the name ecs-refarch and choose the Add to Diagram button.

Figure 13. Screenshot of the Workload Discovery on AWS Resources Page displaying VPC resources with one of the VPCs selected.
On the Create Diagram page, choose a visibility setting from the dropdown list. The Private option means the diagram is visible only to its creator and the Public option means that the diagram is visible to all users of Workload Discovery on AWS. Enter a name for the diagram and choose the Create button.
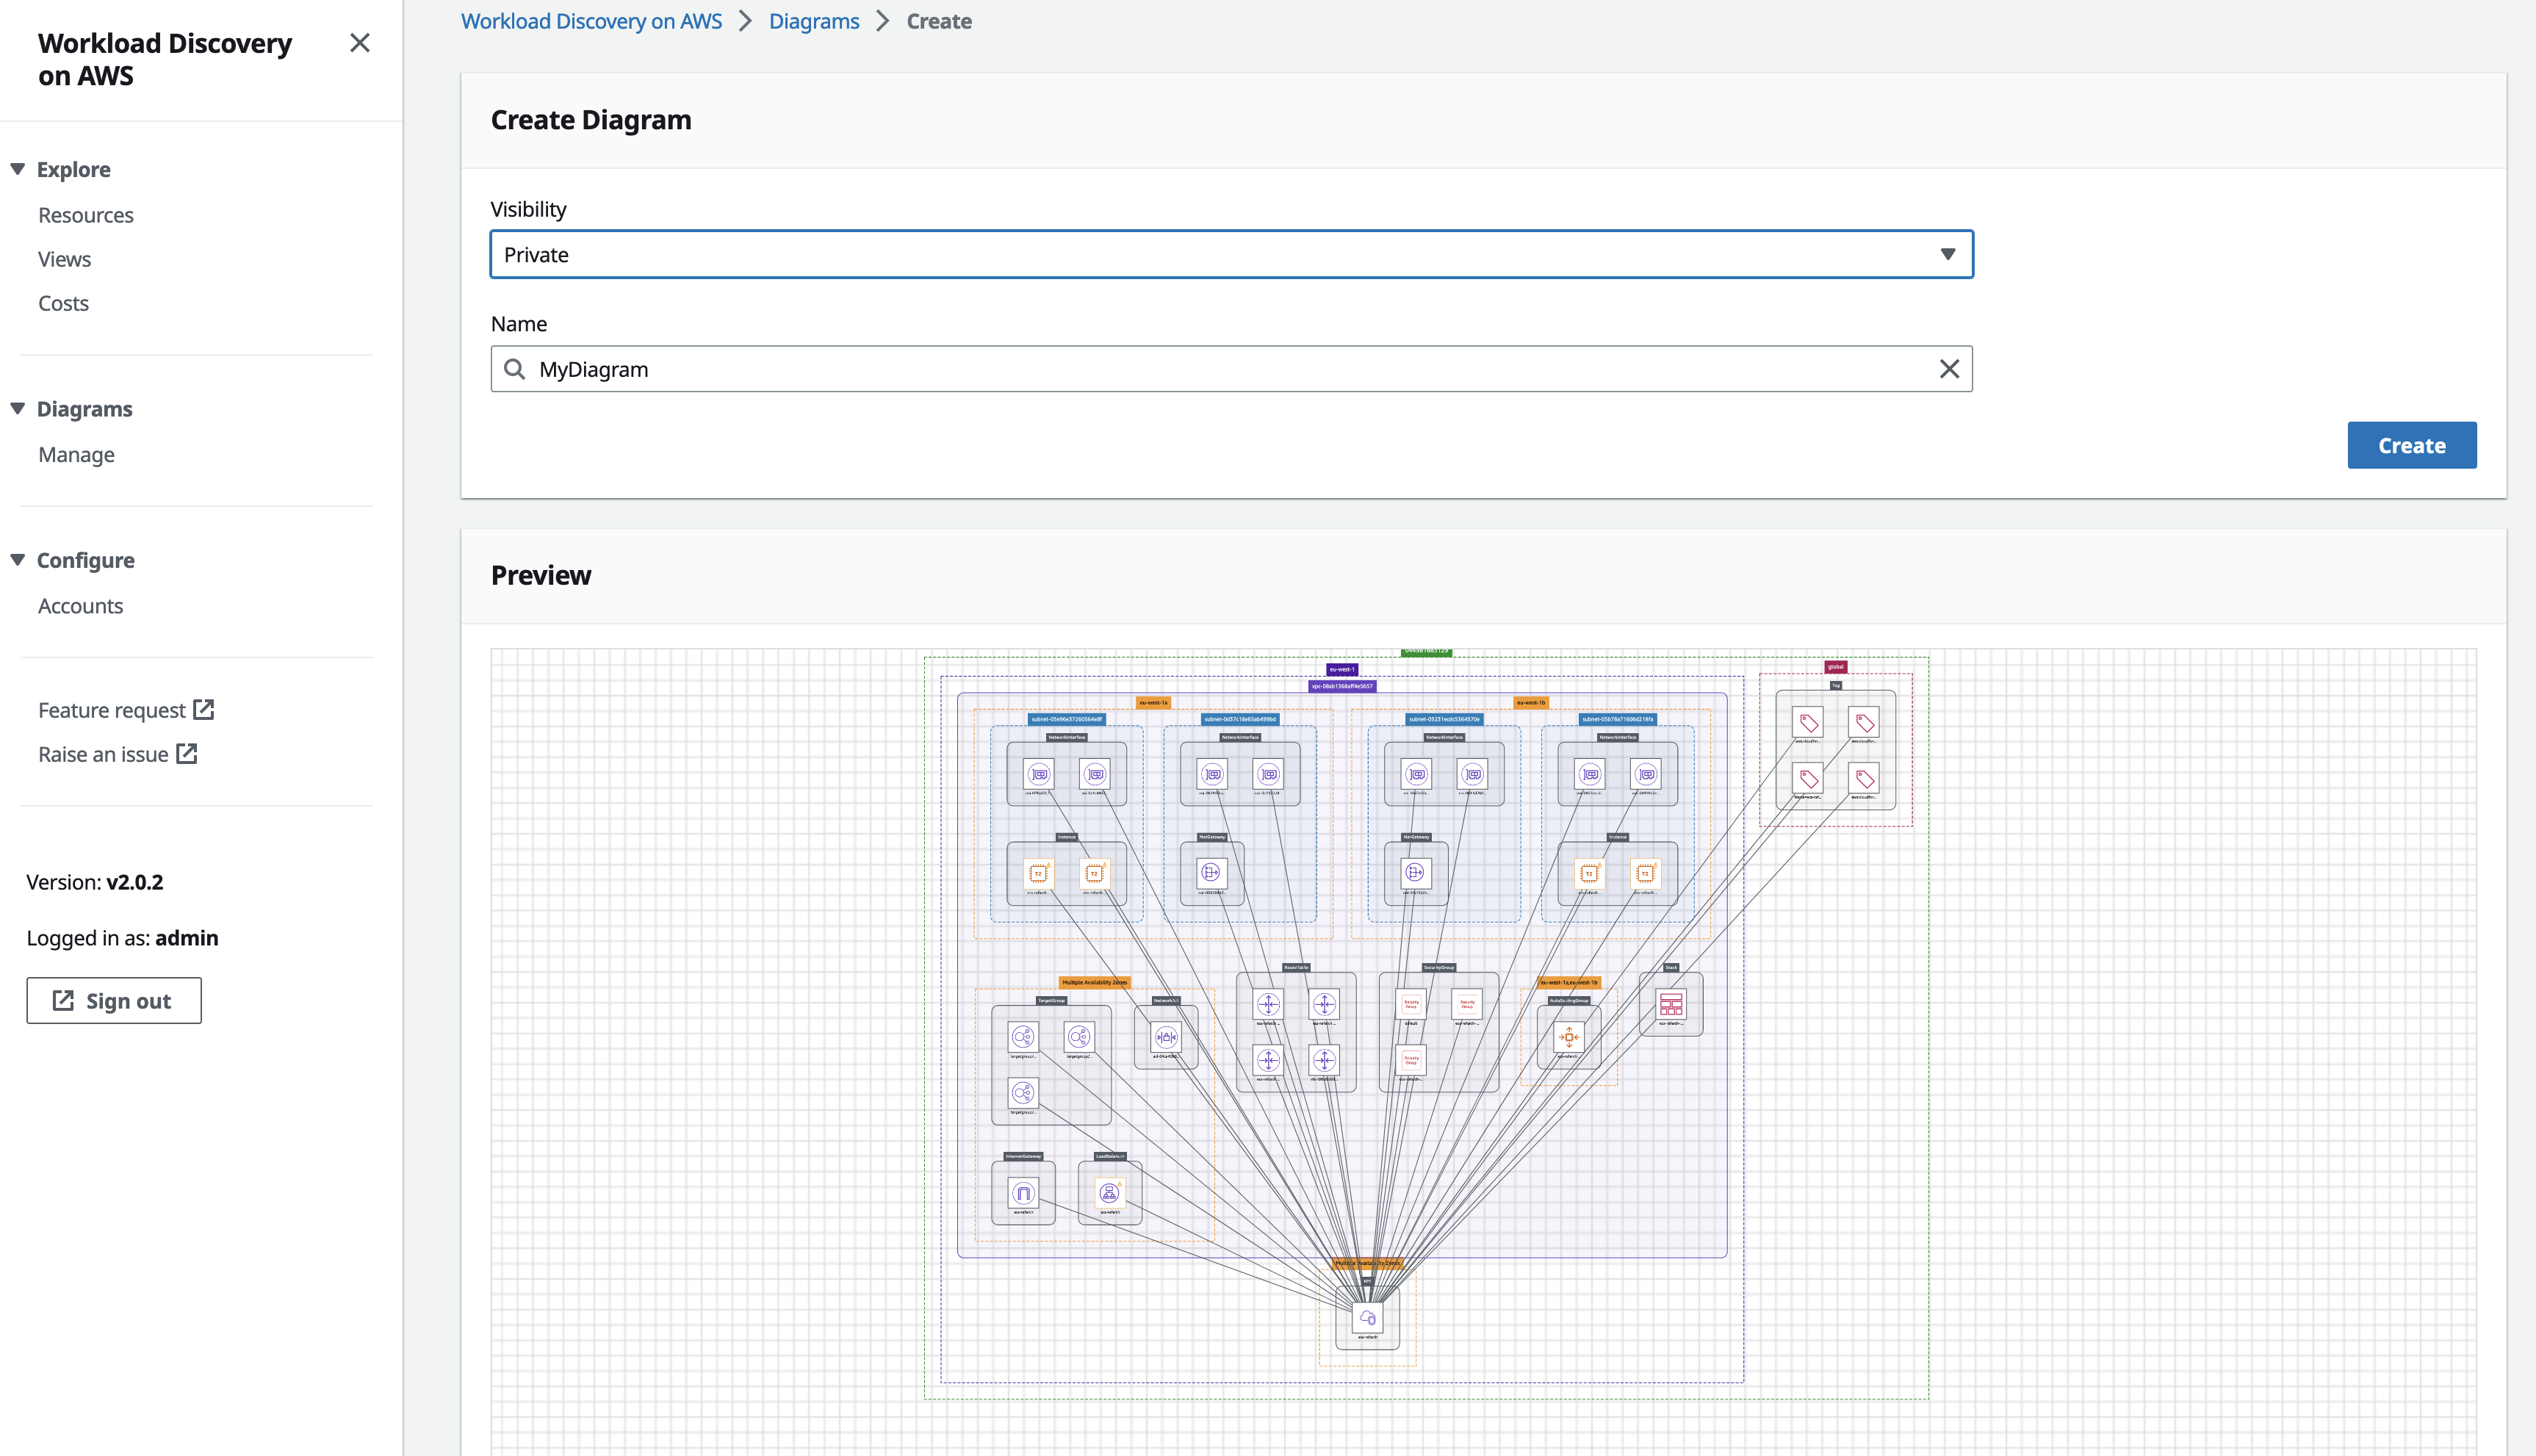
Figure 14. Screenshot of the Workload Discovery on AWS Create Diagram page with a preview showing a VPC and its related resources.
Once the creation process is complete, the diagram will be available for editing.
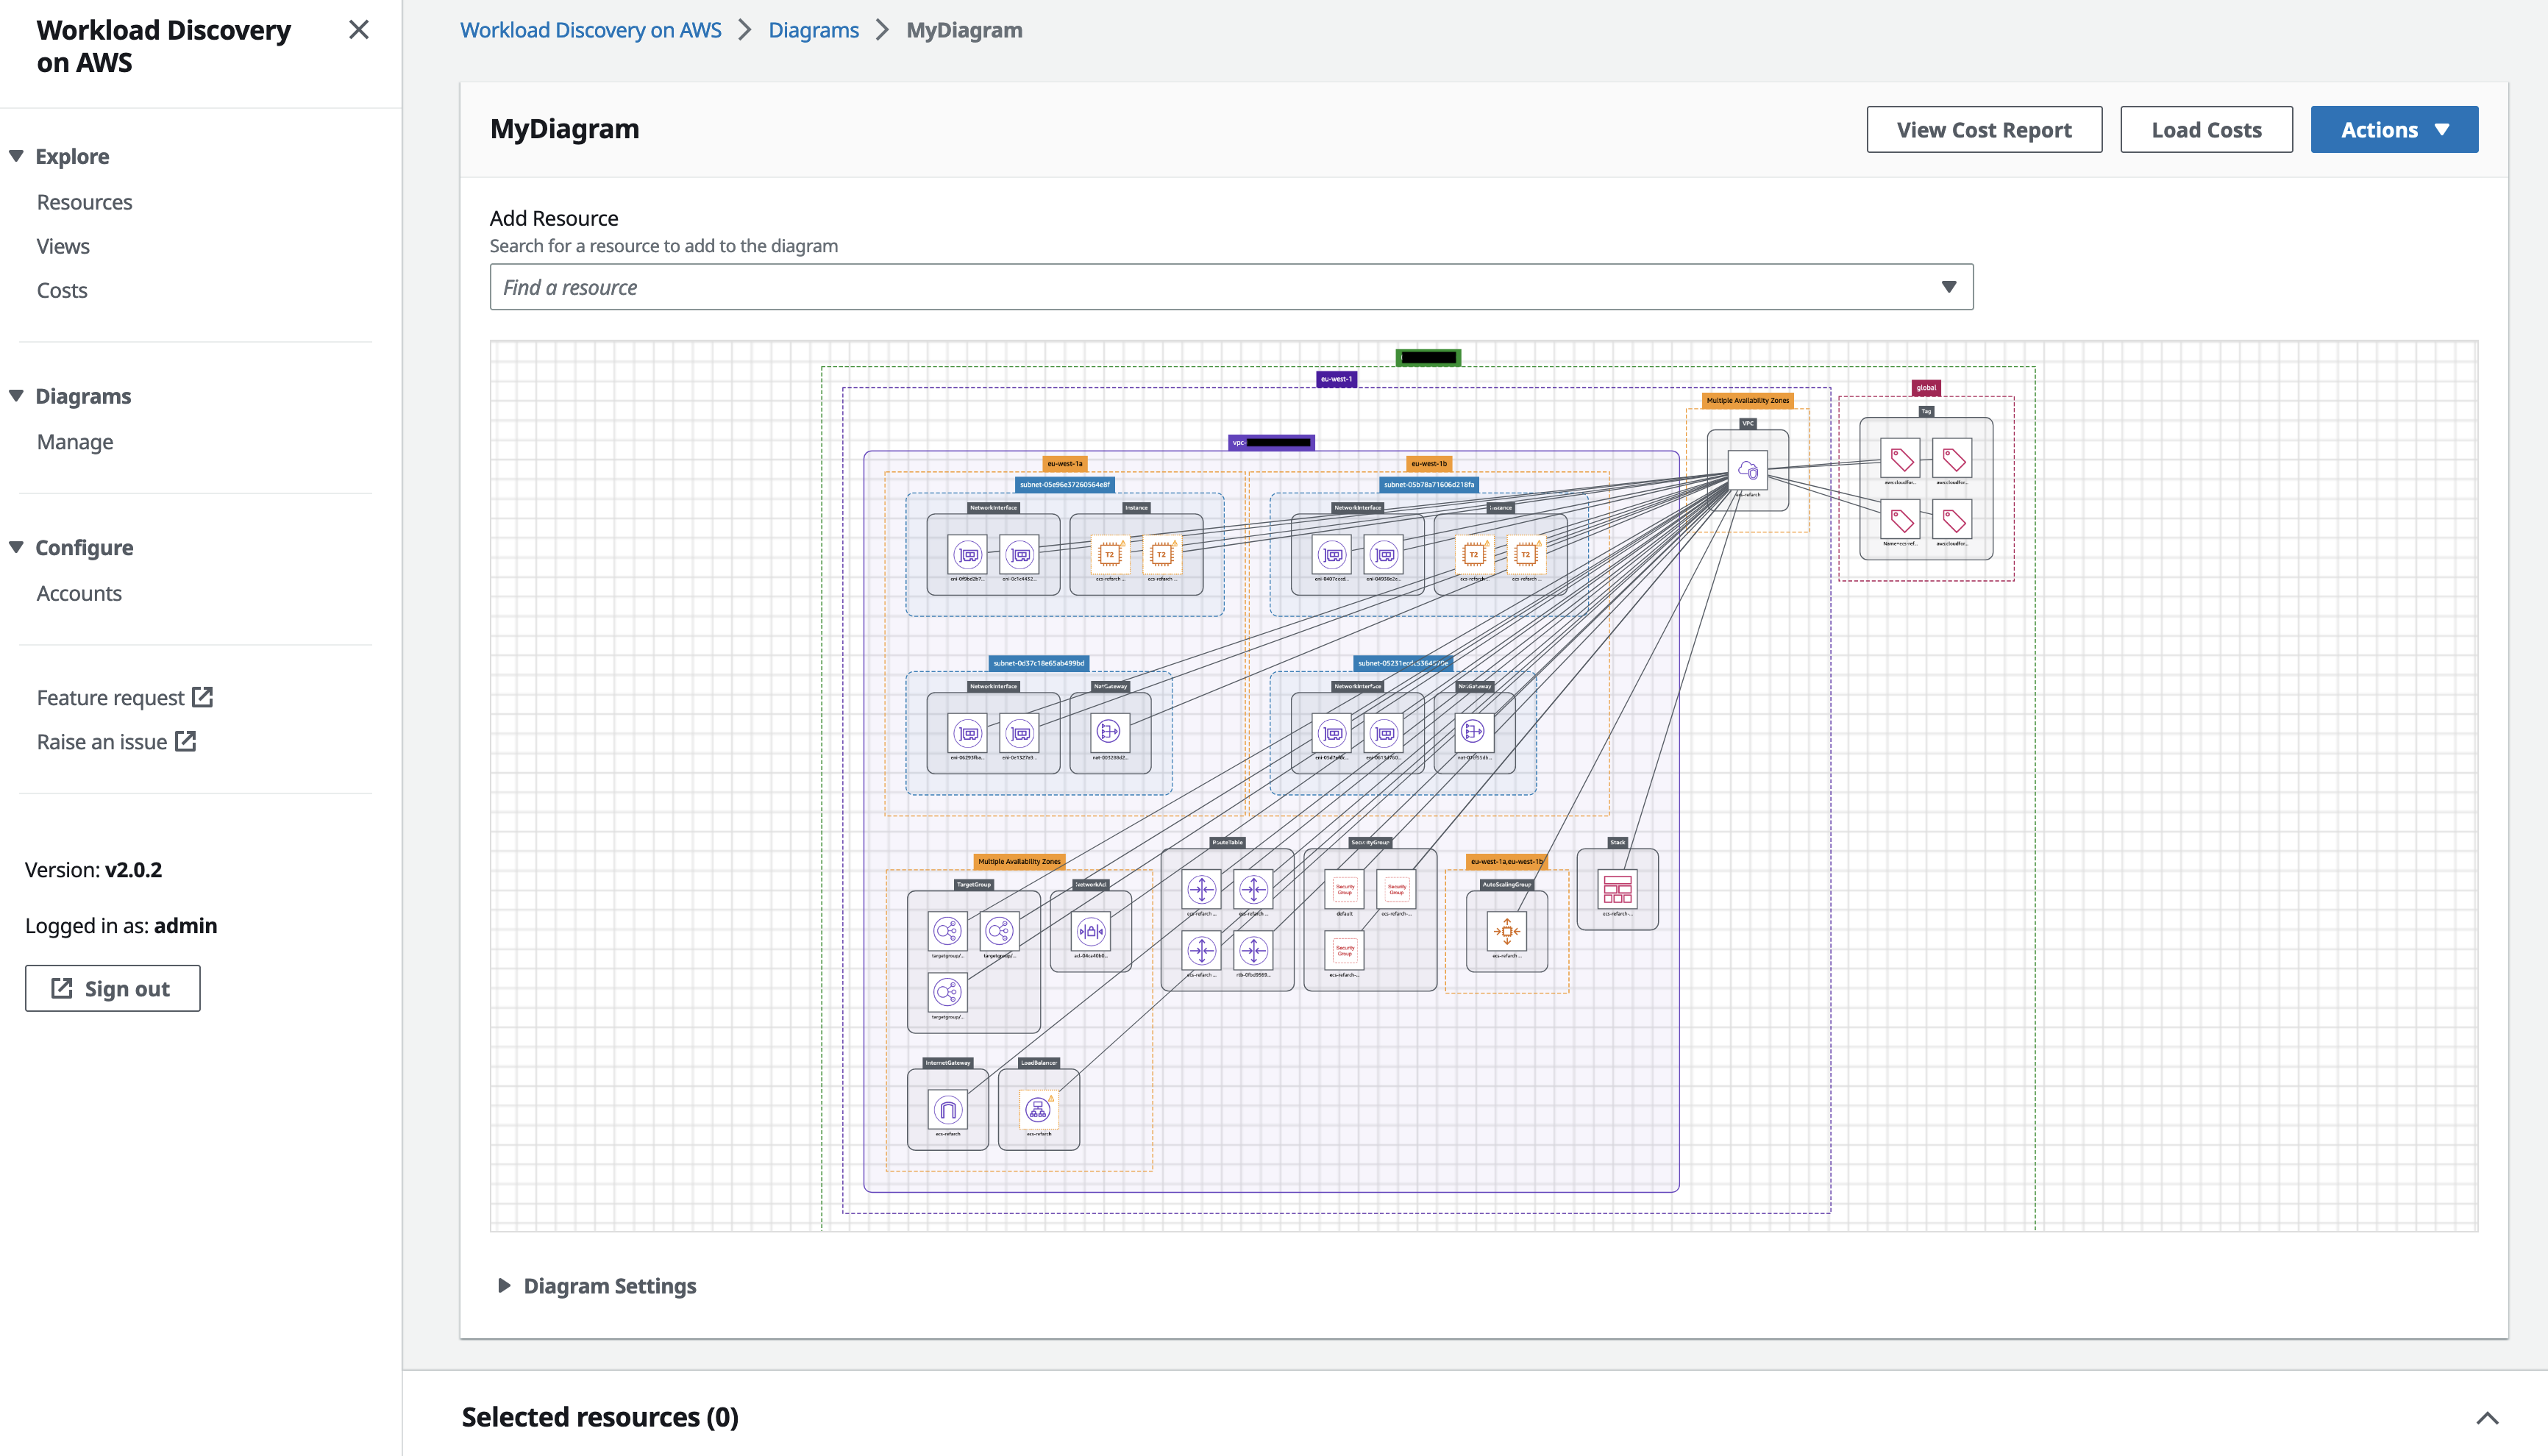
Figure 15. Screenshot of the Workload Discovery on AWS diagram canvas showing a VPC and its related resources.
The relationships between the resources are generally depicted via a line that connects those resources as shown in the following. This feature can be turned on or off by opening the Diagram Settings panel at the bottom of the canvas. The Diagram settings panel also allows you to filter resources by Account ID, Region or resource type. You can also choose to hide or only display resources based on these criteria using the Filter type radio buttons. In this example, only the edges will be hidden. Toggle the Hide Edges toggle switch and choose the Apply button.
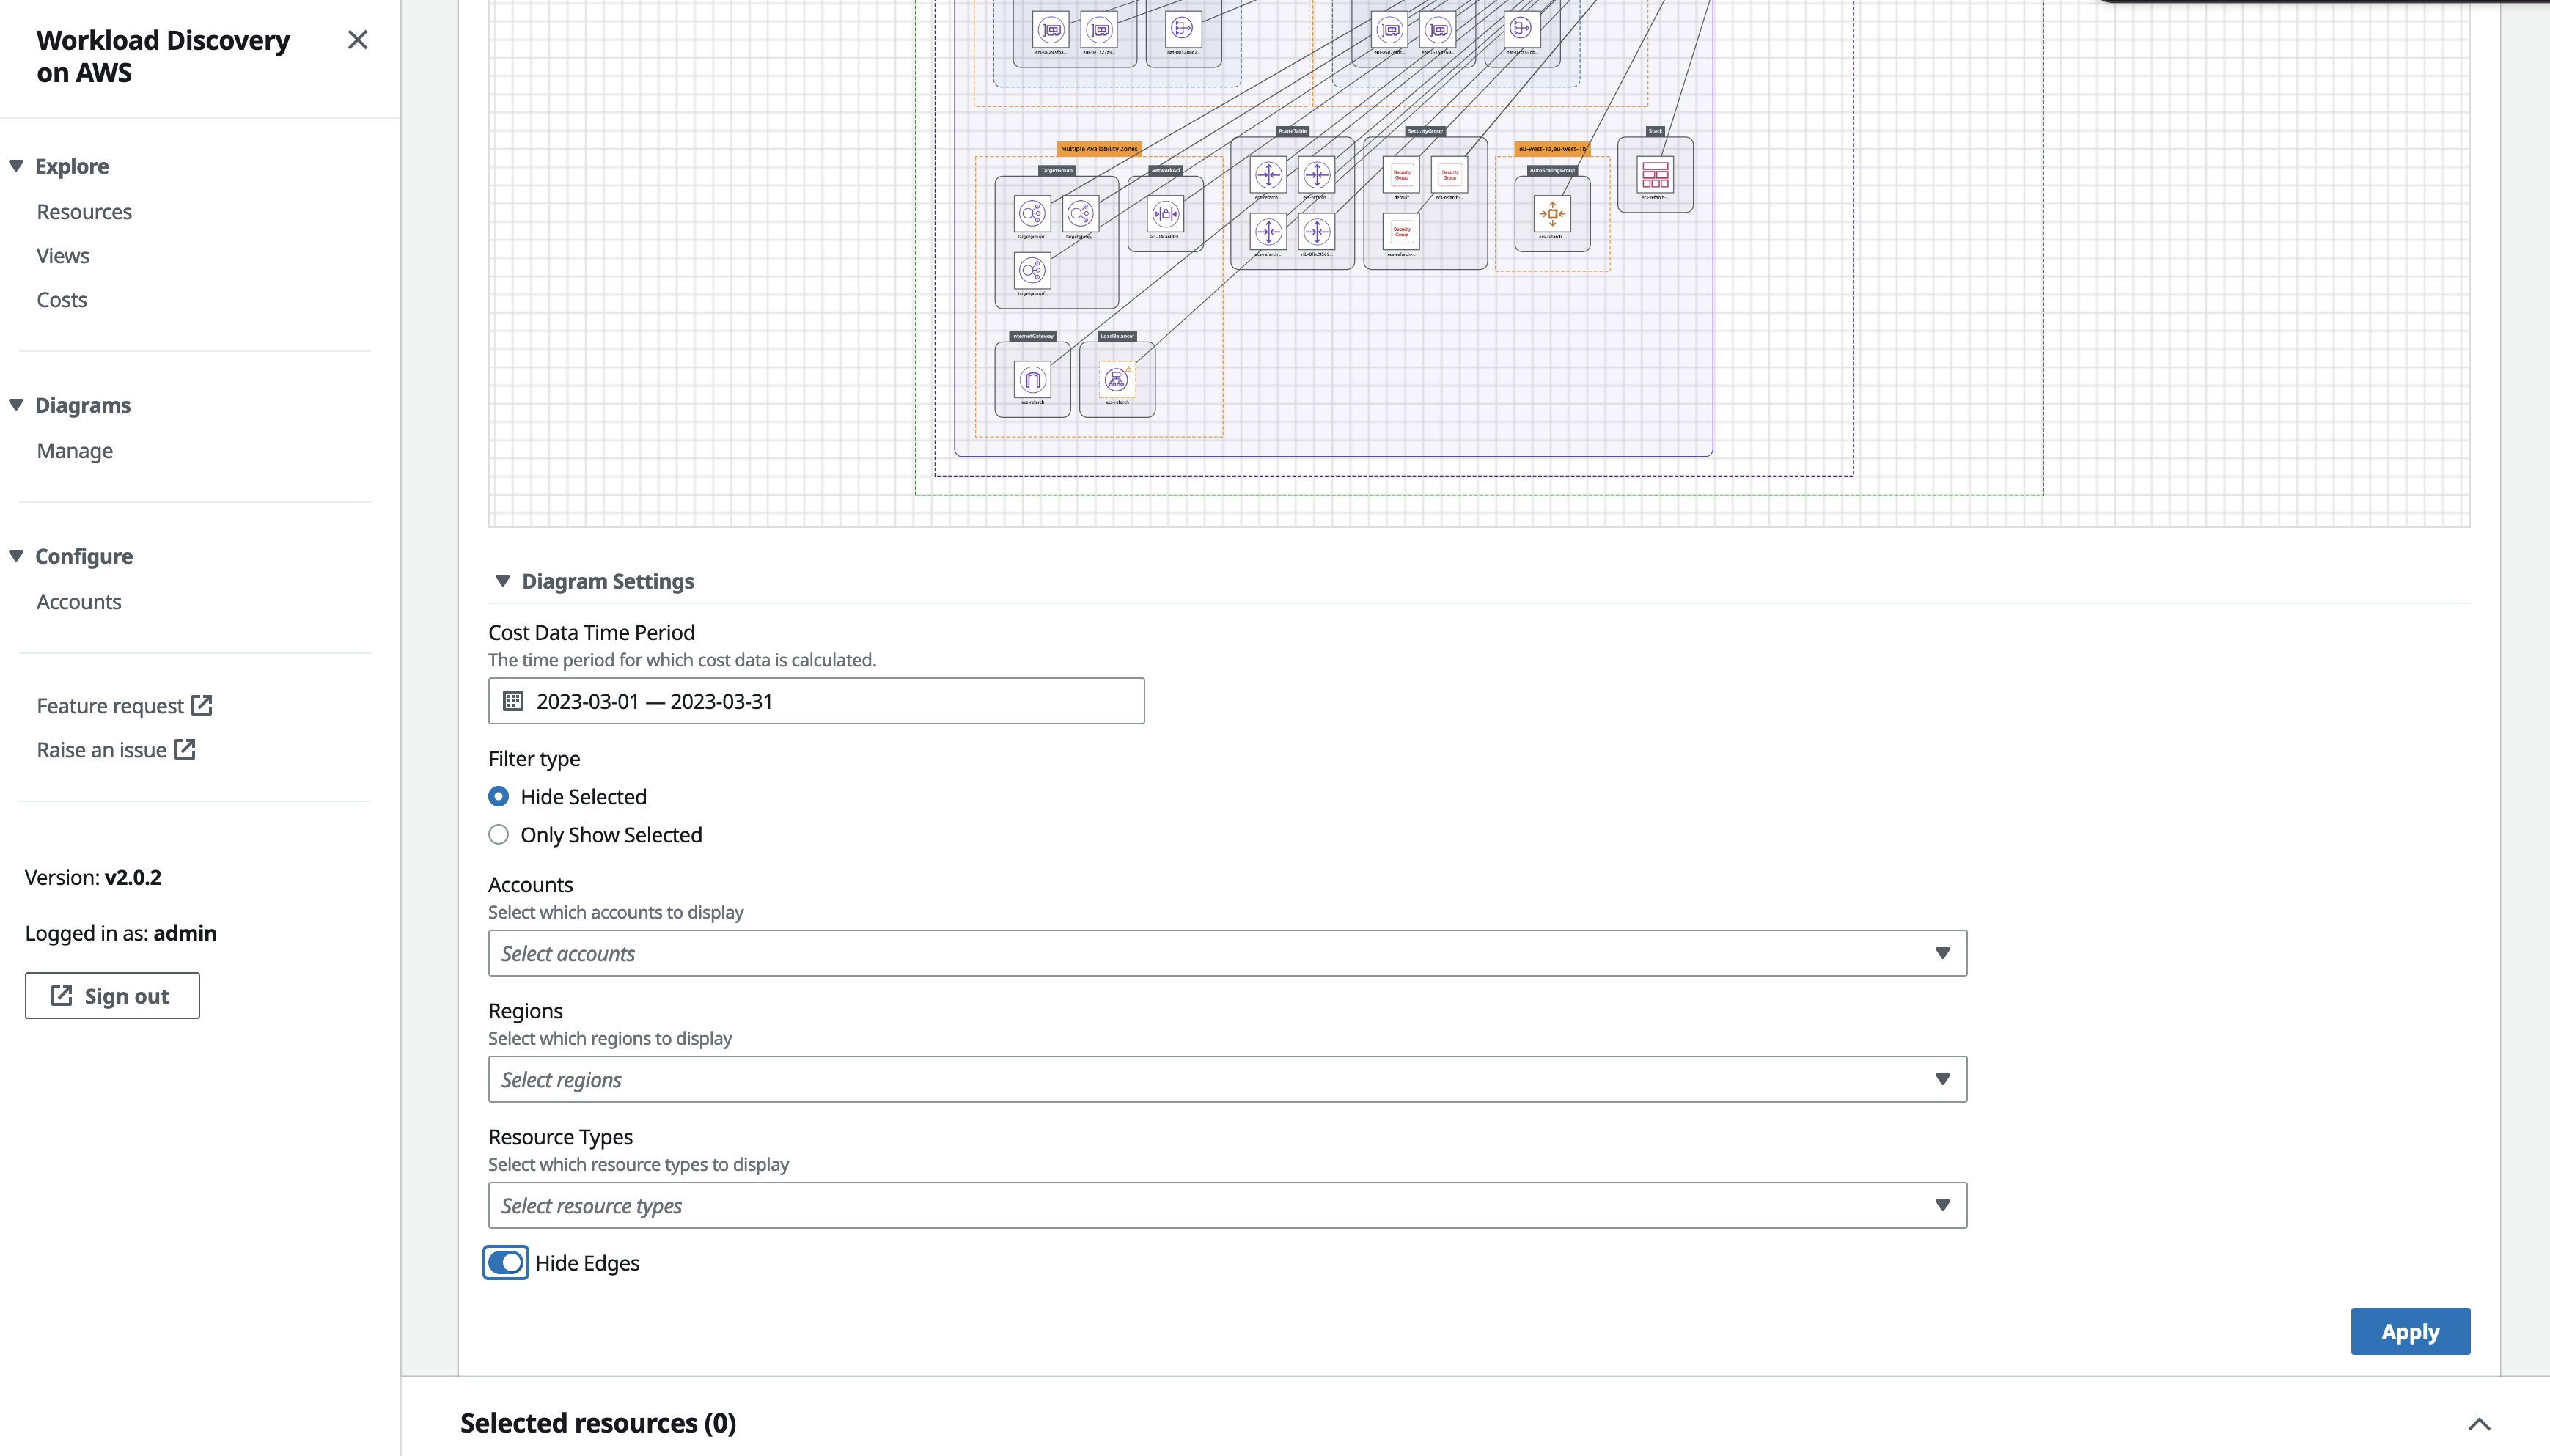
Figure 16. Screenshot of the Workload Discovery on AWS Diagram Settings panel with the Hide Edges toggle button set to enabled.
Choose the Apply button in the confirmatory modal dialog.
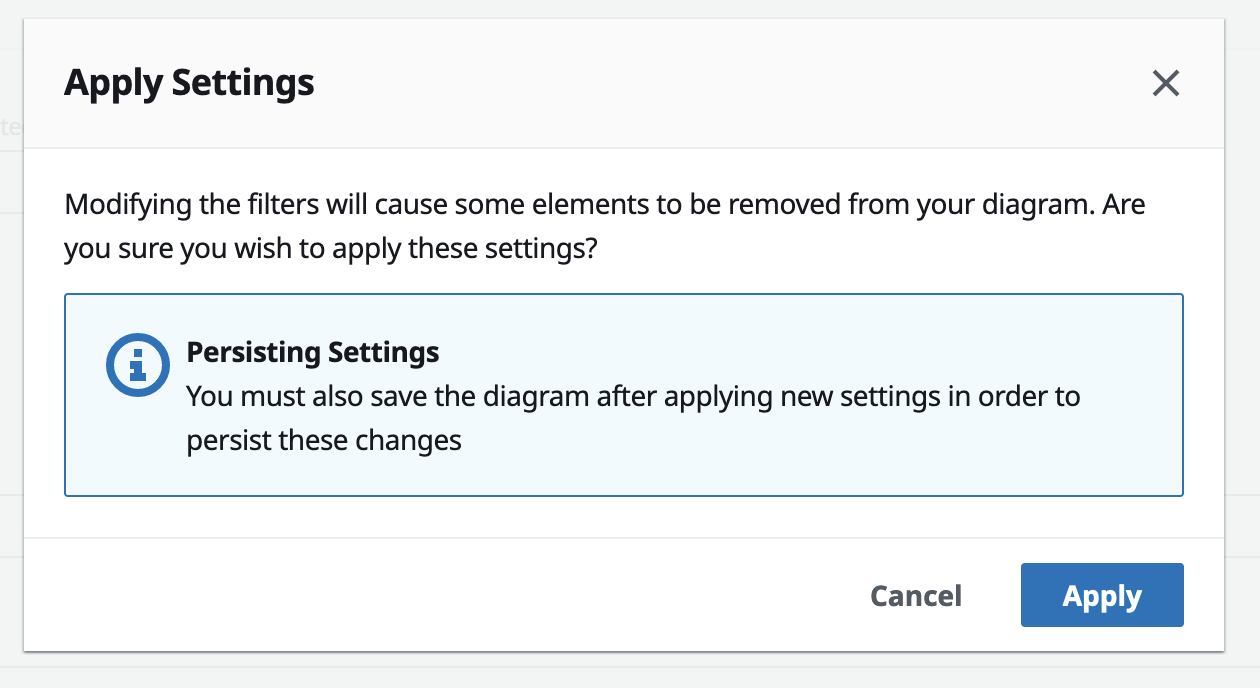
Figure 17. Screenshot of the Workload Discovery on AWS Diagram Settings modal dialog.
The edges will then be hidden in the diagram. Ensure that you save the diagram by selecting the Save option from the Actions menu.
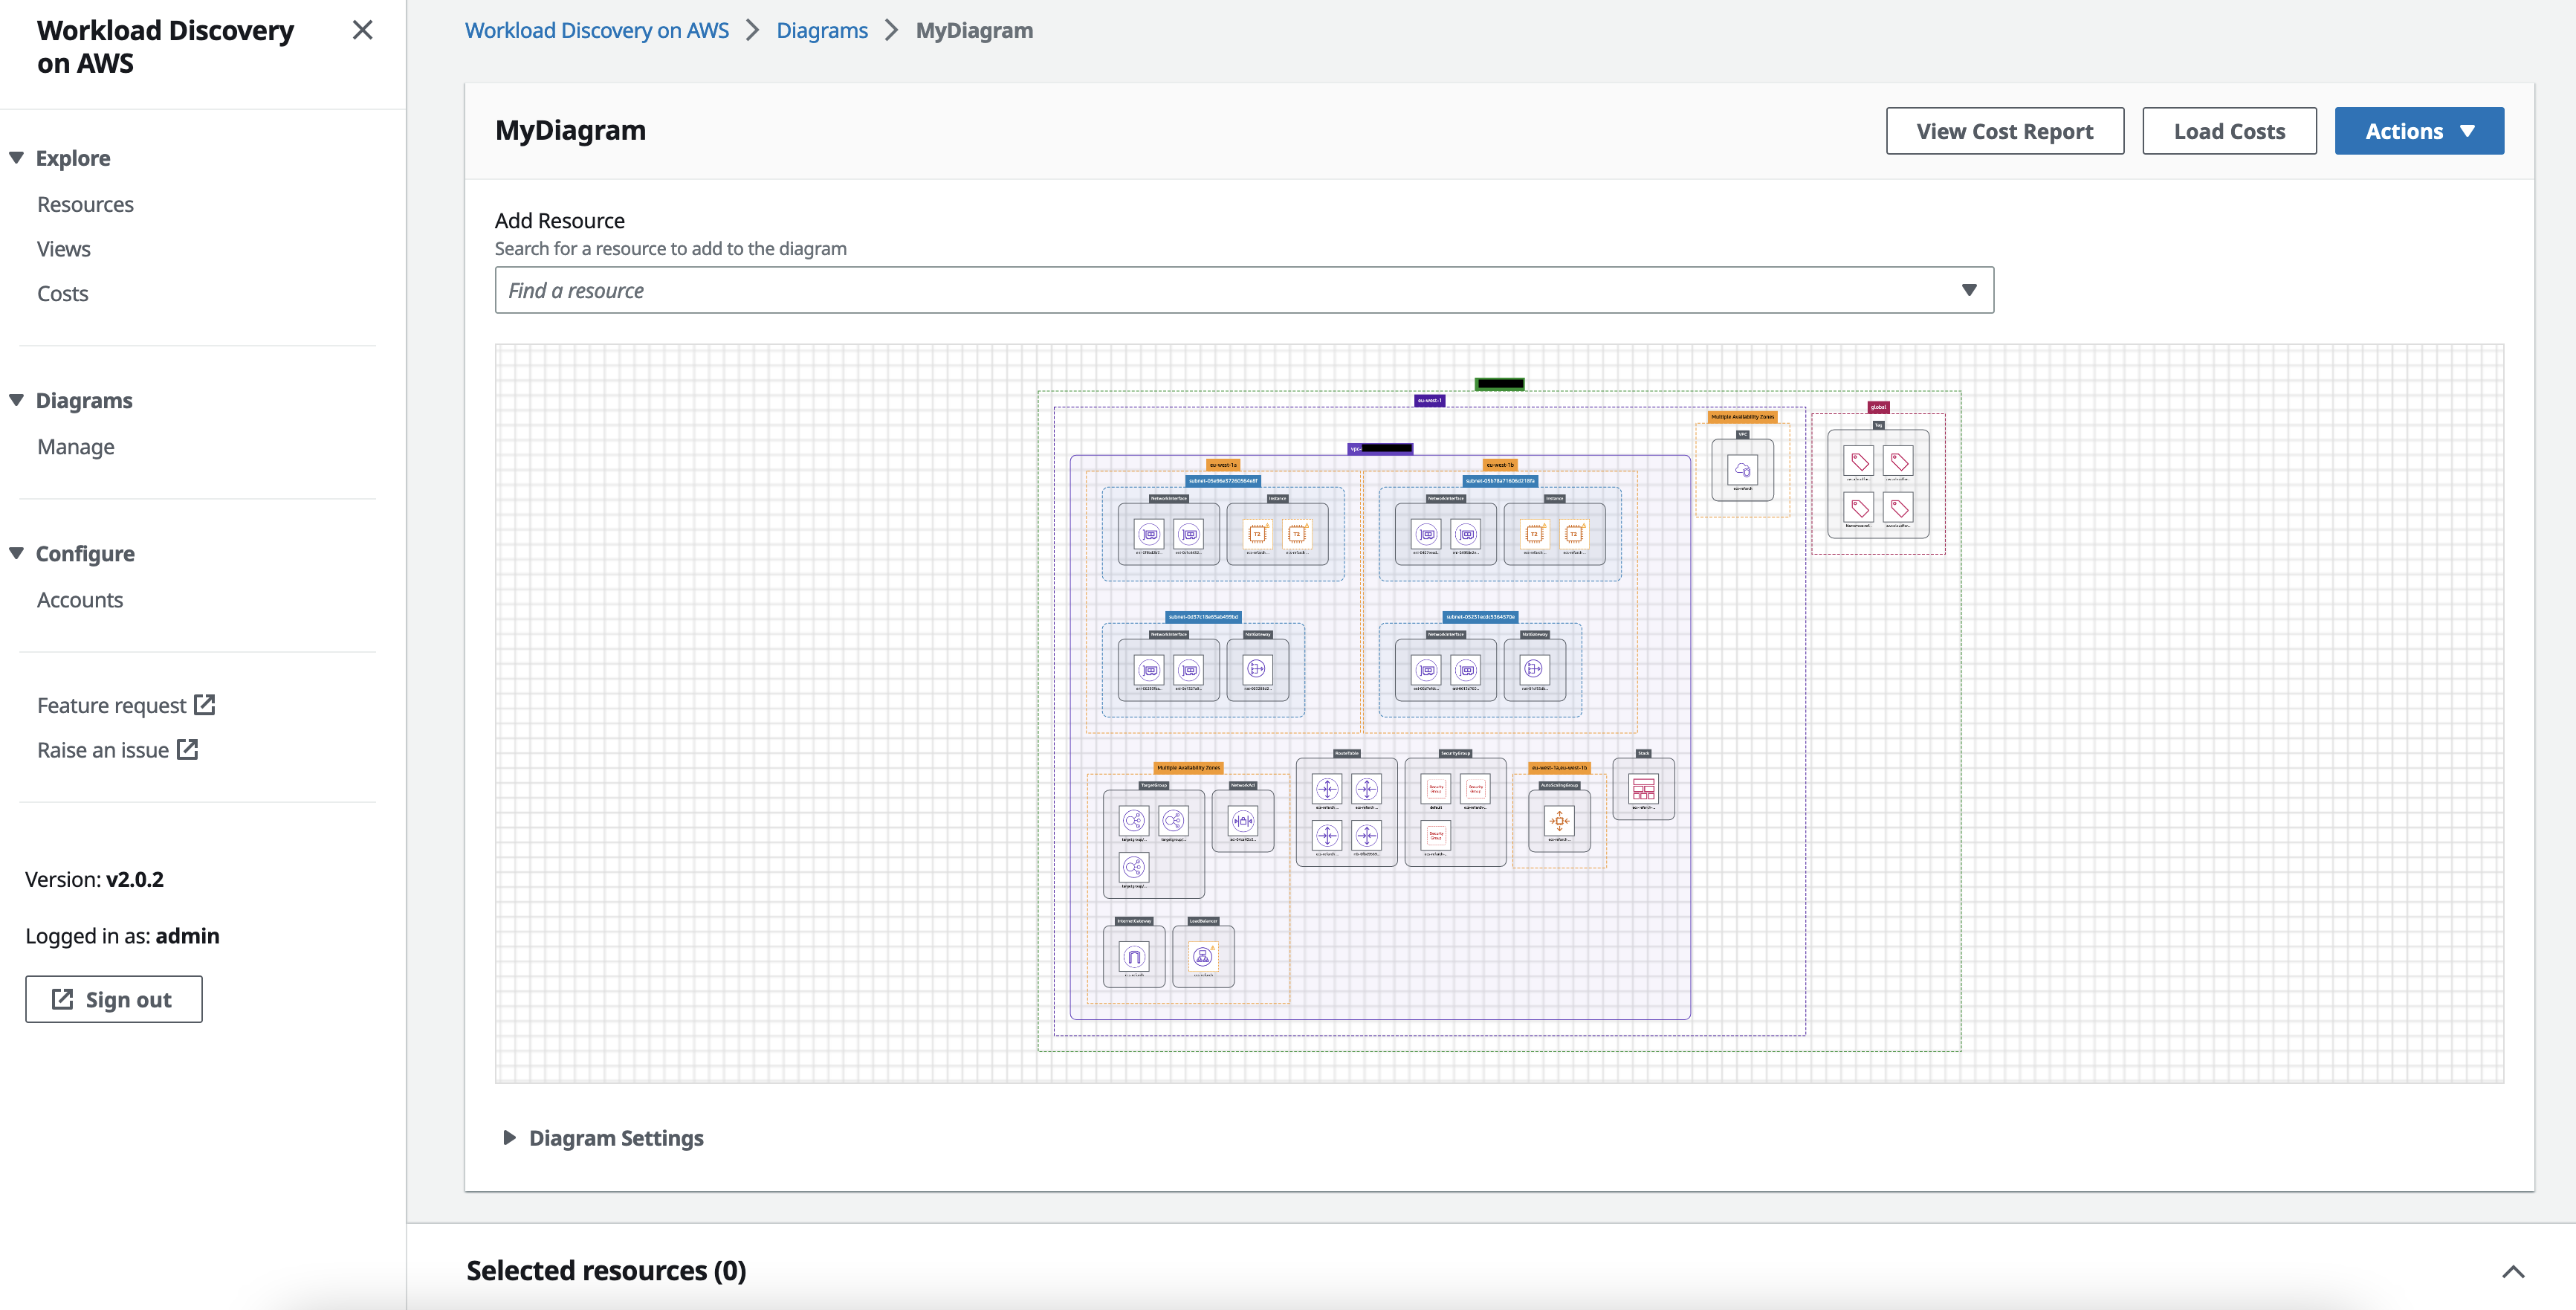
Figure 18. Screenshot of the Workload Discovery on AWS diagram canvas showing a VPC and its related resources with no lines to depict the relationship between the resources.
For the remainder of this post, the screenshots have been captured with edges hidden.
Next, let’s see how the Action dropdown menu options can be used to get a better understanding of the selected AWS resource and its dependencies. Select one of the EC2 instances on the diagram and choose Action, Resources. This menu has the options: Focus, Expand, and Remove.
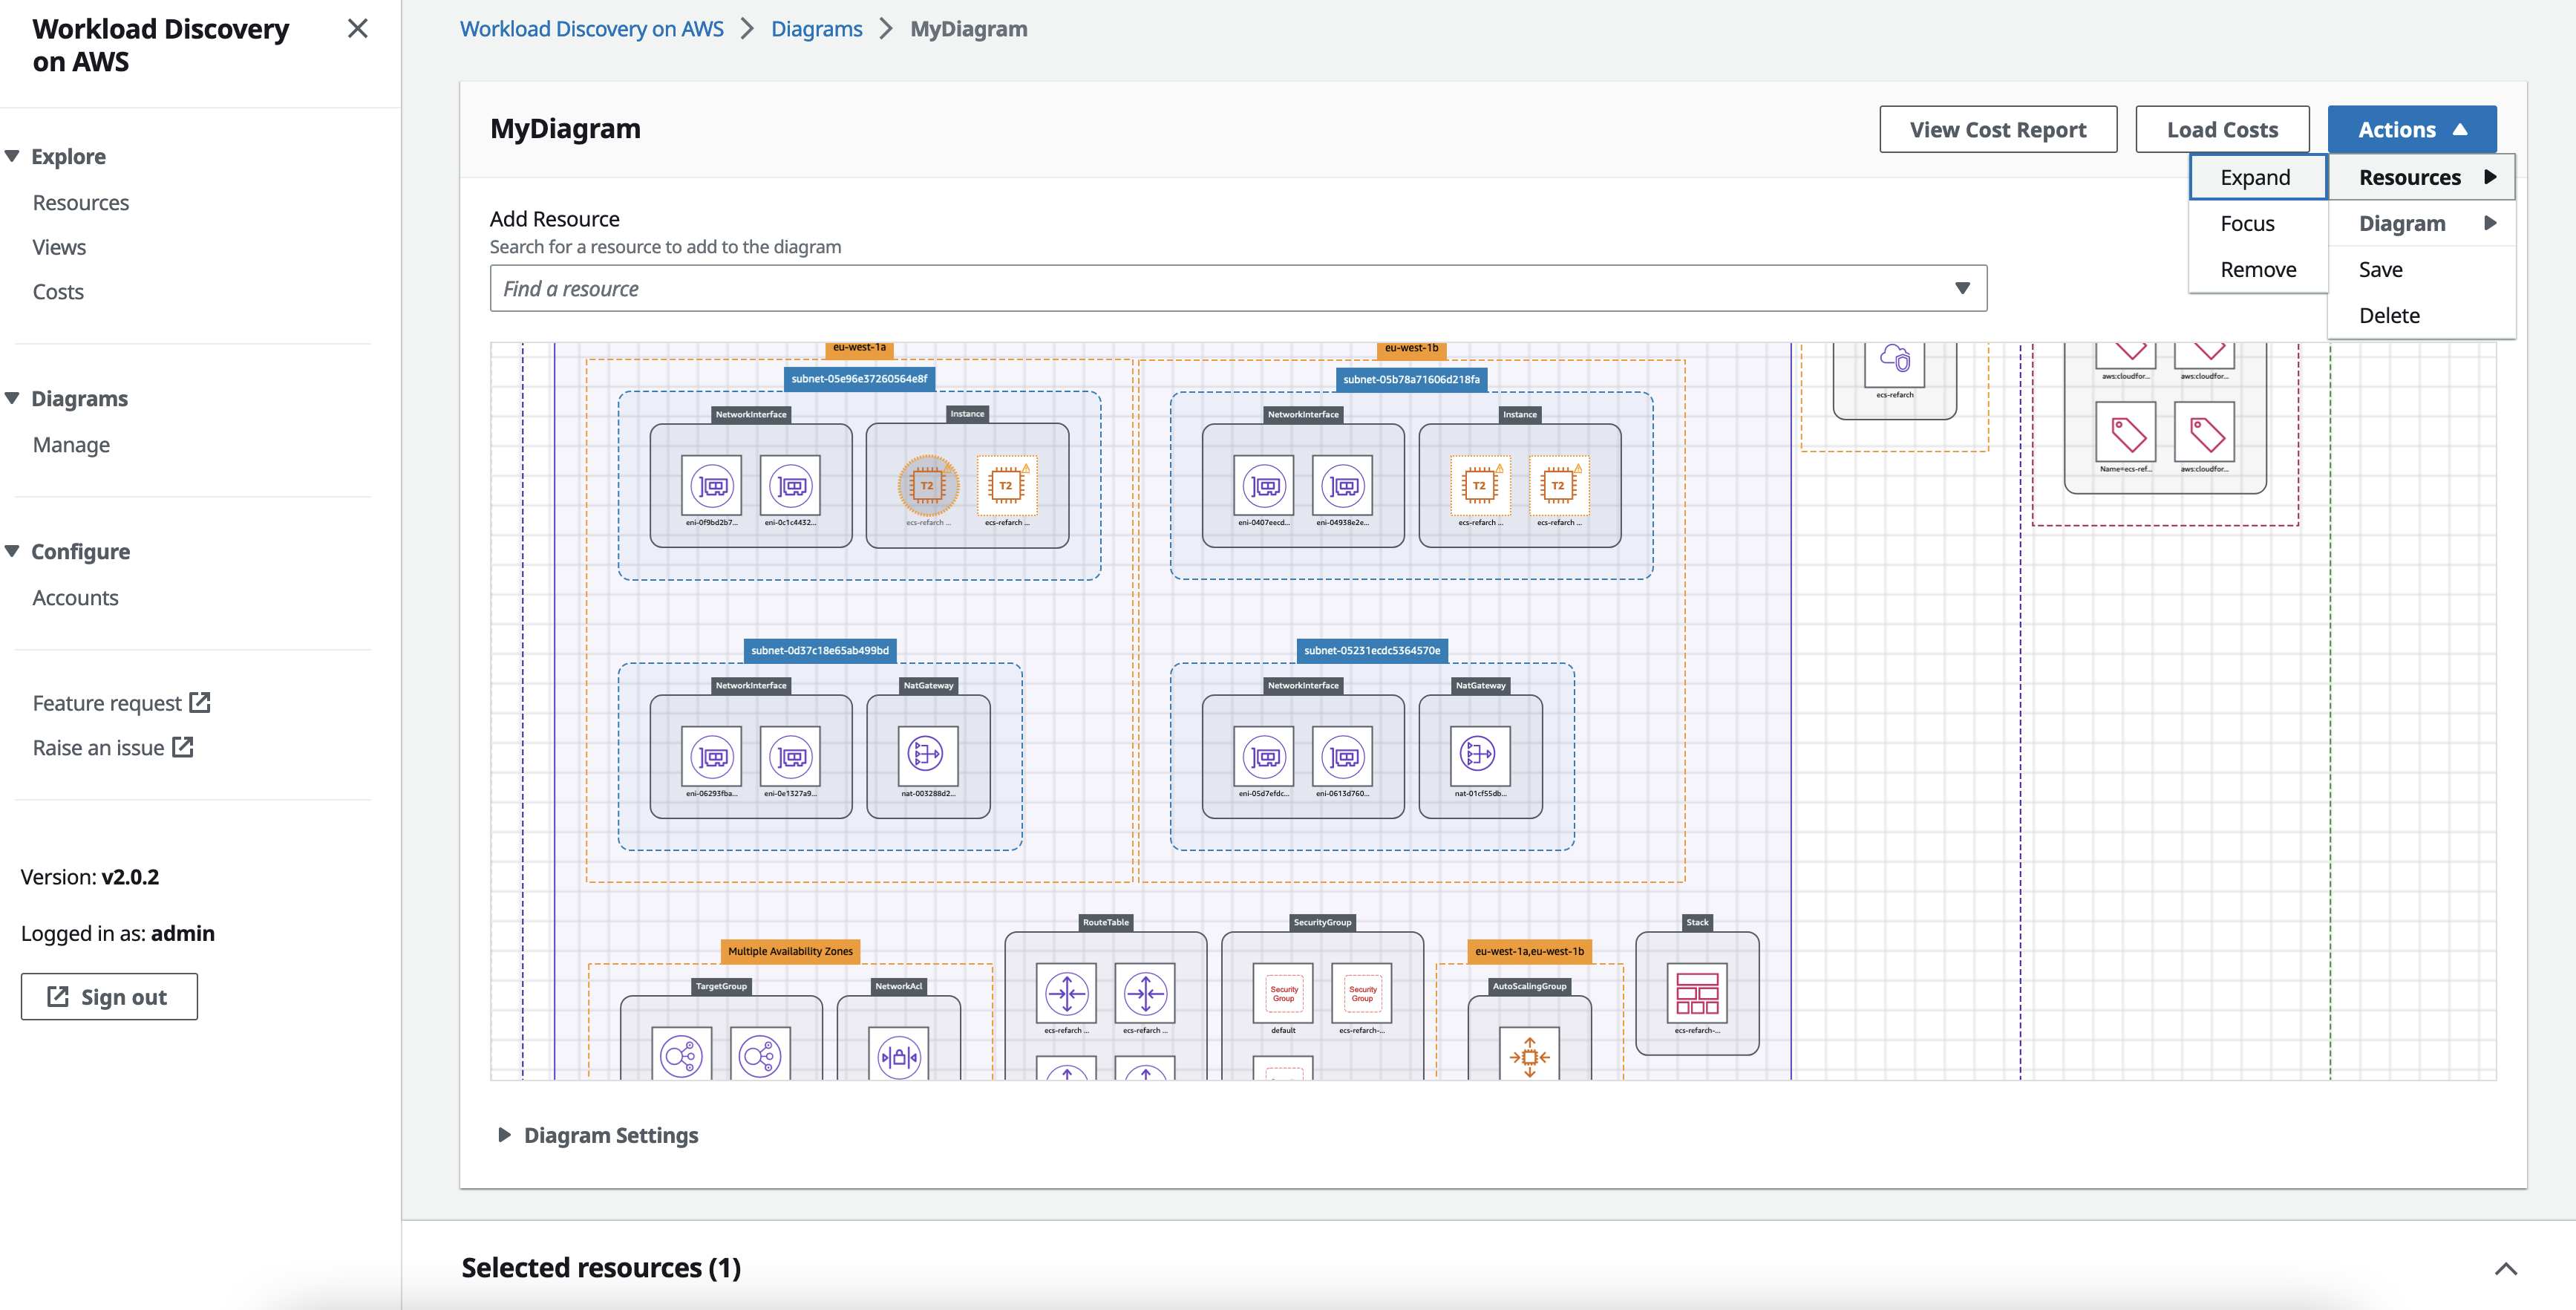
Figure 19. Screenshot of the Workload Discovery on AWS diagram canvas showing the Action, Resources menu.
Focus on the resource lets you visualize a specific resource and its immediate dependencies. When the option Focus is chosen from Action, Diagram, the architecture diagram of the selected resource will be redrawn to show the resource along with its immediate dependencies. As shown in the following figure, the selected EC2 resource will be redrawn to show the immediate dependencies, including Elastic Network Interfaces, Security Groups, EBS Volumes, Autoscaling Groups, ECS Clusters, etc.
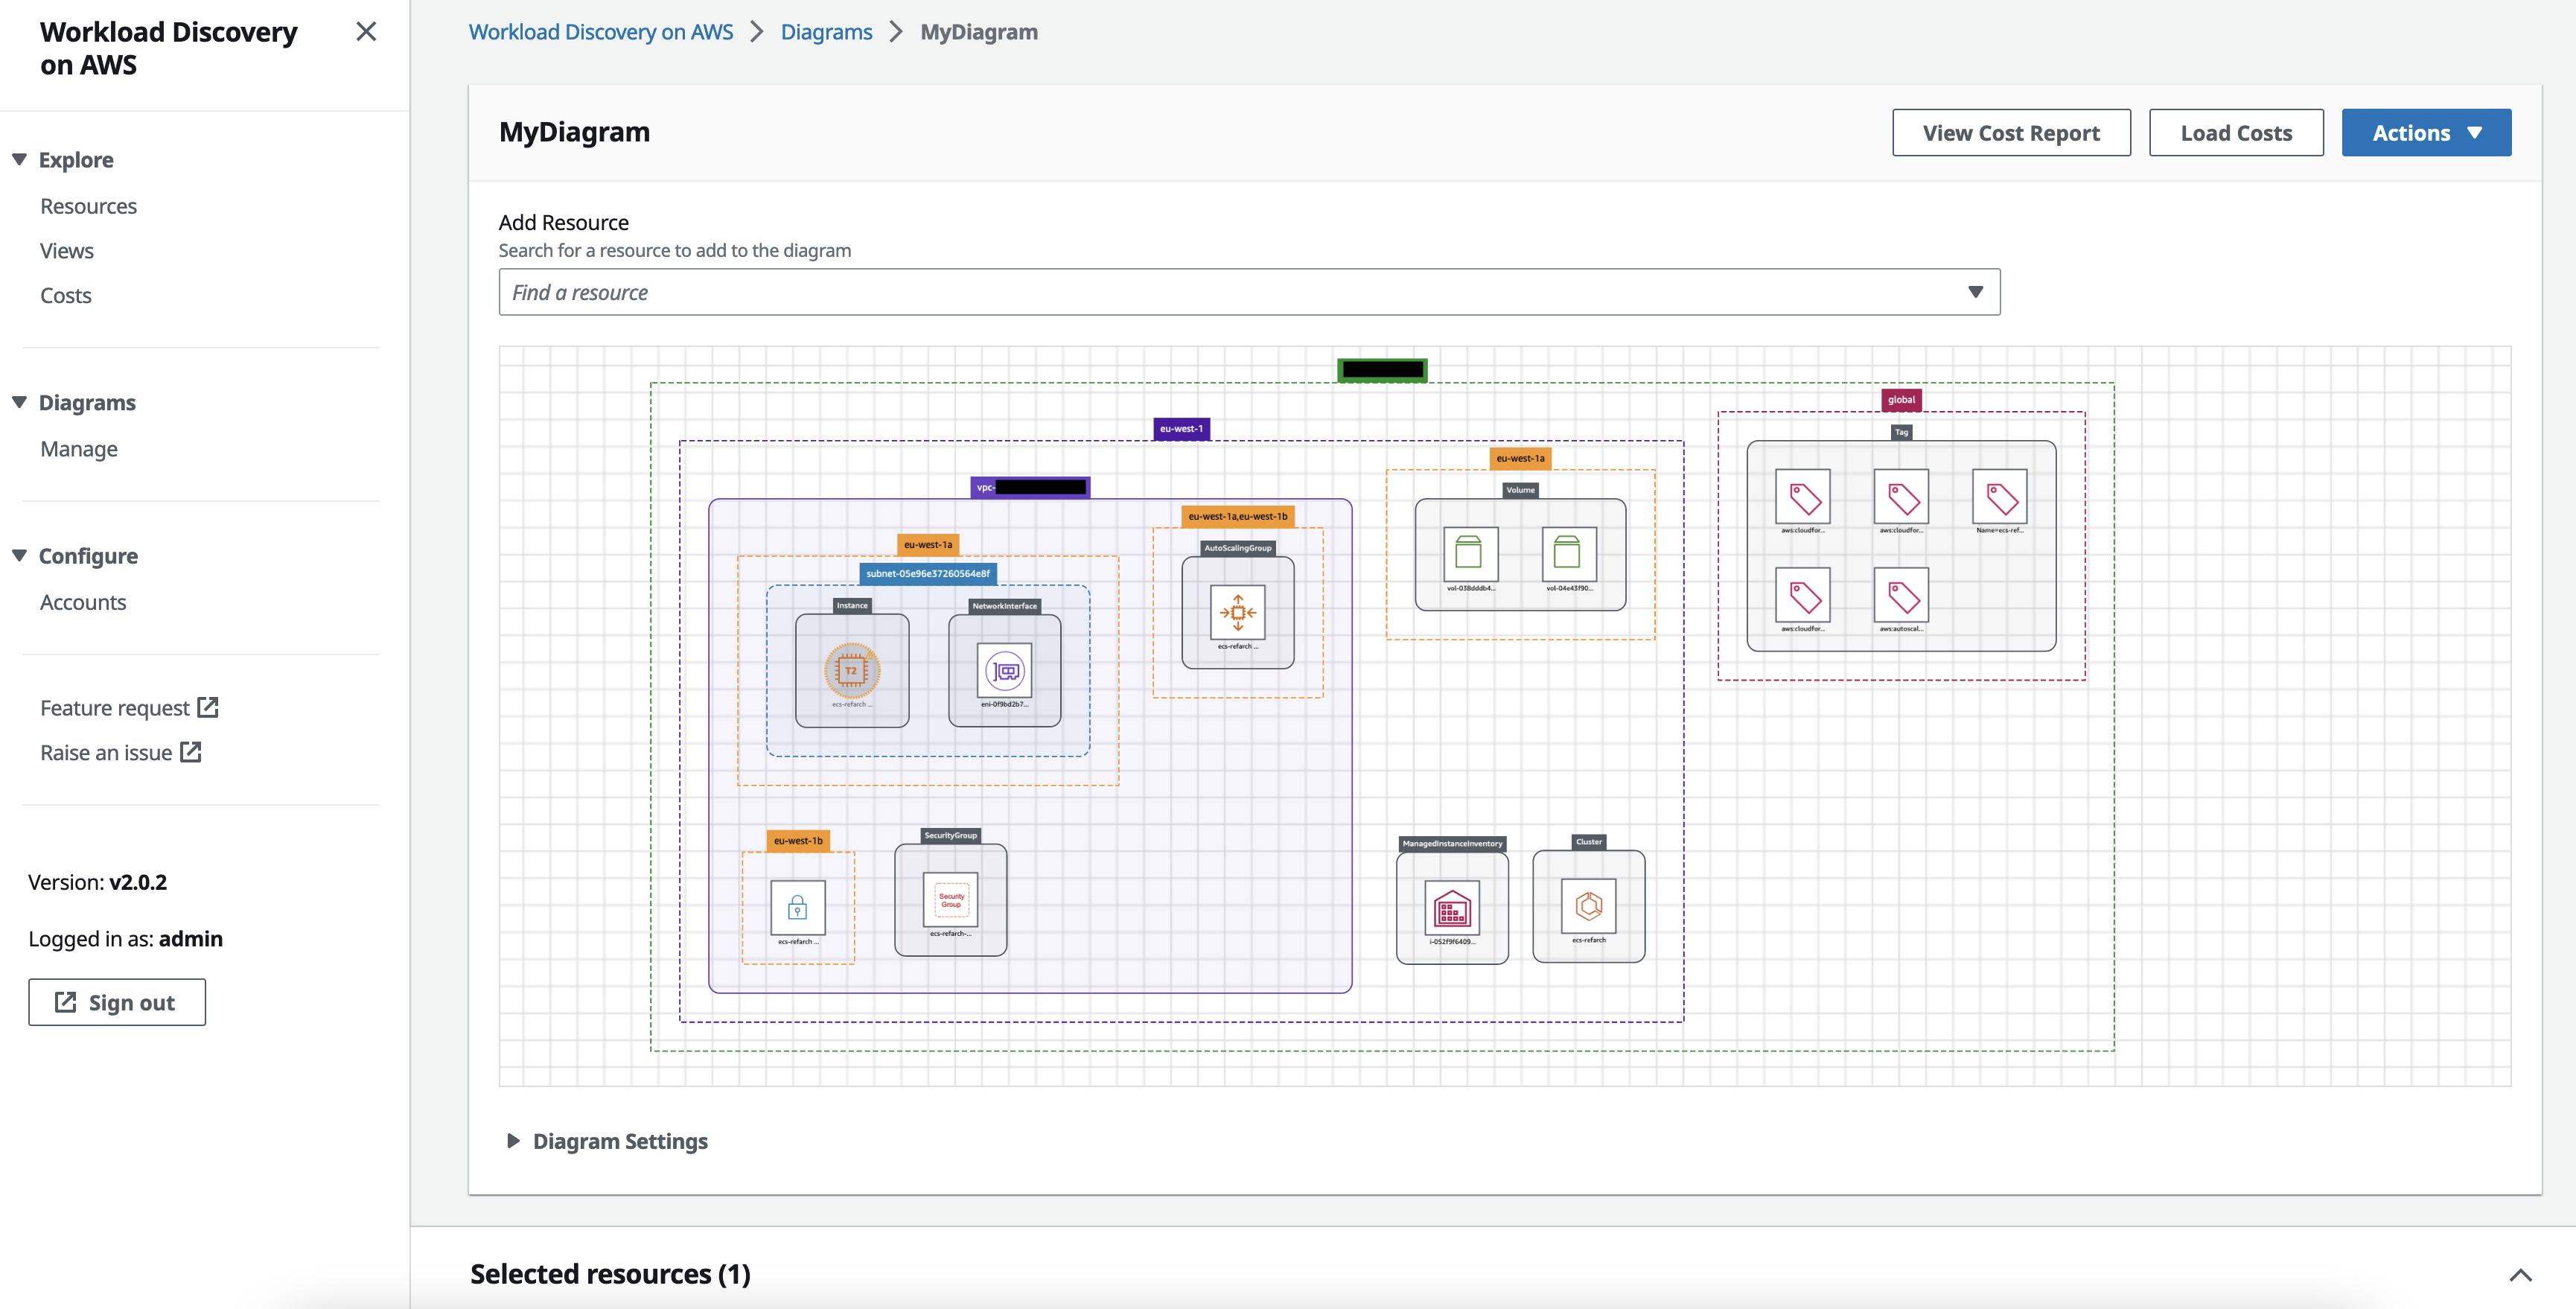
Figure 20. Screenshot of the Workload Discovery on AWS diagram canvas showing that when you Focus, the diagram is rebuilt with only the directly related resources of the selected resource displayed.
Expand the resource lets you visualize the dependencies of a selected AWS resource. Select the ECS Cluster resource icon and choose Action, Diagram, Expand. Alternatively, double click on the ECS Cluster icon. The architecture diagram is redrawn to show dependent resources. In this example, Expand adds new resourcees to the existing diagram such as ECS Services, ECS Tasks, Application Load Balancer Target Groups and others. Optionally, you can rearrange the resources and groups by selecting and dragging them.
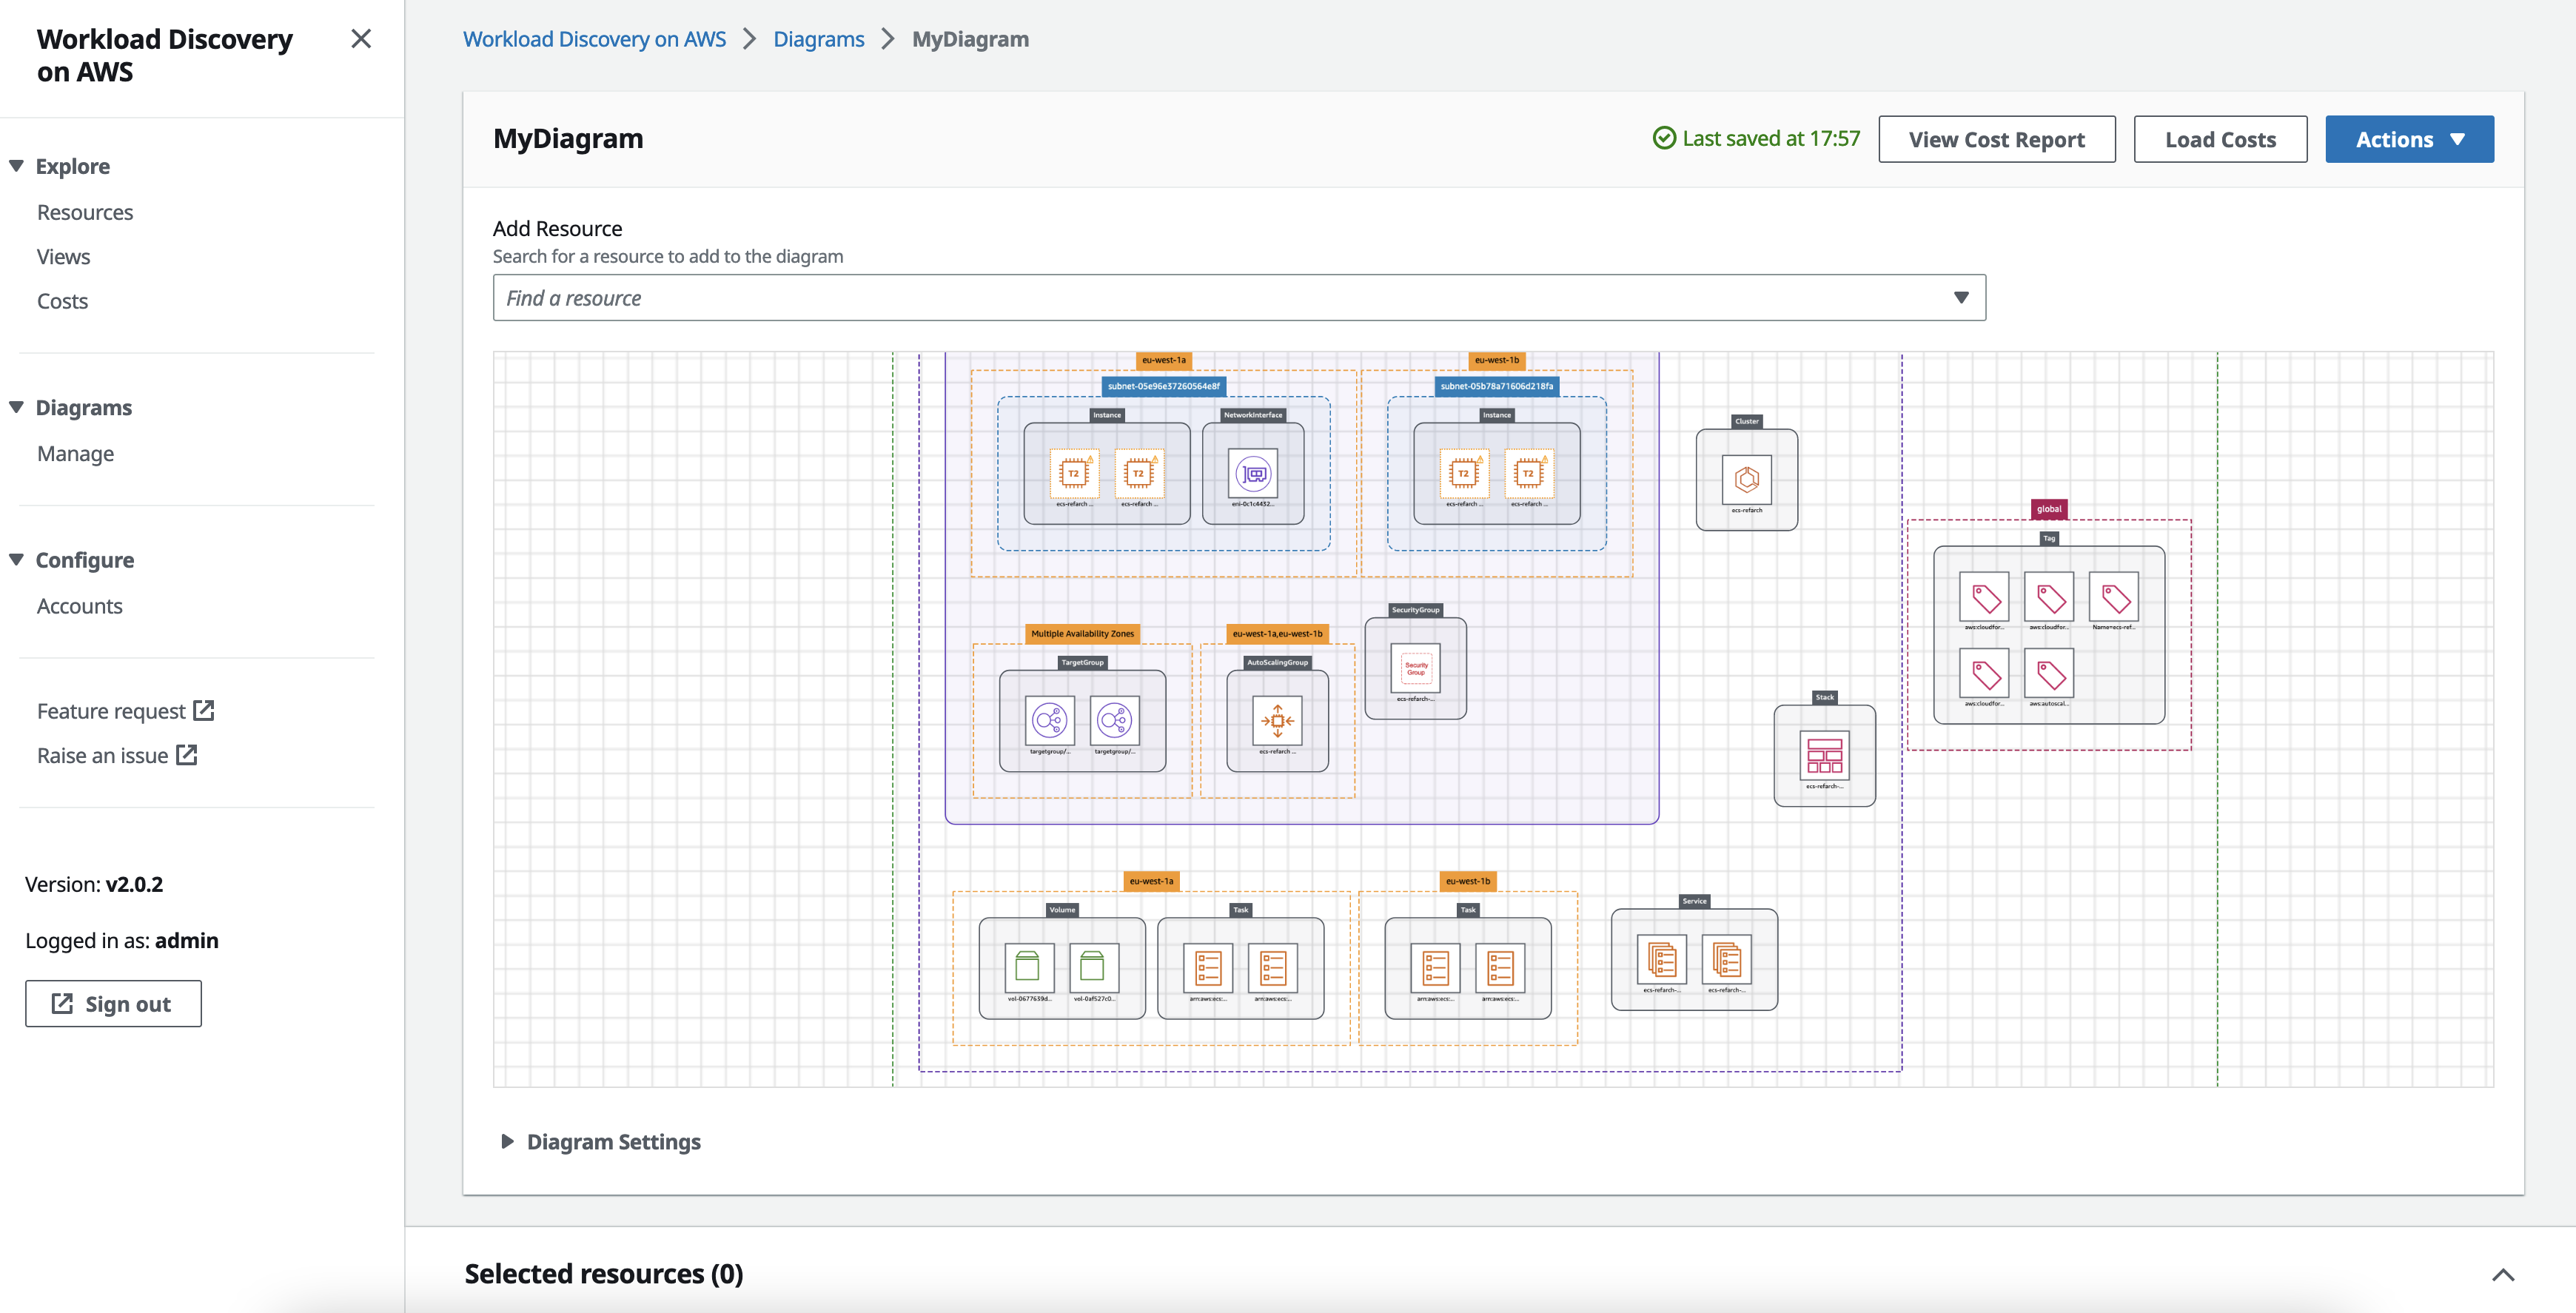
Figure 21. Screenshot of the Workload Discovery on AWS diagram canvas showing that when you Expand a resource, its directly related resources are added to the diagram.
When you select multiple resources, you must use the Expand option rather than double clicking.
To view the details of a resource, select the required resource (you can also select multiple resources) and expand the Selected Resources panel. Select the radio box for the selected resource to display the resources details, including the Account ID, Region, Availability Zone (AZ), Status, ARN, and Tags. Optionally, you can select the ARN link to go directly to the resource on the Console.
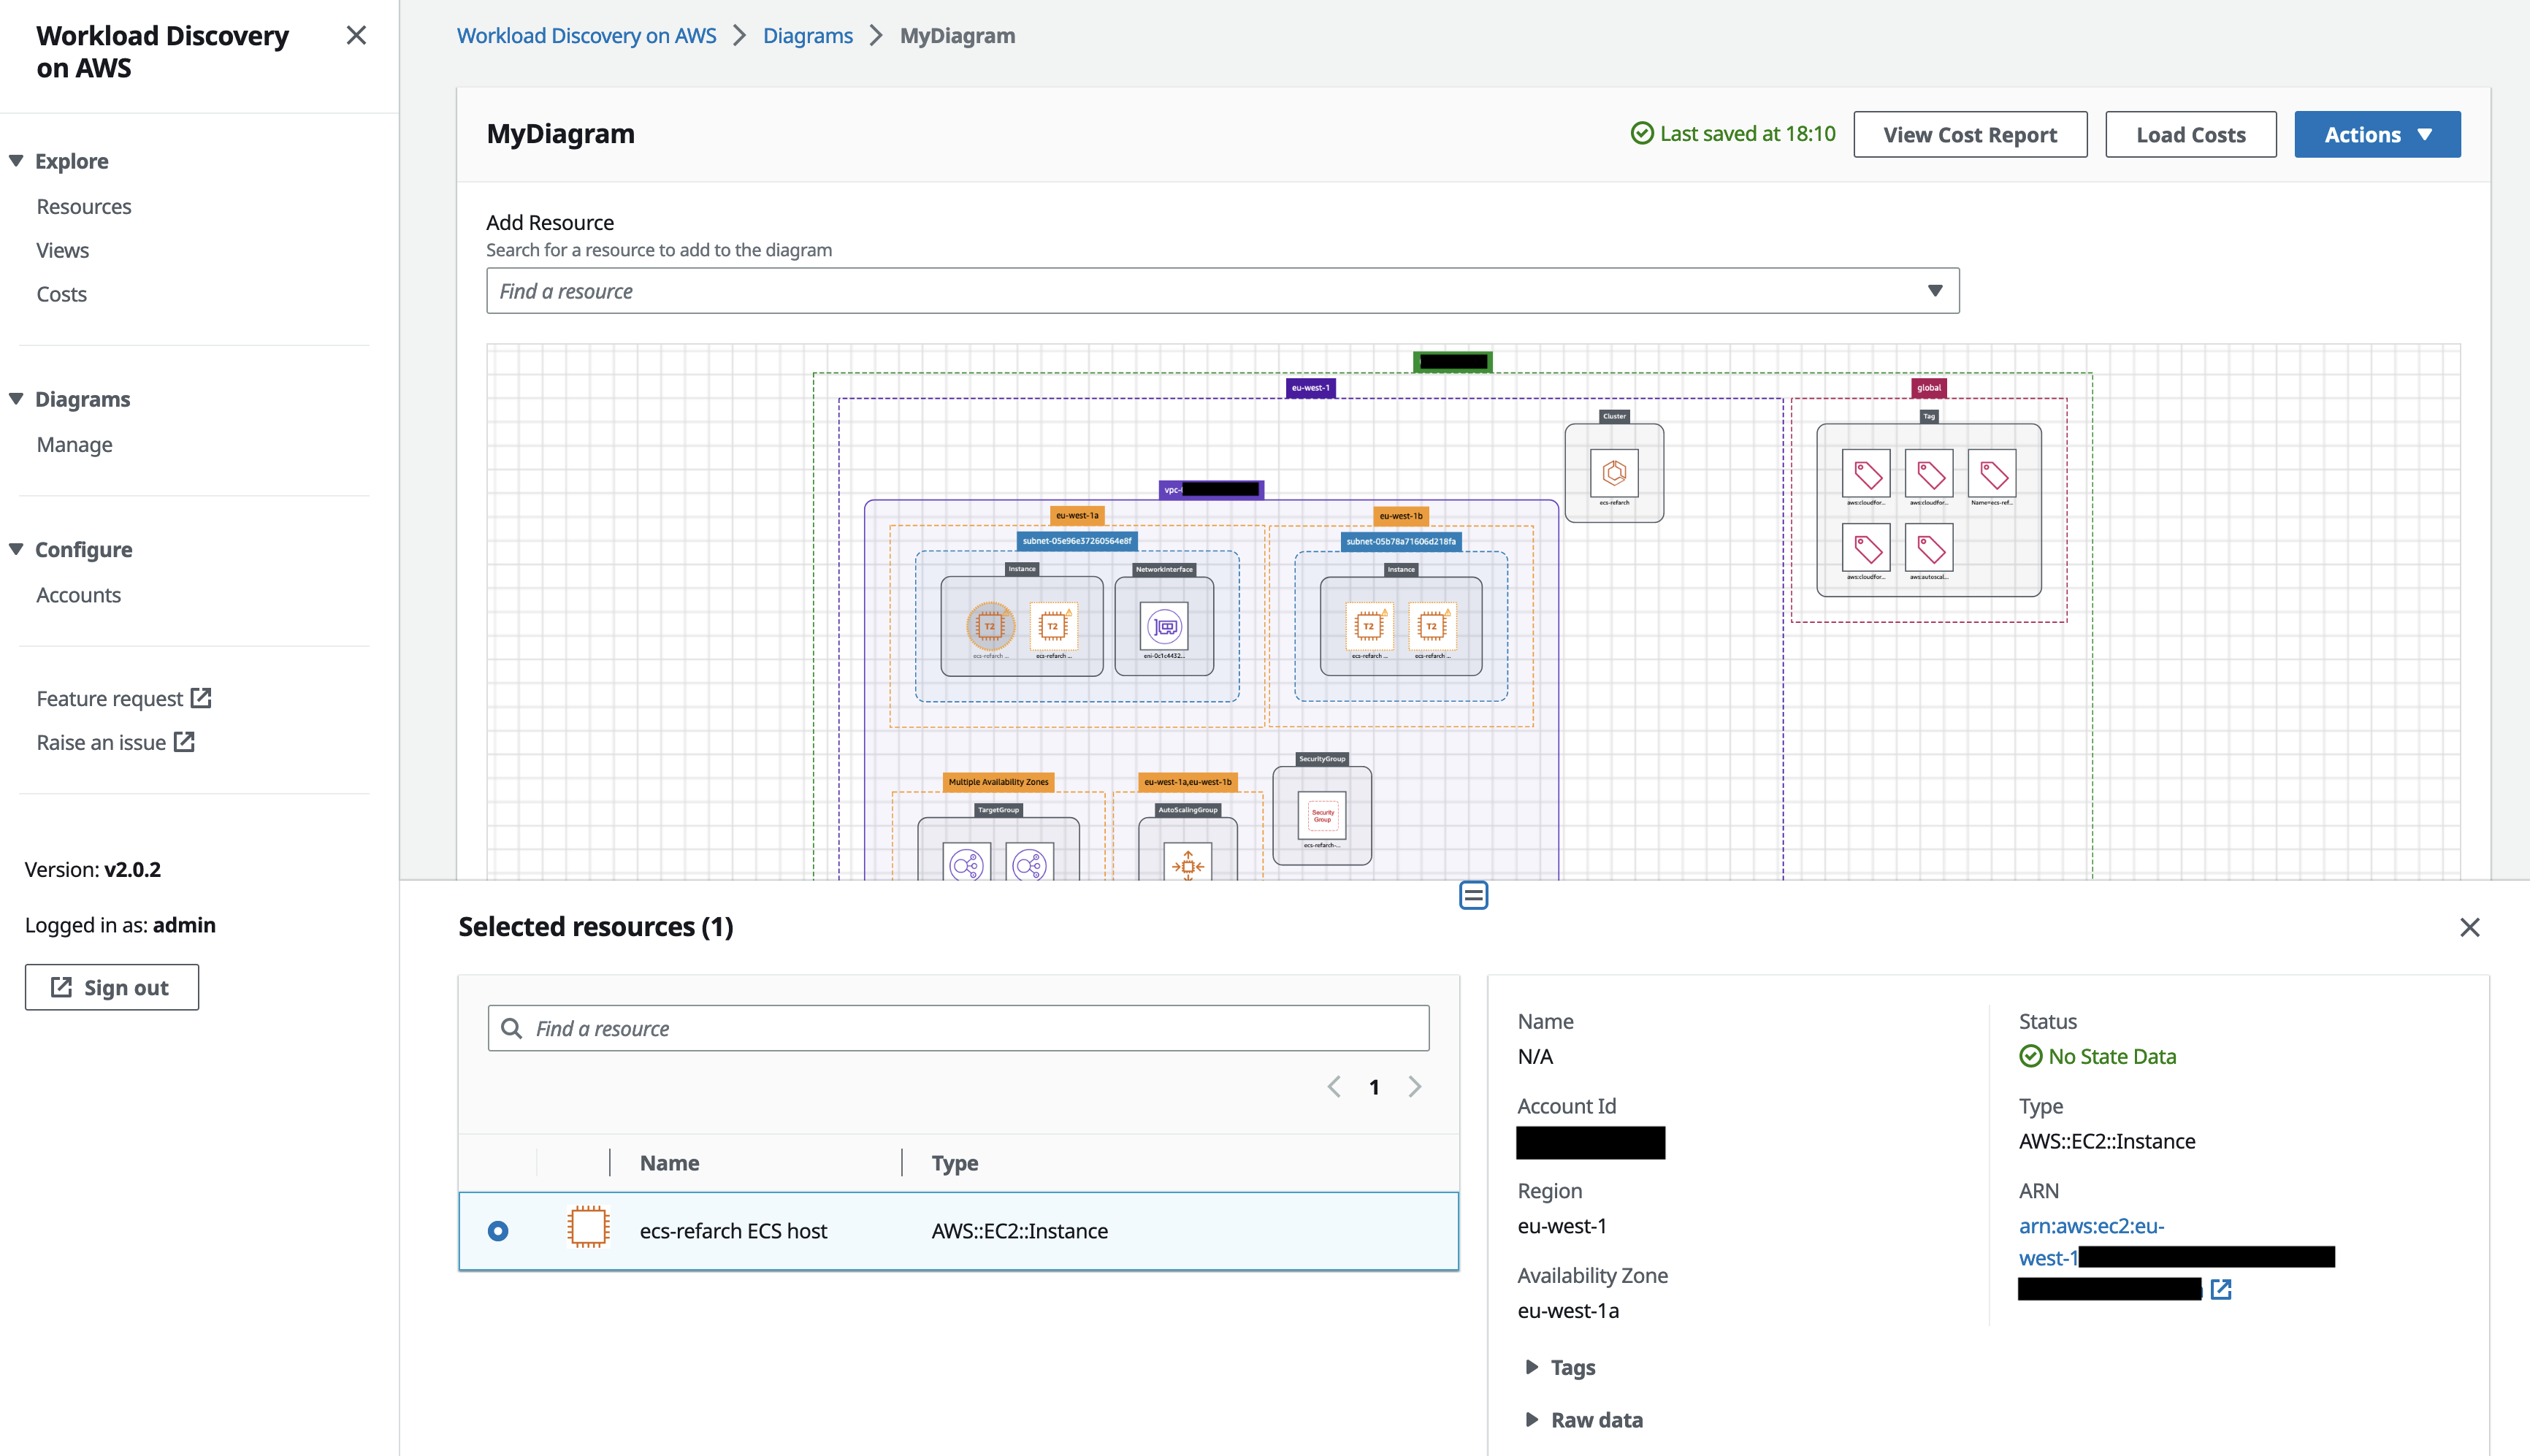
Figure 22. Screenshot of the Workload Discovery on AWS Selected Resources panel showing the details of the selected resource, including the Account ID, Region, Availability Zone (AZ), Status, ARN, and Tags.
The Remove option lets you remove selected resources from the diagram.
Next, let’s see how the Action dropdown menu options can be used to work with our diagram as a whole. Choose Action, Resources. This menu has the options: Group, Fit, Clear, and Export.

Figure 23. Screenshot of the Workload Discovery on AWS diagram canvas showing the Action, Diagram menu.
Group provides a layout with resources grouped by type.
Fit resets the viewport on the canvas to bring the contents to the center.
Clear removes all the resources in the diagram leaving a blank canvas.
Export allows you to export your current visualization to CSV, JSON, or Diagrams.net. Select the Export option and on the Export page select the required format from the Export type radio list. Choose the Export button to export the diagram. The CSV and JSON options will bring up a dialog box for you to specify where on the filesystem to save the diagram. The Diagrams.net option will open a new browser window to the Diagrams.net website with your diagram.
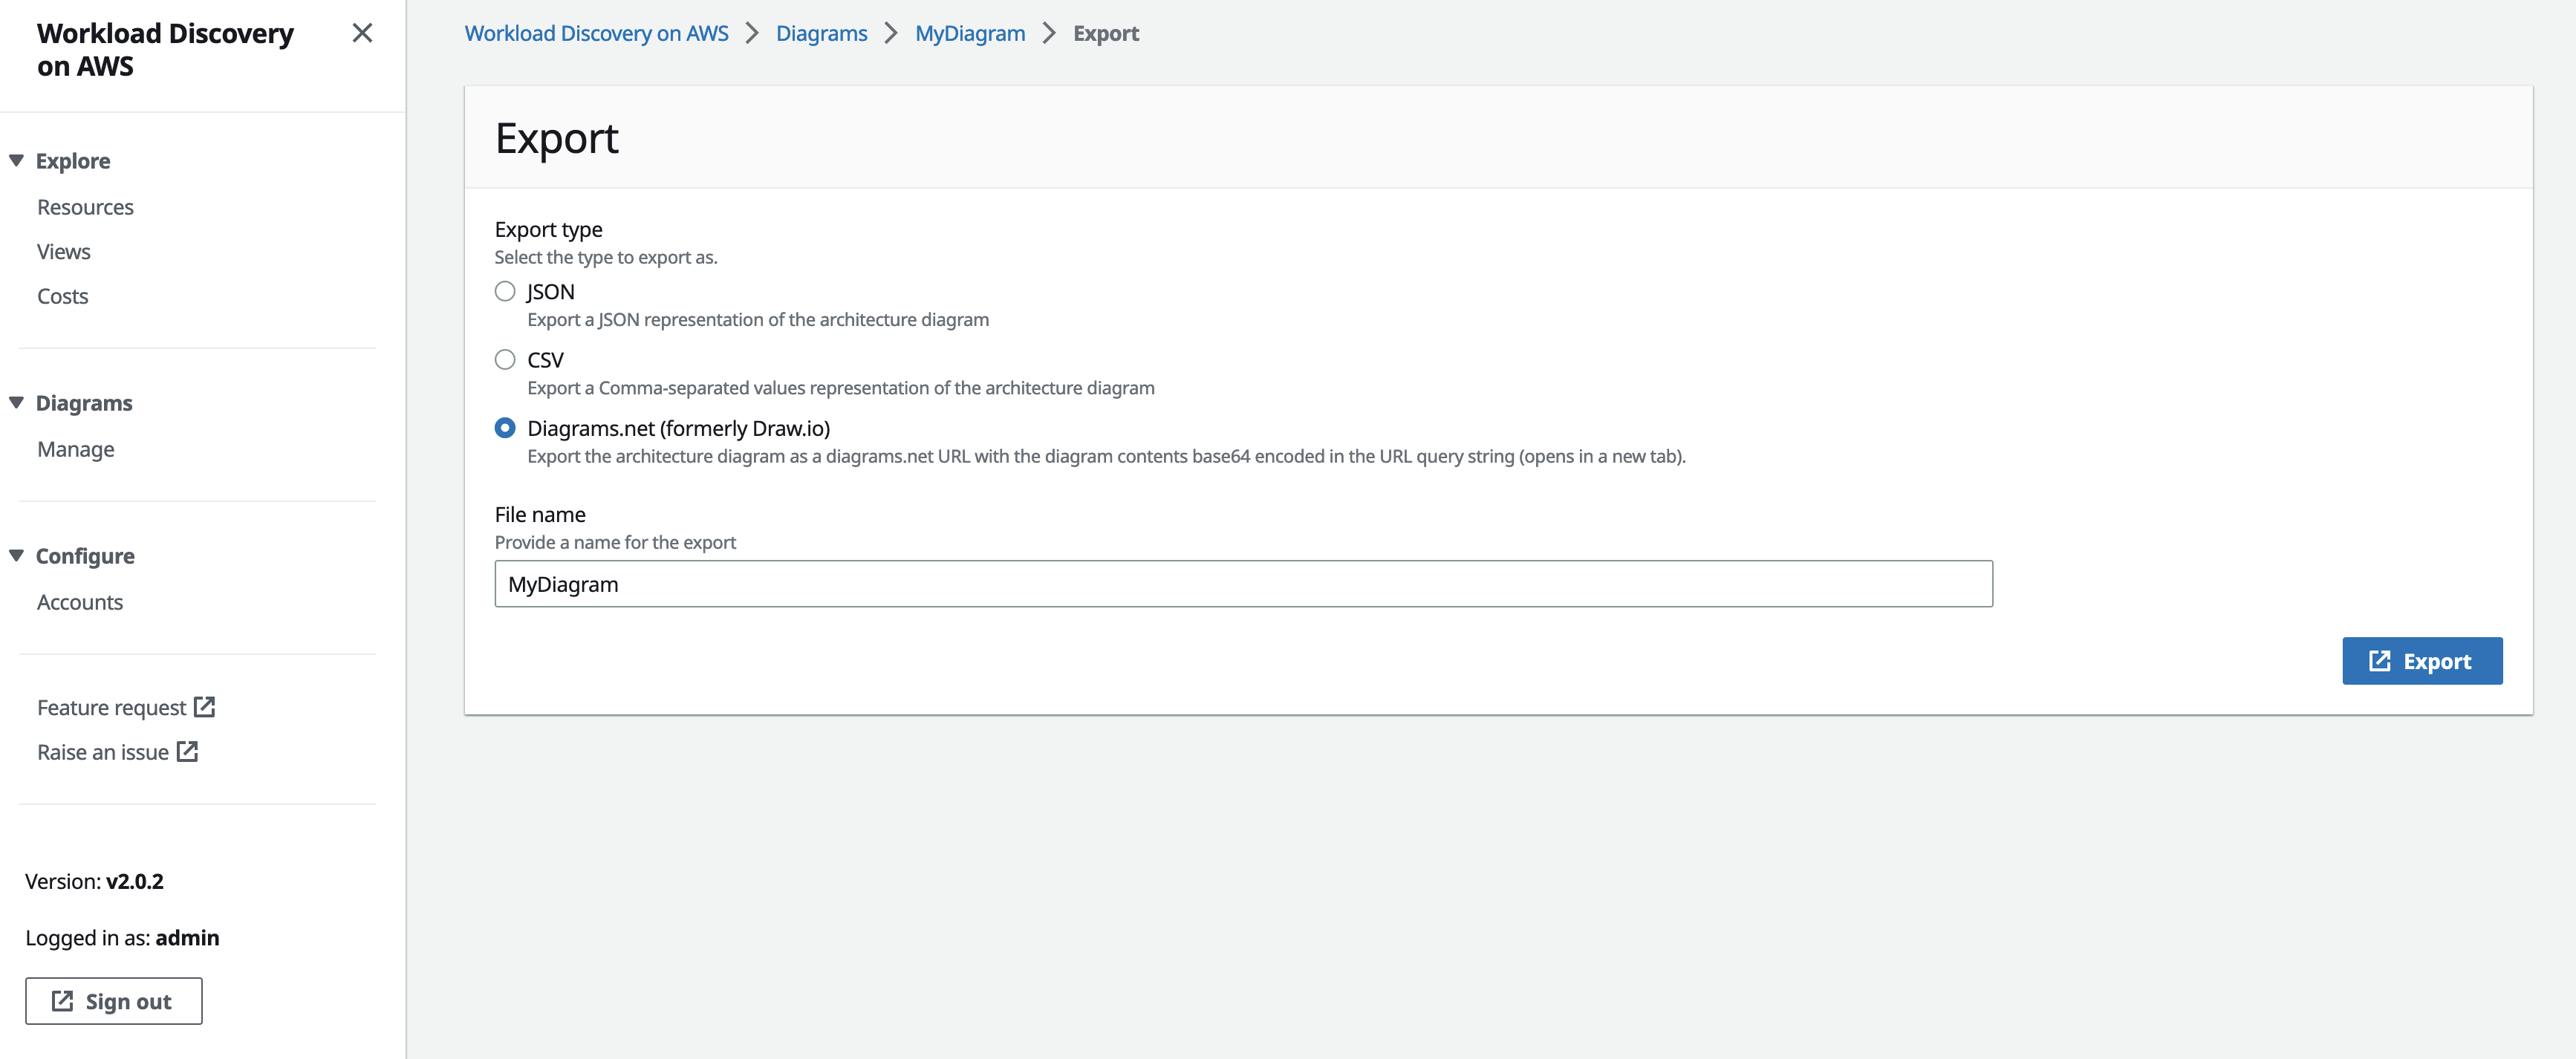
Figure 24. Screenshot of the Workload Discovery on AWS diagram Export Page.
Exploring Cost & Usage reports
You can also use Workload Discovery on AWS to query estimated costs. From the left navigation menu, choose Explore, Costs to navigate to the Costs page. Refer to the Setup Cost & Usage Report with Workload Discovery on AWS page for details on setting up the feature.
On the Costs page you can query the estimated cost and usage by resource, service, or ARNs. Additional parameters such as account number, region, and a date range (both absolute and relative time) can be used to narrow down the results. Select the Calculate Costs button to run the query.
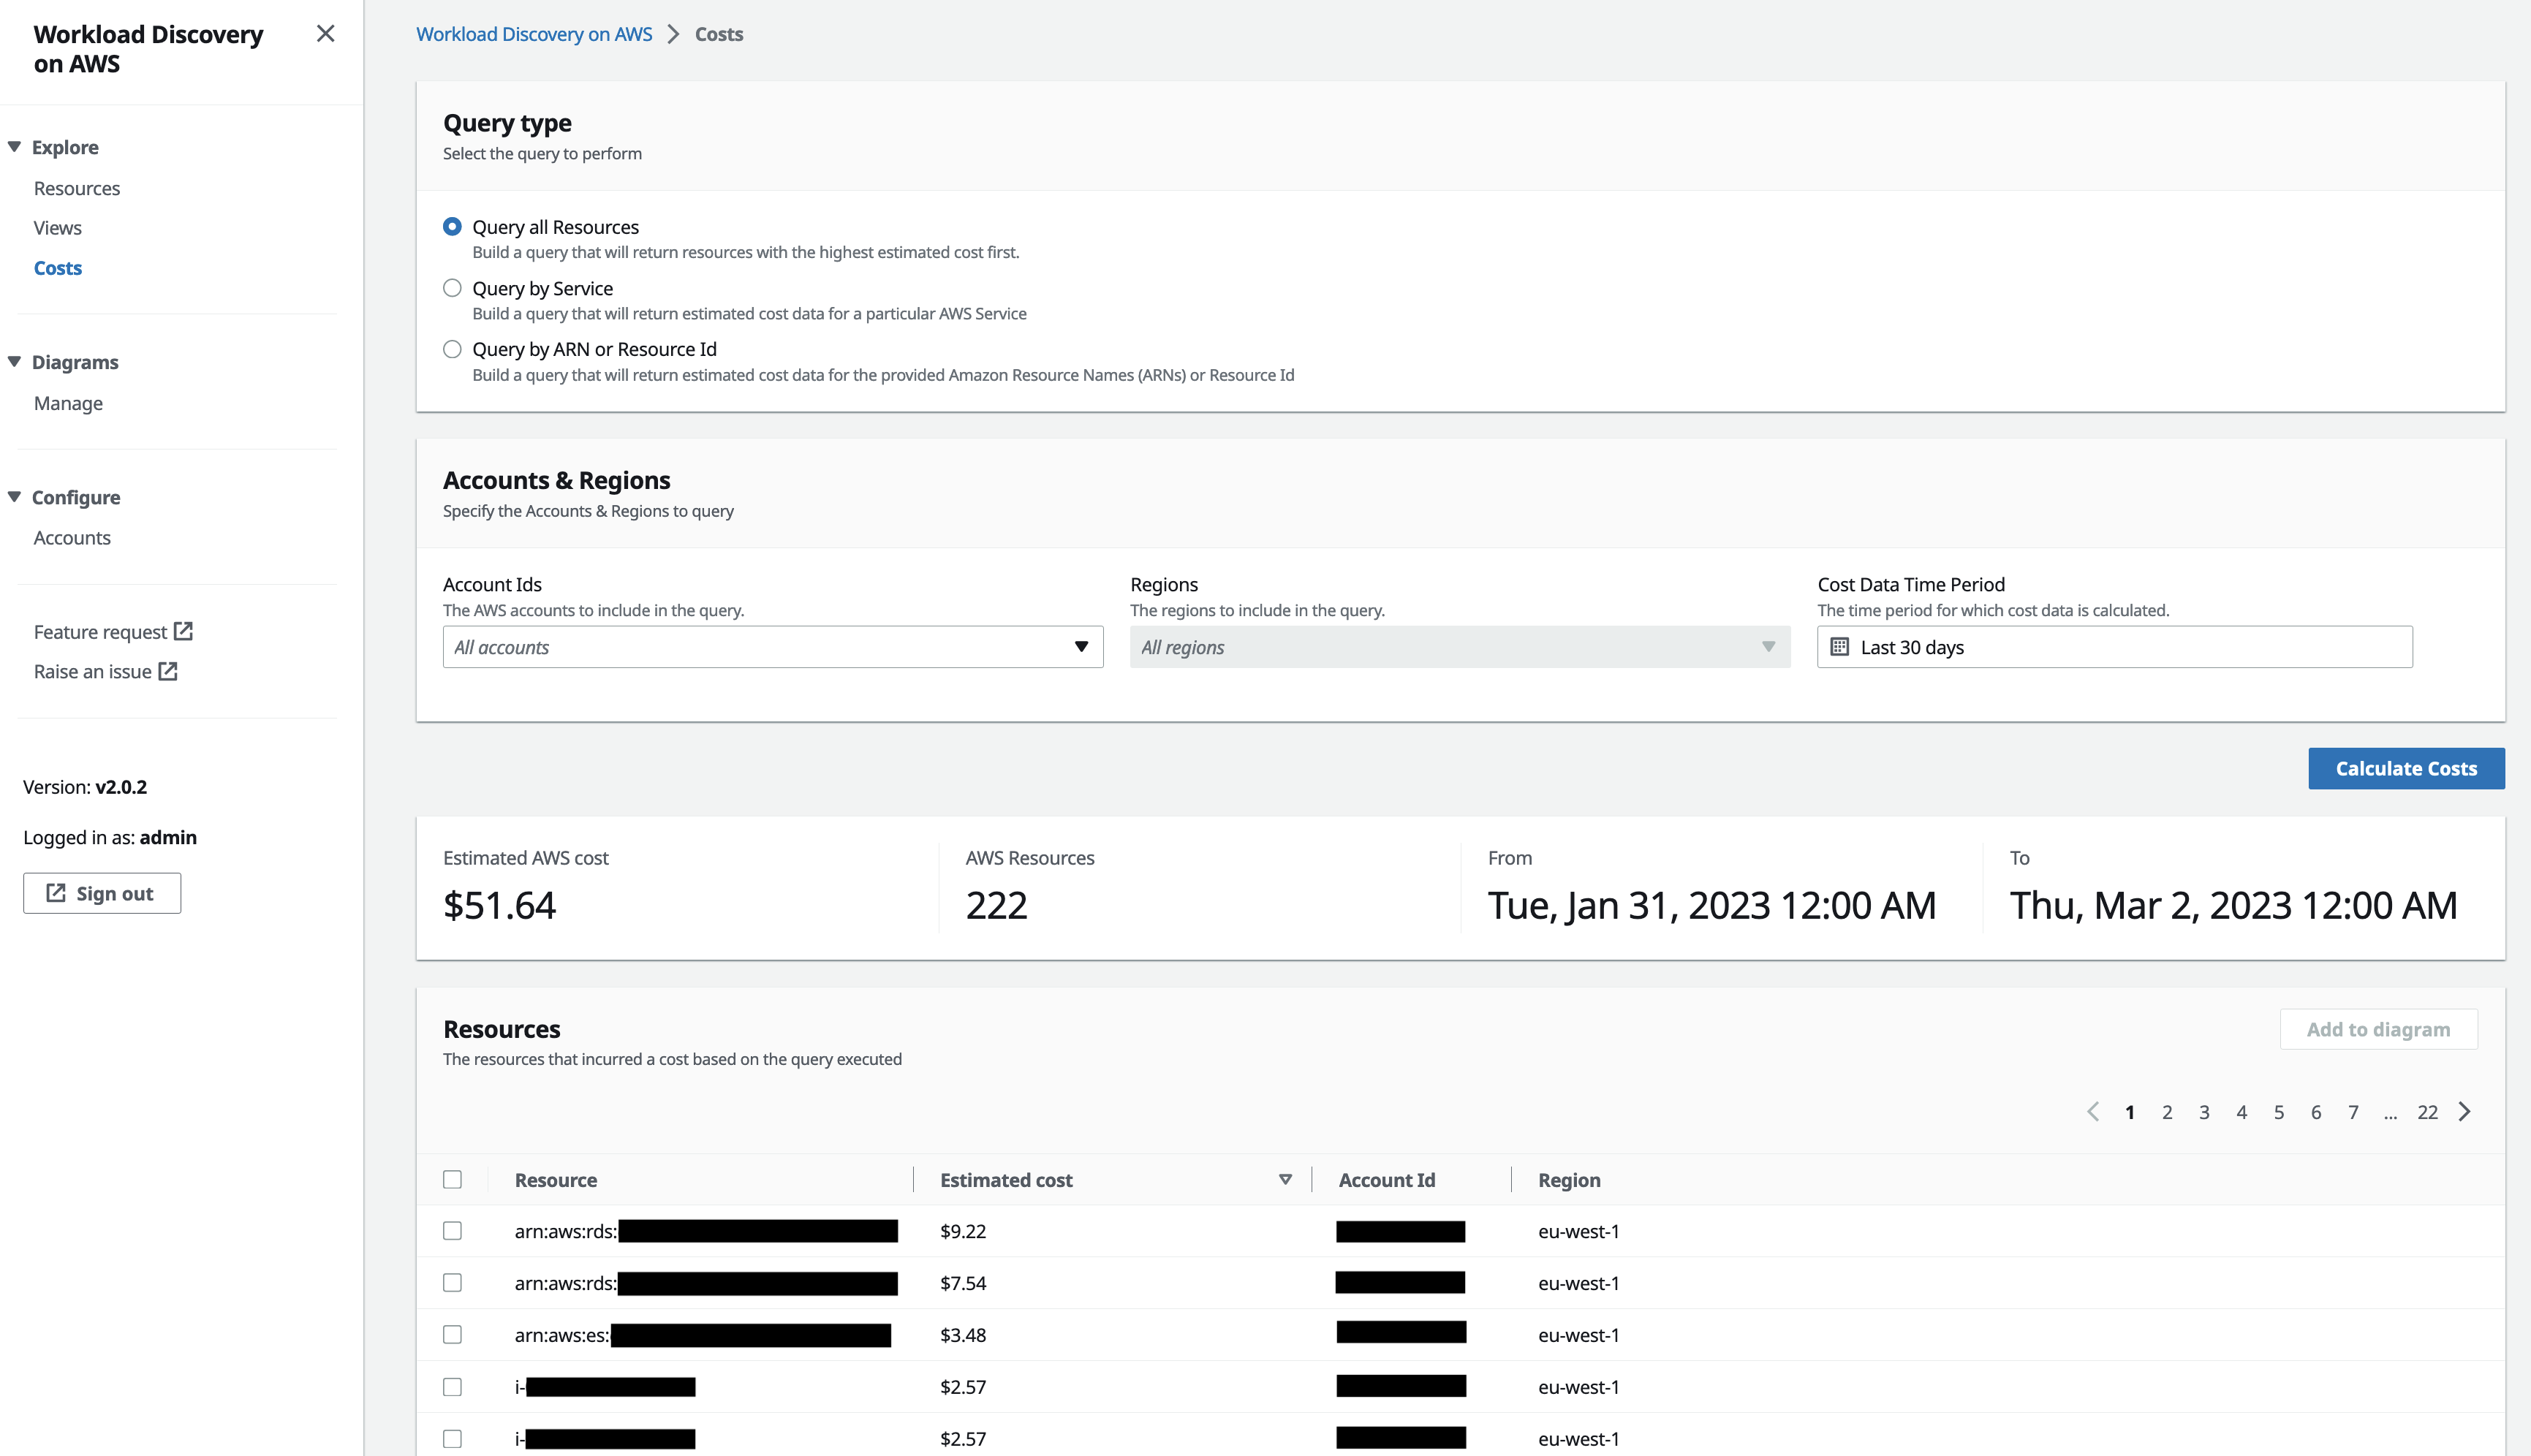
Figure 25. Screenshot of the Workload Discovery on AWS Cost page showing a query for costs for the previous thirty days. The resources are listed from most expensive to least expensive.
You can also select resources in the Resources panel using the check boxes and select the Add to diagram button to visualize the resources in a new diagram.

Figure 26. Screenshot of the Workload Discovery on AWS Cost page showing resources selected to be added to a new diagram.
Another option to view estimated costs is to add cost data to an existing diagram. The example in the following screenshot uses the diagram created in the Select resources and edit visualization section. Select the Load Costs button on your diagram to annotate your diagram with the costs for the displayed resources. You will see dollar amounts added to the labels on the bounding boxes that group resources by Account, Region, Availability Zone, VPC, subnet, etc.
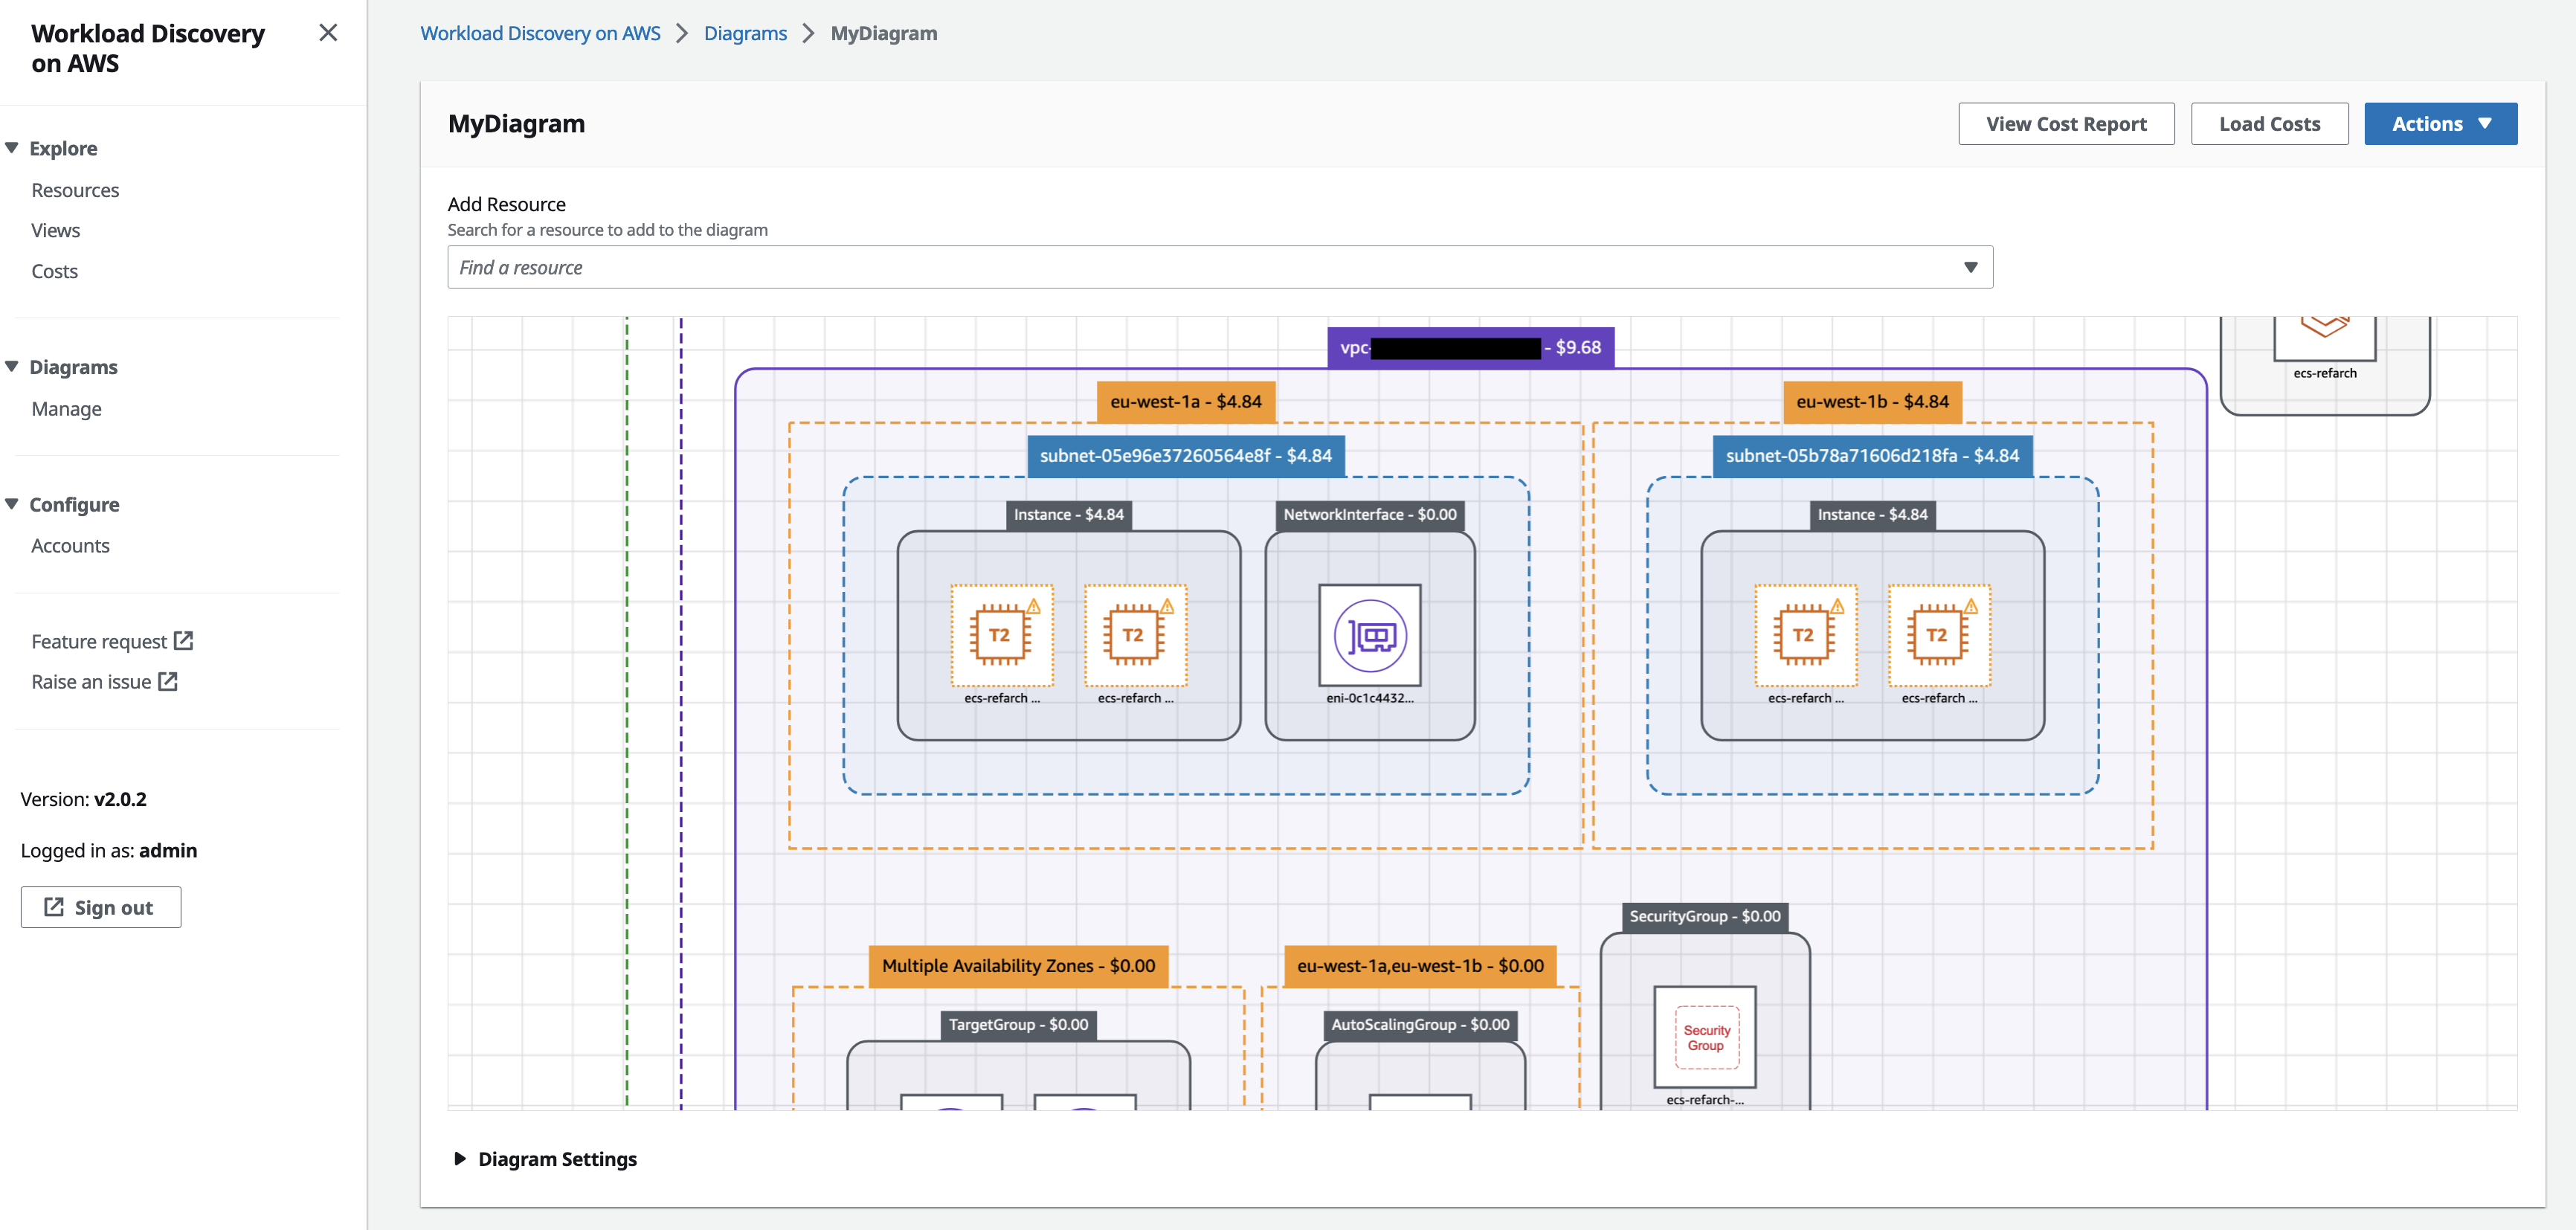
Figure 27. Screenshot of the Workload Discovery on AWS diagram canvas with a diagram that has been annotated with cost data.
You can also generate a cost report for your diagram that shows an overview of the resources with their incurred estimated costs by choosing the View Cost Report button. Users can query the costs by a date range. Once the report is displayed, users can search for resources in the Resources section of the report by entering the resource type in the Find resources search box. The Actions menu provides users with the ability to export the report by using the Export CSV option and also update the report graph by choosing the Update graph menu option.
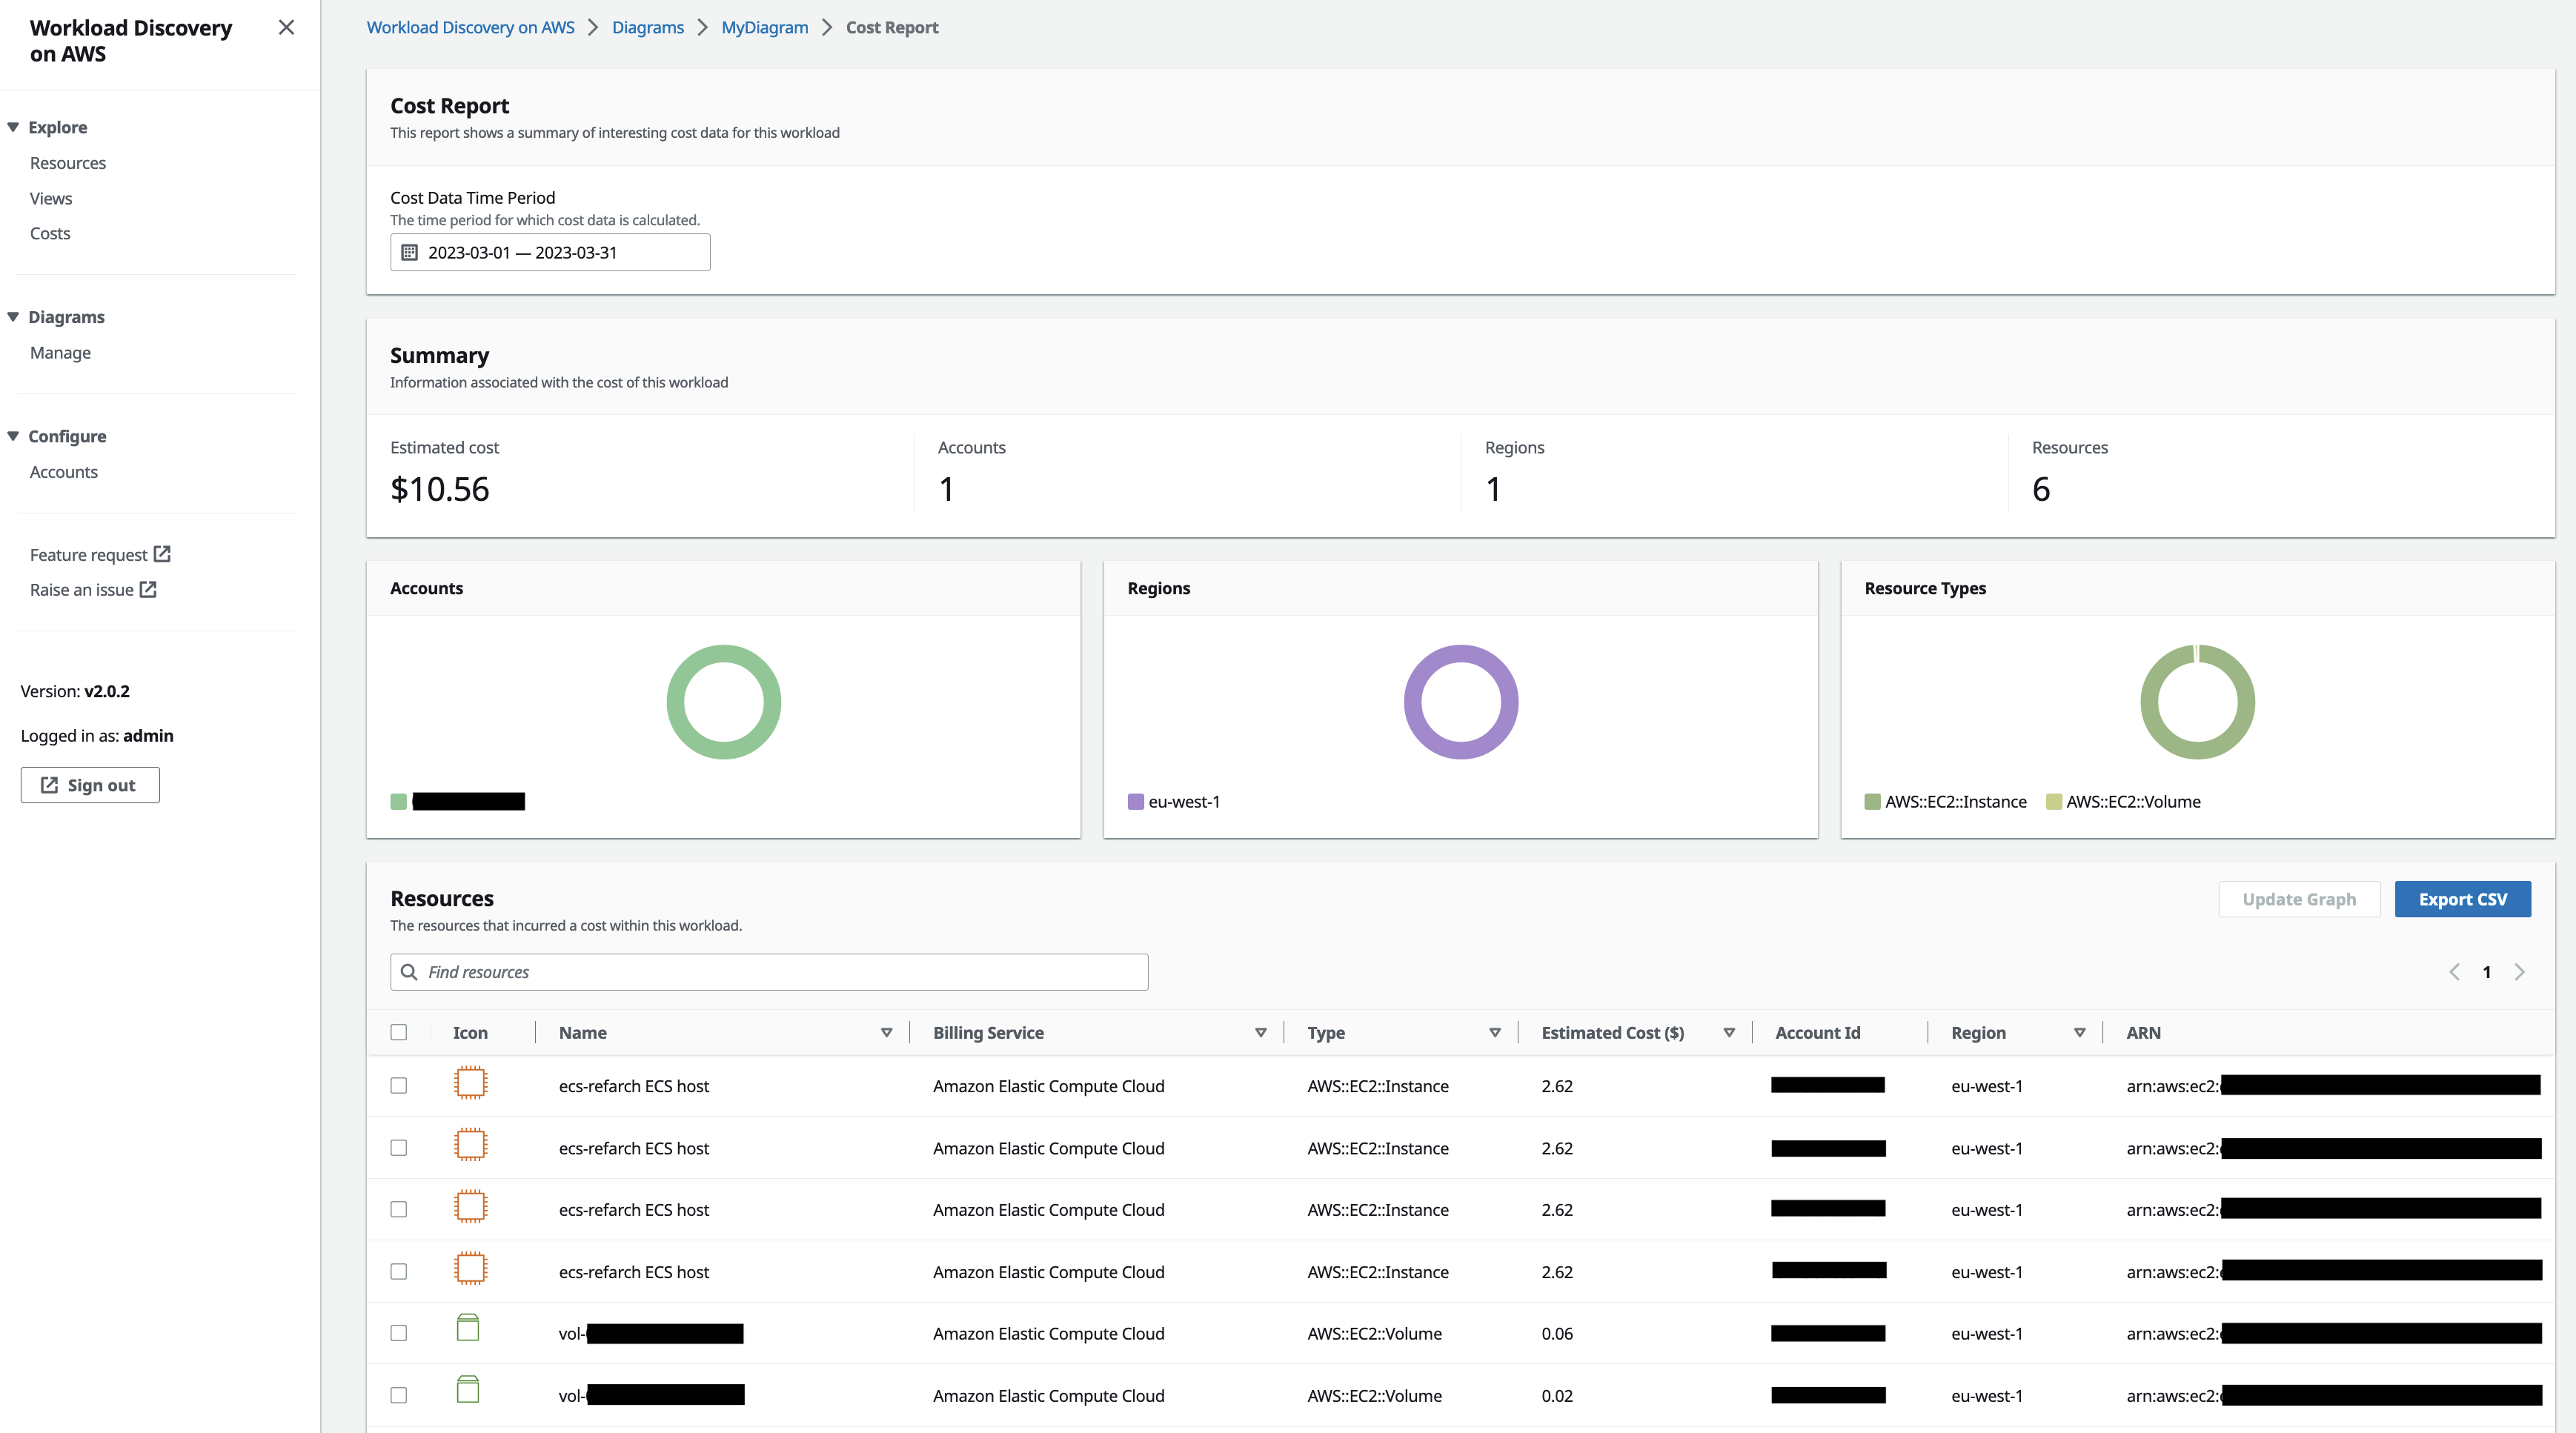
Figure 28. Screenshot of the Workload Discovery on AWS Cost Report page for a diagram, six items from the diagram have incurred costs and they are listed from most expensive to least expensive.
Conclusion
In this post, we showed how an Ops Teams can use Workload Discovery on AWS to generate and visualize the architecture diagram of existing AWS resources and dependencies that are deployed across different AWS accounts. Workload Discovery on AWS is another tool in your toolbox to manage and govern your AWS environment.
About the authors: