Networking & Content Delivery
How to share IP address ranges across accounts with AWS Global Accelerator
Maintaining ownership of IP addresses while deploying resources in multiple accounts can lead to underutilized IP address ranges. AWS Global Accelerator supports cross-account sharing for bring your own IP addresses (BYOIP), which enables you to share IP address ranges with multiple AWS accounts. After you provision an IP address range with Global Accelerator using BYOIP, you can assign IP addresses from the address pool as the static IP address entry points for accelerators in authorized accounts.
Global Accelerator provides static IP addresses that are entry points to route your client traffic to your application workloads over the Amazon Web Services (AWS) global network infrastructure. By default, Global Accelerator assigns static public IP addresses to accelerators from the AWS IP address pool. However, you can instead use IP addresses from your own IP address pool by configuring BYOIP for Global Accelerator.
Benefits of BYOIP and cross-account support
Using your own IP addresses has several advantages. BYOIP addresses can be beneficial when you migrate workloads or if you have applications that rely on consistent public IP addresses. With BYOIP, you can control the IP addresses that you share with your clients for accessing your application. In addition, using BYOIP addresses can help manage your AWS public IPv4 address costs.
Configuring cross-account for BYOIP helps reduce the number of IP address ranges that you need to provision with Global Accelerator when you want to use your own IP addresses with accelerators deployed in multiple accounts. Configuring cross-account provides flexibility for building multi-account architectures and also reduces the overhead of managing multiple IP address ranges.
How cross-account works
You set up resource sharing in Global Accelerator, including shared BYOIP addresses, by creating a cross-account attachment. An attachment specifies the resources that are shared and the principals who can use the shared resources.
- For cross-account BYOIP, in the attachment, you specify the BYOIP CIDR address ranges to share (the resources). In addition, you specify the account IDs (principals) that can use addresses from the CIDR range for the static IP address of an accelerator.
- After you create a cross-account attachment, an account listed as a principal in the attachment can specify a shared BYOIP address as a static IP address for an accelerator in the account.
Solution overview
In this post, we walk you through how to configure cross-account BYOIP in Global Accelerator, and how to use cross-account BYOIP addresses that you’ve provisioned. By completing this walkthrough you will create an accelerator in one account with two BYOIP addresses provisioned in a second account and made available using cross-account resource sharing.
Prerequisites
In our example, we assume access to an AWS account with two BYOIP address ranges provisioned for Global Accelerator. To learn more about provisioning BYOIP addresses, see this earlier Networking & Content Delivery Blog post or the AWS Global Accelerator Developer Guide.
Solution walk-through: How to share IP address ranges across accounts with AWS Global Accelerator
The following sections provide an example of how to configure cross-account BYOIP for Global Accelerator by using the AWS Management Console or the AWS Command Line Interface (AWS CLI). We’ll use the following two accounts in the example:
- 111111111111 – This account has provisioned a BYOIP address range (CIDR) for Global Accelerator and will create the cross-account attachment. We refer to this as the BYOIP management account.
- 222222222222 – This account will create an accelerator that chooses a static IP address from the BYOIP address range provisioned for the BYOIP management account. We refer to this as the accelerator account.
Configure cross-account BYOIP in the AWS Console
To get started, sign in to the BYOIP management account in the console and create the cross-account attachment that shares and authorizes cross-account support for the BYOIP address range.
In the console, navigate to the AWS Global Accelerator page, then choose Cross-account attachments, as shown in the following screenshot (Figure 1).
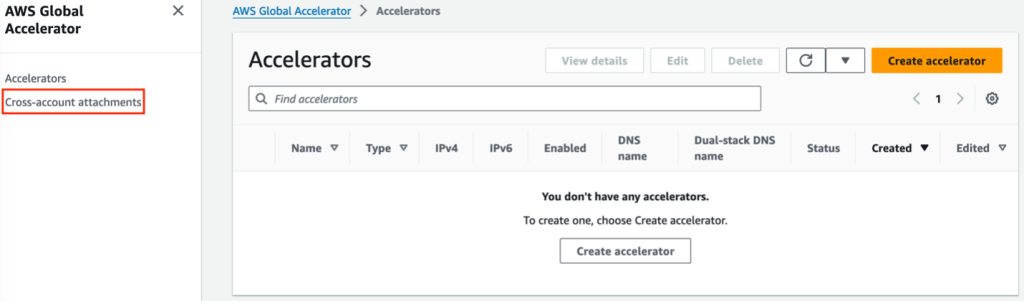
Figure 1. Screenshot of the Cross-account attachments option in the AWS Global Accelerator console
Next, choose Create attachment. Then, on the Create a cross-account attachment page, shown in the following screenshot (Figure 2), specify the address ranges and principals (accounts with accelerators) that you want to configure for cross-account support.

Figure 2. Screenshot of the Create a cross-account attachment page in the AWS Global Accelerator console
To create a cross-account attachment, do the following:
- Enter a name for the attachment.
- Under Add principals, enter the account ID of the account that will create an accelerator using BYOIP addresses from the BYOIP management account. The principal must be an account ID, not an accelerator ARN for cross-account BYOIP.
- Under Add resources, choose a resource type of CIDR, and then, for Resource, select a BYOIP address range.
- To add a second BYOIP address range, choose Add more, and then specify CIDR and the BYOIP address range.
- Choose Create attachment.
Now, you can see the cross-account attachment in the cross-account attachments list, as shown in the following screenshot (Figure 3).

Figure 3. Screenshot of the Cross-account attachments page in the AWS Global Accelerator console
After you create the cross-account attachment, the accounts that are specified as principals in the attachment can use IP addresses from the specified BYOIP CIDR address pool as static IP addresses for accelerators. The following example illustrates how you can do this by signing in to the console with the accelerator account, 222222222222, and then creating an accelerator.
After you sign in with the accelerator account, navigate to the AWS Global Accelerator page and then choose Create accelerator, as shown in the following screenshot (Figure 4).
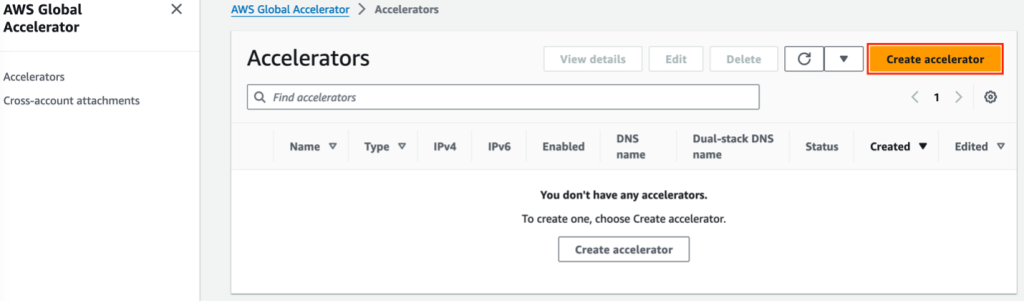
Figure 4. Screenshot of the Accelerators page in the AWS Global Accelerator console
Now, on the Basic configuration page, shown in the following screenshot (Figure 5), enter the information for the accelerator. This includes specifying a BYOIP address, or addresses, for one or both static IP addresses.
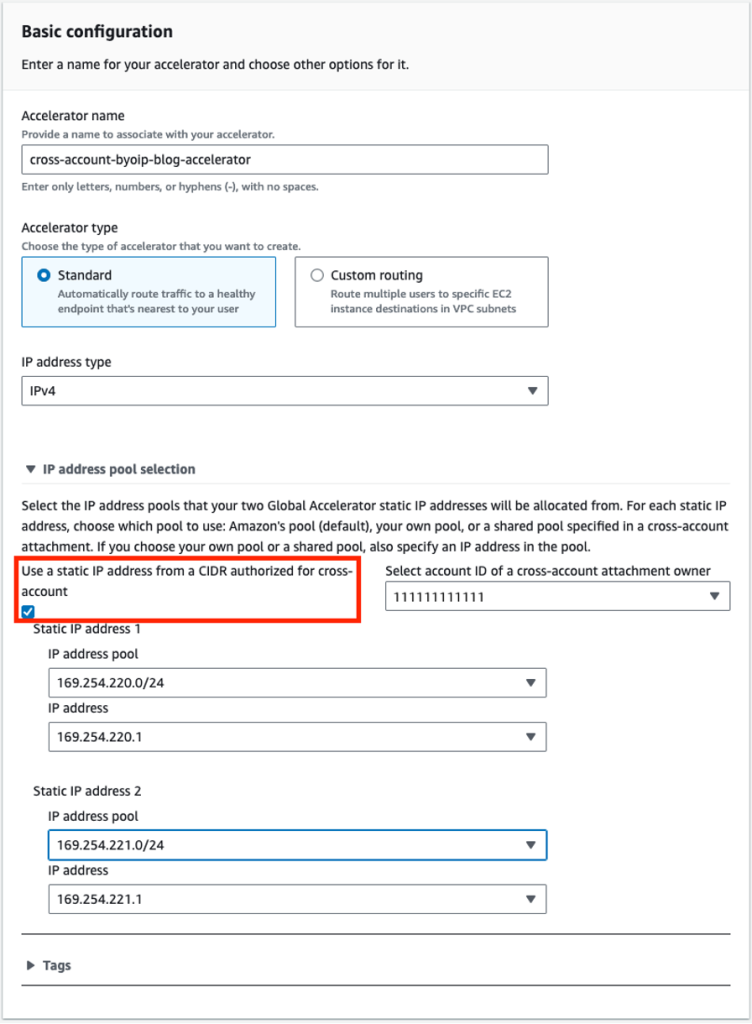
Figure 5. Screenshot of the Basic information page for creating an accelerator in the AWS Global Accelerator console.
To create an accelerator with a cross-account BYOIP address, do the following:
- In the Create accelerator wizard, enter a name for the accelerator.
- Select an accelerator type and IP address type.
- Under IP address pool selection, select Use a static IP address from a CIDR authorized for cross-account.
- For Select account ID of a cross-account attachment owner, select the account ID of the BYOIP management account.
- For Static IP address 1, select a BYOIP address pool and then a specific IP address.
- Optionally, for Static IP address 2, select a BYOIP address pool and another IP address. If you don’t choose a second BYOIP address, Global Accelerator assigns the second static IP address from the AWS address pool. Note that the BYOIP address pool for the second static IP address doesn’t have to be the same as the first BYOIP address pool, but it must be authorized by the same cross-account attachment.
- Choose Next.
Finish the accelerator setup by defining the listeners, endpoints, and endpoint groups for your workload, and then create the accelerator. Now, on the Accelerators page, you’ll see the new accelerator in your list, with the BYOIP addresses that you specified, as shown in the following screenshot (Figure 6).
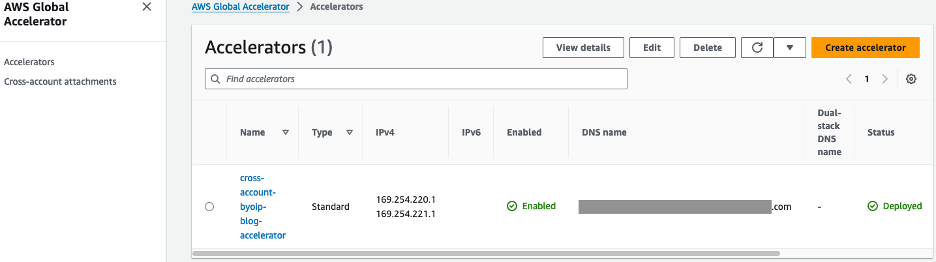
Figure 6. Screenshot showing the new accelerator on the Accelerators page in the AWS Global Accelerator console
Configuring cross-account BYOIP with the AWS CLI
For this example, you’ll need access to the AWS CLI for the two accounts—the BYOIP management account and the accelerator account—as well as a general understanding of how to use the AWS CLI. You must also have already provisioned the CIDR range for Global Accelerator through the BYOIP process.
To share your provisioned BYOIP address ranges, you create a cross-account attachment by using the Global Accelerator create-cross-account-attachment API. For resources, you specify the name of the attachment and the CIDR blocks. For principals, you specify the AWS accounts that you want to provide access to.
Start by signing in to 111111111111, the BYOIP management account, by using your preferred method to access the AWS CLI for an account. Then, enter a CLI command similar to the following to create the cross-account attachment.
To use the authorized BYOIP address range, sign in to 222222222222, the accelerator account, using your preferred method to access the AWS CLI for an account. Then, use the Global Accelerator create-accelerator API to create an accelerator, specifying IP addresses from the BYOIP address ranges. To create the accelerator, enter a CLI command similar to the following:
To finish creating the accelerator, add listeners, endpoints, and endpoint groups for your workload; for example, by using the create-listener and create-endpoint-group APIs.
Cleanup
There is a cost associated with the accelerator created in this walk-through as defined on the AWS Global Accelerator pricing page. To avoid unnecessary charges, you can delete an accelerator you have created using the steps below.
Delete an accelerator in the AWS Console
To disable and delete an accelerator in the AWS Console, do the following:
- On the Accelerators page click the radio button next to the accelerator you wish to disable.
- Choose Edit.
- Choose Disable accelerator, and then choose Save changes.
- On the Accelerators page click the radio button next to the accelerator you wish to delete.
- Choose Delete.
- In the confirmation dialog type delete, and then choose Delete.
Delete an accelerator with the AWS CLI
Prior to deleting an accelerator with the AWS CLI, you must disable the accelerator and remove all endpoint groups and listeners associated with the accelerator.
To disable an accelerator using the AWS CLI, enter a command similar to the following:
aws globalaccelerator update-accelerator --accelerator-arn arn:aws:globalaccelerator::222222222222:accelerator/cccccccc-dddddddddd --no-enabled
To remove an endpoint group from an accelerator using the AWS CLI, enter a command similar to the following:
aws globalaccelerator delete-endpoint-group --endpoint-group-arn arn:aws:globalaccelerator::222222222222:accelerator/cccccccc-dddddddddd /listener/eeeeeeee/endpoint-group/ffffffffffff
To remove a listener from an accelerator using the AWS CLI, enter a command similar to the following:
aws globalaccelerator delete-listener --listener-arn arn:aws:globalaccelerator::222222222222:accelerator/cccccccc-dddddddddd /listener/eeeeeeee
To delete an accelerator using the AWS CLI, enter a command similar to the following:
aws globalaccelerator delete-accelerator --accelerator-arn arn:aws:globalaccelerator::222222222222:accelerator/cccccccc-dddddddddd
Conclusion
In this post, you learned how to configure cross-account BYOIP addresses in AWS Global Accelerator. Cross-account BYOIP sharing allows you to efficiently manage IP addresses when you have multiple AWS accounts and enables you to reduce the number of AWS IP addresses allocated to accelerators. Using cross-account BYOIP can enhance flexibility and scalability when you build multi-account architectures, and it supports the growth of your workloads on AWS. To learn more about Global Accelerator and cross-account resource sharing, visit the AWS Global Accelerator product page.

Derek Ziehl
Derek Ziehl is a Senior Technical Account Manager (TAM) at AWS. He has a background designing large-scale network systems and managing cloud migrations. As a TAM he enjoys enabling customers to run resilient, optimized workloads on AWS.