Networking & Content Delivery
Implementing Default Directory Indexes in Amazon S3-backed Amazon CloudFront Origins Using CloudFront Functions
Amazon CloudFront Functions now makes it possible to do things that were previously only possible with AWS Lambda@Edge, but in a more performant manner. For example, now you can manipulate the URI path—something that is essential when you want to secure an origin using an Origin Access Identity (OAI) with Amazon CloudFront.
In 2017, I wrote a post (Implementing Default Directory Indexes in Amazon S3-backed Amazon CloudFront Origins Using Lambda@Edge) that showed how to rewrite the request between a CloudFront Distribution and an origin (such as Amazon S3) so that URLs such as http://example.com/about/ resolve to a default document index (such as <bucketname>/about/index.html) to avoid S3 returning a “NoSuchKey” error. This results in CloudFront returning an error to site visitors.
This post will show you how to achieve the same result, but by using CloudFront Functions. When I wrote my 2017 post, CloudFront Functions didn’t exist. Today, CloudFront Functions is our current recommended service for lightweight manipulation of items, such as the URI path. For more information about CloudFront Functions and the differences between CloudFront Functions and Lambda@Edge, refer to this post.
Overview of solution
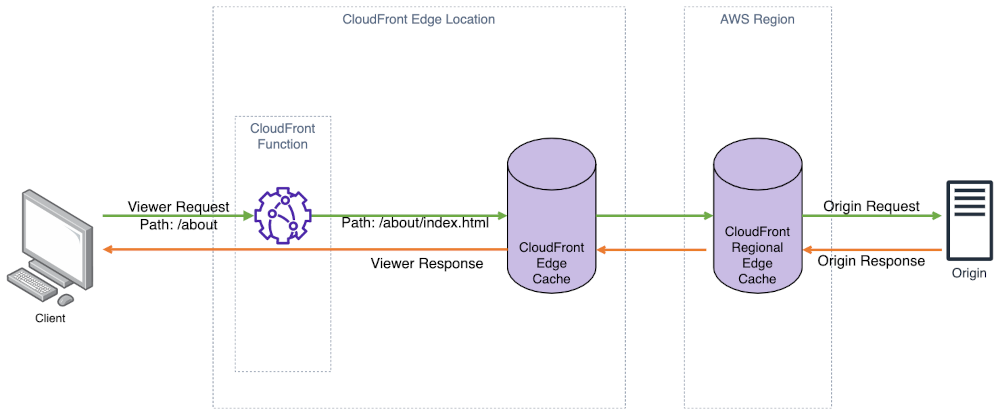
Figure 1: Architecture diagram.
In this example, I will use JavaScript code running within a CloudFront Function that is associated with a CloudFront Distribution to change the path of the request URI to append a default index file (index.html in my example) or whenever the path doesn’t have a filename extension, such as .html. When using CloudFront with an S3 bucket that is kept private using an Origin Access Identity (OAI), CloudFront uses permissions associated with your CloudFront Distribution to access S3 using the S3 REST API. This makes sure that the bucket is kept private by allowing S3 to verify that only CloudFront is authorized to access the bucket (which is serving as your website’s origin).
Although CloudFront does let you specify a default document index for the site root, it doesn’t have similar functionality for sub-directories. Therefore, any request for a page such as http://example.com/about/ is passed as-is to S3, but ‘about/’ doesn’t map to a key (also known as a file) in S3. This results in a “KeyNotFound” error message, which is returned by S3 to CloudFront. To avoid unintentionally leaking information about customers’ S3 buckets, CloudFront instead returns a more generic “AccessDenied” error message to the web viewer.
Implementing this solution will make CloudFront append a default filename (index.html) as part of its request to S3 when a viewer requests a URI such as http://example.com/about or http://example.com/about/. This is especially common with single-page applications (SPAs).
Walkthrough
These instructions assume that you already have a CloudFront Distribution deployed. While S3 is mentioned as being the Origin for our CloudFront Distribution, the same steps are applicable for any CloudFront Distribution where you must rewrite the Origin Request before requesting the resource from your Origin.
Prerequisites
For this walkthrough, you should have the following prerequisites:
- An AWS account
- A CloudFront Distribution deployed and associated with an S3 origin
- Make sure that you have a CloudFront Distribution deployed and configured with an S3 origin.
- Make sure that your origin has content populated. I’m using `
index.html` as my default index document in both the root (http://example.com/index.html) and a sub-folder (http://example.com/about/index.html). - Optional: If you have a domain name that you’d like to use with CloudFront (versus the generic domain that CloudFront provides), then you can associate it to the distribution by following this documentation.
- Appropriate IAM permissions to create and associate a CloudFront Function using the AWS Console.
- Access to the sample JavaScript code on GitHub that we will use for our CloudFront Function.
Creating a CloudFront Function and associating it with your distribution
The CloudFront documentation goes into more detail about CloudFront Functions, how to write function code (the programming model), creating the function, and associating it to your distribution. In this example, we’ll use sample code that has already been prepared for our use case. We will create the function using this code, associate it to our distribution, and validate the behavior.
Making sure that we can test our function
By default, CloudFront Functions does publish metrics (such as the number of function invocations, errors, etc.) to CloudWatch at no additional cost. When developing, it can be helpful to add logging statements to your functions to help test your function—these logging messages only get published to CloudWatch Logs when the function is published to the LIVE stage. You may want to remove any logging statements when deploying CloudFront functions to LIVE, since this function will be associated with a viewer request and will be executed on every request to CloudFront. I recommend creating a retention setting on the Log Group for your CloudFront Function to prevent the storage costs of the logs from growing unchecked over time. This is because there is a cost for CloudWatch Logs outside of the provided free tier.
Since the sample code does not contain any logging statements, I have structured the S3 bucket (Origin) as follows so that I can demonstrate the function works as intended.
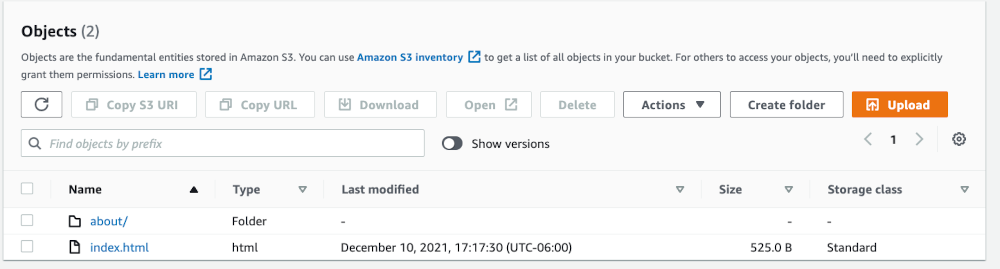
Figure 2: Screenshot showing root of S3 bucket.
Above, I have an index.html file that corresponds to the root of my CloudFront Distribution (http://example.com). I also have a sub-folder (about/) which has another index.html file in it (not shown here) that corresponds to http://example.com/about/. Moreover, I’ve put descriptive and unique HTML content in each file so that I can verify in the browser that the expected content is being served based on the requested URI path and output in the browser.
index.html contents:
<!doctype html>
<html class="no-js" lang="">

<head>
  <meta charset="utf-8">
  <title>Main Page</title>
</head>

<body>

  <p>Hello. You're in the root directory of the website.</p>

</body>

</html>
about/index.html contents:
<!doctype html>
<html class="no-js" lang="">

<head>
  <meta charset="utf-8">
  <title>About</title>
</head>

<body>

  <p>You're in the About Me directory of the website.</p>

</body>

</html>
Right now, if I attempt to go to the http://example.com/about/ path of my CloudFront Distribution, I get the following error:
<Error>
<Code>AccessDenied</Code>
<Message>Access Denied</Message>
<RequestId>…</RequestId>
<HostId>…</HostId>
</Error>
This is expected behavior when using CloudFront with OAI to access an S3 Origin. The same error occurs if I also try http://example.com/about. Now, I’ll implement the CloudFront Function to rewrite the requested URI whenever there isn’t a file extension at the end of each request.
Implementing the CloudFront Function
First, I must create the CloudFront Function. In the console, locate the Functions section on the left-hand menu bar.
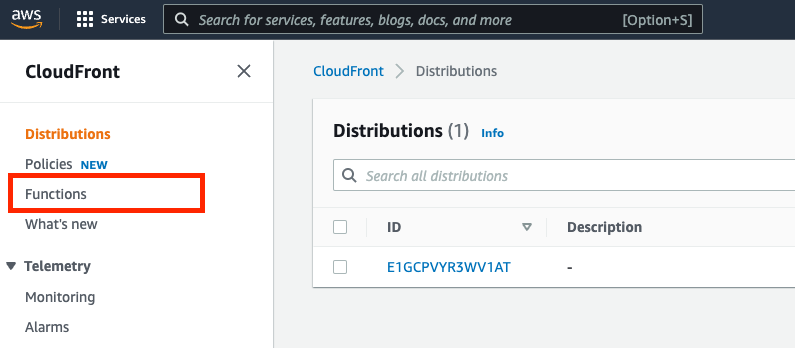
Figure 3: CloudFront console showing where to access CloudFront Functions.
Next, create a new function. I’ll give the function a name, such as RewriteDefaultIndexRequest.
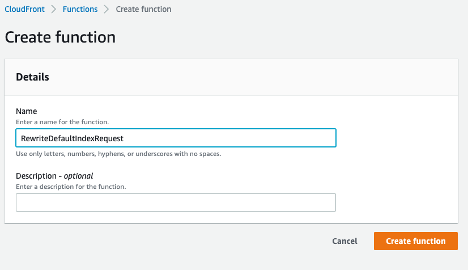
Figure 4: CloudFront console showing create function
Now, copy the sample code from the aws-samples/amazon-cloudfront-functions GitHub repository (it’s in the url-rewrite-single-page-apps folder as index.js). The sample code does two things:
- If the requested URI ends in a `
/` (such asexample.com/about/), then it will append ‘index.html’ as a default index file to the request. - If the requested URI is missing a file extension (such as
example.com/about), then it will append ‘/index.html’ to the request.
Note that if you’re using a file other than index.html as your default document index, then you can replace that here.
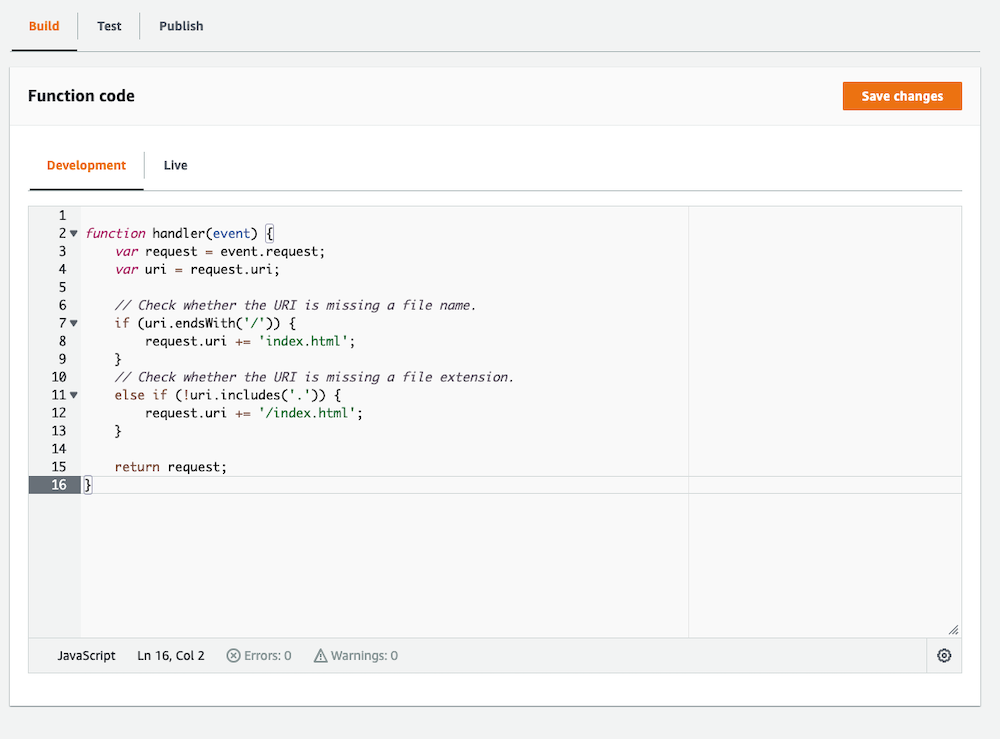
Figure 5: Screenshot showing function code.
After saving the changes to the new CloudFront Function, publish the function by selecting the Publish tab above, and then publish the function. Once done, associate it with the distribution by selecting the “Add association” button that appears in the following image after publishing the function.
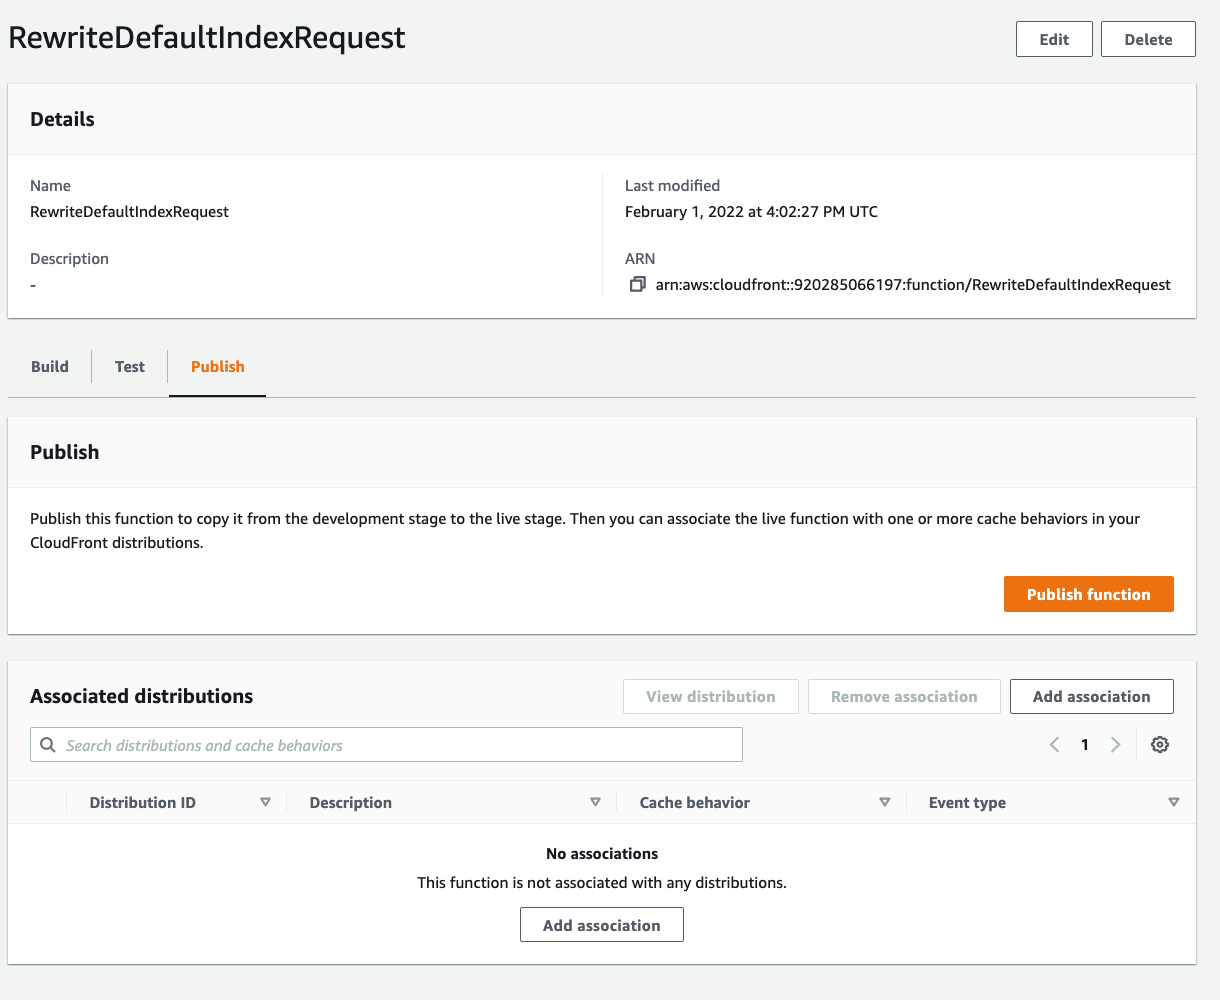
Figure 6: Screenshot showing publish function.
On the next screen, select the appropriate CloudFront Distribution. Making this a viewer request will make sure that the incoming client request gets rewritten to what we expect to exist as a key in our S3 Origin. For example, client requests for ‘about’, ‘about/’ and ‘about/index.html’ all refer to the same object in S3, and we will re-write ‘about’ and ‘about/’ on the incoming request. CloudFront will first check to see if the object already exists in the edge cache, and then fetch it from the origin if needed.
My CloudFront Distribution only has one cache behavior (the one origin), so I’ve chosen that here. If you have multiple S3 origins associated as different behaviors to the same distribution, then you’ll want to make sure that you associate the function with all of them that need this rewrite functionality.
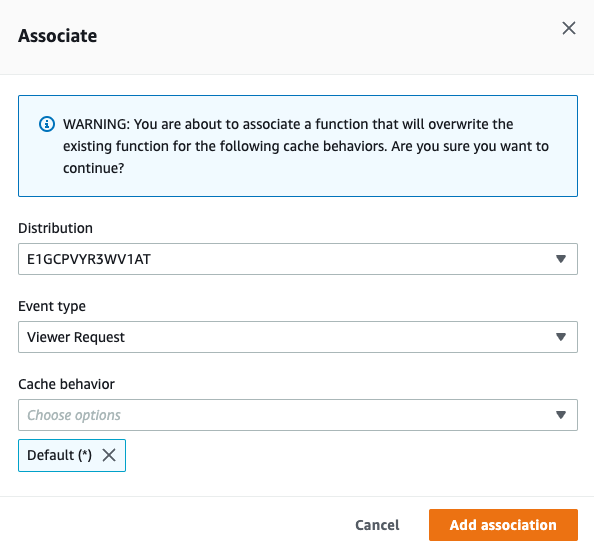
Figure 7: Screenshot showing how to associate function.
Associating a CloudFront Function to a distribution will require CloudFront to perform a deployment, which can take a few minutes. Monitor the status of the deployment to make sure that it has completed before testing.

Figure 8: CloudFront console showing distribution deployment in progress.
Testing
Once the deployment has completed (you can see the status above change from “Deploying” to the new “Last modified” date), validate that the function is rewriting the URL by requesting the path http://example.com/about/ , which failed earlier. If successful, then you should expect the distribution to return the index.html file that is in the about/ sub-folder of your S3 origin. We can use the cURL utility on Linux or a browser to test:
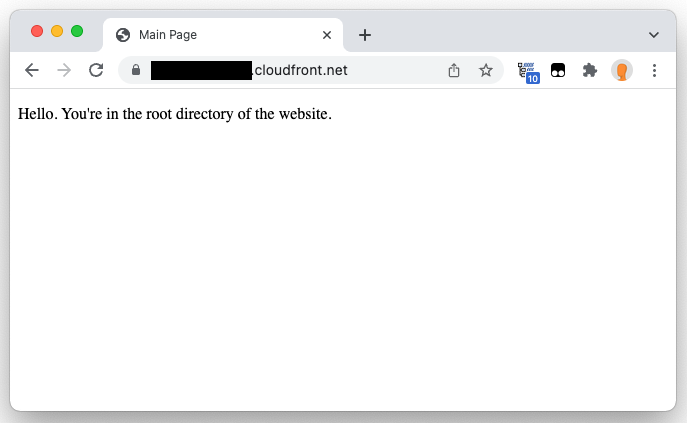
Figure 9: Browser showing root of CloudFront distribution.
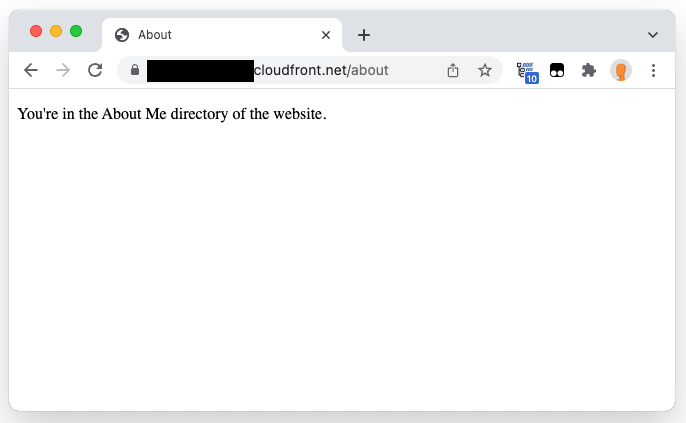
Figure 10: Browser showing about/ path.
Cleaning up
The CloudFront Free Tier currently includes 2,000,000 CloudFront Function Invocations free each month. To avoid any additional costs for this example, remove the CloudFront Function association with your Origin’s behavior and you won’t be charged if you exceed the free tier. Deleting the function itself is optional—there is no charge for the function code. Optionally, you can delete any CloudFront Distribution and Origin if you created them and no longer need them.
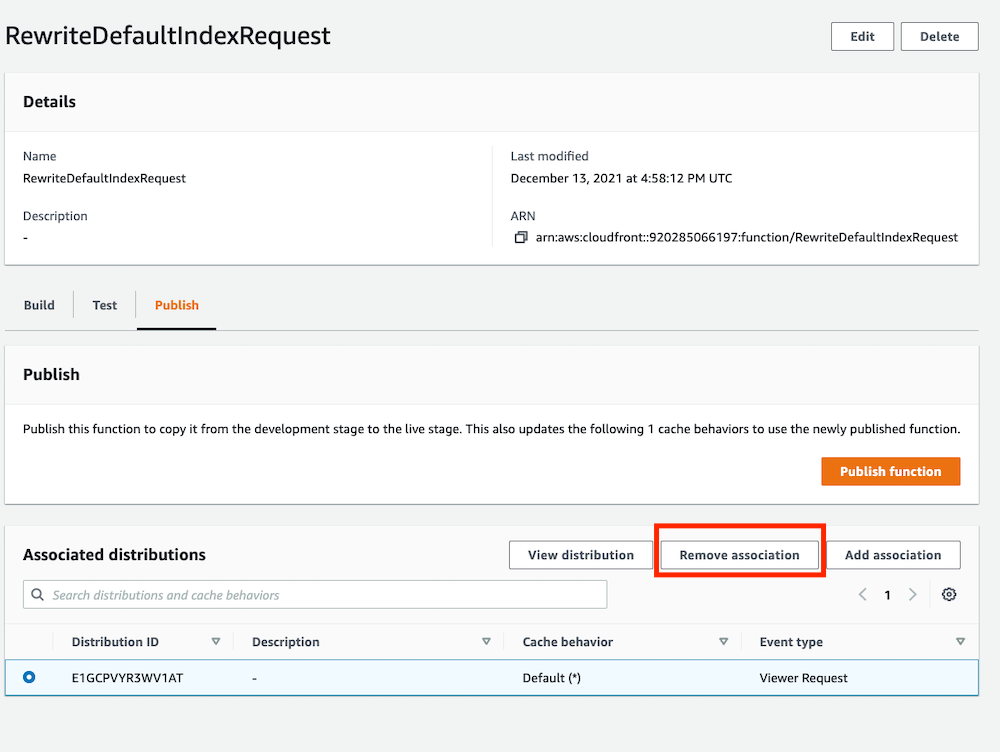
Figure 11: Screenshot showing how to remove function association from distribution.
Conclusion
With the rewrite in place, Amazon CloudFront will request a default document (index.html) when accessing Amazon S3, which is especially helpful when using CloudFront Origin Access Identity to secure access to your S3 Origin. Doing this will prevent S3 from returning an error to CloudFront when trying to access a sub-directory, such as example.com/about/ , as it will request a default index, versus passing the request through as-is.
Further reading
This article focused solely on how to use CloudFront Functions to rewrite the request URI. If you’re interested in further optimizing the performance and security of your CloudFront Distribution and S3 Origin, then check out the following resources:
Restricting access to Amazon S3 content by using an origin access identity (OAI)
Blocking public access to an S3 bucket
CloudFront Cache and Origin Request Policies
About the author

Ronnie Eichler
Ronnie Eichler is a Senior Global Solutions Architect in Dallas, Texas, USA. When he’s not busy solving technology problems, Ronnie enjoys traveling, photography, and fitness (kickboxing, cycling, and yoga currently).