AWS Open Source Blog
Best Practices for Optimizing Distributed Deep Learning Performance on Amazon EKS
中文版 – In this post, we will demonstrate how to create a fully-managed Kubernetes cluster on AWS using Amazon Elastic Container Service for Kubernetes (Amazon EKS), and how to run distributed deep learning training jobs using Kubeflow and the AWS FSx CSI driver. We then will discuss best practices to optimize machine learning training performance on Amazon EKS to improve the throughput and minimize training times.
We use ResNet-50 with the ImageNet dataset and Amazon EC2 P3 instances with NVIDIA Tesla V100 GPUs to benchmark our training throughput performance.
This post is inspired by two previous posts: Scalable multi-node deep learning training using GPUs in the AWS Cloud and Scalable deep learning training using multi-node parallel jobs with AWS Batch and Amazon FSx for Lustre.
First, let’s recap the components of our solution:
Kubernetes is an increasingly popular option for training deep neural networks, as it offers flexibility to use different machine learning frameworks via containers as well as the agility to scale on demand. Amazon EKS is a managed Kubernetes service from AWS that makes it easy to run Kubernetes workloads on AWS EC2 P2 and P3 instances.
Kubeflow is an open source Kubernetes-native platform for developing, orchestrating, deploying, and running scalable and portable machine learning workloads. Kubeflow can run on any Kubernetes cluster, including clusters managed by Amazon EKS. Kubeflow supports two different methods for distributed training of the Tensorflow framework. The first is the native Tensorflow architecture, which relies on a centralized parameter server for coordination between workers. The second is a decentralized approach in which workers communicate with each other directly via the MPI AllReduce primitive, without using parameter servers. NVIDIA’s NCCL library has implemented most of the MPI primitives efficiently on GPUs, and Uber’s Horovod makes it simple to implement this approach for multi-GPU and multi-node training using TensorFlow. Compared to parameter servers, this second approach optimizes bandwidth better and scales better. Kubeflow offers the mpi-operator to make allreduce-style distributed training as simple as training on a single node.
Amazon FSx for Lustre is a new service from AWS that integrates with S3 and provides a high-performance file system optimized for fast processing of workloads such as machine learning and high performance computing (HPC). With the AWS FSx CSI Driver, you can consume an FSx for Lustre filesystem from your containers in a Kubernetes-native manner using persistent volumes and persistent volume claims. The FSx CSI Driver supports static volume provisioning and dynamic volume provisioning, and containers from multiple nodes within a cluster can all connect to the same Lustre filesystem. You can even use S3 as a Lustre data repository and make the training data available to your containers without needing to manually transfer it to start your jobs.
Performance result
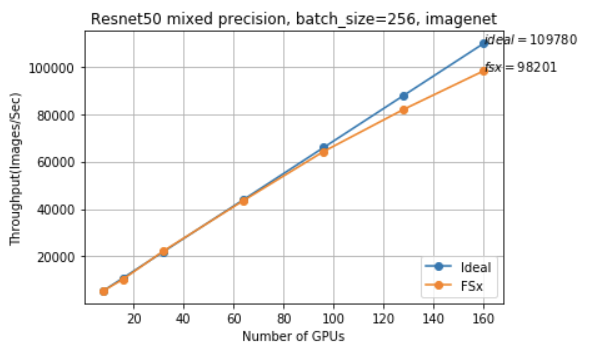
We trained using mixed precision on 20 P3.16xlarge instances (160 V100 GPUs) with a batch size of 256 per GPU (aggregate batch size of ~41k). To achieve better scaling efficiency, we used Horovod, a distributed training toolkit that works with TensorFlow, instead of Tensorflow’s native parameter server approach.
We observed near-linear scaling, between 90-100% scaling efficiency up to 160 GPUs and 98k images per second with TensorFlow.
Configuration
- Amazon EKS (Kubernetes v1.11.8)
- MPI Operator Alpha from Kubeflow 0.4.1
- Amazon EKS-optimized AMI with GPU support
- CUDA 10 with NVIDIA Tesla 410.104 driver
- Docker 18.06.1-ce including nvidia-docker2
- An FSx for Lustre file system hydrated from an S3 bucket that provides ImageNet TFRecords
- FSx CSI Driver v0.1
- Customized Tensorflow Image
- TENSORFLOW_VERSION=v1.13.1
- HOROVOD_VERSION=0.16.0
- CUDNN_VERSION=7.4.2.24-1+cuda10.0
- NCCL_VERSION=2.4.2-1+cuda10.0
- OPENMPI 4.0.0
Steps
The steps below show you how to replicate our work with your own cluster.
Prerequisites
Start by ensuring you have the following tools installed:
Prepare the Imagenet dataset
ImageNet is the most well known dataset for image classification. Since it was published, most of the research that advances state-of-the-art of image classification has been based on this dataset.
The ImageNet dataset is provided by image-net.org. You will need to register first to download the original dataset, which contains the original 1.28M images among 1,000 classes. Use the scripts provided in utils directory or follow tutorials to process the ImageNet images to create TF Records for Tensorflow. Create an S3 bucket to store your ImageNet dataset; there are 1024 training files and 128 validation files, ~57GB in total. Here’s what our data looks like:
Provision a Kubernetes cluster using Amazon EKS
Use eksctl, a command line tool for Amazon EKS, to create your cluster (update parameters as needed):
Once the cluster is created, you can enable GPU support in it by deploying the NVIDIA Device Plugin:
Install the MPI operator
The MPI Operator is a component of Kubeflow which makes it easy to run allreduce-style distributed training on Kubernetes. Once you have ksonnet installed on your OS, you can follow the steps below to install the MPI Operator. An MPIJob crd and job controller will be installed, then you can submit MPIJob to your Kubernetes cluster.
Add registry:
Install packages:
Generate manifests:
Deploy:
Install the FSx CSI driver onto your cluster
Follow the instructions to install the FSx for Lustre CSI Driver.
Once the driver starts up, you can prepare your Persistent Volume Claim and Storage Class. In order to use FSx for Lustre, you need to create two files, storageclass.yaml and claim.yaml.
S3 can be used as a Lustre data repository, and you don’t need to copy the data explicitly from S3 to Lustre. The Persistent Volume will be dynamically provisioned and can be mounted to containers by Kubernetes.
Follow the Dynamic Provisioning Example to replace subnetId, securityGroupIds, and s3ImportPath in your resource files
- s3ImportPath is the bucket you created with the dataset in the previous steps.
- You can get subnetId and securityGroupId by checking the AWS EC2 Panel. Note that ReadWriteMany is used to allow the volume be shared by Pods.
- Use security groups has port 988 open which is used by Lustre.
You can also refer to Using the FSx for Lustre CSI Driver with Amazon EKS if you want to have a deeper understanding of the CSI driver and how the FSx CSI driver should be set up and used.
Build a container image
AWS Deep Learning Containers (AWS DL Containers) are Docker images pre-installed with deep learning frameworks that make it easy to deploy custom machine learning (ML) environments quickly. Deep learning containers let you skip the complicated process of building and optimizing your environments from scratch; they come with the latest Tensorflow, Horovod, and topology optimizations for AWS instances.
Building the Docker image will take a few minutes. If you’d like to save some time and skip building your own image, we have one already built for you using the AWS DL Container as a base layer, please check the pre-built image details.
If you would like to build the image yourself, download this Dockerfile to your local machine and build a container image as follows.
Log in to access to the image repository before pulling the image:
Build your container image:
Push to your container registry:
Submit a training job
The EKS cluster we built above currently has only one node. In order to run multi-node distributed training, you need to add more. To do this, you can use eksctl to update your autoscaling group to the desired number of nodes.
Check your node group name:
Scale out training worker nodes:
Download the MPI template job manifest, then,
- update replicas to the number of your GPU workers.
- update `nvidia.com/gpu: 8` to number of GPUs on the instance type you are using
- update image to your own built images
Note: Your job might be pending while it waits for the FSx for Lustre Persistent Volume to be provisioned.
Performance optimizations
Below are a few more optimizations for you to try to achieve highest performance (some not included above). You can try any or all of them, then re-run the experiment to see how your results change.
Use the latest deep learning toolkits. The GPU Optimized AMI for EKS comes with the latest NVIDIA Linux Driver 410.104. Thanks to this, we can build a customized container image with CUDA 10.0, Tensorflow v1.13.1, and compatible cuDNN and NCCL. The new versions deliver great performance improvements and critical bug fixes. See Amazon Deep Learning Containers for more details.
Set the GPU clock speeds to their maximum frequency. By default, the NVIDIA driver varies the GPU clock speeds. By setting the GPU clock speeds to their maximum frequency, you can consistently achieve maximum performance with your GPU instances. Check the bootstrap command in this CloudFormation Template. See Optimizing GPU Settings for more details.
Launch instances in Placement Groups to leverage low latency without any slowing. You can use this CloudFormation Template to add new node groups with non-blocking, non-oversubscribed, fully bi-sectional connectivity.
Use the latest AWS VPC CNI plugin to get Jumbo Frame support. All NICs get jumbo frames by default on EKS clusters.
Choose the right storage backend. In our experiment, we tested EBS, EFS, and FSx for Lustre. I/O performance is a key factor for overall performance. Data preprocessing (CPU) and model execution of a training step (GPU) run in parallel during the training. While the accelerator is performing training step N, the CPU is preparing the data for step N+1. If you notice that GPU utilization is not always >95%, one possibility is that the GPUs are waiting for the CPUs to complete work. In this case, there’s room to improve. The P3.16xlarge instance has 488GiB memory, so your entire training dataset can fit into memory. This means that, after one epoch, your storage backend will make no difference to performance. You can leverage local node memory in order to provide throughput, and may be able to use a less-performant backend.
Use static Kubernetes CPU Management policy to access exclusive CPUs. By default, all the pods and containers running on a compute node of your Kubernetes cluster can execute on any available cores in the system. With CPU manager static policy enabled, exclusive CPUs can be allocated for the workload container, but not the other containers. In the training case, CPU work could be sensitive to context switches. Using a static policy can be helpful if multiple training jobs share the same node.
Use the correct MPI processor affinity through process binding. Open MPI supports processor affinity on a variety of systems through process binding, in which each MPI process, along with its threads, is “bound” to a specific subset of processing resources (cores, sockets, etc.). The node’s operating system will constrain the process to run only on that subset. Judicious use of bindings can improve performance by reducing resource contention (by spreading processes apart from one another) or improving interprocess communications (by placing processes close to one another). Binding can also improve reproducibility by eliminating variable process placement. Based on our tests, using --bind-to socket -map-by slot is the most optimized option for p3.16xlarge instances.
Optimize CPU performance by building Tensorflow with Intel®MKL DNN. Intel® has added optimizations to TensorFlow for Intel® Xeon® and Intel® Xeon Phi™ through the use of the Intel® Math Kernel Library for Deep Neural Networks (Intel® MKL-DNN) optimized primitives. The optimizations also provide speed improvements for Intel’s consumer processors, e.g. the i5 and i7 Intel processors. To build Tensorflow from source in container image, check the Dockerfile for details.
Optimize Tensorflow to parallelize data transformation process and parallelism threads. The best value for your workload depends on the hardware and training data you are using. A simple approach is to use the number of available CPU cores. The corresponding parameter is num_parallel_calls . P3.16xlarge has 64 vCPUs and and one training worker uses eight GPUs, so we use 64 / 8 = 8. Based on the instance type you use, dividing available CPU cores by the number of GPUs will give you right number for setting this value.
Adjust the thread pools and tuning CPU performance. The corresponding parameters are intra_op_parallelism_threads and inter_op_parallelism_threads . Normally, setting intra_op_parallelism_threads to the number of physical cores and setting inter_op_parallelism_threads to the number of sockets are recommended. P3.16xlarge has two Sockets and 16 Cores per Socket. Since Hyper-threading is used, every core has two Threads. This gives us a total of 64 logical CPUs and 32 physical cores. Based on our testing in GPU training, we didn’t see a big difference adjusting these parameters. If you don’t want to tune them, just assign 0, and the system will automatically pick a proper number for you.
Conclusion and next steps
The results of this work demonstrate that Amazon EKS can be used for the rapid training of deep learning networks using a performant, flexible, and scalable architecture. That said, we believe that there is still room to optimize performance for the implementation described in this blog post. Our goal is to remove performance barriers in different layers and improve overall scaling efficiency for distributed training on EKS.
Because cluster implementations and workloads for training vary, we built an easy-to-use deep learning benchmark utility that you can use to automatically run deep learning benchmark jobs on Amazon EKS. This helps to automate the process described in this blog. The project is in an early stage and we welcome all suggestions and contributions on aws-eks-deep-learning-benchmark on GitHub.