AWS Open Source Blog
Simplify Amazon EKS Multi-Cluster Authentication with Open Source Pinniped
Amazon Elastic Kubernetes Service (Amazon EKS) makes it easy to deploy, manage, and scale containerized applications using Kubernetes. It has native support for AWS Identity and Access Management (AWS IAM) users and roles as entities that can authenticate against a cluster.
However, some of our customers use enterprise identity providers (IdP) like Active Directory, Okta, Google Workspace, and others, to manage identities in their organizations. Setting up and managing these authentication mechanisms across multiple Amazon EKS clusters for their workloads and integrating them with an IdP service is time consuming and operationally inefficient. To simplify this process, this blog describes how customers can use Pinniped across their Amazon EKS clusters.
Pinniped is an open source authentication solution that provides an easy, secure, consistent, and unified way to log in to all of your Kubernetes clusters. Pinniped is composed of two parts:
- The Pinniped Supervisor is an Open ID Connect (OIDC) server which allows users to authenticate with an external IdP, and then issues its own federation ID tokens to be passed on to clusters based on the user information from the IdP.
- The Pinniped Concierge is a credential exchange API which takes as input a credential from an identity source (e.g., Pinniped Supervisor, proprietary IdP), authenticates the user via that credential, and returns another credential which is understood by the host Kubernetes cluster.
Solution Overview
In this walkthrough, we will use two Amazon EKS clusters, one for installing the Pinniped Supervisor (supervisor cluster) and the other for Pinniped Concierge (workload cluster). In the supervisor cluster, Okta is configured as the external IdP to federate identities. Pinniped Concierge on the workload cluster is configured to trust the supervisor cluster for authentication. The authentication flow works as follows (depicted in Figure 1):
- When a client issues a kubectl command, pinniped-cli running on the client machine will redirect the request to a Pinniped Supervisor endpoint to initiate the authentication process.
- Pinniped Supervisor redirects the request to the IdP (Okta) to perform the authentication, and issues an ID token after successful authentication.
- Pinniped CLI calls the Pinniped Concierge to exchange the Supervisor issued token for a credential to authenticate with the workload cluster.
- The workload cluster confirms the identity and provides appropriate access to the client.
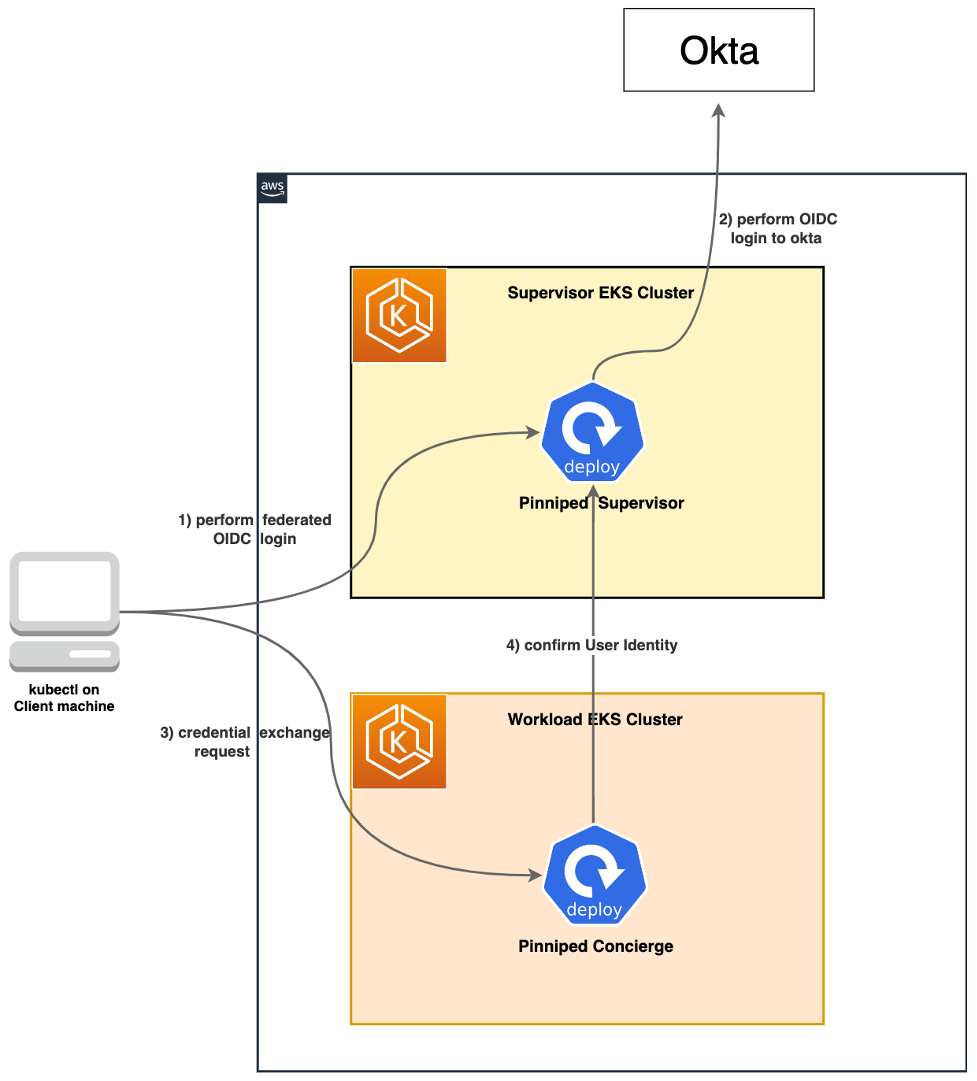
Figure 1 – solution overview.
Prerequisites
- AWS Account
- Two or more Amazon EKS clusters.
- Choose one as Supervisor (eks-supervisor) and the rest as workload clusters (eks-workload-1, etc.)
- Follow the guidance in Amazon EKS documentation to create new Amazon EKS clusters.
- Choose one as Supervisor (eks-supervisor) and the rest as workload clusters (eks-workload-1, etc.)
- A valid DNS domain for your organization and SSL Certificate(s) imported in AWS Certificate Manager (ACM) and a k8s secret. We will use example.com in this walkthrough.
- Follow the instructions in this documentation to import an SSL certificate in ACM.
- SSL certificate issued to demo.example.com. Alternatively, a wild card certificate can be used.
- A k8s TLS secret object created with the SSL certificate details in the Pinniped supervisor cluster. Refer to TLS secrets documentation on how to create one.
- Okta Workforce Identity Cloud Developer account or any compatible IdP listed here.
- One or more user accounts
- One or more Okta Groups. For example, eks-admins, eks-users.
- kubectl – a CLI tool to communicate with kubernetes api server.
- pinniped cli – a CLI used to generate Pinniped-compatible kubeconfig files.
Solution Walkthrough
Configuration setup on the Supervisor cluster
In this section, we will create an application integration in the Okta Admin console to connect Okta IdP with the Pinniped Supervisor, and install the Pinniped Supervisor application on the Supervisor Amazon EKS cluster. Supervisor deployment is exposed outside the cluster using an AWS Network Load Balancer.
Step 1: Create an Okta Application in Admin Console
- Log in to the Okta Admin Console, navigate to Applications > Applications as shown in Figure 2.
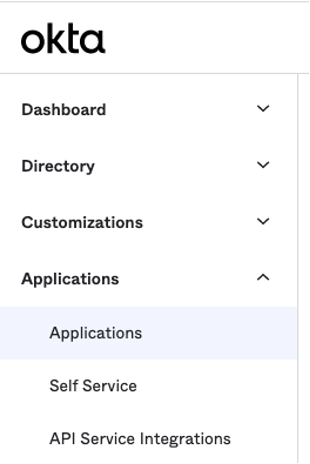
Figure 2: Okta Admin Console
- Follow these steps to create a new app integration, as shown in Figure 3:
- Choose “Create App Integration.”
- For Sign-in method, select OIDC – OpenID Connect.
- For Application type, select Web Application, then choose next.
- Enter a name for your app, such as “EKSApp” and select “Authorization Code” and “Refresh Token” from General Settings section.
- Enter the Sign-in redirect URI. For example, https://demo.example.com/callback.
- Optionally select Limit access to selected groups to restrict which Okta users can log in to Amazon EKS clusters using this integration.
- Save the app and make note of the Client ID and Client secret for future use.
- Run these commands to export the credentials:
export OKTA_CLIENTID=xxxxxxxxxxxexport OKTA_CLIENTSECRET= xxxxxxxxxxxxxxxx
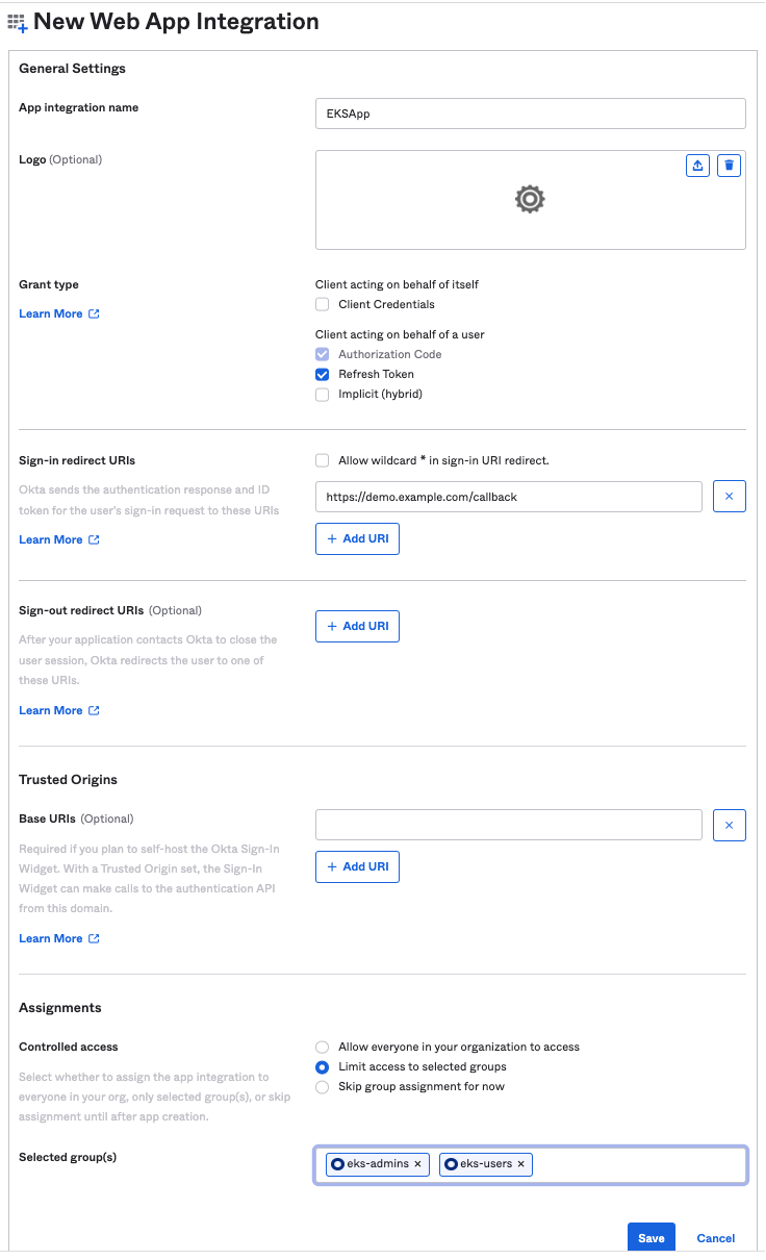
Figure 3: Okta console
Step 2: Install the AWS Load Balancer controller
The AWS Load Balancer Controller manages AWS Elastic Load Balancing (ELB) for a Kubernetes cluster. The controller provisions an AWS Application Load Balancer (ALB) when you create a Kubernetes Ingress object and an AWS Network Load Balancer (NLB) when you create a Kubernetes service of type LoadBalancer.
Follow the instructions from the Amazon EKS documentation to install the AWS Load Balancer controller.
Step 3: Install the ExternalDNS add-on
You can install the ExternalDNS add-on to manage DNS records dynamically via Kubernetes resources in a DNS provider-agnostic way. In this walkthrough, we are using the external-dns integration with an Amazon Route 53 hosted zone to automatically create DNS records for the ingress hostnames.
Follow the instructions to install the external-dns add-on on your Amazon EKS Cluster.
Step 4: Install Pinniped on Supervisor Cluster
Switch the kubectl context to point to the eks-supervisor cluster:
kubectl config use-context <<replace with eks-supervisor context name>>
export AWS_CERTIFICATE_ARN=<<replace with ACM Certificate ARN>>
export DNS_NAME=demo.example.com<<replace with your domain name>>
Install the Pinniped Supervisor by running the following command:
kubectl apply -f https://get.pinniped.dev/v0.23.0/install-pinniped-supervisor.yaml
Run the following command to verify the supervisor installation:
Create a k8s service object of type LoadBalancer to expose the Pinniped supervisor outside the cluster.
Note: For this walkthrough, an internet facing NLB is provisioned. You can modify the “service.beta.kubernetes.io/aws-load-balancer-scheme” annotation to make it private and accessible only with in your network.
You can fetch the network load balancer DNS name using the following command:
Step 5: Verify DNS records in Route 53
In this walkthrough, we used external-dns (Step 3) integration with Route 53 to automatically create the DNS record in Route 53 hosted zone as shown in Figure 4. The DNS record correspond to the Fully Qualified Domain Name (FQDN) of the network load balancer that was provisioned in Step 4. Alternatively, if you using another DNS provider, make sure necessary CNAME records are added to access Pinniped Supervisor application using your domain name.

Figure 4: AWS Console – Route 53 Hosted zone
Step 6: Create FederationDomain
Create a FederationDomain Custom Resource Definition (CRD) resource in the Pinniped Supervisor cluster to act as an OIDC provider to the workload clusters.
Step 7: Configure Okta as the external IdP
To configure Okta as an external IdP, create the OIDCIdentityProvider CRD resource and k8s secret with the Okta credentials obtained in Step 1. Okta Issuer URL can be obtained by logging into Okta Admin Console and navigating to API console under Security menu.
This completes the configuration setup on the Supervisor cluster for federated authentication using Okta. Let’s proceed to set up the workload clusters.
Configuration setup on the workload clusters
In this section, we deploy Pinniped Concierge on the workload cluster and configure it to trust the Supervisor cluster. We also create the role-based access control (RBAC) permissions for a couple of Okta user groups and validate the entire setup by running the kubectl commands.
Step 1: Install Pinniped Concierge on the workload clusters
Switch the kubectl context to point to eks-workload-1 cluster:
kubectl config use-context <<replace with eks-workload-1 context name>>
Install Pinniped Concierge by running the following commands:
kubectl apply -f https://get.pinniped.dev/v0.23.0/install-pinniped-concierge-crds.yaml
kubectl apply -f https://get.pinniped.dev/v0.23.0/install-pinniped-concierge-resources.yaml
Run the following command to verify the pinniped-concierge installation:
Configure Pinniped Concierge on the first workload cluster to trust the Supervisor’s FederationDomain for authentication by creating a JWTAuthenticator:
Step 2: Setup RBAC permissions
Let’s configure the users and groups with appropriate RBAC permissions in the workload cluster. For this, we create two Kubernetes role bindings, one with elevated permissions (cluster-admin) and the other with read only (view) permissions and associate them with Okta groups. Replace the bolded text with your own values.
Step 3: Validate the access
To test the access, cluster administrators can utilize pinniped-cli to generate the kubeconfig files for workload clusters and share with developers, DevOps, and other Amazon EKS users. Switch the kubectl context to the workload cluster and run this command to generate the Pinniped-compatible kubeconfig:
pinniped-cli get kubeconfig > workload1-kubeconfig.yaml
The following screenshot shows a sample Pinniped-compatible kubeconfig.
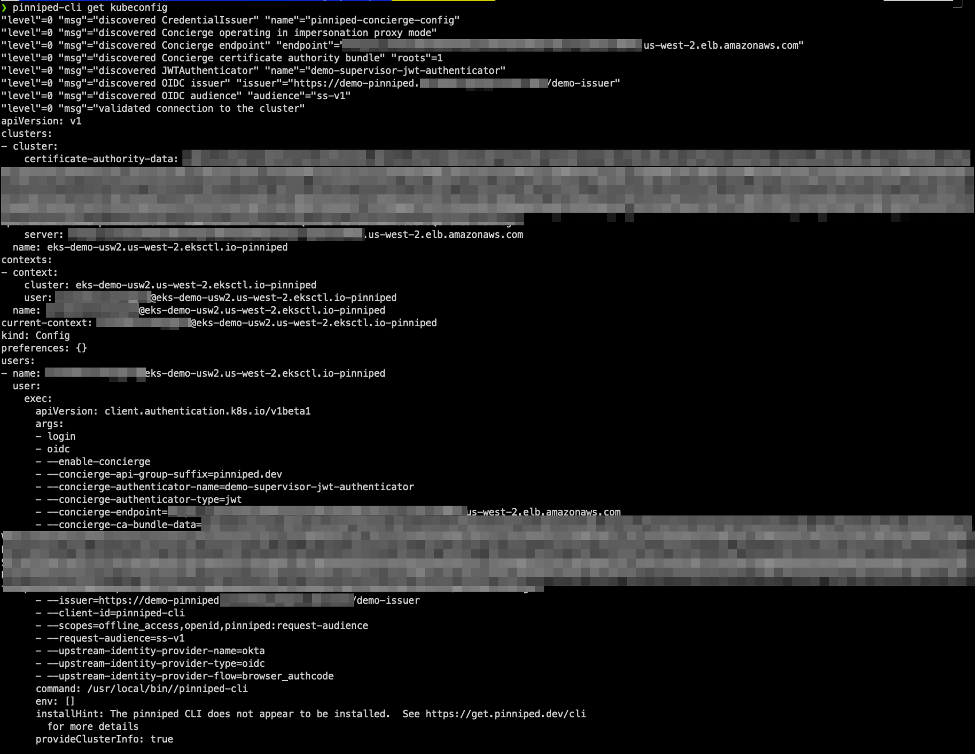
Figure 5: Sample Pinniped compatible kubeconfig
As a developer or DevOps user, you can access the workload clusters by using regular kubectl commands and this kubeconfig.
kubectl can-i get pods --kubeconfig workload1-kubeconfig.yaml
yes
Users are prompted to authenticate with Okta as shown in Figure 6, when these kubeconfig files are used. Once successfully authenticated, they will be granted appropriate access based on their RBAC permissions.
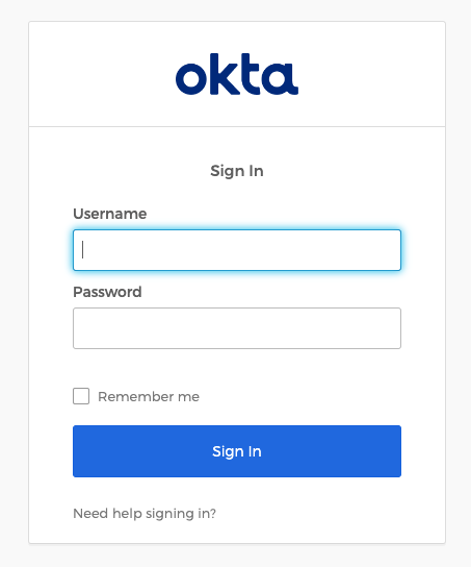
Figure 6: Okta login page

Figure 6: Login success message
Once authenticated, you can utilize the following command to view the user, group, and cluster details.
pinniped-cli whoami --kubeconfig workload1-kubeconfig.yaml
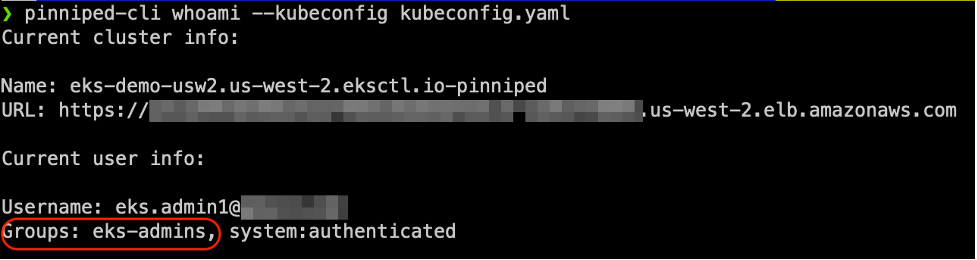
Figure 7: pinniped whoami command
You can repeat the authentication flow for different users/groups to test their appropriate permissions. For example, a read only user group cannot perform create, update, and delete operations on k8s objects.
kubectl can-i create namespace --kubeconfig workload1-kubeconfig.yaml
no
pinniped-cli whoami --kubeconfig workload1-kubeconfig.yaml
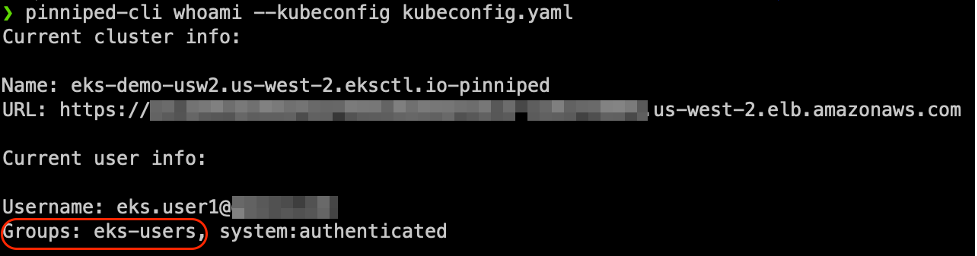
Figure 8: pinniped whoami command
You can repeat the Steps 1 to 3 on multiple workload clusters to integrate the authentication with Okta. This demonstrates how to bring identities from your own IdP into multiple Amazon EKS clusters in a consistent way using Pinniped.
Clean up
To avoid incurring any additional costs, destroy all the infrastructure that you provisioned in relation to the solution described in this post.
Delete Pinniped Concierge on workload clusters:
kubectl config use-context <<replace with eks-workload-1 context name>>
kubectl delete JWTAuthenticator demo-supervisor-jwt-authenticator
kubectl delete -f https://get.pinniped.dev/v0.23.0/install-pinniped-concierge-crds.yaml
kubectl delete -f https://get.pinniped.dev/v0.23.0/install-pinniped-concierge-resources.yaml
Delete Pinniped Supervisor configuration on the supervisor cluster:
kubectl config use-context <<replace with eks-supervisor context name>>
kubectl delete FederationDomain demo-federation-domain -n pinniped-supervisor
kubectl delete service pinniped-supervisor-loadbalancer -n pinniped-supervisor
kubectl delete secret okta-client-credentials -n pinniped-supervisor
kubectl delete OIDCIdentityProvider okta -n pinniped-supervisor
kubectl delete -f https://get.pinniped.dev/v0.23.0/install-pinniped-supervisor.yaml
Delete the Amazon EKS clusters:
Refer to Deleting an Amazon EKS cluster to delete the eks-supervisor and eks-workload-1 clusters.
Delete the Okta Application:
Log in to Okta Admin Console
- Navigate to Applications > Applications
- Select the Application “EKSApp” and press on Deactivate link from the settings icon
Conclusion
In this post, we showed how to streamline Amazon EKS multi-cluster authentication using Pinniped and Okta as an identity provider. We started off configuring Pinniped Supervisor on a supervisor cluster and Pinniped Concierge on the workload clusters to trust the identities from the Supervisor. Then we demonstrated how a user can authenticate with kubectl using their identity from Okta and securely access the workload cluster.
Learn more about supported container solutions, customer case studies, and additional resources at Containers at AWS.