AWS Public Sector Blog
Sharing SAS data with Athena and ODBC
If you work in data analytics, you are probably familiar with the software package SAS. If you share data with other researchers, especially if they are using a different tool, you may try exporting the data as spreadsheet. But if you do this with more than one or two colleagues, you can quickly run into version issues, not knowing which file is the most current. Rather than sending data files everywhere, Amazon Web Services (AWS) offers a simple way to store your data in one central location so that you can read your data into SAS and still share it with other colleagues.
In addition to its native file format, SAS is able to read from many other data sources, including the Open Database Connectivity (ODBC) format. Amazon Athena is an interactive query service that uses standard SQL queries to access your data. SAS can use ODBC to connect to Athena while leaving the data in an open format for use by other users and their software of choice that also supports ODBC. Athena can then be your primary, up-to-date data store to share with your colleagues. In this blog post, I will explain how to export your data, store it in AWS, and query the data using SAS.
Preparing the data
Before Athena can query the data, it should first be in a supported format. Athena supports CSV, JSON, Parquet, and Avro file formats. If your data is already stored in the proprietary SAS format, you can export it to CSV by executing a procedure or using the SAS Export Wizard, as shown in Figure 1. Throughout this post, I will be referencing SAS, version 9.4.

Figure 1: SAS Export Wizard
The resulting CSV data files are stored in an Amazon Simple Storage Service (Amazon S3) bucket. The files can be uploaded to Amazon S3 using the AWS Management Console, the Command Line Interface (CLI), or a third-party Amazon S3 client. You need to use credentials that have permissions to store files in your Amazon S3 bucket.
Glue everything together
Once stored in Amazon S3, the data next needs to be prepared for use. AWS Glue is a serverless data integration service that makes it simple to discover, prepare, and combine data for analytics and other uses. Since CSV files do not include data types, this process labels the fields, indicating whether the data is a string, an integer, a floating point value, etc. AWS Glue creates a data catalog that Athena and other AWS analytics services can reference to access your data.
In the AWS Glue console, create a crawler and point it to the data in Amazon S3. AWS Glue uses an AWS Identity and Access Management (IAM) role to grant it permission to read the data. You can create a new role as the crawler is set up or use an existing role. Choose whether the crawler runs on a schedule or on demand. The crawler only needs to be run when new data is added so that it can be properly categorized. Enter or select a name for the database where the metadata is stored. Then, launch the crawler.

Figure 2: AWS Glue crawler review screen
After the crawler finishes, it creates a table in the metadata database that defines your data files. It lists the column names and identifies a data type for each. You can adjust the data types as needed so review carefully. For example, AWS Glue may identify a field of numbers as an integer, but you may wish to process that field as a string. This only needs to be done once for a set of data.
Setting up Athena
Using the Athena console, you can now query the data in your data catalog. You must be logged in with credentials that have permissions to use Athena and read the data in Amazon S3, as Athena assumes the permissions of the user. (There is an AWS-managed policy named “AmazonAthenaFullAccess” that you can use as a starting point.) Verify that the “database” selected in the Athena console matches what you specified for the AWS Glue crawler. Then, look for your data files in the list of “tables.” The simplest way to check the data is to run the “preview table” query, which returns the first ten records. If the output looks correct, you are ready to configure SAS to query Athena.

Figure 3: Amazon Athena console screen
Setting up ODBC
You will need to add the Athena ODBC drivers to your computer before you can modify SAS. Choose the proper driver for your computer based on its operating system and whether it is 32- or 64-bit. You can find the ODBC installation instructions here.
The ODBC connector also requires credentials. Use IAM to set up programmatic access credentials that have permissions to use Athena and the underlying Amazon S3 resources. If you have an existing console user, you can add “access keys,” which provides an Access key ID and Secret access key for you to use. Note, you must save these values at the time of creation. If you lose or forget them, they cannot be retrieved, and you must create new keys.
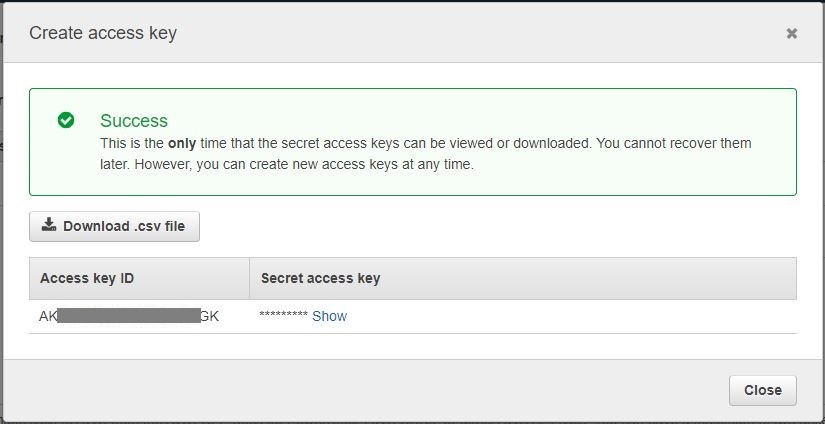
Figure 4: Access key creation
In the ODBC configuration, add the AWS Region, data catalog name, schema (which Athena refers to as database), Athena workgroup (which is primary by default) and the Amazon S3 location where queries should be saved.
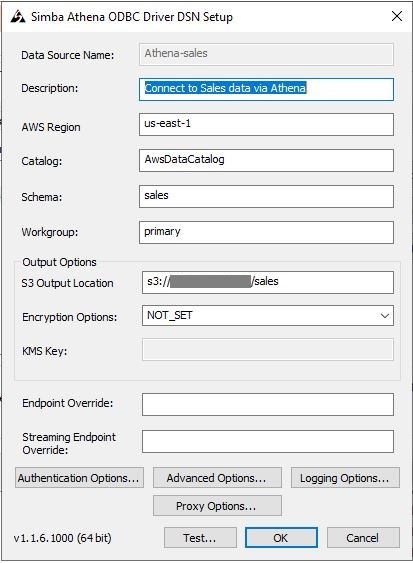
Figure 5: ODBC configuration
Next, select Authentication Options. Select IAM Credentials from the drop-down menu. Then, using the Access key ID and Secret access key from the IAM user, enter the Access key ID in the User field and Secret access key in the Password field. Select OK to save and return to the ODBC configuration window. Then select the Test button to verify that everything is correct. Finally, select OK to save the ODBC configuration.

Figure 6: ODBC authentication options
Pointing SAS to Athena
SAS must also have its ODBC connector installed. This is part of the SAS/ACCESS software package. You may need to re-run the SAS Installer to add these features, as they are not installed by default.
Once the ODBC connector is installed, create a new library. Give the library a name (such as Athena) and choose ODBC as the connection type. In the Data source drop-down, select the name of the ODBC driver. Finally, add options to specify the schema, which is what Athena refers to as database. The User ID and Password fields do not need to be specified because they are stored in the ODBC DSN settings. However, even though the schema is also defined in the ODBC DSN settings, it must be explicitly entered in the configuration. See example in Figure 7.

Figure 7: SAS New Library Wizard
Putting it all together
Open the new library. Your data is shown as a “table” in SAS. Select this table and run your usual SAS PROC SQL queries.
Learn more about how AWS is serving higher education institutions. Explore more research-related blog posts. To get started creating your own research workloads on AWS, reach out to your solutions architect or contact us.