AWS Quantum Technologies Blog
Running Jupyter notebooks as hybrid jobs with Amazon Braket
Researchers often start their quantum journey by running experiments using an interactive development environment such as Amazon Braket managed Jupyter notebooks. While Jupyter notebooks are a fantastic way to get started, for larger workloads, the variability in queue time to process individual quantum tasks on quantum processing units (QPUs) adds up quickly, causing unpredictable and long wait times. This is particularly important for iterative algorithms that interleave classical calculations with calls to a QPU. To overcome this challenge, Amazon Braket introduced Hybrid Jobs – a fully-managed, containerized environment to run experiments combining classical and quantum computations without having to re-queue between quantum tasks.
In this blog post, we show how to seamlessly scale up from an exploratory notebook to repeatable and reliable experiments on different hardware. By running Jupyter notebooks directly as Hybrid Jobs, you can benefit from the performance and convenience of jobs, without modifying existing notebooks.
Running notebooks with Papermill
Jupyter notebooks have become popular tools in the data science industry for their ease-of-use for exploratory work. Notebooks are great for documentation, visualizations, and interactive coding. While the interactive nature of notebooks is ideal for quick iterations, it is difficult to reliably test, programmatically modify, and deploy them in a reproducible way. Papermill is an open-source tool designed to ease the transition from one-off experiments to running repeatable workloads.
Papermill streamlines the process of running, recording, and modifying notebooks in a programmatic way by treating them as functions. Users can run the same notebook with multiple different input values without the need to manually run each cell or convert the notebook into a Python script. This enables you to quickly go from exploratory work to large-scale experiments.
To run a notebook from start-to-finish, you only needs to specify the input notebook file (.ipynb) and the location to save the output notebook, as shown below in Figure 1. Papermill then generates an output notebook containing the results of the run.
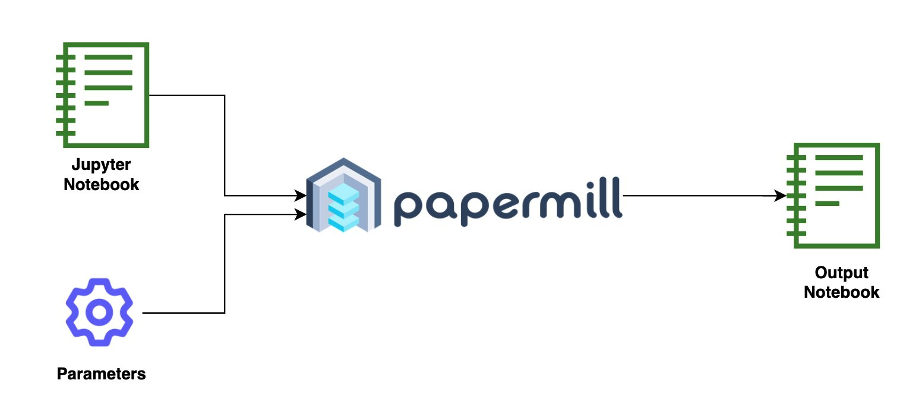
Figure 1: Papermill takes input parameters and a Jupyter notebook and runs the notebooks with those parameters to produce an output notebook.
Using the Papermill Python module, you can run an input notebook and save the result to an output notebook using the code snippet below:
import papermill as pm

pm.execute_notebook(
     "input_notebook.ipynb",
     "output_notebook.ipynb"
)
This code defines the paths for the input and output notebooks. Then, the execute_notebook function is called to run the input notebook and save the output notebook to the specified location. Since Papermill runs notebooks as function calls from Python, they can be called from within a Hybrid Job.
Running Jupyter notebooks as Hybrid Jobs
Now that you have seen how to run a single notebook using Papermill, let’s see how you can package your notebooks using Amazon Braket Hybrid Jobs to scale up and run repeatable experiments. The complete code for this example can be found in the Hybrid Jobs section of the Amazon Braket examples repository.
For this example, the input notebook to run will be the first getting started notebook (0_Getting_Started.ipynb) from the examples repository. This notebook prepares a two-qubit Bell state on a local simulator and plots the resulting measurement counts. The following code snippet builds the Bell state:
from braket.circuits import Circuit

bell_circ = Circuit().h(0).cnot(0,1)
To run the Jupyter notebook as a job, you can use the Python script, notebook_runner.py as the entry point when creating a job. The notebook will be provided as input data, making it accessible to the job at runtime. The following code snippet creates a job that will run the notebook using the local simulator:
from braket.aws import AwsQuantumJob

notebook_name = "0_Getting_started_papermill.ipynb”
job = AwsQuantumJob.create(
    device="local:braket/local",
    source_module="src",
    entry_point="src.notebook_runner:run_notebook",
    input_data=f"src/{notebook_name}",
)
You can use any supported Braket device, such as the on-demand simulator SV1 or QPUs, for the device argument. This example uses the local simulator that comes with the Amazon Braket SDK at no additional cost, so the device argument is set to device = "local:braket/local".
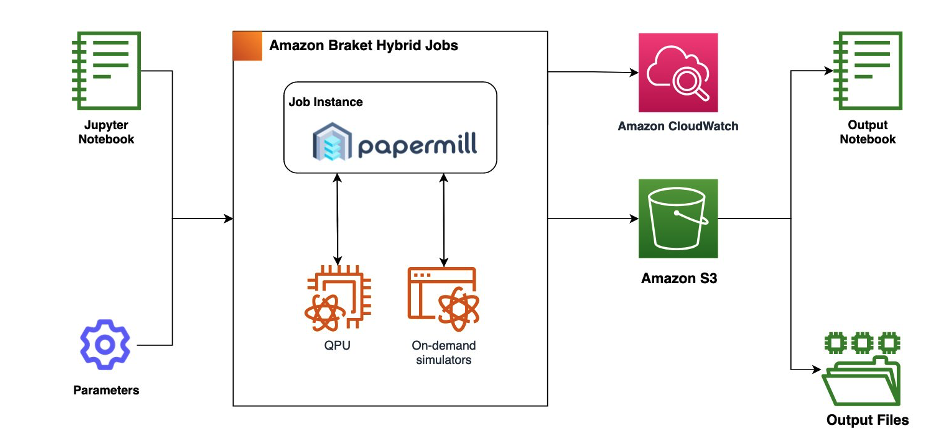
Figure 2: Hybrid Jobs manages the classical compute resources and runs the notebook with priority access to QPUs. The job saves results from the notebook to Amazon S3 and logs the metrics in Amazon CloudWatch. Additionally, you can directly visualize the metrics and costs in the Braket console.
The second argument specifies the source directory that contains the helper script (notebook_runner.py) and the input notebook. We also include a requirements file in the source directory to automatically install any additional Python dependencies, in this case Papermill and Jupyter. The entry point is the run_notebook() function from the notebook_runner.py file.
Lastly, we use the input data argument to upload the input notebook.
Once you run this code, the job will be created, and you can check on its status in the Amazon Braket console. Figure 3 shows a screenshot of the Braket Jobs page that lists all jobs created in the current AWS region.

Figure 3: Screenshot of the Amazon Braket Jobs console page.
After the notebook has finished running, the output notebook along with any other outputs will be saved as a compressed file in an Amazon S3 bucket under output/model.tar.gz. To download the results, navigate to the job results directory through the Braket console or use the provided notebook downloader:
job.download_result("folder/results")Now that we’ve seen the basics of running a Jupyter notebook in Hybrid Jobs, let’s take a look at how to scale up to run and organize multiple experiments with various parameters.
Parameterizing notebooks for different QPUs
Now that you have packaged your notebook within a job container, let’s see how you can parametrize notebooks to run repeatable experiments using Papermill. This enables you to change settings, such as the number of shots, without modifying the underlying notebook code.
In the top cell of the input notebook, we declare all the parameters to use in the job. To tell Papermill which parameters it can change, we add a tag to this cell called parameters. Using an IDE such as VSCode, a cell tag can be added by clicking the + sign at the bottom of a cell as shown in Figure 4. Alternatively, in JupyterLab, select the gear icon from the left-hand menu. This will open a sidebar with the option to Add Tag. Type in parameters and click + to save this tag. For more information, see the Papermill documentation.
In our example, we define three parameters: shots, device_arn, and results_dir.
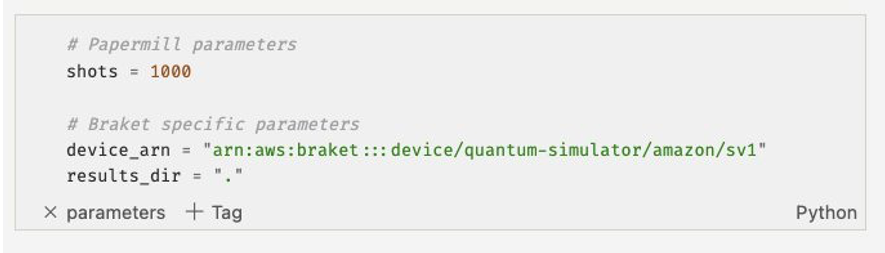
Figure 4: Jupyter notebook cell with the “parameters” tag in VS Code.
You can define any custom parameter that you need for your algorithm in this way. The device_arn and results_dir are Braket specific parameters, that are automatically populated by the corresponding fields when you create the job. The device_arn enables you to define which QPU your notebook will be granted priority access to for the duration of your job. The results_dir parameter is used by Hybrid Jobs to save the output in the correct S3 bucket. When running the notebook locally, this should be the path where you want to save files. Additional parameters (such as shots), will be passed to the notebook as the hyperparameters option when you create a job.
By parameterizing your notebook, you can now run the same experiment on different QPUs with priority access. For example, the following script submits a job to four different Braket devices (on-demand simulators and QPUs). Note that running hybrid jobs through on-demand simulators and QPUs does incur a cost.
Refer to our Pricing Page to review the costs prior to submitting your workload. You can also use the Braket Cost Tracker to track your costs in near real-time.
devices = ["arn:aws:braket:::device/quantum-simulator/amazon/sv1",
           "arn:aws:braket:us-west-1::device/qpu/rigetti/Aspen-M-3",
           "arn:aws:braket:eu-west-2::device/qpu/oqc/Lucy",
           "arn:aws:braket:::device/qpu/ionq/ionQdevice"]

for device_arn in devices:
    AwsQuantumJob.create(
        device=device_arn,
        source_module="src",
        entry_point="src.notebook_runner:run_notebook",
        input_data=f"src/{notebook_name}",
        hyperparameters={"shots": 1_000} # user-specified hyperparameters
    )
Submitting all notebooks simultaneously is convenient as you don’t have to wait for the device to become available. Amazon Braket will automatically queue your job and run your tasks when the device comes online, prioritizing them over standalone tasks. This is especially important for iterative algorithms such as VQE that run a sequence of tasks in order to converge.
The Braket console shows the running jobs in the current AWS region as shown in Figure 5. The Rigetti, OQC and IonQ QPUs are available in us-west-1, eu-west-2 and us-east-1 regions respectively. Note that the simulators SV1 and DM1 are available in all regions.

Figure 5: List of current running jobs in the Braket console page in us-east-1 region.
The jobs will complete when the target device is available. Note that QPU availability varies among the hardware providers. The latest availability status is available on the Devices page of the Amazon Braket console. The cost for running this example at time of writing of this blog is $11.60 USD.
The output notebooks can be downloaded with the download_result function, or by following the output data configuration tab in in the Jobs page on the console as shown in Figure 6.
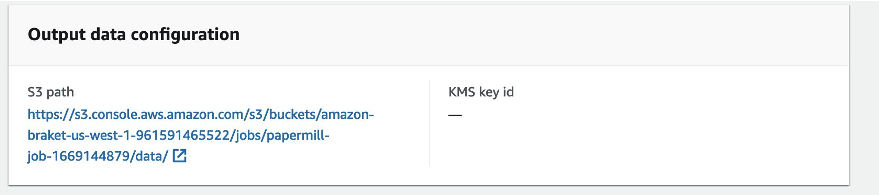
Figure 6: S3 path to download the job results.
Since each notebook saves a histogram.png file, you can easily compare the results from each QPU or simulator. Figure 7 shows the final measurement counts from preparing a Bell state on all devices. You can find the code for generating this plot in the GitHub example notebook.
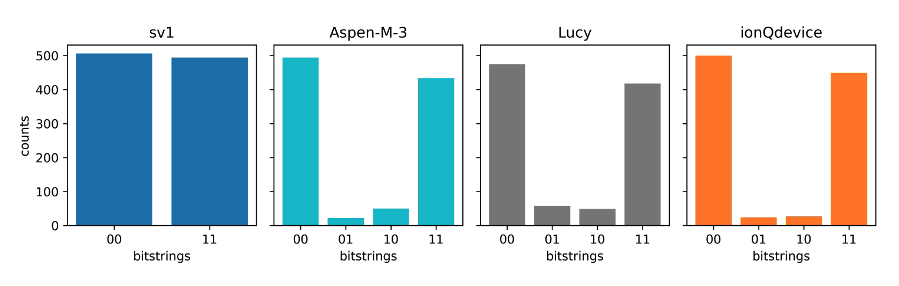
Figure 7: Histogram of measurement counts from preparing a two-qubit Bell state. Histograms were generated by running each notebook on different devices using Papermill and Hybrid Jobs.
In this example, you prepared a Bell state on each device. Designing experiments that run consistently across different devices is essential for quantum algorithm research. To achieve this, automating the process of running notebooks on various target devices can be a powerful tool.
Submitting notebooks to the Braket console
The previous Bell state example demonstrated how to create jobs using the Amazon Braket SDK, but you can also create jobs using the Braket Console. To upload a notebook to run as a job, follow this link to the “Create job” page. You will be prompted to input details of the job you want to create (Fig. 8).
Step 1: Create a Job name. First, enter a name for the job. In this example the name is papermill-example.
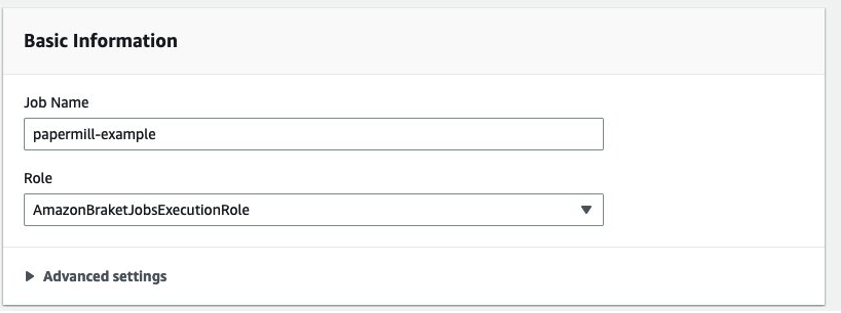
Figure 8: Enter a name and role for the job.
Step 2: Upload files to run. Next, you select the files to upload for the run. In this example, you must first create an S3 bucket containing the src folder code. Then you can select this bucket as source module for the job. The entry point is src.notebook_runner:run_notebook.
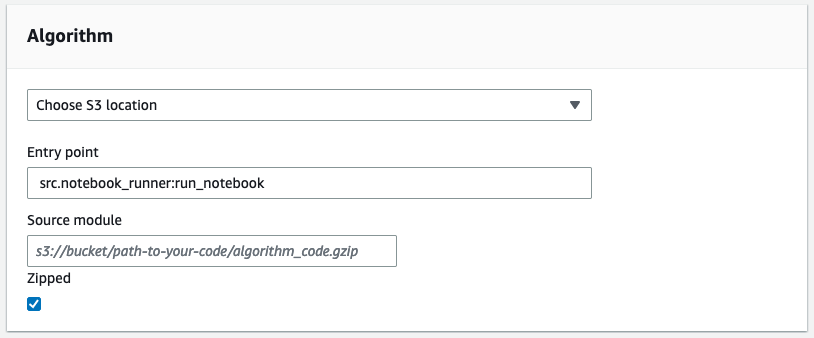
Figure 9: Choose either to upload a zipped file directly, or an S3 location, along with the entry point.
Step 3: Choose a device. The next step is to select the simulator or QPU to use in the job. Make sure you are in the AWS region in which the QPU is available. Below, we choose the on-demand simulator SV1 which is available in all regions where Amazon Braket is available.
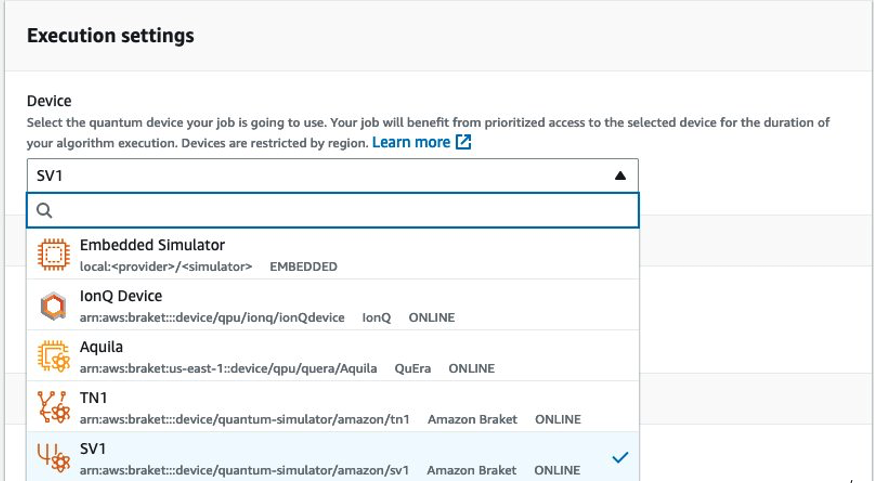
Figure 10: Selecting a Braket device in us-east-1 region from the drop-down menu
Step 4: Adding hyperparameters. You can click “Add new hyperparameter” to add the number of shots to execute. In the example below, we set the number of shots to 2000.
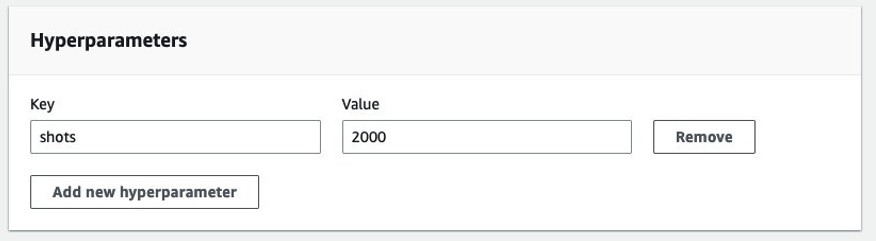
Figure 11: Adding “shots” as a hyperparameter.
Step 5: Add the notebook to run. Finally, under the Input Data section, upload the notebook you want to run. In this example, the channel name is “input”, however any name will work.
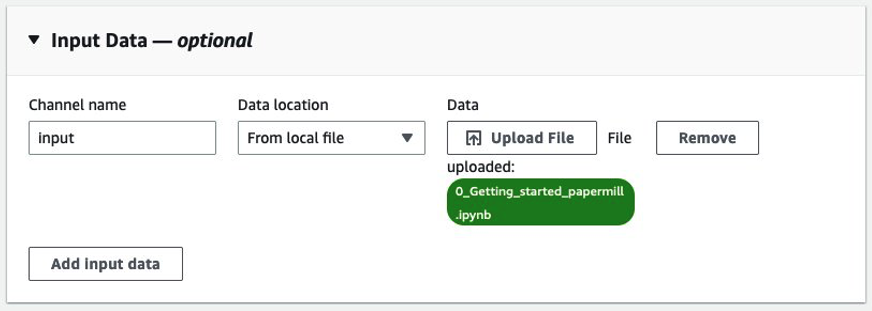
Figure 12: Selecting the input data as the input notebook, in this example “0_Getting_started_papermill.iypnb”.
Step 6: Download results. Once the job completes, the results are saved to Amazon S3. In the completed job, you can click the output data path from Figure 6 to download the results. The results will contain the output notebook and any additional saved artifacts.
Summary
Designing and running experiments across a variety of different parameters and devices such as QPUs and simulators is essential for quantum algorithm research. In this blog post, we showed how Papermill and Hybrid Jobs allow a seamless transition from exploratory analysis in notebooks to running a systematic experiment. By using jobs, researchers can get the benefits of performance, reliability, and best practices for experiment management – all while keeping the familiar notebook interface.
Developers can also use Papermill to design robust integration tests that mimic complex workflows spanning across various Braket simulators and QPUs. To get started with Papermill notebooks on Amazon Braket, follow the full example available on our GitHub page.
To get started using quantum computers for your own algorithms research, check out the Amazon Braket quantum computing service and apply for credits via the AWS Cloud Credit for Research program.