AWS Security Blog
Access AWS using a Google Cloud Platform native workload identity
Organizations undergoing cloud migrations and business transformations often find themselves managing IT operations in hybrid or multicloud environments. This can make it more complex to safeguard workloads, applications, and data, and to securely handle identities and permissions across Amazon Web Services (AWS), hybrid, and multicloud setups.
In this post, we show you how to assume an AWS Identity and Access Management (IAM) role in your AWS accounts to securely issue temporary credentials for applications that run on the Google Cloud Platform (GCP). We also present best practices and key considerations in this authentication flow. Furthermore, this post provides references to supplementary GCP documentation that offer additional context and provide steps relevant to setup on GCP.
Access control across security realms
As your multicloud environment grows, managing access controls across providers becomes more complex. By implementing the right access controls from the beginning, you can help scale your cloud operations effectively without compromising security. When you deploy apps across multiple cloud providers, you should implement a homogenous and consistent authentication and authorization mechanism across both cloud environments, to help maintain a secure and cost-effective environment. In the following sections, you’ll learn how to enforce such objectives across AWS and workloads hosted on GCP, as shown in Figure 1.
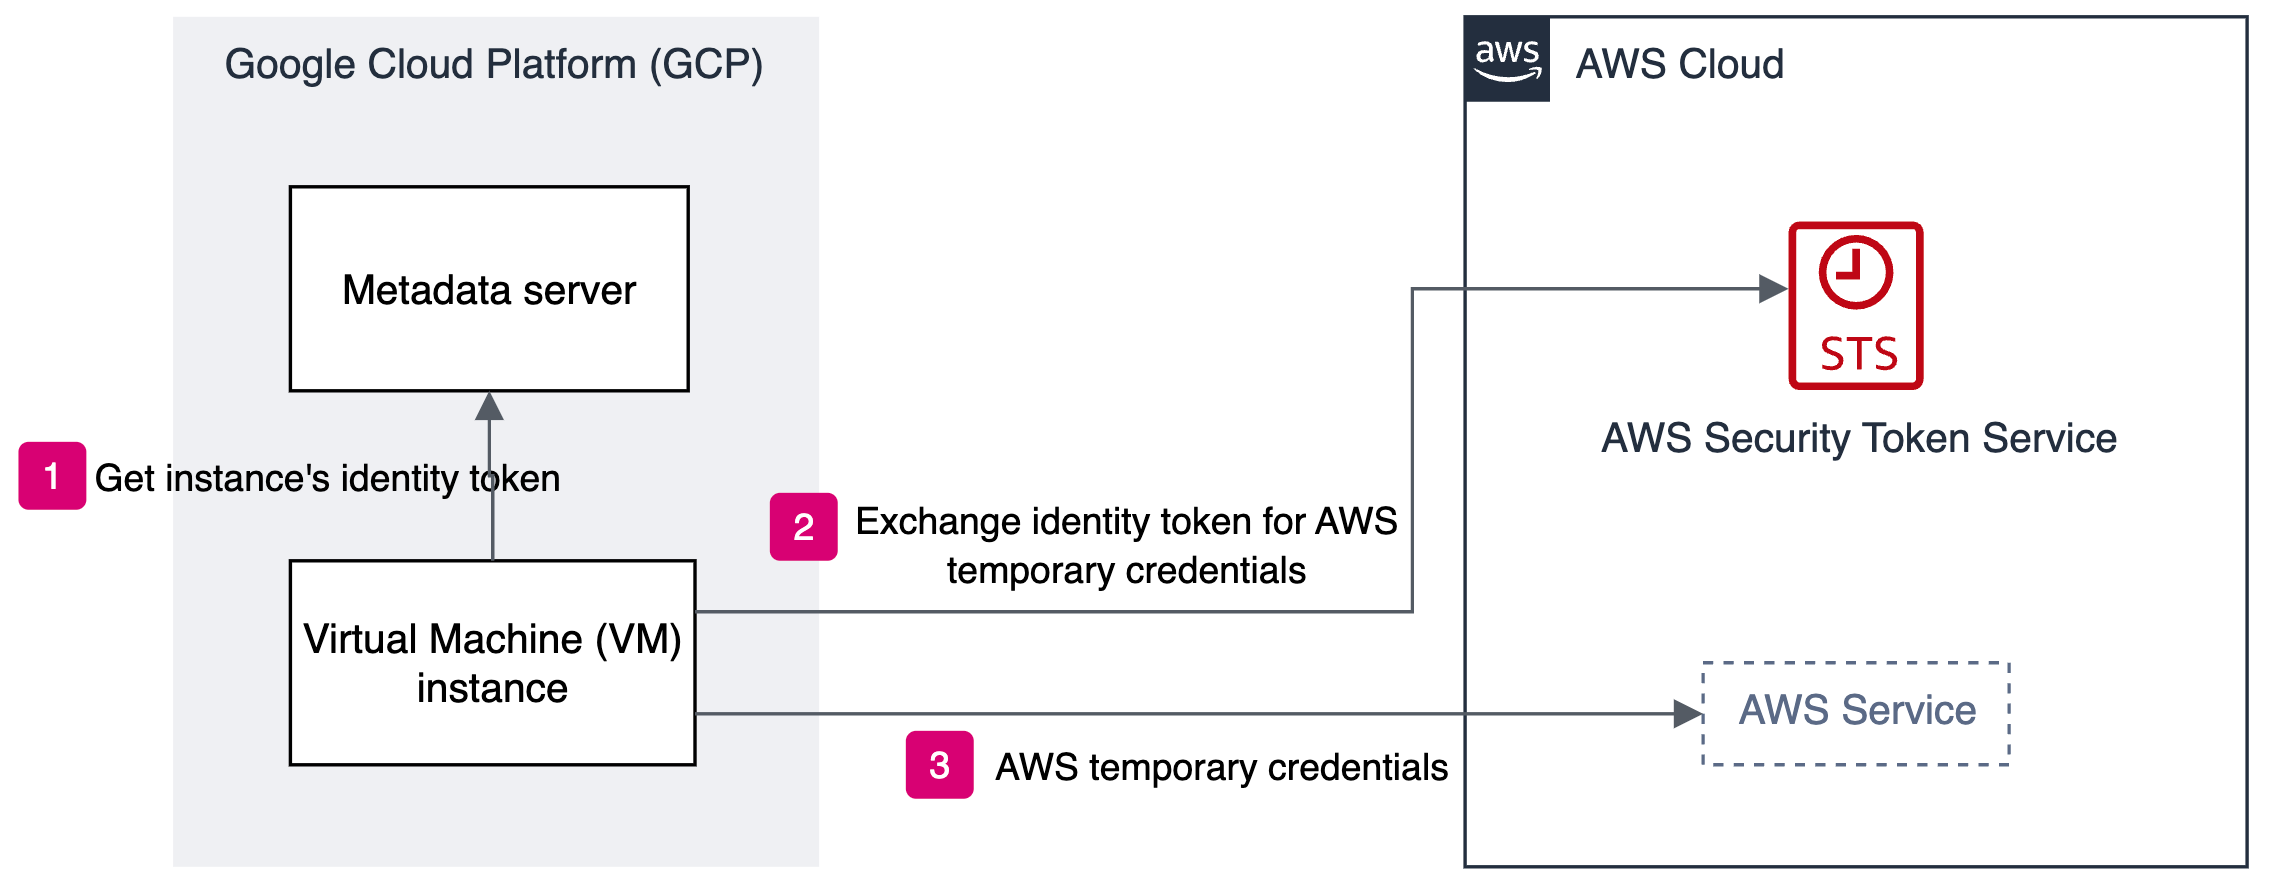
Figure 1: Authentication flow between GCP and AWS
Prerequisites
To follow along with this walkthrough, complete the following prerequisites.
- Create a service account in GCP. Resources in GCP use service accounts to make API calls. When you create a GCP resource, such as a compute engine instance in GCP, a default service account gets created automatically. Although you can use this default service account in the solution described in this post, we recommend that you create a dedicated user-managed service account, because you can control what permissions to assign to the service account within GCP.
To learn more about best practices for service accounts, see Best practices for using service accounts in the Google documentation. In this post, we use a GCP virtual machine (VM) instance for demonstration purposes. To attach service accounts to other GCP resources, see Attach service accounts to resources.
- Create a VM instance in GCP and attach the service account that you created in Step 1. Resources in GCP store their metadata information in a metadata server, and you can request an instance’s identity token from the server. You will use this identity token in the authentication flow later in this post.
- Install the AWS Command Line Interface (AWS CLI) on the GCP VM instance that you created in Step 2.
- Install jq and curl.
GCP VM identity authentication flow
Obtaining temporary AWS credentials for workloads that run on GCP is a multi-step process. In this flow, you use the identity token from the GCP compute engine metadata server to call the AssumeRoleWithWebIdentity API to request AWS temporary credentials. This flow gives your application greater flexibility to request credentials for an IAM role that you have configured with a sufficient trust policy, and the corresponding Amazon Resource Name (ARN) for the IAM role must be known to the application.
Define an IAM role on AWS
Because AWS already supports OpenID Connect (OIDC) federation, you can use the OIDC token provided in GCP as described in Step 2 of the Prerequisites, and you don’t need to create a separate OIDC provider in your AWS account. Instead, to create an IAM role for OIDC federation, follow the steps in Creating a role for web identity or OpenID Connect Federation (console). Using an OIDC principal without a condition can be overly permissive. To make sure that only the intended identity provider assumes the role, you need to provide a StringEquals condition in the trust policy for this IAM role. Add the condition keys accounts.google.com:aud, accounts.google.com:oaud, and accounts.google.com:sub to the role’s trust policy, as shown in the following.
Make sure to replace the <placeholder values> with your values from the Google ID Token. The ID token issued for the service accounts has the azp (AUTHORIZED_PARTY) field set, so condition keys are mapped to the Google ID Token fields as follows:
- accounts.google.com:oaud condition key matches the aud (AUDIENCE) field on the Google ID token.
- accounts.google.com:aud condition key matches the azp (AUTHORIZED_PARTY) field on the Google ID token.
- accounts.google.com:sub condition key matches the sub (SUBJECT) field on the Google ID token.
For more information about the Google aud and azp fields, see the Google Identity Platform OpenID Connect guide.
Authentication flow
The authentication flow for the scenario is shown in Figure 2.
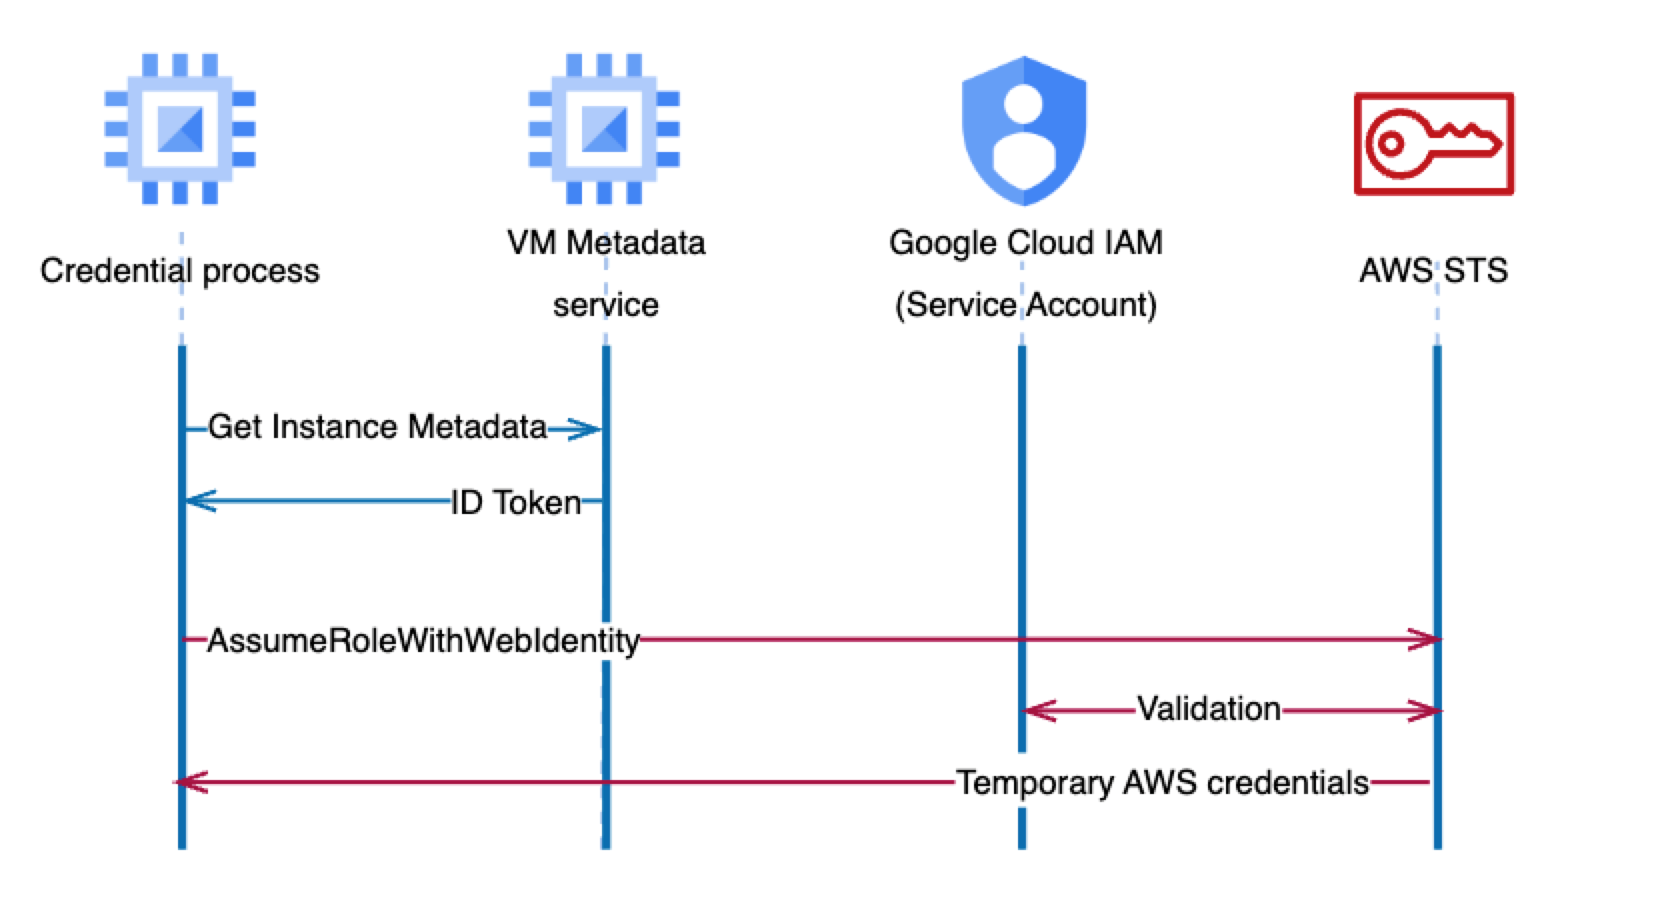
Figure 2: Detailed authentication flow with AssumeRoleWithWebIdentity API
The authentication flow has the following steps:
- On AWS, you can source external credentials by configuring the credential_process setting in the config file. For the syntax and operating system requirements, see Source credentials with an external process. For this post, we have created a custom profile TeamA-S3ReadOnlyAccess as follows in the config file:
To use different settings, you can create and reference additional profiles.
- Specify a program or a script that credential_process will invoke. For this post, credential_process invokes the script /opt/bin/credentials.sh which has the following code. Make sure to replace <111122223333> with your own account ID.
The script performs the following steps:
- Google generates a new unique instance identity token in the JSON Web Token (JWT) format.
The payload of the token includes several details about the instance and the audience URI, as shown in the following.
The IAM trust policy uses the aud (AUDIENCE), azp (AUTHORIZED_PARTY) and sub (SUBJECT) values from the JWT token to help ensure that the IAM role defined in the section Define an IAM role in AWS can be assumed only by the intended GCP service account.
- The script invokes the AssumeRoleWithWebIdentity API call, passing in the identity token from the previous step and specifying which IAM role to assume. The script uses the Identity subject claim as the session name, which can facilitate auditing or forensic operations on this AssumeRoleWithWebIdentity API call. AWS verifies the authenticity of the token before returning temporary credentials. In addition, you can verify the token in your credential program by using the process described at Obtaining the instance identity token.
The script then returns the temporary credentials to the credential_process as the JSON output on STDOUT; we used jq to parse the output in the desired JSON format.
The following is an example of temporary credentials returned by the credential_process script:
- Google generates a new unique instance identity token in the JSON Web Token (JWT) format.
Note that AWS SDKs store the returned AWS credentials in memory when they call credential_process. AWS SDKs keep track of the credential expiration and generate new AWS session credentials through the credential process. In contrast, the AWS CLI doesn’t cache external process credentials; instead, the AWS CLI calls the credential_process for every CLI request, which creates a new role session and could result in slight delays when you run commands.
Test access in the AWS CLI
After you configure the config file for the credential_process, verify your setup by running the following command.
The output will look similar to the following.
Amazon CloudTrail logs the AssumeRoleWithWebIdentity API call, as shown in Figure 3. The log captures the audience in the identity token as well as the IAM role that is being assumed. It also captures the session name with a reference to the Identity subject claim, which can help simplify auditing or forensic operations on this AssumeRoleWithWebIdentity API call.
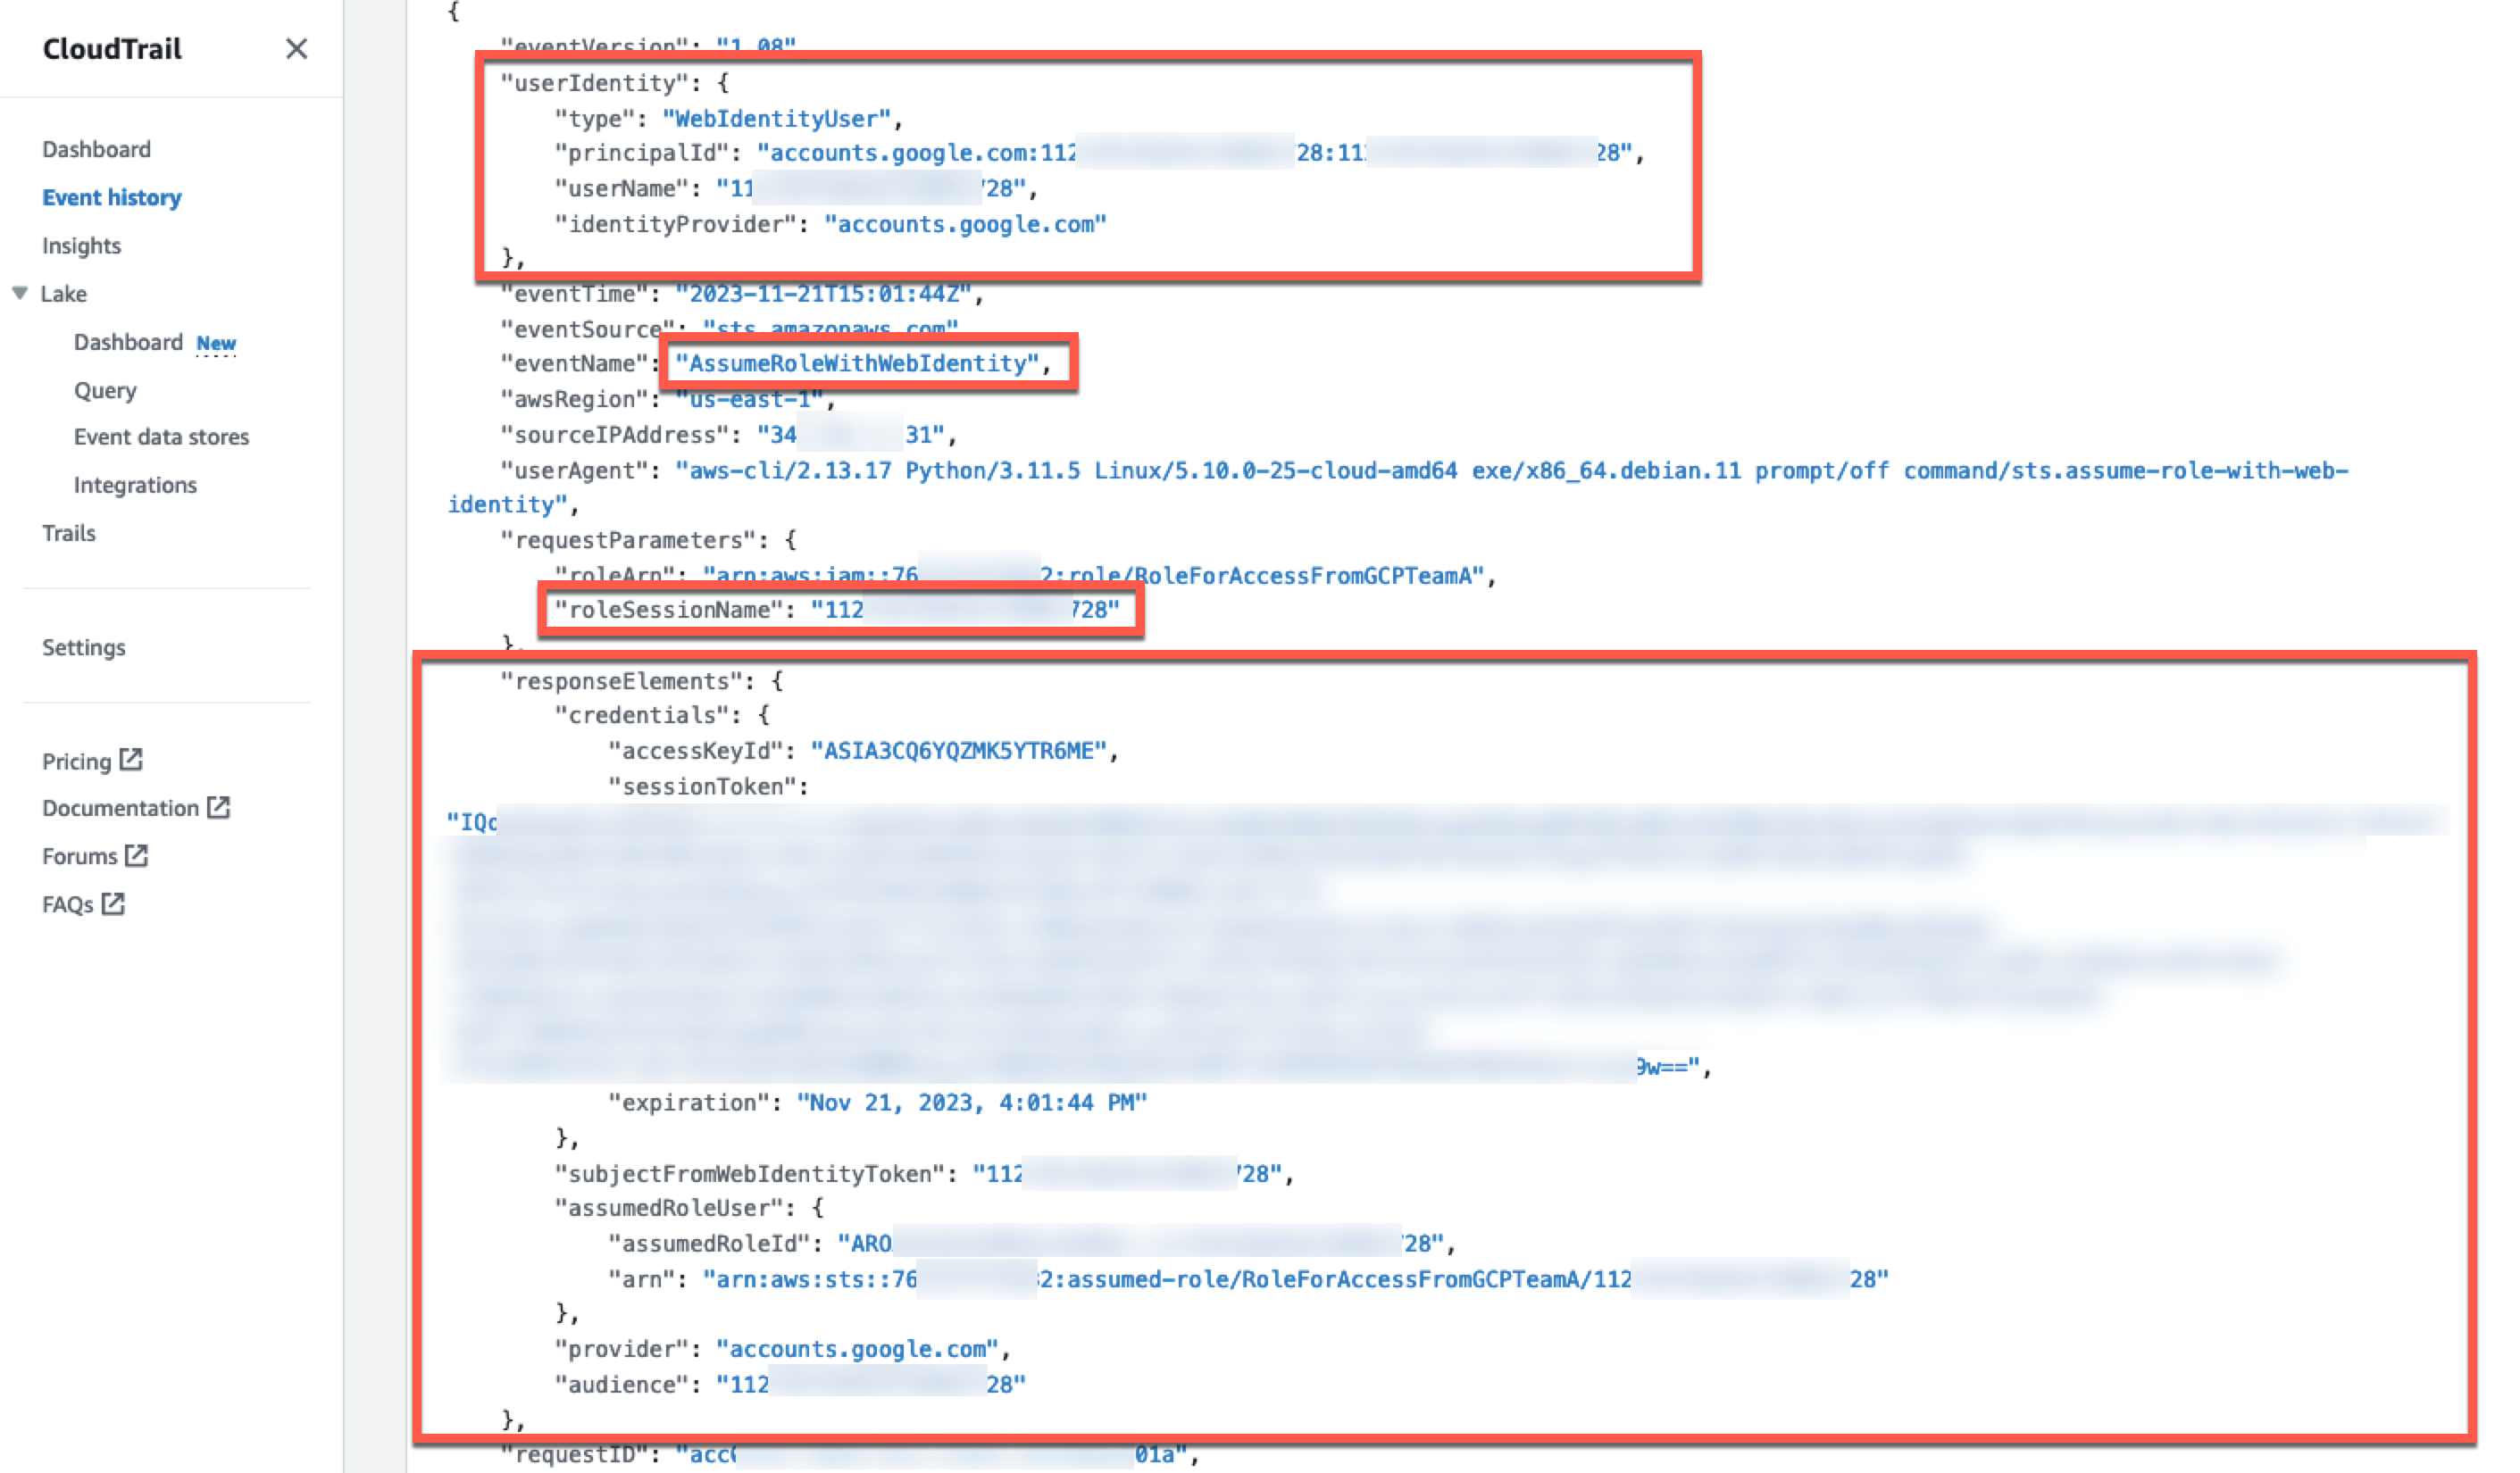
Figure 3: CloudTrail event for AssumeRoleWithWebIdentity API call from GCP VM
Test access in the AWS SDK
The next step is to test access in the AWS SDK. The following Python program shows how you can refer to the custom profile configured for the credential process.
Before you run this program, run pip install boto3. Create an IAM role that has the AmazonS3ReadOnlyAccess policy attached to it. This program prints the names of the existing S3 buckets in your account. For example, if your AWS account has two S3 buckets named DOC-EXAMPLE-BUCKET1 and DOC-EXAMPLE-BUCKET2, then the output of the preceding program shows the following:
If you don’t have an existing S3 bucket, then create an S3 bucket before you run the preceding program.
The list_bucket API call is also logged in CloudTrail, capturing the identity and source of the calling application, as shown in Figure 4.
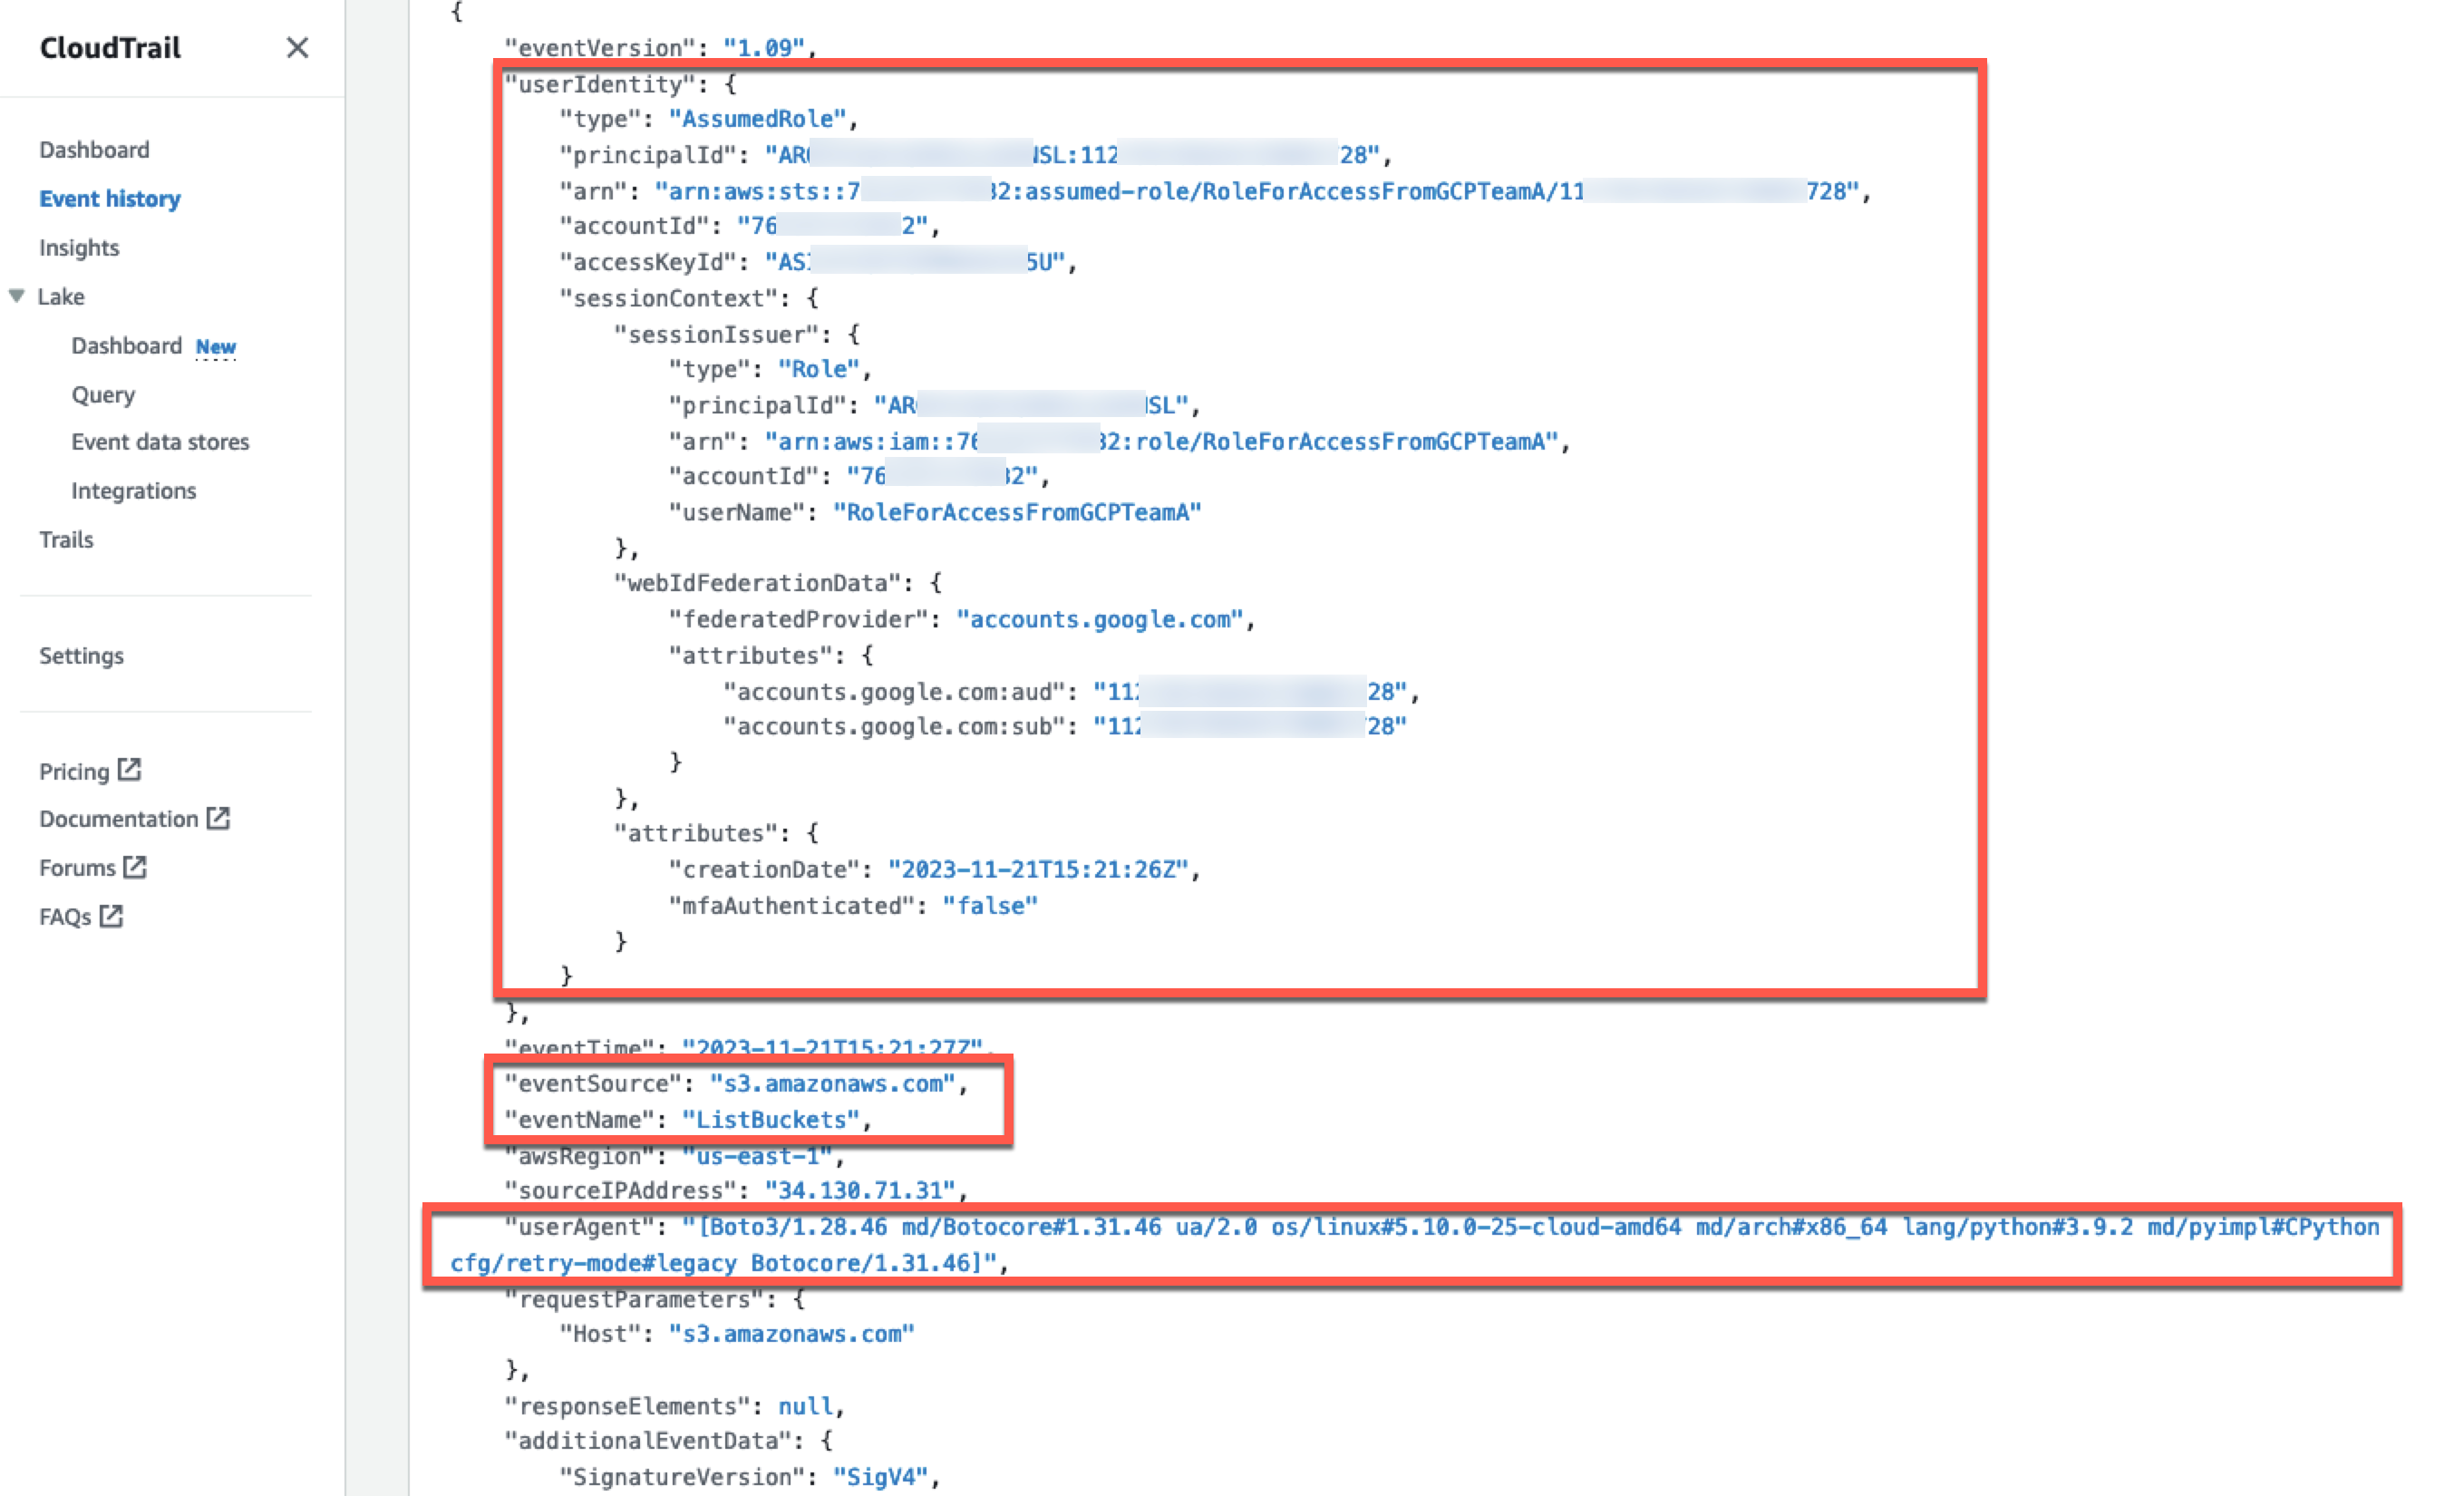
Figure 4: CloudTrail event for S3 API call made with federated identity session
Clean up
If you don’t need to further use the resources that you created for this walkthrough, delete them to avoid future charges for the deployed resources:
- Delete the VM instance and service account created in GCP.
- Delete the resources that you provisioned on AWS to test the solution.
Conclusion
In this post, you learned how to exchange the identity token of a virtual machine running on a GCP compute engine to assume a role on AWS, so that you can seamlessly and securely access AWS resources from GCP hosted workloads.
We walked you through the steps required to set up the credential process and shared best practices to consider in this authentication flow. You can also apply the same pattern to workloads deployed on GCP functions or Google Kubernetes Engine (GKE) when they request access to AWS resources.
If you have feedback about this post, submit comments in the Comments section below. If you have questions about this post, contact AWS Support.
Want more AWS Security news? Follow us on Twitter.