AWS Security Blog
How to access AWS resources from Microsoft Entra ID tenants using AWS Security Token Service
March 19, 2025: We made some corrections to the syntax, including fixing a hyphen and the format of the quotation marks.
September 20, 2024: Updated with information on the v1.0 and v2.0 access tokens in the Microsoft identity platform and changes in the Audience value when v2.0 access tokens are used. Removed a note about obtaining access tokens from managed identities.
Use of long-term access keys for authentication between cloud resources increases the risk of key exposure and unauthorized secrets reuse. Amazon Web Services (AWS) has developed a solution to enable customers to securely authenticate Azure resources with AWS resources using short-lived tokens to reduce risks to secure authentication.
In this post, we guide you through the configuration of AWS Identity and Access Management (IAM) OpenID Connect (OIDC) identity provider to establish trust with a Microsoft Entra ID tenant. By following the steps outlined in this post, you will enable a Microsoft Azure hosted resources to use an IAM role, with privileges, to access your AWS resources.
Solution overview
In this solution, we show you how to obtain temporary credentials in IAM. The solution uses AWS Security Token Service (AWS STS) in conjunction with Azure managed identities and Azure App Registration. This method provides a more secure and efficient way to bridge Azure and AWS clouds, providing seamless integration without compromising secure authentication and authorization standards.
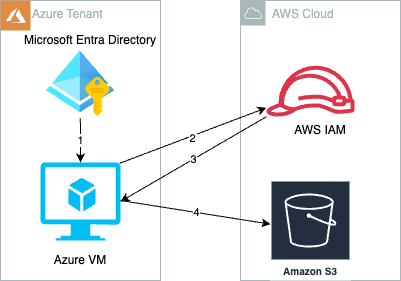
Figure 1: Azure cloud resources access AWS resources with temporary security credentials
AWS IAM,
As shown in Figure 1, the process is as follows:
- Create and attach an Azure managed identity to an Azure virtual machine (VM).
- Azure VM gets an Azure access token from the managed identity and sends it to AWS STS to retrieve temporary security credentials.
- An IAM role created with a valid Azure tenant audience and subject validates that the claim is sourced from a trusted entity and sends temporary security credentials to the requesting Azure VM.
- Azure VM accesses AWS resources using the AWS STS provided temporary security credentials.
Prerequisites
You must have the following before you begin:
- An AWS account.
- An Azure account subscription.
- In your Azure account, ensure there’s an existing managed identity or create a new one for testing this solution. More information can be found in Configure managed identities for Azure resources on a VM using the Azure portal.
- Create a VM instance in Azure and attach the managed identity that you created in Step 3.
- Install jq, boto3, and AWS Command Line Interface (AWS CLI) version 2 on an Azure VM for testing.
Implementation
To prepare the authentication process with Microsoft Entra ID, an enterprise application must be created in Microsoft Entra ID. This serves as a sign-in endpoint and provides the necessary user identity information through OIDC access tokens to the identity provider (IdP) of the target AWS account.
Register a new application in Azure
- In the Azure portal, select Microsoft Entra ID.
- Select App registrations.
- Select New registration.
- Enter a name for your application and then select an option in Supported account types (in this example, we chose Accounts in this Organization directory only). Leave the other options as is. Then choose Register.

Figure 2: Register an application in the Azure portal
Configure the application ID URI
- In the Azure portal, select Microsoft Entra ID.
- Select App registrations.
- On the App registrations page, select All applications and choose the newly registered application.
- On the newly registered application’s overview page, choose Application ID URI and then select Add.
- On the Edit application ID URI page, enter the value of the URI, which looks like
urn://<name of the application> or api://<name of the application>. - The application ID URI will be used later as the audience in the identity provider (idP) section of AWS.
Note: There are two access token versions available in the Microsoft identity platform: v1.0 and v2.0. These versions determine the claims that are in the token. Authorized party (azp) is a string and a GUID, and it is only present in v2.0 tokens. If the azp claim is set, then enter this value as the Audience value in the identity provider (IdP) configuration (step 1d in the Configure AWS section of this post).

Figure 3: Configure the application ID URI
- Open the newly registered application’s overview page.
- In the navigation pane, under Manage, choose App roles.
- Select Create app role and then enter a Display name and for Allowed member types, select Both (Users/Groups + Applications).
- For Description, enter a description.
- Select Do you want to enable this app role? And then choose Apply.

Figure 4: Create and enable an application role
- Assign a managed identity—as created in Step 4 of the prerequisites—to the new application role. This operation can only be done by either using the Azure Cloud Shell or running scripts locally by installing the latest version of the Microsoft Graph PowerShell SDK. (For more information about assigning managed identities to application roles using PowerShell, see Azure documentation.)
You must have the following information:
- ObjectID: To find the managed identity’s Object (Principal) ID, go to the Managed Identities page, select the identity name, and then select Overview.

Figure 5: Find the ObjectID of the managed identity
- ID: To find the ID of the application role, go to App registrations, select the application name, and then select App roles.

Figure 6: Find the ID of the application role
- PrincipalID: Same as ObjectID, which is the managed identity’s Object (Principal) ID.
- ResourceID: The ObjectID of the resource service principal, which you can find by going to the Enterprise applications page and selection the application. Select Overview and then Properties to find the ObjectID.

Figure 7: Find the ResourceID
- ObjectID: To find the managed identity’s Object (Principal) ID, go to the Managed Identities page, select the identity name, and then select Overview.
- With the resource IDs, you can now use Azure Cloud Shell and run the following script in PowerShell terminal with New-AzureADServiceAppRoleAssignment. Replace the variables with the resource IDs.
Configure AWS
- In the AWS Management Console for IAM, create an IAM Identity Provider.
- In the left navigation pane, select Identity providers and then choose Add an identity provider.
- For Provider type, choose OpenID Connect.
- For Provider URL, enter
https://sts.windows.net/<Microsoft Entra Tenant ID>. Replace<Microsoft Entra Tenant ID>with your Tenant ID from Azure. This allows only identities from your Azure tenant to access your AWS resources. - For Audience use the
client_idof the Azure managed identity or the application ID URI from enterprise applications.- For Audience, enter the application ID URI that you configured on step 5 of Configure the application ID URI. If you have additional client IDs (also known as audiences) for this IdP, you can add them to the provider detail page later.
- You can also use different audiences in the role trust policy in the next step to limit the roles that specific audiences can assume. To do so, you must provide a
StringEqualscondition in the trust policy of the IAM role.

Figure 8: Adding an audience (client ID)
- Using an OIDC principal without a condition can be overly permissive. To make sure that only the intended identities assume the role, provide an audience (
aud) and subject (sub) as conditions in the role trust policy for this IAM role.sts.windows.net/<Microsoft Entra Tenant ID>/:subrepresents the identity of your Azure workload that limits access to the specific Azure identity that can assume this role from the Azure tenant. See the following example for conditions.- Replace
<Microsoft Entra Tenant ID>with your tenant ID from Azure. - Replace
<Application ID URI>with your audience value configured in the previous step. - Replace
<Managed Identity’s object (Principal) ID>with your ObjectID captured in the first bullet of Step 12 of Configure the application ID URI.
- Replace
Test the access
To test the access, you’ll assign a user assigned managed identity to an existing VM.
- Sign in to the Azure portal.
- Navigate to the desired VM and select Identity, User assigned, and then choose Add.

Figure 9: Assigning a User assigned Identity
- Select the managed identity created as part of prerequisite and then choose Add.

Figure 10: Add a user assigned managed identity
- In AWS, we used
credential_processin a separate AWS Config profile to dynamically and programmatically retrieve AWS temporary credentials. The credential process calls a bash script that retrieves an access token from Azure and uses the token to obtain temporary credentials from AWS STS. For the syntax and operating system requirements, see Source credentials with an external process. For this post, we created a custom profile calledDevTeam-S3ReadOnlyAccess, as shown in the config file:To use different settings, you can create and reference additional profiles.
- For this example,
credentials_processinvokes the script/opt/bin/credentials.sh. Replace<111122223333>with your own account ID. - After you configure the AWS Config CLI file for the
credential_processscript, verify the setup by accessing AWS resources from Azure VM.- Use AWS CLI to run the following command. You should see list of Amazon Simple Storage Service (Amazon S3) buckets from your account.
- Using AWS SDK for Python to run
s3AccessFromAzure.py. You should see a list of S3 buckets from your account. This example also demonstrates specifying a profile to use for credential purposes.
Note: The AWS CLI doesn’t cache external process credentials; instead, the AWS CLI calls the
credential_processfor every CLI request, which creates a new role session. If you use AWS SDKs, the credentials are cached and reused until they expire.
We used Azure VM as an example to access AWS resources, but a similar approach can be used for any compute resources in Azure that are capable of issuing Azure credentials.
Clean up
If you don’t need the resources that you created for this walkthrough, delete them to avoid future charges for the deployed resources:
- Delete the VM instance, managed identity, and enterprise applications created in Azure.
- Delete the resources that you provisioned on AWS to test the solution.
Conclusion
In this post, we showed you how to securely access AWS resources from Azure workloads using an IAM role assumed with one-time, short-term credentials. By using this solution, your Azure workloads will request temporary security credentials and remove the need for long-term AWS credentials or other secrets usage that are less secure methods of authentication.
Use the following resources to help you get started with AWS IAM federation:
- Identity federation in AWS
- About web identity federation
- AWS Identity and Access Management Forums
- How to use managed identities for Azure resources on an Azure VM to acquire an access token
If you have feedback about this post, submit comments in the Comments section below.