AWS Security Blog
How to Establish Federated Access to Your AWS Resources by Using Active Directory User Attributes
To govern federated access to your AWS resources, it’s a common practice to use Microsoft Active Directory (AD) groups. When using AD groups, establishing federation requires the number of AD groups to be equal to the number of your AWS accounts multiplied by the number of roles in each of your AWS accounts. As you can imagine, this can result in the creation of a very large number of AD groups to manage federated access.
However, some organizations have limits on how many AD groups they can create. For example, an organization might need to keep its AD group hierarchy reasonably flat and avoid a deep nesting of groups. Such a situation needs a solution that doesn’t require you to create exponentially more AD groups while still allowing you to use access control and automated user integration.
In this blog post, I provide step-by-step instructions for integrating AWS Identity and Access Management (IAM) with Microsoft Active Directory Federation Services (AD FS) by using AD user attributes, allowing you to establish federated access without expanding your total number of AD groups. Your organization’s enterprise administrator probably has existing processes in place for managing AD group memberships and provisioning, and you can extend these processes to the management of AD user attributes and the reduction of your organization’s dependency on AD groups.
Prerequisites
This post assumes:
- You have a working AD directory and AD FS server.
- You have created an identity provider (IdP) in your AWS account using your XML file (https://<your-server-name-here>/FederationMetadata/2007-06/FederationMetadata.xml) from your AD FS server. Remember the name of your IdP because you will use it later in this solution.
- You have created the appropriate IAM roles in your AWS account, which will be used for federated access.
After you satisfy these prerequisites, you can proceed to the next section of this post to configure your AD users and AD FS server.
Solution overview
To benefit fully from the solution in this post, your AD and AD FS environment should look similar to what is shown in the following diagram. I focus this post on AD users and claim rules in an AD FS server. AD FS claim rules provide the logic to identify who has been correctly set up in AD with the appropriate user attributes to sign in via AD FS to the AWS Management Console.
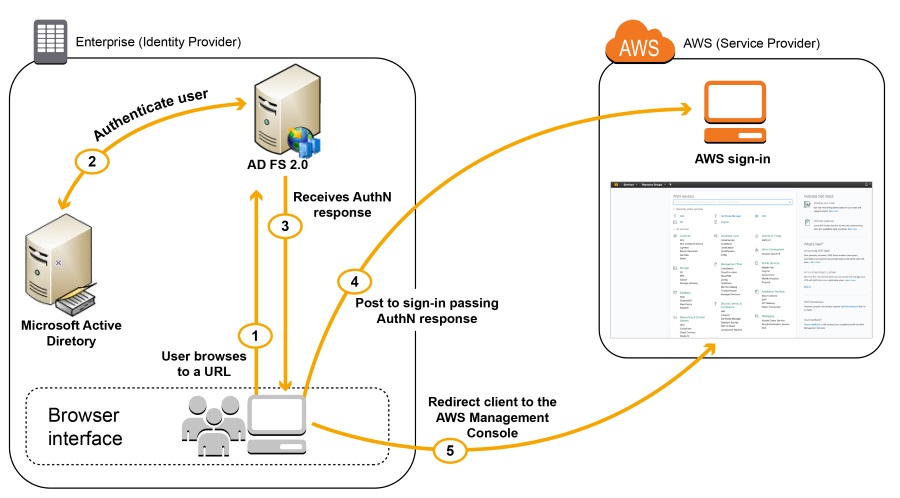
In the preceding diagram:
- An AD user (let’s call him Bob) browses to the AD FS sample site (https://Fully.Qualified.Domain.Name.Here/adfs/ls/IdpInitiatedSignOn.aspx) inside this domain.
- The sign-in page authenticates Bob against AD. If Bob is already authenticated or using a domain joined workstation, he also might be prompted for his AD user name and password.
- Bob’s browser receives a SAML assertion in the form of an authentication response from AD FS. Bob’s access is authorized based on his AD group membership or on AD user attributes configured on his account.
- Bob’s browser automatically posts the SAML assertion to the AWS sign-in endpoint for SAML (https://signin.aws.amazon.com/saml). The endpoint uses the AssumeRoleWithSAML API to request temporary security credentials and then constructs a sign-in URL for the AWS Management Console using those credentials.
- Bob’s browser receives the sign-in URL and redirects to the AWS Management Console.
Deploy the solution
A. Configure an AD user’s account
Because the AD user attributes hold all the associated AWS account and role information when using this solution, you will start by configuring an AD user’s accounts.
To edit the user attributes in an AD user’s account:
- On your AD server, in the Active Directory Users and Computers console, go to View > Advanced Features in Active Directory Users and Computers to see the Attribute editor tab.

- For AD user Bob, edit one attribute using the built-in AD attribute editor. The attribute I am using is url, which is a multi-valued string. If you use another AD user attribute, consider how you will need to modify your AD FS claim rules later because different attributes may return the values differently back to the AD FS server. The name of the AD user attribute will be used in the AD FS claim rules later in this post.
- Bob has two AWS accounts: 111122223333 and 444455556666. Each of Bob’s AWS accounts has two roles: AWS-Dev and AWS-ReadOnly. I have configured Bob’s url attribute with the corresponding values associated with his AWS accounts and roles. As part of the attribute entries, I prefixed each entry with AWS- to have a unique identifier. As shown in the following screenshot, I added the entries one at a time so that each value can be returned back to my AD FS server:
- AWS-111122223333-Dev
- AWS-111122223333-ReadOnly
- AWS-444455556666-Dev
- AWS-444455556666-ReadOnly

- Bob also requires an email address because that information will be used in the role session name when Bob signs in to the AWS Management Console via his chosen AWS account and associated role. We use Bob’s email address only because it’s a common user attribute most users have and is also unique across users. The unique identifier is then forwarded by AD FS to be used by AWS as a unique value for users. If you have enabled AWS CloudTrail, the role session name is captured in CloudTrail and allows for ease of identification of who assumed the role and subsequent API calls the user or role might have executed on the platform (for example, ec2:terminateinstance).

Now that you have configured Bob’s account, you will configure the AD FS server claim rules.
B. Configure the AD FS server claim rules
Because this blog post assumes your environment is already up and running and to ensure that you can follow along, I am providing example Windows PowerShell code that you can run on your AD FS server. This code allows you to choose a conventional approach by using AD groups in AD FS claim rules, or for the purposes of this post, to use AD FS claim rules with AD user attributes. If you use the AD group approach on your AD FS server with the example code, your AD group naming convention must be: AWS-YourAccountNumber–YourRoleName. If you have already created claim rules for AWS on your AD FS server, I encourage you to run this code against a different AD FS server that has no existing AWS rules.
To configure the AD FS claim rules:
- Open the AD FS console. You can find it by searching for ad, as shown in the following screenshot.

- Expand Trust Relationships and choose Relying Party Trusts.

- Run the example Windows PowerShell code from the command prompt in the same directory where you extracted the .zip file. The following screenshot shows a list of the example files from the .zip file.

- Run the 01-Configure-ADFS-AD-User-URL-mapping.ps1 Windows PowerShell script to set up the AD FS claim rules. Note: Run this script with Administrative permissions. A log file is generated to which you can refer, as shown in the following screenshot.

- After you run the Windows PowerShell script, you will see the new relying party trust that has been created in your AD FS configuration for Amazon Web Services, as shown in the following screenshot.

- Right-click Amazon Web Services & AD User URL and choose Edit Claim Rules.

- The following screenshot shows what your AD FS server claim rules should look like now.

About these four claim rules:
- Claim rule 1 captures the Windows account name of the current user whose attributes will then be queried further with claim rule 3.
- Claim rule 2 captures Bob’s email address for use in the role session name.
- Claim rule 3 queries the current user’s URL attributes to identify which account and role the user is authorized to assume access to. These URL attribute values are then stored in a variable (http://temp/variable) for use in claim rule 4.
- Claim rule 4 works by matching the first pattern match, ([^d]{12}), to $1 and the second pattern match, (\w*), to $2 for each entry in http://temp/variable. With this final rule, you define the resulting value for the AWS role attribute in a dynamic way, which allows the configuration to scale to support virtually any number of AWS accounts and IAM roles without further configuration within AD FS. By using these claim rules, you query, store, and then convert the values in the URL attributes to the IAM role attributes that AWS expects.

At the beginning of this post, I mentioned that you need to remember the name of the IdP you created in your AWS account, and now is when you will use your IdP’s name. Replace myADFS, highlighted in the following code, with the name of your IdP. (When modifying the rules, be careful not to insert any additional spaces because they can cause claim rules to not work as designed.)
C. Test AD user Bob’s federated access
Go to the AD FS sign-in page (https://Fully.Qualified.Domain.Name.Here/adfs/ls/IdpInitiatedSignOn.aspx) to test Bob’s federated access. Note that you might see a certificate warning if the server uses a locally self-signed certificate from Internet Information Services.
To test Bob’s federated access:
- Choose Sign in to one of the following sites, choose Amazon Web Services& AD User URL from the list, and then choose Continue to Sign In.
- If prompted, type Bob’s user name and password. You will be redirected to sign in to the Amazon Web Services AD FS page previously defined when you set up the AD FS relying party trusts.

- After you authenticate to the server as Bob, your browser is redirected to https://signin.aws.amazon.com/saml, and you can choose which of Bob’s accounts and roles to use from. Choose a role and then choose Sign In.

- You have signed in as Bob, and his email address now appears as part of the role session name, as shown in the following screenshot.

You can now see Bob’s email address used in the role session name. If you have enabled CloudTrail, the role session name is captured in CloudTrail and allows you to easily identify who assumed the role. If Bob wants to switch to a different account or role, he can return to his AD FS sign-in page (https://Fully.Qualified.Domain.Name.Here/adfs/ls/IdpInitiatedSignOn.aspx) and choose an alternative account or role.
Summary
In this blog post, I demonstrated how to use dynamic resolution of federated access using AD user attributes to scale your configuration and support a large number of AWS accounts and associated IAM roles. This is a powerful technique for managing a large number of AWS accounts and the federated access of associated AD users. Even though I demonstrate the integration of IAM with AD FS and AD, you can replicate this solution across your choice of SAML federated access technology, such as Shibboleth or OpenLDAP.
If you have comments about this blog post, submit them in the “Comments” section below. If you have implementation or troubleshooting questions, start a new thread on the IAM forum.
– Pierre
Want more AWS Security how-to content, news, and feature announcements? Follow us on Twitter.