AWS Security Blog
TLS inspection configuration for encrypted egress traffic and AWS Network Firewall
In the evolving landscape of network security, safeguarding data as it exits your virtual environment is as crucial as protecting incoming traffic. In a previous post, we highlighted the significance of ingress TLS inspection in enhancing security within Amazon Web Services (AWS) environments. Building on that foundation, I focus on egress TLS inspection in this post.
Egress TLS decryption, a pivotal feature of AWS Network Firewall, offers a robust mechanism to decrypt, inspect the payload, and re-encrypt outbound SSL/TLS traffic. This process helps ensure that your sensitive data remains secure and aligned with your organizational policies as it traverses to external destinations. Whether you’re a seasoned AWS user or new to cloud security, understanding and implementing egress TLS inspection can bolster your security posture by helping you identify threats within encrypted communications.
In this post, we explore the setup of egress TLS inspection within Network Firewall. The discussion covers the key steps for configuration, highlights essential best practices, and delves into important considerations for maintaining both performance and security. By the end of this post, you will understand the role and implementation of egress TLS inspection, and be able to integrate this feature into your network security strategy.
Overview of egress TLS inspection
Egress TLS inspection is a critical component of network security because it helps you identify and mitigate risks that are hidden in encrypted traffic, such as data exfiltration or outbound communication with malicious sites (for example command and control servers). It involves the careful examination of outbound encrypted traffic to help ensure that data leaving your network aligns with security policies and doesn’t contain potential threats or sensitive information.
This process helps ensure that the confidentiality and integrity of your data are maintained while providing the visibility that you need for security analysis.
Figure 1 depicts the traffic flow of egress packets that don’t match the TLS inspection scope. Incoming packets that aren’t in scope of the TLS inspection pass through the stateless engine, and then the stateful engine, before being forwarded to the destination server. Because it isn’t within the scope for TLS inspection, the packet isn’t sent to the TLS engine.
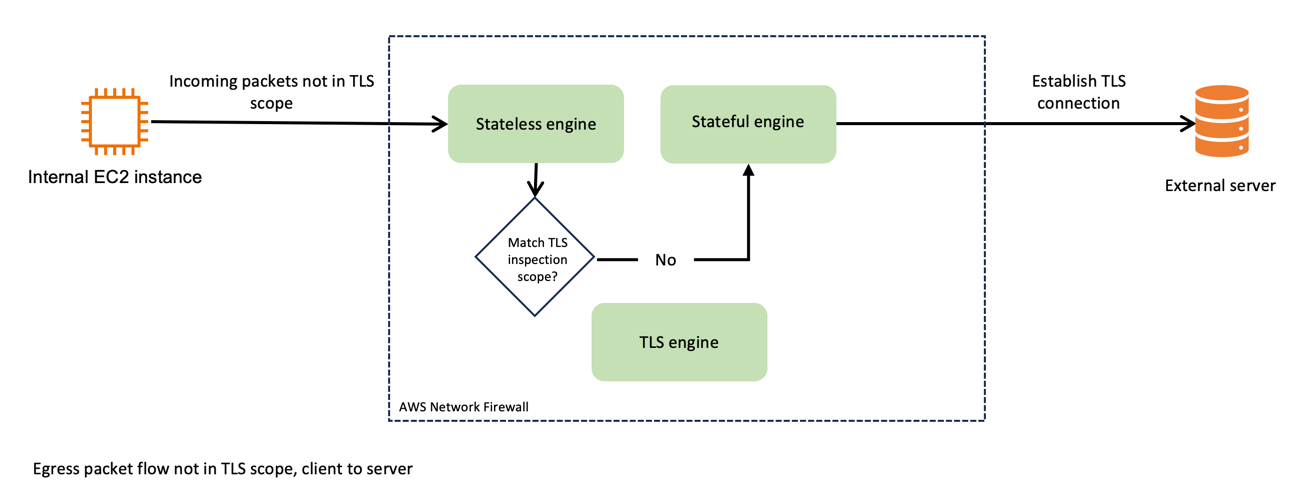
Figure 1: Network Firewall packet handling, not in TLS scope
Now, compare that to Figure 2, which shows the traffic flow when egress TLS inspection is enabled. After passing through the stateless engine, traffic matches the TLS inspection scope. Network Firewall forwards the packet to the TLS engine, where it’s decrypted. Network Firewall passes the decrypted traffic to the stateful engine, where it’s inspected and passed back to the TLS engine for re-encryption. Network Firewall then forwards the packet to its destination.
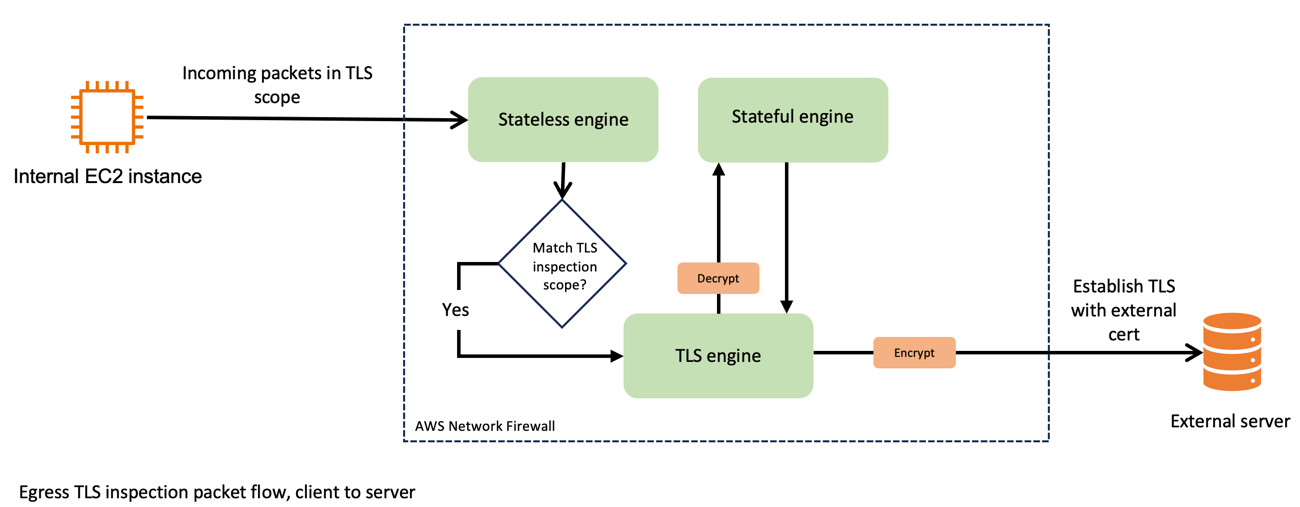
Figure 2: Network Firewall packet handling, in TLS scope
Now consider the use of certificates for these connections. As shown in Figure 3, the egress TLS connections use a firewall-generated certificate on the client side and the target servers’ certificate on the server side. Network Firewall decrypts the packets that are internal to the firewall process and processes them in clear text through the stateful engine.

Figure 3: Egress TLS certificate usage
By implementing egress TLS inspection, you gain a more comprehensive view of your network traffic, so you can monitor and manage data flows more effectively. This enhanced visibility is crucial in detecting and responding to potential security threats that might otherwise remain hidden in encrypted traffic.
In the following sections, I guide you through the configuration of egress TLS inspection, discuss best practices, and highlight key considerations to help achieve a balance between robust security and optimal network performance.
Additional consideration: the challenge of SNI spoofing
Server Name Indication (SNI) spoofing can affect how well your TLS inspection works. SNI is a component of the TLS protocol that allows a client to specify which server it’s trying to connect to at the start of the handshake process.
SNI spoofing occurs when an entity manipulates the SNI field to disguise the true destination of the traffic. This is similar to requesting access to one site while intending to connect to a different, less secure site. SNI spoofing can pose significant challenges to network security measures, particularly those that rely on SNI information for traffic filtering and inspection.
In the context of egress TLS inspection, a threat actor can use SNI spoofing to circumvent security tools because these tools often use the SNI field to determine the legitimacy and safety of outbound connections. If the threat actor spoofs the SNI field successfully, unauthorized traffic could pass through the network, circumventing detection.
To effectively counteract SNI spoofing, use TLS inspection on Network Firewall. When you use TLS inspection on Network Firewall, spoofed SNIs on traffic within the scope of what TLS inspection looks at are dropped. The spoofed SNI traffic is dropped because Network Firewall validates the TLS server certificate to check the associated domains in it against the SNI.
Set up egress TLS inspection in Network Firewall
In this section, I guide you through the essential steps to set up egress TLS inspection in Network Firewall.
Prerequisites
The example used in this post uses a prebuilt environment. To learn more about the prebuilt environment and how to build a similar configuration in your own AWS environment, see Creating a TLS inspection configuration in Network Firewall. To follow along with this post, you will need a working topology with Network Firewall deployed and an Amazon Elastic Compute Cloud (Amazon EC2) instance deployed in a private subnet.
Additionally, you need to have a certificate generated that you will present to your clients when they make outbound TLS requests that match your inspection configuration. After you generate your certificate, note the certificate body, private key, and certificate chain because you will import these into ACM.
Integration with ACM
The first step is to manage your SSL/TLS certificates through AWS Certificate Manager (ACM).
To integrate with ACM
- Obtain a certificate authority (CA) signed certificate, private key, and certificate chain.
- Open the ACM console, and in the left navigation pane, choose Certificates.
- Choose Import certificates.
- In the Certificate details section, paste your certificate’s information, including the certificate body, certificate private key, and certificate chain, into the relevant fields.
- Choose Next.
- On the Add Tags page, add a tag to your certificate:
- For Tag key, enter a name for the tag.
- For Tag value – optional, enter a tag value.
- Choose Next.
- To import the certificate, choose Import.
Note: It might take a few minutes for ACM to process the import request and show the certificate in the list. If the certificate doesn’t immediately appear, choose the refresh icon. Additionally, the Certificate Authority used to create the certificate you import to ACM can be public or private.
- Review the imported certificate and do the following:
- Note the Certificate ID. You will need this ID later when you assign the certificate to the TLS configuration.
- Make sure that the status shows Issued. After ACM issues the certificate, you can use it in the TLS configuration.

Figure 4: Verify the certificate was issued in ACM
Create a TLS inspection configuration
The next step is to create a TLS inspection configuration. You will do this in two parts. First, you will create a rule group to define the stateful inspection criteria. Then you will create the TLS inspection configuration where you define what traffic you should decrypt for inspection and how you should handle revoked and expired certificates.
To create a rule group
- Navigate to VPC > Network Firewall rule groups.
- Choose Create rule group.
- On the Choose rule group type page, do the following:
- For Rule group type, select Stateful rule group. In this example, the stateless rule group that has already been created is being used.
- For Rule group format, select Suricata compatible rule string.
Note: To learn how Suricata rules work and how to write them, see Scaling threat prevention on AWS with Suricata
- Leave the other values as default and choose Next.
- On the Describe rule group page, enter a name, description, and capacity for your rule group, and then choose Next.
Note: The capacity is the number of rules that you expect to have in this rule group. In our example, I set the value to 10, which is appropriate for a demo environment. Production environments require additional thought to the capacity before you create the rule group.
- On the Configure rules page, in the Suricata compatible rule string section, enter your Suricata compatible rules line-by-line, and then choose Next.
Note: I don’t provide recommendations for specific rules in this post. You should take care in crafting rules that meet the requirements for your organization. For more information, see Best practices for writing Suricata compatible rules for AWS Network Firewall.
- On the Configure advanced settings – optional page, choose Next. You won’t use these settings in this walkthrough.
- Add relevant tags by providing a key and a value for your tag, and then choose Next.
- On the Review and create page, review your rule group and then choose Create rule group.
To create the TLS inspection configuration
- Navigate to VPC > Network Firewall > TLS inspection configurations.
- Choose Create TLS inspection configuration.
- In the CA certificate for outbound SSL/TLS inspection – new section, from the dropdown menu, choose the certificate that you imported from ACM previously, and then choose Next.

Figure 5: Select the certificate for use with outbound SSL/TLS inspection
- On the Describe TLS inspection configuration page, enter a name and description for the configuration, and then choose Next.
- Define the scope—the traffic to include in decryption. For this walkthrough, you decrypt traffic that is on port 443. On the Define scope page, do the following:
- For the Destination port range, in the dropdown, select Custom and then in the box, enter your port (in this example, 443). This is shown in Figure 6.

Figure 6: Specify a custom destination port in the TLS scope configuration
- Choose Add scope configuration to add the scope configuration. This allows you to add multiple scopes. In this example, you have defined a scope indicating that the following traffic should be decrypted:
Source IP Source Port Destination IP Destination Port Any Any Any 443 - In the Scope configuration section, verify that the scope is listed, as seen in Figure 7, and then choose Next.

Figure 7: Add the scope configuration to the SSL/TLS inspection policy
- For the Destination port range, in the dropdown, select Custom and then in the box, enter your port (in this example, 443). This is shown in Figure 6.
- On the Advanced settings page, do the following to determine how to handle certificate revocation:
- For Check certificate revocation status, select Enable.
- In the Revoked – Action dropdown, select an action for revoked certificates. Your options are to Drop, Reject, or Pass. A drop occurs silently. A reject causes a TCP reset to be sent, indicating that the connection was dropped. Selecting pass allows the connection to establish.
- In the Unknown status – Action section, select an action for certificates that have an unknown status. The same three options that are available for revoked certificates are also available for certificates with an unknown status.
- Choose Next.
Note: The recommended best practice is to set the action to Reject for both revoked and unknown status. Later in this walkthrough, you will set these values to Drop and Allow to illustrate the behavior during testing. After testing, you should set both values to Reject.
- Add relevant tags by providing a key and value for your tag, and then choose Next.
- Review the configuration, and then choose Create TLS inspection configuration.
Add the configuration to a Network Firewall policy
The next step is to add your TLS inspection configuration to your firewall policy. This policy dictates how Network Firewall handles and applies the rules for your outbound traffic. As part of this configuration, your TLS inspection configuration defines what traffic is decrypted prior to inspection.
To add the configuration to a Network Firewall policy
- Navigate to VPC > Network Firewall > Firewall policies.
- Choose Create firewall policy.
- In the Firewall policy details section, seen in Figure 8, enter a name and description, select a stream exception option for the policy, and then choose Next.

Figure 8: Define the firewall policy details
- To attach a stateless rule group to the policy, choose Add stateless rule groups.
- Select an existing policy, seen in Figure 9, and then choose Add rule groups.

Figure 9: Select a stateless policy from an existing rule group
- In the Stateful rule group section, choose Add stateful rule groups.
- Select the newly created TLS inspection rule group, and then choose Add rule group.
- On the Add rule groups page, choose Next.
- On the Configure advanced settings – optional page, choose Next. For this walkthrough, you will leave these settings at their default values.
- On the Add TLS inspection configuration – optional section, seen in Figure 10, do the following:
- Choose Add TLS inspection configuration.
- From the dropdown, select your TLS inspection configuration.
- Choose Next.

Figure 10: Add the TLS configuration to the firewall policy
- Add relevant tags by providing a key and a value, and then choose Next.
- Review the policy configuration, and choose Create firewall policy.
Associate the policy with your firewall
The final step is to associate this firewall policy, which includes your TLS inspection configuration, with your firewall. This association activates the egress TLS inspection, enforcing your defined rules and criteria on outbound traffic. When the policy is associated, packets from the existing stateful connections that match the TLS scope definition are immediately routed to the decryption engine where they are dropped. This occurs because decryption and encryption can only work for a connection when Network Firewall receives TCP and TLS handshake packets from the start.
Currently, you have an existing policy applied. Let’s briefly review the policy that exists and see how TLS traffic looks prior to applying your configuration. Then you will apply the TLS configuration and look at the difference.
To review the existing policy that doesn’t have TLS configuration
- Navigate to VPC > Network Firewall > Firewalls
- Choose the existing firewall, as seen in Figure 11.

Figure 11: Select the firewall to edit the policy
- In the Firewall Policy section, make sure that your firewall policy is displayed. As shown in the example in Figure 12, the firewall policy DemoFirewallPolicy is applied—this policy doesn’t perform TLS inspection.

Figure 12: Identify the existing firewall policy associated with the firewall
- From a test EC2 instance, navigate to an external site that requires TLS encryption. In this example, I use the site example.com. Examine the certificate that was issued. In this example, an external organization issued the certificate (it’s not the certificate that I imported into ACM). You can see this in Figure 13.

Figure 13: View of the certificate before TLS inspection is applied
Returning to the firewall configuration, change the policy to the one that you created with TLS inspection.
To change to the policy with TLS inspection
- In the Firewall Policy section, choose Edit.
- In the Edit firewall policy section, select the TLS Inspection policy, and then choose Save changes.
Note: It might take a moment for Network Firewall to update the firewall configuration.

Figure 14: Modify the policy applied to the firewall
- Return to the test EC2 instance and test the site again. Notice that your customer certificate authority (CA) has issued the certificate. This indicates that the configuration is working as expected and you can see this in Figure 15.
Note: The test EC2 instance must trust the certificate that Network Firewall presents. The method to install the CA certificate on your host devices will vary based on the operating system. For this walkthrough, I installed the CA certificate before testing.

Figure 15: Verify the new certificate used by Network Firewall TLS inspection is seen
Another test that you can do is revoked certificate handling. Example.com provides URLs to sites with revoked or expired certificates that you can use to test.
To test revoked certificate handling
- From the command line interface (CLI) of the EC2 instance, do a curl on this page.
Note: The curl -ikv command combines three options:
- -i includes the HTTP response headers in the output
- -k allows connections to SSL sites without certificates being validated
- -v enables verbose mode, which displays detailed information about the request and response, including the full HTTP conversation. This is useful for debugging HTTPS connections.
- At the bottom of the output, notice that the TLS connection was closed. This is what it looks like when the Revoked – Action is set to Drop.
- Modify your TLS inspection configuration to Reject instead:
- Navigate to VPC > Network Firewall > TLS inspection configuration, select the policy, and choose Edit.
- In the Revoked – Action section, select Reject.
- Choose Save.
- Test the curl again.
- The output should show that an error 104, Connection reset by peer, was sent.
As you configure egress TLS inspection, consider the specific types of traffic and the security requirements of your organization. By tailoring your configuration to these needs, you can help make your network’s security more robust, without adversely affecting performance.
Performance and security considerations for egress TLS inspection
Implementing egress TLS inspection in Network Firewall is an important step in securing your network, but it’s equally important to understand its impact on performance and security. Here are some key considerations:
- Balance security and performance – Egress TLS inspection provides enhanced security by allowing you to monitor and control outbound encrypted traffic, but it can introduce additional processing overhead. It’s essential to balance the depth of inspection with the performance requirements of your network. Efficient rule configuration can help minimize performance impacts while still achieving the desired level of security.
- Optimize rule sets – The effectiveness of egress TLS inspection largely depends on the rule sets that you configure. It’s important to optimize these rules to target specific security concerns relevant to your outbound traffic. Overly broad or complex rules can lead to unnecessary processing, which might affect network throughput.
- Use monitoring and logging – Regular monitoring and logging are vital for maintaining the effectiveness of egress TLS inspection. They help in identifying potential security threats and also provide insights into the impact of TLS inspection on network performance. AWS provides tools and services that you can use to monitor the performance and security of your network firewall.
Considering these factors will help ensure that your use of egress TLS inspection strengthens your network’s security posture and aligns with your organization’s performance needs.
Best practices and recommendations for egress TLS inspection
Implementing egress TLS inspection requires a thoughtful approach. Here are some best practices and recommendations to help you make the most of this feature in Network Firewall:
- Prioritize traffic for inspection – You might not need the same level of scrutiny for all your outbound traffic. Prioritize traffic based on sensitivity and risk. For example, traffic to known, trusted destinations might not need as stringent inspection as traffic to unknown or less secure sites.
- Use managed rule groups wisely – AWS provides managed rule groups and regularly updates them to address emerging threats. You can use AWS managed rules with TLS decryption; however, the TLS keywords will no longer invoke for traffic that has been decrypted by the firewall, within the stateful inspection engine. You can still benefit from the non-TLS rules within managed rule groups, and gain increased visibility into those rules because the decrypted traffic is visible to the inspection engine. You can also create your own custom rules against the inner protocols that are now available for inspection—for example, matching against an HTTP header within the decrypted HTTPS stream. You can use managed rules to complement your custom rules, contributing to a robust and up-to-date security posture.
- Regularly update custom rules – Keep your custom rule sets aligned with the evolving security landscape. Regularly review and update these rules to make sure that they address new threats and do not inadvertently block legitimate traffic.
- Test configuration changes – Before you apply new rules or configurations in a production environment, test them in a controlled setting. This practice can help you identify potential issues that could impact network performance or security.
- Monitor and analyze traffic patterns – Regular monitoring of outbound traffic patterns can provide valuable insights. Use AWS tools to analyze traffic logs, which can help you fine-tune your TLS inspection settings and rules for optimal performance and security.
- Plan for scalability – As your network grows, make sure that your TLS inspection setup can scale accordingly. Consider the impact of increased traffic on performance and adjust your configurations to maintain efficiency.
- Train your team – Make sure that your network and security teams are well informed about the TLS inspection process, including its benefits and implications. A well-informed team can better manage and respond to security events.
By following these best practices, you can implement egress TLS inspection in your AWS environment, helping to enhance your network’s security while maintaining performance.
Conclusion
Egress TLS inspection is a critical capability for securing your network by providing increased visibility and control over encrypted outbound traffic. In this post, you learned about the key concepts, configuration steps, performance considerations, and best practices for implementing egress TLS inspection with Network Firewall. By decrypting, inspecting, and re-encrypting selected outbound traffic, you can identify hidden threats and enforce security policies without compromising network efficiency.
To learn more about improving visibility in your network with egress TLS inspection, see the AWS Network Firewall developer guide for additional technical details, review AWS security best practices for deploying Network Firewall, and join the AWS Network Firewall community to connect with other users.
If you have feedback about this post, submit comments in the Comments section below. If you have questions about this post, contact AWS Support.