AWS Storage Blog
Understanding Recovery Point Objectives using CloudEndure Disaster Recovery
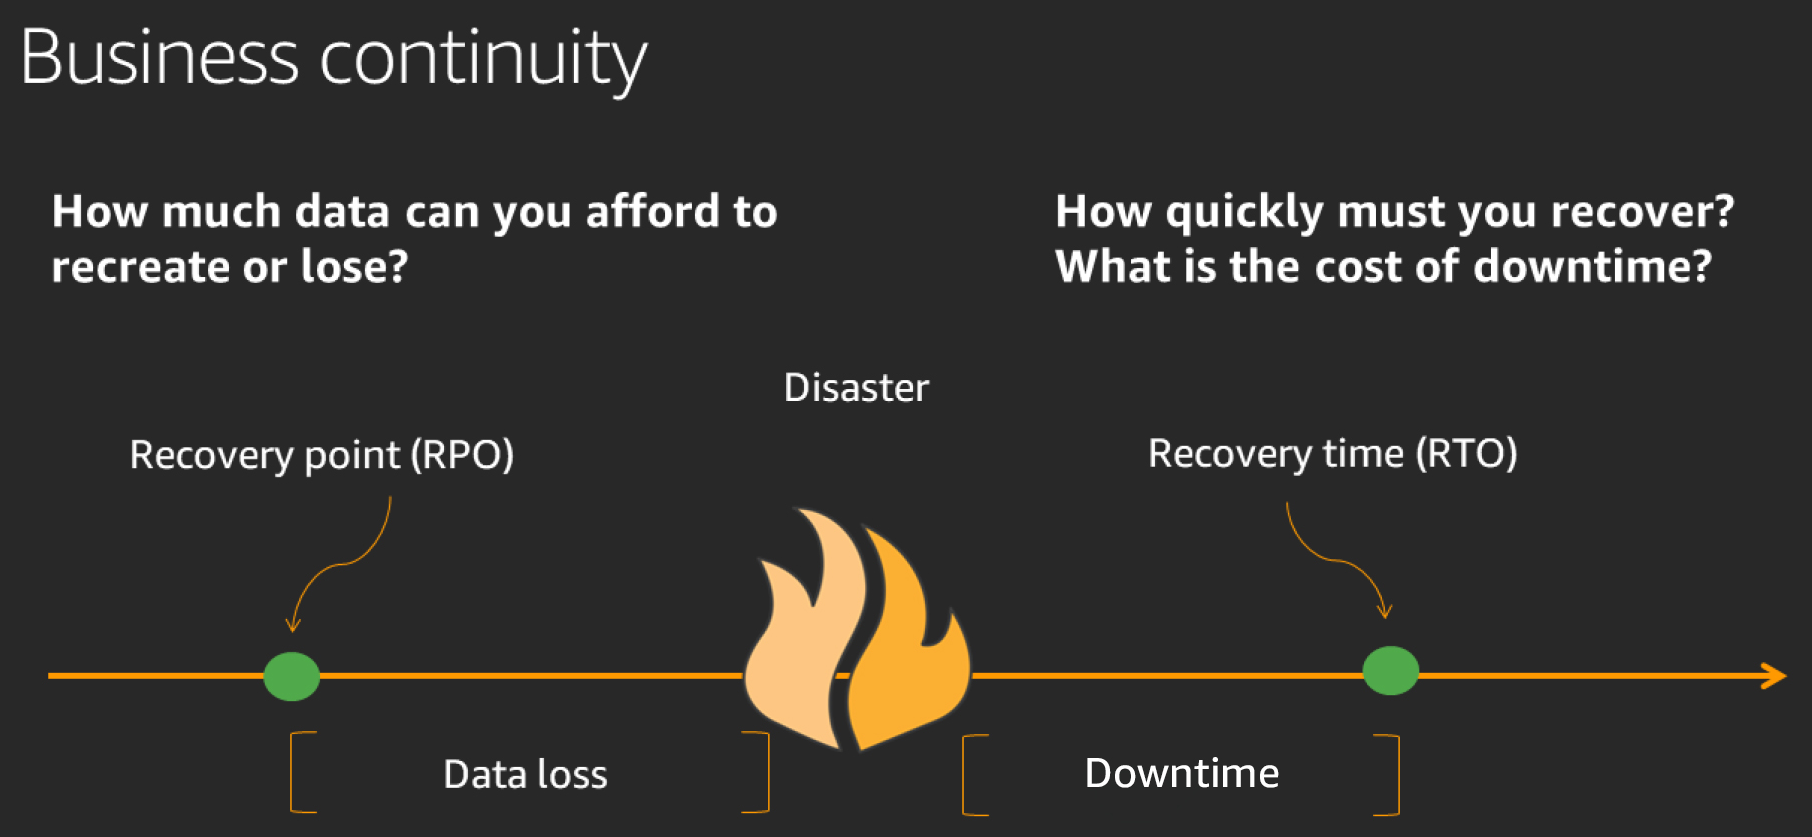
IT disasters such as data center failures, server corruptions, or cyber attacks can not only disrupt your business, but also cause data loss, impact your revenue, and damage your reputation. It is important to protect this data and compute from disruptive events with minimal data loss. For any business, a Recovery Point Objective (RPO) that defines a maximum acceptable amount of time since the last data recovery point is critically important for business continuity. CloudEndure Disaster Recovery is a scalable, cost-effective solution that protects your data by achieving an exceptional RPO.
In this blog, we discuss how CloudEndure Disaster Recovery can help you achieve the best RPO to meet your business needs. We also explore how data replication backlogs occur and how they can affects business RPO (we define a backlog later in this post). In addition, we demonstrate how to solve various backlog scenarios. We launch an Amazon Linux 2 instance with a MySQL database hosted on it, and then generate a database load on this instance. To make things simpler, we are using a predefined Amazon Machine Image (AMI) that is already bundled with MySQL database, and a proprietary load generator tool to generate high, medium, and low throughputs on the MySQL database. To understand the RPO achieved by CloudEndure Disaster Recovery, we use the load-generator tool in the AMI to generate different database loads.
But before that, let’s dive into some basics…
About CloudEndure Disaster Recovery
CloudEndure Disaster Recovery minimizes downtime and data loss by providing fast, reliable recovery of physical, virtual, and cloud-based servers into AWS Cloud, including public Regions, AWS GovCloud (US), and AWS Outposts. CloudEndure Disaster Recovery continuously replicates your machines (including the operating system, system state configuration, databases, applications, and files) into a low-cost staging area in your Target AWS account and preferred Region.
You can use CloudEndure Disaster Recovery to protect your most critical databases, including Oracle, MySQL, and SQL Server, in addition to enterprise applications such as SAP.
Common concepts
Some of the common concepts that you should be familiar with are as follows:
Recovery Point Objective
Recovery Point Objective (RPO) is the maximum acceptable amount of time since the last data recovery point. In CloudEndure, this manifests to the latest point-in-time used to restore the data following a disaster. CloudEndure Disaster Recovery helps achieve your RPO goals by continuously replicating the machine to the staging environment and allowing the failover target to launch with the last consistent state of the machine before a disaster.
Recovery Time Objective
A Recovery Time Objective (RTO) represents how long it takes to restore operations and make the systems available for users after a disaster. RTO is different from RPO; in CloudEndure terminology, RTO is the time it takes for a Target instance to launch and become available after a disaster.
For further reading on RPO and RTO, review the DR objectives in the reliability pillar of the AWS Well-Architected Framework.
Continuous data protection (CDP)
CDP refers to backup of computer data by automatically saving a copy of every change made to that data. In CloudEndure, CDP manifests to a state after initial sync is complete and when the source and staging server are in full sync.
Lag
The amount of time passed since the server was last in CDP mode. The lag depends on several factors such as replication speed, network bandwidth available, overall disk storage, changes in the disk while the data is replicating, and I/O speed of the storage.
Backlog
Backlog is the amount of data on the disk pending for replication in order to reach CDP mode.
How does CloudEndure help achieve the required business RPO?
The CloudEndure agent identifies write operations on the source disk, and asynchronously replicates the data to the recovery AWS Region. The CloudEndure agent compresses and encrypts the data during transit before this new data arrives on the staging environment. When a user initiates a Test/Recovery launch using the latest snapshot (as shown in the following screenshot), then the following occurs, depending on the replication state of the machine:
- If the machine is in CDP, then CloudEndure takes an on-demand snapshot, which is the last consistent state of the volume at the time of test launch. CloudEndure Disaster Recovery uses this snapshot to launch the most up-to-date target instance.
- If the machine is lagging during Test/Recovery launch, then CloudEndure uses an existing snapshot that reflects the latest consistent state of the machine. Similarly, if a disaster occurs and the source machine is no longer available, CloudEndure would use the most recent consistent snapshot to launch a recovery instance.

Now let’s dive in, analyze, and compare the results based on the RPO using CloudEndure Disaster Recovery.
Testing
In the testing phase, we are going to simulate a DR scenario and compare the results achieved by CloudEndure with an RPO that meets business requirements. Please note that every business may have different RPO requirements. To simplify the process for you, we have bootstrapped all the necessary tools and packages into a custom AMI that you will use to launch a source machine.
During the testing, we are going to see how to recover to the latest recovery point on a target machine launched and meet business RPO, in varying network bandwidth scenarios. Since most readers of this blog will not be able to perform a source network bandwidth throttling, we will be using the Network Bandwidth Throttling feature available in the CloudEndure Replication Settings.
With the Network Bandwidth Throttling feature, you can limit the network bandwidth between the source machine and the replication server to a desired value. For the purposes of this blog, we set it to 80 Mbps ≈ 10 MBps. Using the loadgenerator.py tool available in the launched source machine, we generate database loads at different throughputs: low (1–2 MBps), medium (4–8 MBps), and high (14–18 MBps). We attribute the speeds low, medium, and high to these values only for the purpose of this blog. Later we see how the RPO is affected with high (14–18 MBps) write-intensiveness and with network throttling set to 10 MBps, and how to get a good RPO even with high throughputs.
Setting up the environment
- Launch an Amazon EC2 instance using the AMI ami-0fe05b676d073cfd9 in N. Virginia (us-east-1) Region. This AMI is a customized image built off a vanilla Amazon Linux 2 image.
- Use a large instance type (such as m4.2xlarge or m4.4xlarge) for the purpose of this test to support higher throughputs and avoid any potential bottlenecks on the source machine.
- Make sure to launch the instance in a subnet that meets the network requirements as per the instructions here.
- Install the CloudEndure agent on this EC2 source instance using any DR project’s token.
- Please make sure to use a dedicated replication server for the purpose of this test. This is to ensure that when we are performing the tests any other source machines on the project do not share the network bandwidth.
- Set the Network Bandwidth Throttling value to (80 Mbps ≈ 10 MBps) in Machine Replication Settings.

Note: The Network Bandwidth Throttling value is set to 10 MBps in order to limit the network bandwidth between the source machine and the Replication Server.
Testing RPO with Network Bandwidth Throttling value set to 80 Mbps
Now that we have our setup ready, let us test the RPO with Network Bandwidth Throttling value set to 80 Mbps and with low, medium, and high write-intensiveness.
Low write-intensiveness on source (up to 1–2 MBps):
Before starting the load test, ensure that the machine is in CDP mode in your CloudEndure console. Log in to the source EC2 instance launched for testing and run the database load generator as shown in the following screenshot. The load generator script (loadgenerator.py) is under /home/ec2-user directory. We will now proceed to run the load for at least 15 minutes in each scenario starting with Low write-intensiveness on source machine:
#python /home/ec2-user/loadgenerator.py –write_intensiveness low
While the load generator is pushing data to the MySQL database with low levels of throughputs, stop the instance from EC2 Console or using the command halt -p.
Note: In a real DR scenario, the machine will either crash, corrupt or may shut down for several reasons. In order to simulate an actual DR scenario, we are shutting down the instance and verifying the recovery point.
Now go ahead and perform a target launch with the latest recovery point. Wait for the launch process to complete, start the source instance again, and login to both source and the Target instance to validate the results.
Results:
A bash script is running automatically on every boot (on source and target machines) that populates the “logs” file in /home/ec2-user directory with the last record timestamp from MySQL database. Compare this file on both the source and target machines. As the load generator is generating traffic at throughputs (1–2 MBps) that are lower than the network bandwidth value (10 MBps) set in the replication settings, there is no lag. As you can see in the following screenshot, due to no lag, CloudEndure provides a sub-second RPO because the last recorded timestamp on the source and target machines are the same.
#cat /home/ec2-user/logs
Medium write-intensiveness on source (up to 4–8 MBps):
Before starting the load test again, ensure that the machine is in CDP mode in your CloudEndure console. Run the load generator again for at least 15 minutes with medium write-intensive speeds (as shown in the following snipper and screenshot) on the source machine.
#python /home/ec2-user/loadgenerator.py –write_intensiveness medium
While the load generator is still running, stop the instance to simulate a disaster event.
Now go ahead and perform a target launch with the latest recovery point. Wait for the launch process to complete, start the source instance again, and login to both source and the target instance to validate the results.
Results:
As you can see in the following screenshot, even with a medium write-intensive source machine, CloudEndure provides a sub-second RPO as the last record timestamp on source and target machines are the same. In this case, there will be also be no lag as the medium write-intensive speeds (4–8 MBps) on the source machine are lower than the network throttling value (10 MBps).
#cat /home/ec2-user/logs
High write intensiveness on source (up to 14–18 MBps):
Before starting the load test again, ensure that the machine is in CDP mode in your CloudEndure console. Run the database load generator again, this time with high write-intensive speeds as shown in the following snippet:
#python /home/ec2-user/loadgenerator.py –write_intensiveness high
As you are running the load generator at 14-18 MBps (greater than network throttling value 10 MBps), you will notice the lag growing for this source machine in the CloudEndure console. Wait for 15 minutes, and then stop the source instance.
Now go ahead and perform a target launch with the latest recovery point. Wait for the launch process to complete, start the source instance again, and login to both source and the target instance to validate the results.
Results:
With high write-intensive speeds, you will see a difference in the last recorded timestamp on both the source and target instance. This is because the machine was lagging when the load generator was running with high write speeds and throttling enabled, eventually affecting RPO.
#cat /home/ec2-user/logs
Now let us look at how you can achieve a business-ready RPO with high write-intensive machines too.
Testing RPO without network throttling and with high write intensiveness
Disable the Network Bandwidth Throttling feature in Replication Settings, and wait for the source machine to reach CDP.

Now, run the load generator again with high write-intensive speeds for at least 15 minutes. You will notice that the machine remains in CDP while the high load is still generating. Stop the source instance.
Now go ahead and perform a target launch with the latest recovery point. Wait for the launch process to complete, start the source instance again, and login to both source and the target instance to validate the results.
Results:
As you can now see, with high write-intensive speeds, the source and target machine’s last database record timestamps are same – suggesting a sub-second RPO.
#cat /home/ec2-user/logs
Cleaning up
If you had followed through the preceding tests, then you may have the test resources running that would incur charges. Complete the following steps to shut down your test environment:
- Delete the target machine from the CloudEndure console.
- Remove the source machine from the CloudEndure console.
- Shut down the EC2 source instance.
Final thoughts
A bottleneck is essentially a step in any process suffering from limited capacity or bandwidth, such that the rest of the process grinds to a snails pace, or even standstill. One of the most common reasons for bottlenecks is a low network bandwidth. CloudEndure Disaster Recovery will use as much of the throughput available, but a low bandwidth will still limit replication speed. This blog illustrates how to simulate a low-bandwidth scenario by using CloudEndure’s Network Bandwidth Throttling feature that enables you to adjust the available network bandwidth. Bottlenecks also occur when the uplink connection is breaking intermittently, which will slow down and interfere with the replication speed.
In addition to network-related bottlenecks, there can also be staging area-related bottlenecks. For example, when using the default replication settings, CloudEndure uses a low-cost t3.small instance type as the replication server, shared across several replicating source machines. Each replication server replicates up to 15 disks from different source machines. When replicating write-intensive source machines, a t3.small instance may not be able to handle higher bandwidths, resulting in a potential bottleneck (see baseline bandwidths for AWS instance types). CloudEndure allows you to customize the replication server settings to use any instance type for the replication server. You can use a dedicated replication server, which is not shared with other machines (check out the documentation for more information). This allows you to increase your Amazon EBS and network throughput metrics by removing bottlenecks caused by write-intensive source machines through the usage of a larger replication server instance types.
If you have addressed the main causes of bottleneck we described, but are still experiencing a bottleneck, it could be due to these less-common causes:
- CloudEndure automatically provisions gp2 staging volumes for any volume larger than 500 GB. These Amazon EBS volumes may cause a bottleneck if their throughput is still not high enough to handle the replicated data. The user can mitigate by customizing EBS volumes type to gp2/gp3 or io1/io2 with Provisioned IOPS. Check out the documentation for more information.
- CloudEndure uses a lightweight agent with minimal memory and CPU footprint. However, system resource utilization such as memory/IO on the source machine can cause a bottleneck. This happens when the application responsible for writing data on the source machine itself is memory/IO intensive and not enough resources are available for the CloudEndure agent to replicate the data in a timely manner.
Conclusion
In general, an increased backlog results in a recovered target machine that does not contain the latest data from the source machine and may potentially cause you to miss your business RPO requirements. When a bottleneck prevents a source machine from replicating to the staging area on AWS in a timely manner, a backlog occurs. In order to eliminate the backlog, you must identify and solve the cause of the bottleneck.
The cause of a backlog may be difficult to predict. However, understanding the dependencies and possible bottlenecks can greatly aid you in resolving it and getting you one-step close to achieving your business’s RPO needs.
Thanks for reading this blog post! If you have any comments or questions, please don’t hesitate to leave them in the comments section.