AWS Storage Blog
Use IP whitelisting to secure your AWS Transfer for SFTP servers
AWS customers across a wide variety of industries must often exchange data with other organizations using the standard SSH File Transfer Protocol (SFTP). Examples of such data include financial records, media files, or sensitive information such as health records or personal finance data. SFTP provides a mature and secure transport mechanism for transporting these files, using the same public and private key encryption mechanisms employed by the SSH protocol. AWS Transfer for SFTP (AWS SFTP) fulfills this need by providing a fully managed service enabling transfers over SFTP, while the data is stored in Amazon Simple Storage Service (Amazon S3).
You can deploy an AWS SFTP server using Public endpoints or Virtual Private Cloud (VPC) hosted endpoints. You can use Public endpoints to quickly and easily provide internet access to your AWS SFTP servers. Alternatively, you can use VPC hosted endpoints for greater control over how users access your SFTP servers.
To provide additional security for VPC hosted endpoints, we recently added support for VPC Security Groups and Elastic IP addresses. Using security groups, customers can apply rules to limit SFTP access to specific public IPv4 addresses or IPv4 address ranges. End users outside of the allowed IP address list are unable to connect to the server. Additionally, customers can now associate Elastic IP addresses with their server endpoint. This enables end users behind firewalls to whitelist access to the SFTP server via a static IP, or a pair of IPs for failover.
In this blog, we show you how to use these new features to further increase the security of your AWS SFTP servers. First, we discuss the basic architectural components of a common deployment scenario for AWS SFTP. Next, we walk through how to configure this architecture in detail. Finally, we walk through how to test that your architecture is configured correctly.
Architecture
The following diagram shows the key components that are used to build a secure AWS SFTP server and make it available to SFTP clients over the internet. These components include the server itself, a VPC endpoint, Elastic IP addresses in two Availability Zones, a Security Group, and an Internet Gateway to provide internet access to your server.
Clients inside data centers globally can access the endpoint using the public IPv4 Elastic IPs or a custom domain whose CNAME points to the service supplied URL (<server-id>.server.transfer.<region>.amazonaws.com). Additionally, the SFTP server can be accessed using its private endpoint addresses by clients inside the same VPC, other VPCs using VPC Peering, or on-premises environments over AWS Direct Connect or VPN. This is useful so you don’t need to pay internet gateway charges for traffic originating in these VPC connected environments.
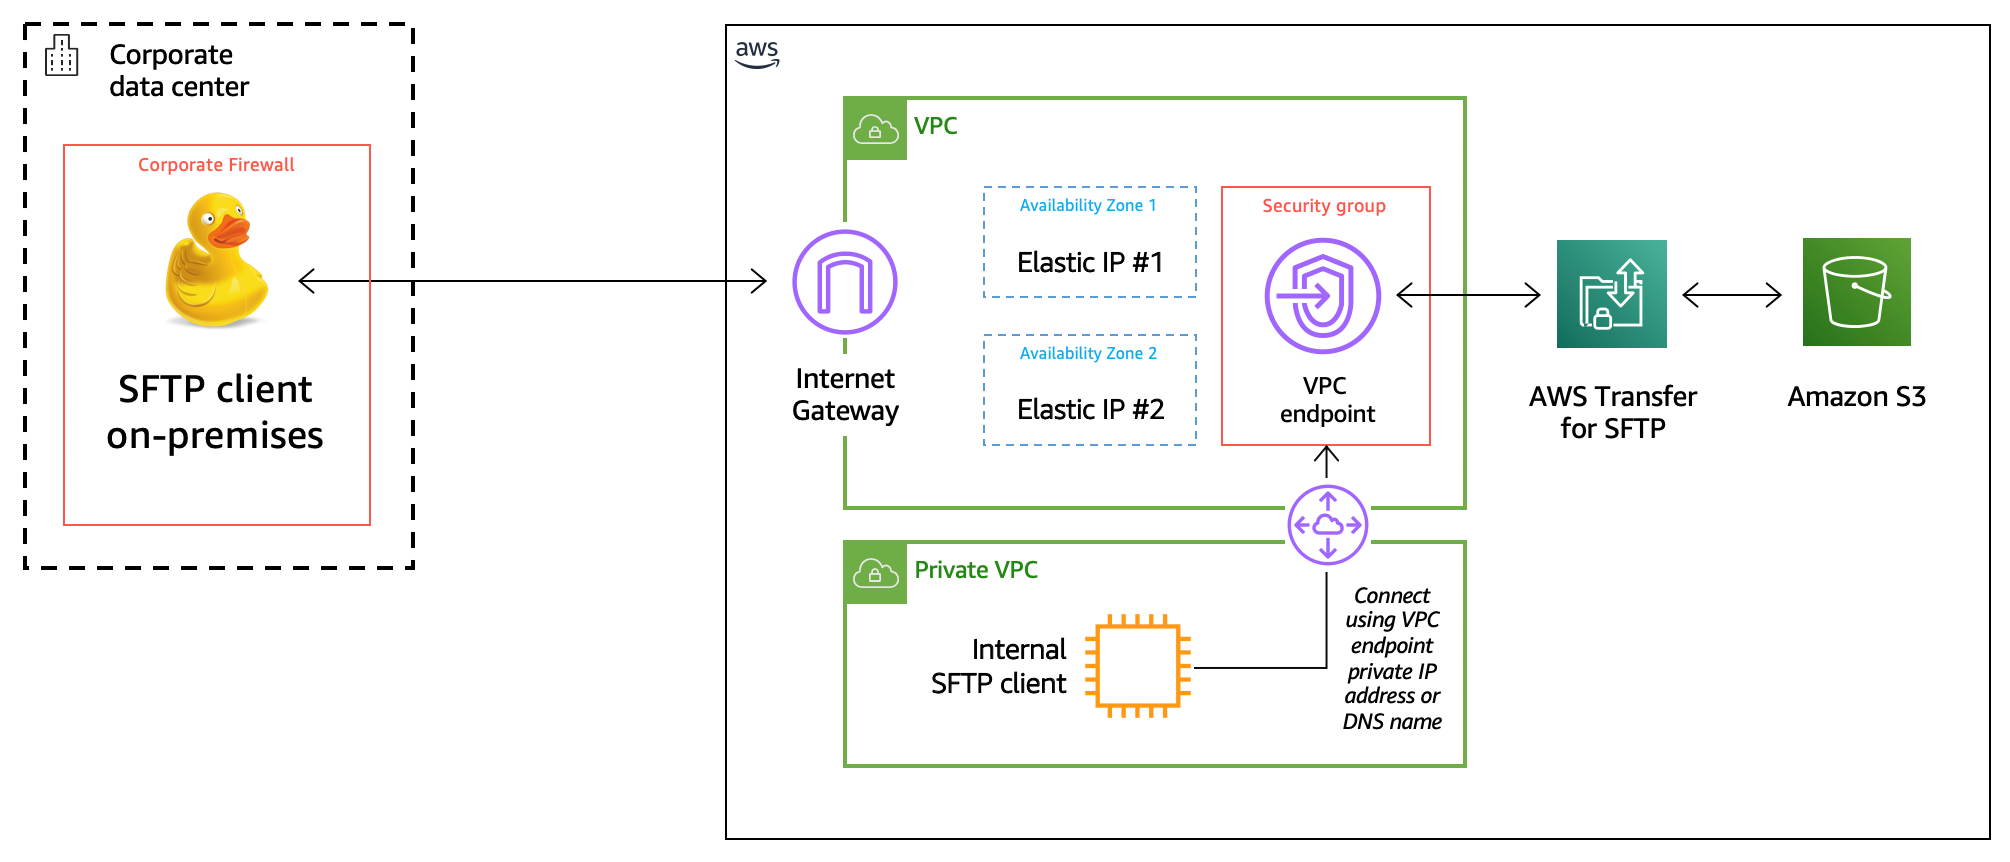
When you create your server, you select the VPC you want to host it in, and associate Elastic IP addresses. The service automatically creates a server endpoint hosted in your VPC, making the endpoint accessible via the Elastic IP addresses (and private IP address as mentioned above). You can then create Security Groups and apply them to the VPC endpoint, using IP address rules to dictate which hosts SFTP clients can access the endpoint from. Optionally, you can also set rules on which resources in your VPC or VPC connected environments can access this endpoint.
In the next section, we’ll walk you through each of these steps in detail.
Setup
To get started, you can use the AWS CloudFormation template available here to create the VPC environment shown above in your AWS Region. The template allocates two Elastic IP addresses while creating a VPC, two subnets, and an Internet Gateway. AWS SFTP uses a Multi-AZ architecture to achieve high availability. By creating two subnets and assigning an Elastic IP address to each, your SFTP service is able to withstand the loss of an Availability Zone.
Note: While this solution uses Elastic IP addresses, you can also use EC2 BYOIP to import your own static IP addresses. The BYOIP feature is particularly useful when you are migrating from an existing SFTP server and you must maintain the same endpoint IP addresses.
Once the AWS CloudFormation stack has been created, you see the following in the outputs tab:

You can see the ID of the VPC, the Availability Zones the subnets were created in, as well as the Elastic IP addresses. With these resources created, you can now proceed to create your AWS SFTP server.
First, go to the AWS SFTP console and choose Create Server. Then, under Endpoint Configuration, select VPC for a VPC hosted endpoint. In this exercise, you are creating an Internet Facing server, so select that option. From the VPC drop-down menu, select the VPC with the ID you noted from the outputs of your AWS CloudFormation template. Optionally, you can assign a Custom hostname that can be used by your clients to connect to your endpoint. In this example, we will use the service supplied hostname (details in the next section on how this relates to your Elastic IPs). See the following screenshot for reference:

Once you have selected your VPC, you see that the only two Availability Zones you may choose are the ones your AWS CloudFormation template selected to create your subnets. Select each of those, then select your subnet ID in the left drop-down menu and one of your Elastic IPs in the right drop-down menu for each Availability Zone:

Note: The service lets you choose up to three Availability Zones and it is recommended that you choose more than one Availability Zone for HA purposes.
Once everything is selected as shown above, choose the Create server button. It takes a few minutes to create your SFTP server. When the creation is complete, and the server status shows as Online, select the new server to get more information.

In the preceding screenshot, you can see two key resources that were automatically created by the service.
First, because you chose to deploy the server in your VPC, a VPC endpoint was automatically created by the service (as shown above under “Endpoint type”). All network traffic to and from the SFTP server passes through this endpoint. You apply Security Groups to this endpoint to whitelist SFTP clients.
Second, because you chose to make your server internet facing, a DNS name was supplied for your server. This DNS name is the hostname that SFTP clients use to access the server (as shown under “Endpoint”). AWS SFTP automatically created an alias record for the DNS name of the form “<serverid>.transfer.<region>.amazonaws.com.” An ANAME record was created that includes the two Elastic IP addresses you assigned to the server. The service Console provides you the option to assign your custom domain as the hostname your clients can use to access your endpoint using Route 53 CNAME.
By default, your VPC’s security group is assigned to the endpoint. You can create and use a different Security Group where you eventually whitelist your client IP address for access to the SFTP server. Go to the VPC service in the AWS Management Console and select Security Groups. At the top of the page, choose Create security group. On the following page, specify a name and description, and then assign the security group to the VPC created by the AWS CloudFormation template. Choose Create to create the security group. Once this Security Group is created, you must assign it to your VPC endpoint as well. Return to the console page for your AWS SFTP server. Under Endpoint type, follow the link for your VPC endpoint (vpce-<endpointid>). This launches the Endpoints console page for your VPC endpoint. From the Security Groups tab, select Edit Security Groups. See the following screenshot for an example:

On the Manage security groups page, uncheck the box for the default VPC security group, and check the box for your newly created Security Group. Select Save to complete the process.
Optional setup for private VPC access
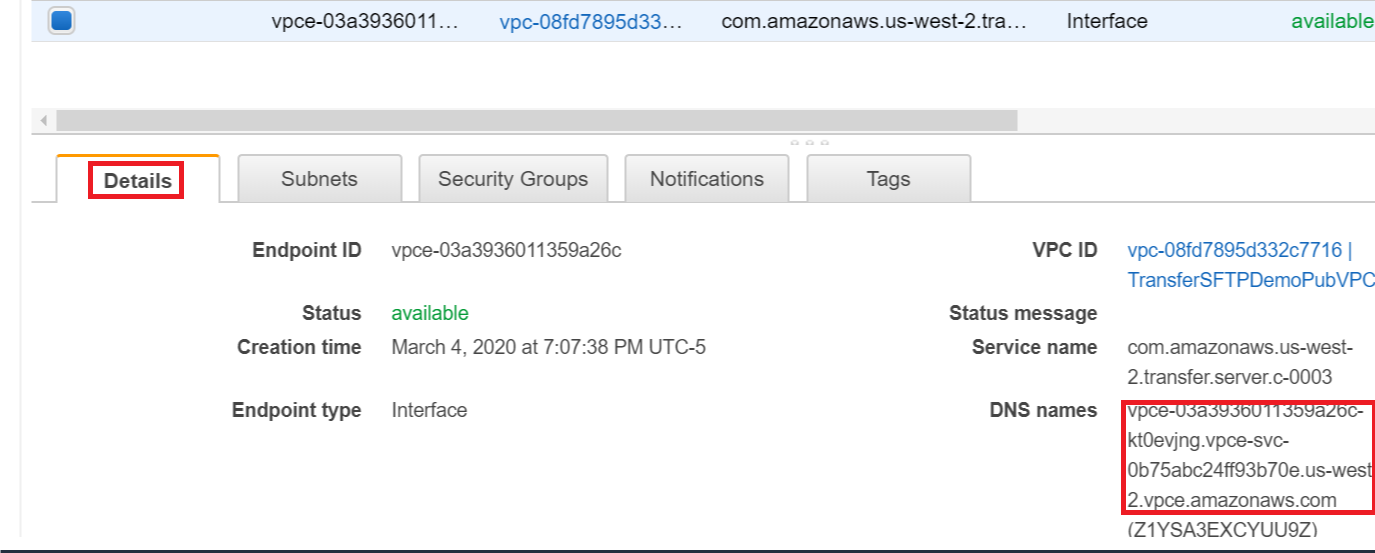
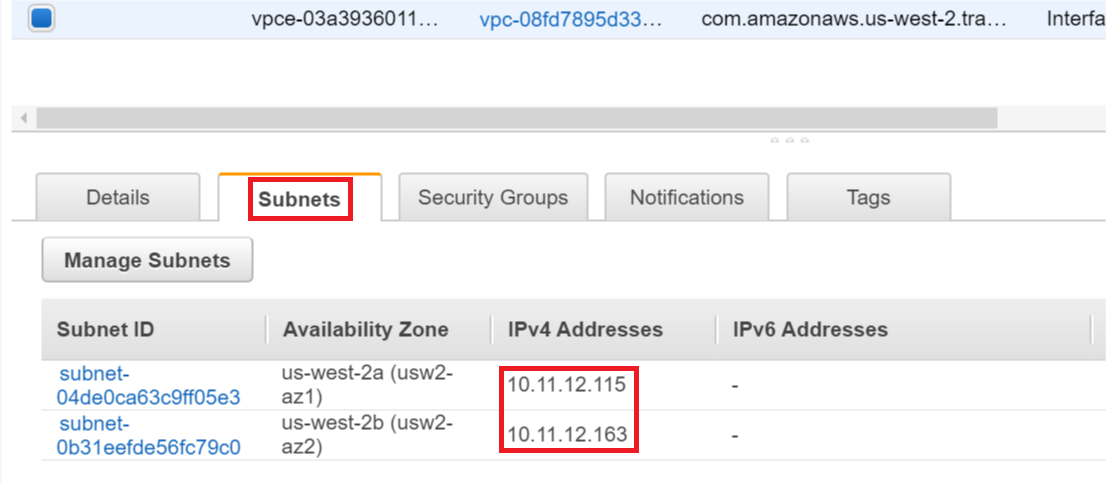
You may also want to allow traffic from clients in the same VPC, other VPCs (via Peering), or on-premises environments (via Direct Connect/VPN) to reach your SFTP server endpoint without traversing public IP space. In some cases, certain VPCs may not even be allowed to pass traffic to the internet and may lack a NAT Gateway or Internet Gateway. In these use cases, clients can access the server’s endpoint using the endpoint’s private IP addresses. You may obtain these addresses and their associated DNS names by reviewing the Details and Subnets tabs of your SFTP server endpoint in the endpoints area of the VPC console.
Details tab screenshot:
Subnets tab screenshot:
In order to allow traffic from other VPCs to reach your SFTP server, you want to establish a VPC peering session. A VPC peering session is not limited to VPCs within a single account, and also might be used to provide direct access to other accounts or partner organizations. Once the VPC peering session is established, appropriate routes must be added in order to allow subnets within those VPCs to reach each other. The final step to allow traffic originating from the peer VPC to reach your SFTP server endpoint is to whitelist either specific IPs or ranges to your Security Group. See the test procedure below for an example of adding whitelisted IPs.
Test
You can easily test access to your SFTP server either via your terminal on Linux or macOS systems, or using a third-party tool such as Cyberduck, WinSCP, or Filezilla. Before attempting to connect to the server, you must first return to the AWS SFTP console page for your server to create a user account.
Note: Our example uses a Service-managed identity provider for the SFTP server, which authenticates users using SSH keys. AWS Transfer for SFTP also supports custom authentication methods, which allows you to do password authentication, as well as authentication via 3rd party providers.
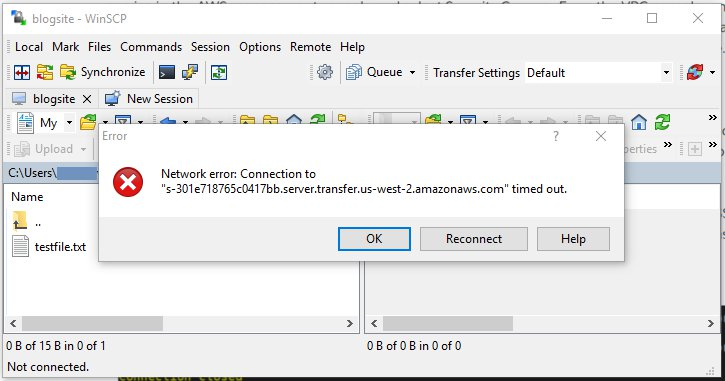
Once you’ve created a user account, you’re able to attempt to connect to your SFTP server using the private key that corresponds with the public key used during user creation. Using the hostname of your SFTP server, try to connect using your preferred SFTP client. At this point, you should experience a timeout, such as the one shown in the following screenshot. This is because your IP address has not been configured to reach the VPC over the appropriate port.
Return to the settings page in the AWS Management Console for the Security Group you created earlier. On the settings page, choose the Inbound Rules tab, and choose Edit Rules. Select SSH as the Type – this automatically selects the appropriate protocol and port range for SFTP. For the purposes of this exercise, select My IP under Source – this automatically populates the IP address from which you logged into the console. Enter a description, and choose Save Rules:

Once you have added the new rule to your security group, select Close. You now see an inbound rule in your security group that gives your IP address access to your VPC via port 22, which gives you access to your SFTP server.
Now that this rule is in place, attempt to connect to your session again from your SFTP client. As shown in the following screenshot, you should now be able to connect to your SFTP session. Optionally you can upload a file and view it in the S3 console.

Cleaning up
To clean up the resources you created as part of this post, you want to delete your AWS SFTP server. Once the server has been deleted, you can then proceed to delete the AWS CloudFormation stack that you deployed earlier. Taking these steps ensures you incur no additional costs from following along with this post.
Conclusion
In this blog, we showed you how to use VPC Security Groups to whitelist access to your AWS SFTP servers. First we deployed an AWS CloudFormation template to configure the needed network elements to configure the sample architecture. Next, we created a new AWS SFTP server with an endpoint hosted inside a VPC. Then, we demonstrated how to use the Security Group associated with that VPC to whitelist access to your server endpoint only to specific IPs, and optionally to peered VPCs inside or outside your account.
Using the new features described in this post, you can now limit AWS Transfer for SFTP endpoint access to the IPs of your trusted customers and business partners. This adds an additional layer of security, and in addition to the authentication mechanisms supported by AWS SFTP, prevents unknown or untrusted entities from even reaching the endpoint. Additionally, a major benefit to hosting the endpoint with two Elastic IPs is that it gives your customers the ability to filter SFTP outbound when their firewalls don’t support URL-based filtering. These benefits can be helpful when working with tightly regulated data such as financial records or Personal Health Information (PHI).
Thanks for reading this blog post, please leave a comment if you have any questions. To learn more about AWS Transfer for SFTP, check out the following links: