AWS Big Data Blog
Build an end to end, automated inventory forecasting capability with AWS Lake Formation and Amazon Forecast
Amazon Forecast is a fully managed service that uses machine learning (ML) to generate highly accurate forecasts without requiring any prior ML experience. Forecast is applicable in a wide variety of use cases, including estimating product demand, inventory planning, and workforce planning.
With Forecast, there are no servers to provision or ML models to build manually. Additionally, you only pay for what you use, and there is no minimum fee or upfront commitment. To use Forecast, you only need to provide historical data for what you want to forecast, and any additional related data that may influence your forecasts. The latter may include both time-varying data, such as price, events, and weather, and categorical data, such as color, genre, or region. The service automatically trains and deploys ML models based on your data and provides you with a custom API to retrieve forecasts.
This post demonstrates how you can automate the data extraction, transformation, and use of Forecast for the use case of a retailer that requires recurring replenishment of inventory. You achieve this by using AWS Lake Formation to build a secure data lake and ingest data into it, orchestrate the data transformation using an AWS Glue workflow, and visualize the forecast results in Amazon QuickSight.
Use case background
Retailers have a recurring need to replenish inventory. For example, consider a clothing retailer that typically sells through its e-commerce and physical store channels. You need to maintain optimum levels of inventory on hand to meet demand while minimizing warehouse costs. Some of the common questions you need to answer for effective inventory management are:
- What is the optimal quantity of inventory to reorder from my supplier for my next sales cycle?
- What should the composition of product SKUs be in the purchase order to the supplier?
- How do I most effectively determine the right mix and quantity of products to stock at individual retail store locations?
You can use Forecast to answer these questions. You extract data from the source systems, apply transformations to make the data ready for use in Forecast, and use Forecast to load, train, and forecast.
The following diagram shows the end-to-end system architecture of the proposed solution using Lake Formation, AWS Glue, and Amazon QuickSight.
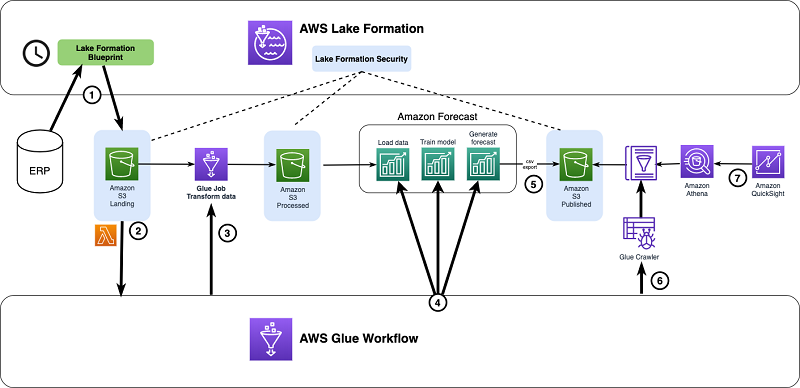
You use Lake Formation to manage governance and access control on the data lake. Additionally, you use the following resources:
- Lake Formation blueprint to ingest sales data into a data lake
- AWS Lambda and Amazon S3 event notification to trigger an AWS Glue workflow
- AWS Glue workflow to trigger the execution of the data transform AWS Glue job
- AWS Glue workflow to orchestrate the three steps within Forecast (load, train, forecast)
- Forecast to export the forecast results into the data lake
- AWS Glue to trigger a crawler on the exported forecast results
- Amazon Athena and Amazon QuickSight to visualize the exported forecast results
Setting up the required IAM policies
Before you get started, you need to set up the required IAM policies. Complete the following steps:
- Sign in to the IAM console as a user with the
AdministratorAccessAWS managed policy. - Create an IAM user named
report_builderto use when building your Amazon QuickSight analysis report and dashboard for visualization. - Grant the
AmazonAthenaFullAccesspolicy to the user.In the following steps, you create an IAM role for the AWS Glue jobs, crawler, and workflow to assume during their execution. - On the IAM console, choose Roles.
- Choose Create role.
- On the Create role page, choose AWS service, and then choose Glue.
- Choose Next: Permissions.
- From the list of available policies, search for the AWSGlueServiceRole policy and select it.
- Name the role
GLUE_WORKFLOW_ROLE. - Choose Create role.
- On the Roles page, search for and choose
GLUE_WORKFLOW_ROLE. - On the Trust relationships tab, choose Edit trust relationship.
- Add the following assume role for Forecast :
- Choose Update Trust Policy.
- On the role Summary page, on the Permissions tab, choose Add inline policy.
- Add the following inline policy:
Setting up your data lake storage
Next, you need a data lake to use in this automation. You create S3 buckets for data storage and apply appropriate security and governance. If you already have a data lake on Amazon S3, you can continue to use those S3 buckets with Lake Formation.
On the Amazon S3 console, create the following buckets:
forecast-blog-landing(for raw data ingest)forecast-blog-processed(for the transformed data)forecast-blog-published(for end consumers to access results)
This post includes walkthrough instructions for the landing folder, which you can repeat for the other two folders.
Enabling centralized access control on your data lake
You use Lake Formation’s centralized access control to enable access to the underlying S3 buckets for users and roles. With this model, you don’t need to create any additional IAM access policies or S3 bucket policies for your users and roles.
- Sign in to the AWS Lake Formation console as a data lake administrator IAM user.For instructions on setting up a data lake administrator user, see Create a Data Lake Administrator.To manage access control from Lake Formation, you register the three S3 buckets you created earlier as data lake locations with Lake Formation.
- On the Lake Formation dashboard, choose Register Location.

- For Amazon S3 path, enter your S3 bucket location (
s3://forecast-blog-landing). - Choose Register location.

- Repeat these steps for the
processedandpublished.
Setting up the Lake Formation data catalog for your data lake
You create three databases in the Lake Formation data catalog, one for each S3 bucket you created earlier. All transformations done via AWS Glue operate on the databases in this catalog.
- On the Lake Formation console, under Data catalog, choose Databases.
- Choose Create database.

- In the Database details section, for Name, enter the name for the database (
forecast-blog-landing-db). - For Location, enter the location to the corresponding S3 bucket.
- For Description, add an optional description.
- Deselect Use only IAM access control for new tables in this database.
- Choose Create database.

- Repeat the above steps for the
processedandpublished. - On the Databases page, select the database you just created.
- From the Actions drop-down menu, choose Grant.

- For IAM users and roles, choose the
GLUE_WORKFLOW_ROLEyou created earlier. - For Database permissions, select Create table.
- Choose Grant.
 At this stage, you have set up your data lake with Lake Formation. The following diagram illustrates your resources so far.
You’re now ready to ingest sales data into your data lake.
Ingesting data
This post uses an example MySQL table called sales, which contains 2 years of sales history of a single product. The schema of the table is as follows:
| Column Name | Column Type |
InvoiceNo |
int |
StockCode |
int |
Description |
varchar(200) |
Quantity |
int |
InvoiceDate |
varchar(50) |
UnitPrice |
float |
CustomerID |
int |
StoreLocation |
varchar(100) |
CustomerName |
varchar(200) |
- To begin the ingestion, create the source database.The following CloudFormation template creates a free-tier RDS MySQL instance with a database named
sales_schemawithin a new VPC with the required sample data for this post. The template deploys in theus-west-2Region.
![]()
- Create a new Glue connection for the source database.
- On the Lake Formation console, choose Blueprints.
- Choose Use a blueprint.
- Select Incremental database as the blueprint type for a regular ingest of sales data from the source relational database.
- Follow the prompts to complete the incremental blueprint setup.

- For Database connection, choose forecast-blog-db.
- For Source data path, enter
sales_schema/sales.
- For Incremental data enter Table name = sales, Bookmark keys = InvoiceDate (column name is case sensitive), Bookmark order = Ascending

- For Target database, choose forecast-blog-landing-db.
- For Target storage location, enter
s3://forecast-blog-landing. - For Data format, choose Parquet.

- For Workflow name, enter
forecast-blog-wf. - For IAM role, choose GLUE_WORKFLOW_ROLE.
- For Table prefix, enter
blog.
The target location must be the landing S3 bucket that you created earlier, and table prefix must be set to blog. This is the raw data that subsequent AWS Glue jobs transform and process. For information about using an incremental database blueprint, see Importing Data Using Workflows.
Start the blueprint after you create it.
Orchestrating data transformation and forecast generation
When you have the raw sales data ingested into the data lake landing bucket, you execute a custom AWS Glue workflow to orchestrate the automation of data transformation, AWS Forecast load/train/forecast execution, and making the forecasts available for business dashboards. Complete the following steps:
- Create an AWS Glue crawler to crawl the
publishedS3 bucket that you created earlier.- Use the
GLUE_WORKFLOW_ROLEthat you created earlier.
- Use the
- Create the following AWS Glue jobs to use in the forecasting automation.
- Create the data transformation job as Type = Spark, Glue version = Spark 2.4, Python 3 with improved job startup times (Glue Version 2.0)
- Create the remaining jobs as Type = Python shell, Python version = Python 3 (Glue version 1.0)
- For IAM role, use
GLUE_WORKFLOW_ROLE.
- On the Connections page, choose Save job and edit script without selecting any connections. The following jobs are available on GitHub:
- Data transformation job (Spark)
- Importing data into Forecast (Python shell: Python 3)
- Checking the load data job status (Python shell: Python 3)
- Training the Forecast predictor (Python shell: Python 3)
- Checking the train predictor job status (Python shell: Python 3)
- Generating forecast (Python shell: Python 3)
- Checking the forecast job status (Python shell: Python 3)
- Exporting forecast to data lake published bucket (Python shell: Python 3)
- Checking the export forecast job status (Python shell: Python 3)
Next, you create a new AWS Glue workflow to orchestrate the entire automation. The workflow lets you build and orchestrate a sequence of AWS Glue jobs and crawlers via triggers to complete a complex process.
- On the AWS Glue console, choose Workflows.
- Choose Add workflow.

- For Workflow name, enter
AmazonForecastWorkflow. - For Description, add an optional description.
- For Default run properties, enter the keys and values in the following table.
| Key | Value |
landingDB |
forecast-blog-landing-db |
landingDBTable |
blog_sales_schema_sales |
processedBucket |
forecast-blog-processed |
publishedBucket |
forecast-blog-published |
- Choose Add workflow.

After you create the workflow, you add triggers, jobs, and a crawler in your workflow.
- Choose the workflow you created earlier.
- Choose Add trigger.
- For name, enter
StartWorkflow. - For Trigger type, select On demand.
- Choose Add.

- On the Jobs tab, choose the job you created earlier.
- Choose Add.

- Choose Add node.
- Create a new trigger to watch the end of the transform job and start the data import job.
- For Name, enter
StartDataImport. - For Trigger type, select Event.
- For Trigger logic, leave as Start after ANY watched event.
- Choose Add.

- Choose Add node to the left of the trigger and choose the data transformation job you created earlier.

- Choose Add node to the right of the trigger and choose the import data job you created earlier.

- Repeat these steps to create the following triggers:
| Trigger | Glue job to complete | Glue job to start |
| CheckImportTrigger |
Importing data into Forecast
|
Checking the load data job status |
| StartPredictorTrigger |
Checking the load data job status
|
Training the Forecast predictor
|
| CheckPredictorTrigger |
Training the Forecast predictor
|
Checking the train predictor job status |
| GenerateForecastTrigger | Checking the train predictor job status | Generating forecast |
| CheckForecastTrigger | Generating forecast | Checking the forecast job status |
| ExportForecastTrigger | Checking the forecast job status | Exporting forecast to data lake published bucket |
| CheckExportTrigger | Exporting forecast to data lake published bucket |
Checking the export forecast job status
|
| StartCrawlerTrigger |
Checking the export forecast job status
|
Crawler you created to crawl the published S3 bucket |
- From the Actions drop-down menu, choose Run.
This starts the end-to-end forecasting process.
Visualizing your forecasts
To provide your users with a dashboard that refreshes regularly with new forecasts, set up an Amazon QuickSight report and a dashboard and connection to the data lake via Athena. You can use Amazon QuickSight and the Athena data source to access the forecast data and make visualizations.
First, you need to grant access to the forecast data to QuickSight. Identify the Amazon QuickSight service role in your account. Amazon QuickSight assumes the service role (aws-quicksight-service-role-v0) to interact with other AWS services. The service role is automatically created when you start using Amazon QuickSight.
- As the data lake administrator user, on the Lake Formation console, locate the table created by the AWS Glue workflow under your
published-db.This is the table that has the exported forecast data to visualize. - Grant Select access on this table to the Amazon QuickSight service role using the Grant action within Lake Formation.For more information, see Granting Data Catalog Permissions.You now create a dashboard to visualize the forecast data in Amazon QuickSight.
- On the Amazon QuickSight console, choose Manage data.
- Create a data source for Athena.
- For Data source name, enter
forecast-blog-published-db. - Choose Create data source.

- For Database, choose forecast-blog-published-db.
- Select the table that your crawler created for the exported forecast (forecast_blog_published).
- Choose Select.

- Choose Visualize.

- Create a new analysis on the dataset.
- Publish a visualization dashboard.The following screenshot is a QuickSight dashboard displaying your exported forecast. The dashboard was created from a line chart analysis with the columns
p10,p50, andp90values selected for the y-axis anddateselected for the x-axis.
Forecast generates probabilistic forecasts so you can generate forecasts at different percentiles depending on your specific use case (for example, if under-stocking or over-stocking is critical to the business). The preceding graph represents the upper and lower bands of forecasted inventory values for the product in your sample data and a selected location (applied as a filter) for a 10-day period. Using this, you can decide on the optimum levels of stock to hold or order for that week.
The p10 is the lower boundary, meaning that there’s only a 10% chance that the actual value is below this line. However, P90 is the upper bound, meaning that there’s a 90% chance that the actual value is below this line. As your training data becomes more comprehensive, the p10 and p90 start to converge. You can also generate forecasts on custom quantiles of your choosing.
For conservative planning, choose a value closer to the p90, which means you’re willing to purchase more inventory than what you actually sell. For aggressive planning, choose a value closer to the p10, which means that you’re willing to accept the risk of running out of inventory.
Conclusion
In this post, you learned how to build an automated inventory forecasting capability for your business on AWS using AI through Forecast and Lake Formation. You learned how to set up a data lake on AWS with the required security governance using Lake Formation. You also learned how to automate the end-to-end process of ingesting sales data into your data lake and automating the data transformation; loading, training, and generating forecasts with Forecast; and making the forecasts accessible to your end-users via Amazon QuickSight visualizations.
About the Author
 Syed Jaffry is a solutions architect with Amazon Web Services. He works with Financial Services customers to help them deploy secure, resilient, scalable and high performance applications in the cloud.