AWS Compute Blog
Using bus-to-bus event routing with Amazon EventBridge
Using Amazon EventBridge, you can now route events between different event buses in the same Region and same AWS account. Combined with the ability to route events cross-Region, this provides you with significant flexibility in routing events in your workloads. This blog post explains how to use event routing and walks through ways you can use this feature.
EventBridge enables developers to route events between AWS services, integrated software as a service (SaaS) applications, and your own applications. Previously, you could only consume events from AWS services from the default bus, and events from SaaS applications appeared only in partner event buses. With bus-to-bus routing, you can now forward these events to other buses using the same model for routing events to existing targets.
Putting events onto another bus is charged at the same rate as other put events operations – see the EventBridge pricing page to learn more.
How bus-to-bus routing works
Event buses route events using rules, which match events with patterns, and route to targets. To route an event from an event bus in any Region, you must create a rule and define which event bus to route to. You can have up to 100 event buses per AWS account. This is a soft limit which you can raise by submitting a support ticket from the AWS Service Quotas console.
Using same-Region buses as targets works the same way as using cross-account or cross-Region buses as targets. To add a bus in the same Region as a target to a rule:
- Navigate to the EventBridge console. Choose Create rule.
- Provide a name and pattern and choose the source event bus.
- In the Select targets panel:
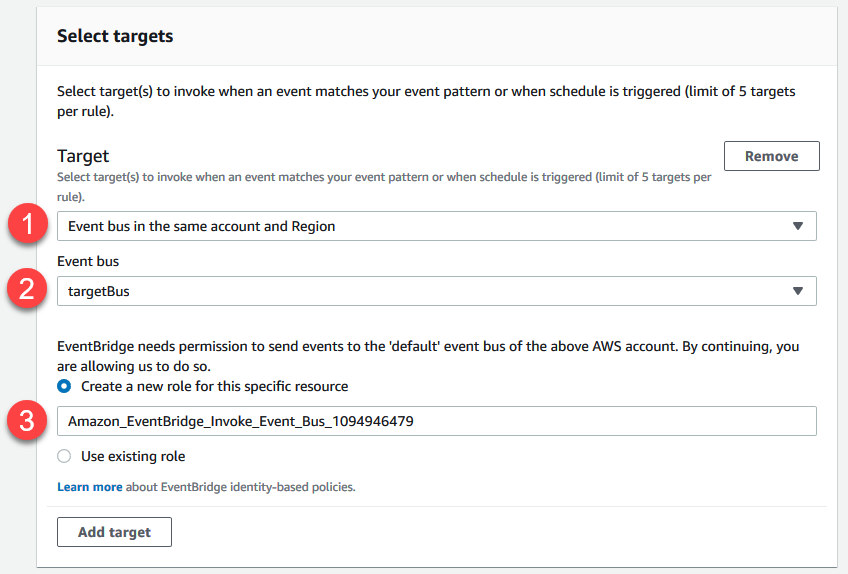
– For Target, select Event bus in the same account and Region.
– For Event Bus, enter the name of the target event bus.
– Keep the selected option Create a new role for this specific resource. This creates the necessary IAM permissions to allow the rule to put events on the target bus. - Choose Save.
Events that match the rule are then delivered to the event bus. The delivered event is identical to the original event and does not contain any additional metadata or attributes. You can specify multiple target event buses in the same rule by using multiple targets.
You can only forward an event between same-Region buses once. If you have routed an event from a source bus to a target bus, the target bus cannot then forward the event to another bus.
If you use the CLI to configure the target, you must manually create the IAM role that provides permission for the rule to route to the target bus. This role should include a policy that allows an event:PutEvents action for the target bus:
{
    "Version": "2012-10-17",
    "Statement": [
        {
            "Effect": "Allow",
            "Action": [
                "events:PutEvents"
            ],
            "Resource": [
                "arn:aws:events:us-east-1:123456789012:myApplicationBus/*"
            ]
        }
    ]
}
You must also enable events.amazonaws.com as a trusted entity on the IAM role:
{
  "Version": "2012-10-17",
  "Statement": [
    {
      "Effect": "Allow",
      "Principal": {
        "Service": "events.amazonaws.com"
      },
      "Action": "sts:AssumeRole"
    }
  ]
}
The target bus also requires a rule to process the event, otherwise the event is discarded. You can create a rule on the target bus to route the event to AWS Lambda functions, Amazon SQS queues, API destinations, or any other available target.
Using bus-to-bus routing to simplify event flow and access
Previously, a single workload may need rules on multiple buses for events related to one application. This is because events from AWS services are routed to the default bus while events from SaaS partners have their own dedicated buses. With this feature, you can now route events from multiple buses to a single custom bus.
This can be useful for centralizing events related to a single project, application, or team within your organization. For example, in a banking application where ATM transactions originate on the default bus, there could be multiple departments interested in the events.

These departments can now subscribe to their own dedicated buses for messages, and do not need access to the source buses:
- The Marketing department receives ATM events on a Marketing bus. The rule forwarding the event filters out personally identifiable information (PII) from the event, so the marketing team can use the data.
- The Compliance department receives the same events but with no fields redacted. This Compliance bus also receives events from a Splunk partner event bus which captures log events from the ATM machines.
- The Operations department receives only ATM events where a machine has operational issues, and transactional events are excluded. The Operations bus also receives Zendesk ticket updates related to ATM maintenance from a partner event bus.
Additionally, this can help if you need to filter or route AWS-related events to an application, but you do not want to provide access to all AWS events. In the case, create a rule on the default event bus to match the allowed events and forward to a custom bus used by the consuming application. You can then use IAM to deny access to the default bus and enable access to the custom bus.
Creating a bus-to-bus routing rule in AWS CloudFormation
Using AWS CloudFormation or the AWS Serverless Application Model (AWS SAM), you can deploy EventBridge buses, rules, and policies using infrastructure as code (IaC). To create a rule on an event bus that routes events to another bus in the same account, first create the AWS::Events::Rule resource:
Resources:
  EventRuleBusToBus:
    Type: AWS::Events::Rule
    Properties:
      Description: "Routes from MyBusName to myApplicationBus"
      EventBusName: "MyBusName"
      State: "ENABLED"
      EventPattern:
        source:
          - 'MyTestApp'
        detail:
          - 'MyTestAppDetail'
      Targets:
        - Arn: "arn:aws:events:us-east-1:123456789012:event-bus/myApplicationBus"
          Id: "myApplicationBusTarget"
          RoleArn: !GetAtt EventBridgeIAMrole.Arn
Next, create an AWS::IAM::Role resource that allows EventBridge to put events on the target bus in the destination Region:
  EventBridgeIAMrole:
    Type: AWS::IAM::Role
    Properties:
      AssumeRolePolicyDocument:
        Version: 2012-10-17
        Statement:
        - Effect: Allow
          Principal:
            Service:
              !Sub events.amazonaws.com
          Action: sts:AssumeRole
      Path: /
      Policies:
      - PolicyName: PutEventsBusToBus
        PolicyDocument:
          Version: 2012-10-17
          Statement:
          - Effect: Allow
            Action:
            - events:PutEvents
            Resource:
            - "arn:aws:events:us-east-1:123456789012:event-bus/ myApplicationBus"
Conclusion
With bus-to-bus event routing in EventBridge, you can now route events from any type of event bus to the default and custom buses. This post explains how to configure bus-to-bus event routing in the console and CLI and discusses potential use-cases.
For more serverless learning resources, visit Serverless Land.