AWS for M&E Blog
Scheduling Epic Games’ Unreal Engine pipelines with AWS Thinkbox Deadline
This blog post was co-authored by Michael Muir, Senior Product Specialist at Epic Games.
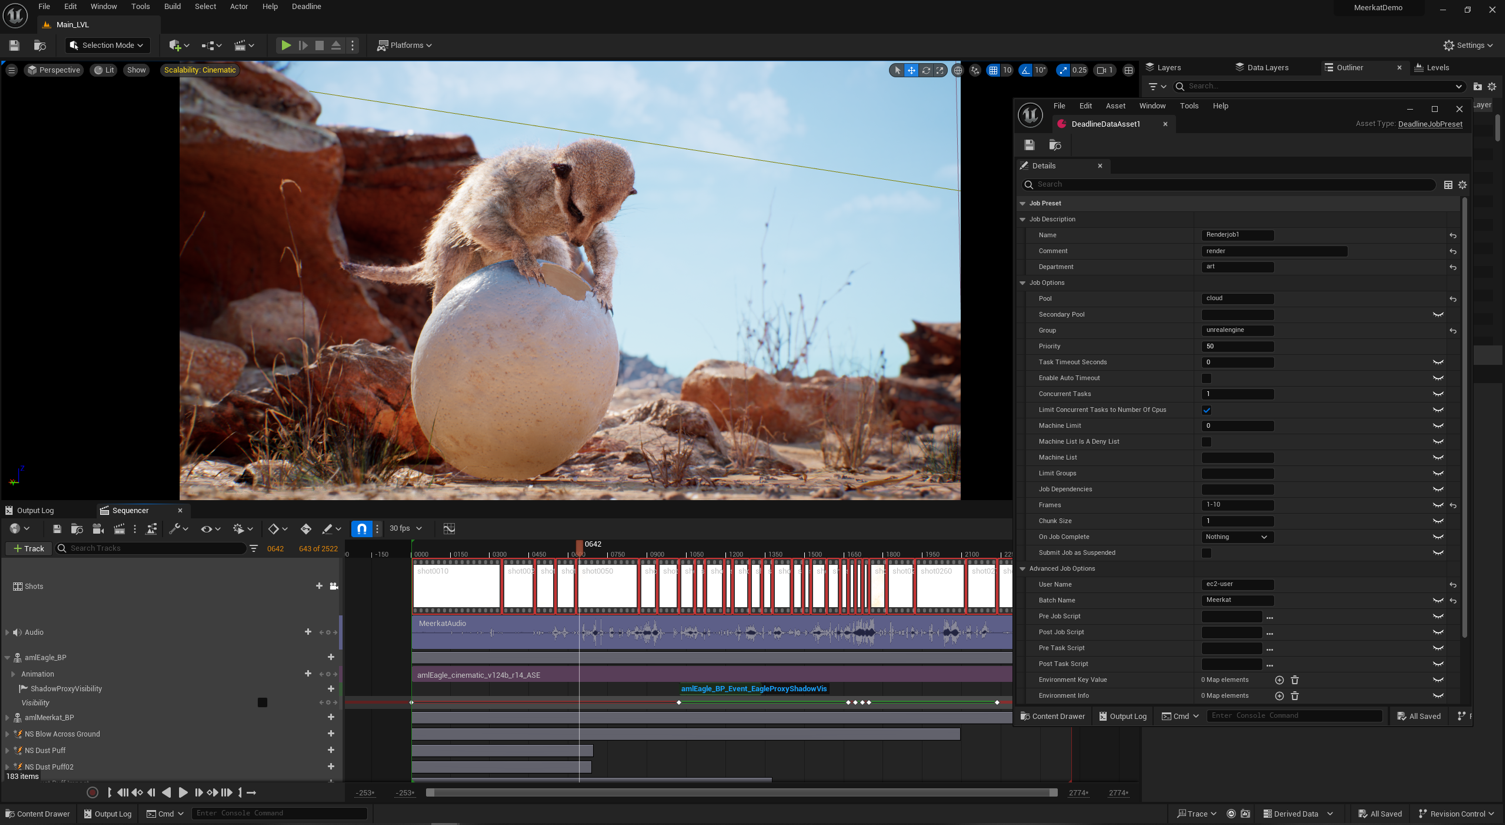
Figure 01: Epic Games’ Unreal Engine provides real-time content generation, manipulation and rendering.
Introduction
Epic Games’ Unreal Engine has revolutionized the creation and manipulation of real-time 3D content. With technology advances such as Lumen and Nanite in Unreal Engine 5, leaps in immersive fidelity and realistic interactive experiences have empowered industries ranging from tv and film, to games, to architecture, engineering, and construction (AEC).
One of the primary benefits of Unreal Engine is the ability for artists to work in, or near, final quality in real time. However, the advantages of real-time workflows can quickly disappear if artists have to context switch and wait for their shots to render, or other pipeline processes to complete. AWS Thinkbox Deadline, a hybrid administration and compute management software for Windows, Linux and macOS based render farms, can help solve this. It allows processes like rendering to be offloaded to a compute farm, freeing up creative teams to focus on their artistic challenges.
In collaboration with Epic Games, AWS Thinkbox is excited to announce a new set of plugins, covering a variety of functionality. The new plugins allow for generic project tasks, such as rendering, to be submitted to Deadline directly from within Unreal Engine. The inherent details surrounding the submissions persist within projects via a new Deadline Job Preset Asset type. With support for Unreal Engine’s remote Movie Render Queue execution through to Deadline, users can quickly submit queues to process on local, remote, or cloud-based workers. Rendering and a broader set of custom pipeline processing capabilities are now supported to suit production and workflow needs through a new set of APIs.
“We are excited to have an artist-friendly way to submit to our GPU farm from inside Unreal Engine with the new Deadline plugin” – Peter Nofz, VFX Supervisor, Rodeo FX
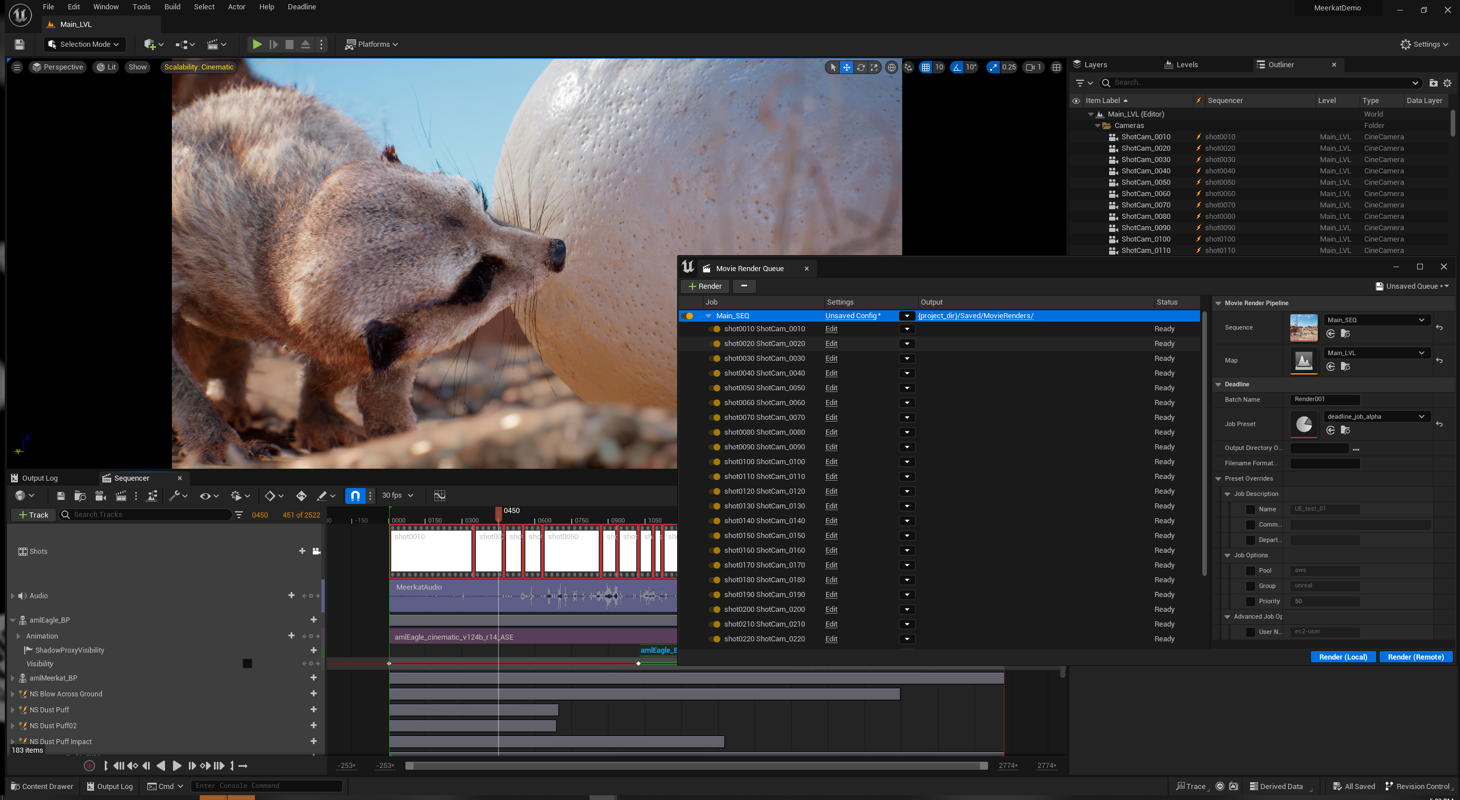
Figure 02: Submissions to Deadline can be made directly from within Unreal Engine.
“The Deadline for UE5 plugin is an exciting (and much needed) next step in streamlining our render pipeline!” –
Aythan Maconachie, Tech Lead, Glitch Productions
Deadline Setup
To integrate Deadline into an Unreal Engine environment using plugins, you need the following:
- A 10.3.0 installation of the Deadline Repository or newer. You can find instructions for installing Deadline here.
- Unreal Engine artistic workstations to generate and submit content, running at least Unreal 5.2.0. If a new version of Unreal requires plugins to be rebuilt, you will also need a development environment, such as Visual Studio Code 2022. Information on setting up Unreal Engine for development can be found here.
- Deadline Client software installed and configured on the Unreal Engine artist workstations. This guide uses the Deadline Client method of submission.
Step 1: Plugin Installation
The Unreal Engine plugins are supplied within the Deadline Repository. These need to be copied to your Unreal Engine Project(s), and you will need to repeat this step for every new project you create in the future:
- Create a “Plugins” sub-folder within your Unreal Project folder.
- Go to your Deadline repository installation, and navigate to the Unreal Engine plugins folder found in <Deadline Repository>\plugins\UnrealEngine5\UnrealEnginePlugins.
- Copy the UnrealDeadlineService and the MoviePipelineDeadline plugin folders into each project’s “Plugins” folder.
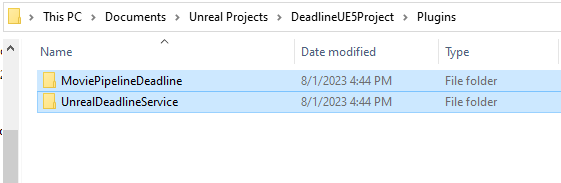
Figure 03: Providing both plugins to the Unreal Engine project.
Step 2: Plugin Activation
With the plugins copied to the file location within the project’s file structure, start Unreal Engine, and load that project. Ensure that both the Unreal Deadline Service and Movie Pipeline Deadline plugins are loaded within the Unreal Engine editor:

Figure 04: Setup of the Deadline plugins within Unreal Engine.
- Open the Plugin Browser (Edit > Plugins) from the main menu.
- Search for “Deadline” in the search dialog.
- Enable both the Unreal Deadline Service and Movie Pipeline Deadline plugins and restart the Editor.
When using a newer version of Unreal Engine than the plugins were built with, the plugins need to be rebuilt to match that particular version; if requested, say “Yes”.
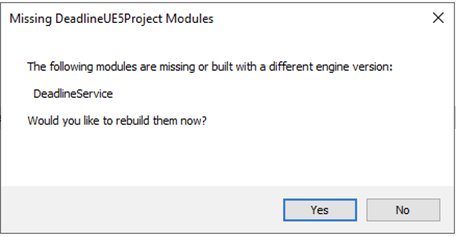
Figure 05: Visual requests to build plugins to match Unreal Engine version.
Note: If this process fails, a likely culprit is a missing development environment–e.g., a lack of Visual Studio 2022. You need to update the development environment inline with Unreal Engine requirements from with the details in this link. You can find detail logs in the “<Unreal_Project >/Saved/Logs” folder to help diagnose issues of this nature.
Step 3: Configuration of the Deadline Service Plugin Within Unreal
The Deadline Service plugin is used to determine the communication environment between Unreal Engine and Deadline.
To configure the Deadline Service:
- Go to Edit > Project Settings.
- Search for “Deadline” in the browser to find the Plugins – Deadline Service.
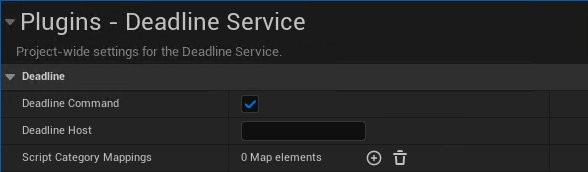
Figure 06: The Deadline Service options.
The Deadline Command enabled option is the default (and recommended) method to configure how the plugins communicate their submission to Deadline. The other method is to communicate via a Deadline Web Service, utilizing a host address, which is not covered in this blog.
Once the Deadline Service plugin’s basics are configured, you can additionally elect to specify named directory paths for scripts within Unreal Engine:
- Add a Script Category Mappings.
- Enter a key-value pair describing directories that will be resolved by the Deadline Data Asset during runtime.
Step 4: Deadline Job Presets with the Data Asset Node
Presets are the foundation of a Deadline job submission, and you must build a preset before submitting jobs and tasks. Configurations of Deadline jobs are stored within the Unreal Engine project as a Data Asset utilizing a new “DeadlineJobPresetLibrary” class. The Data Asset node allows you to define reusable presets within this project for Deadline job submissions. These details can include job names, comments, the groups and pools of workers that can work on the job, frame ranges, and other additional information.
To create a Deadline Data Asset:
- Right click in the Content Browser to create a Miscellaneous > Data Asset.
- Search for the “DeadlineJobPresetLibrary” class.**From Deadline 10.3.1 onwards, a new DeadlineJobPreset miscellaneous asset type has been created to make this easier ; simply right click in the Content Browser to create a Miscellaneous > Deadline Job Preset.
- Name the new Data Asset to represent what you would like to do, such as “BasicDeadlineExport”.
- Expand the Job Options and enter the job details for the Deadline Job.
- Give the new Preset element a description, such as “Sequence export from Movie Render Queue”.
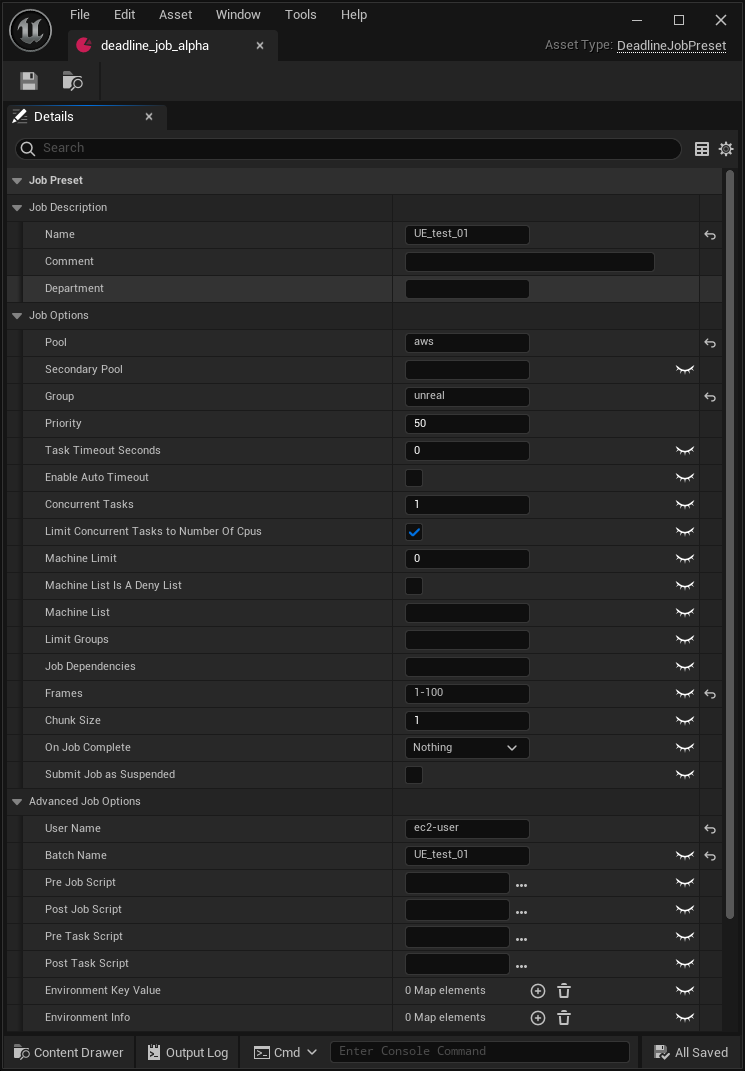
Figure 07: The Deadline Data Asset is used to specify presets of Deadline job configurations.
- Expand the Job Info and enter the job details for Deadline job:
- Batch Name is the generic name of the job being submitted.
- Group is the group of UE resources to assign to jobs.
- Pool is the pool of UE resources to assign to jobs.
- With the Plugin Info Preset, you can enter additional key/value pairs to be used for programmatic use later. The following are two required and one recommend entry:
- Executable: The path to the application you wish to process tasks, such as <Unreal_Install_Folder>\Engine\Binaries\Win64\UnrealEditor-Cmd.exe
- ProjectFile: The path to the Project File to process, such as <Unreal_Project>\ProjectFile.uproject
- CommandLineArguments is optional but highly useful. Find the full array of Unreal Engine command line arguments here.
- Save the Data Asset.
In addition, each Deadline option within the job preset has a visibility flag. This allows team leadership to expose or hide specific options from users when they submit jobs. The visible/exposed options are still editable within the submitters by users when they go to submit their jobs. See Step 5a: Remote Execution via Movie Render Queue section for more details.
Note: The use of quotes around value data is not supported.
Step 5: Rendering with Movie Render Queue
With the Movie Pipeline Deadline plugin installed, Unreal Engine can submit Movie Render Queue pipelines of shots and sequences externally to be rendered via Deadline. As rendering within Movie Render Queue provides functionality like warm up frames, Unreal Engine creates Deadline tasks in parity with queue items, typically entire shots as one task, whereas other 3D and 2D applications typically schedule tasks at a per frame level.
To configure Deadline to be available for Movie Render Queue processing:
- Open the Project Settings Edit > Project Settings
- Search for “Movie Render Pipeline” to find Plugins > Movie Render Pipeline.
- Under Default Remote Executor, select “MoviePipelineDeadlineRemoteExecutor” to enable Deadline to be the default method to execute a remote render.
- Under Default Executor Job, select “MoviePipelineDeadlineExecutorJob” to enable the Deadline plugin to display settings within Movie Render Queue UI.
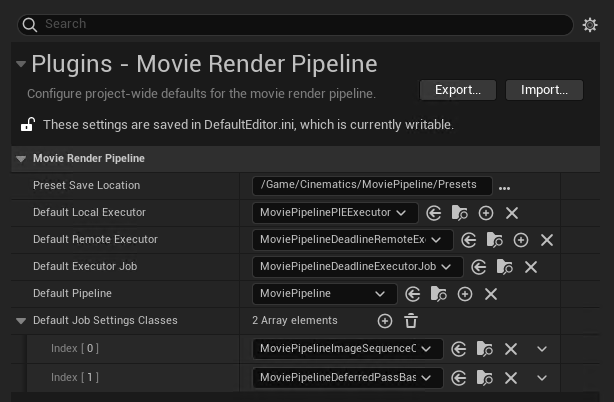
Figure 08: Movie Render Queue enabled to support remote execution via Deadline.
To submit sequences, or shots, to Deadline you have two options:
Step 5a. Remote execution via Movie Render Queue
You can submit shots and sequences for Deadline rendering through Movie Render Queue.
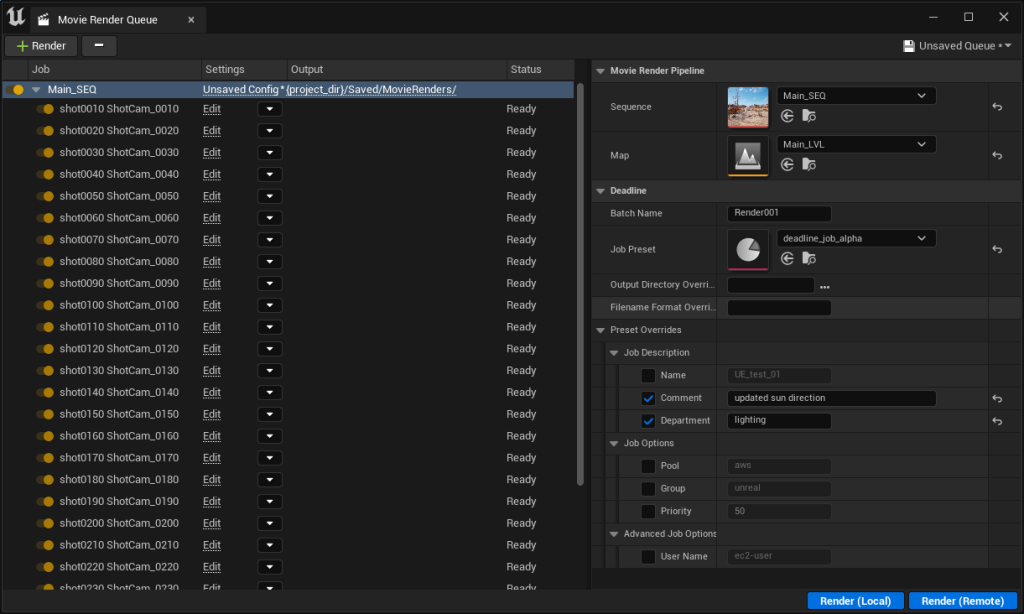
Figure 09: Movie Render Queue configured to remotely execute rendering in Deadline.
To setup and render via Movie Render Queue:
- Open Movie Render Queue (Windows > Cinematics > Movie Render Queue).
- Add a sequence, or shot, to the job queue by clicking on the +Render button, or alternatively load an existing MoviePipelineQueue of shots.
- Set the Batch Name for the job from the Deadline pane to the right.
- Select the Preset Library you wish to use to control render settings, also within the Deadline pane on the right
- Optionally provide a new output directory and filename.
Within the Preset Overrides section, you may modify the visible parameters of the Deadline Job Preset for the current render without modifying the Deadline Data Asset permanently.
To create an override in the Preset Overrides section:
- Enable the checkbox next to the parameter you wish to override.
- Make the desired change in the editable field.
In the example above, the user has overwritten two of the options in the submitter: the job’s comment, and the department properties.
To submit the render to Deadline, select Render (Remote) to instruct Unreal Engine to create a Deadline Job. At this stage a command line console appears for a few seconds while the job is submitted to Deadline.
Step 5b. Remote execution via the Queue Asset Submitter
The other way you can submit render jobs to Deadline is with the Queue Asset Submitter, which appears under the Deadline menu in the Unreal Engine menu bar, after the Deadline plugins have been enabled.
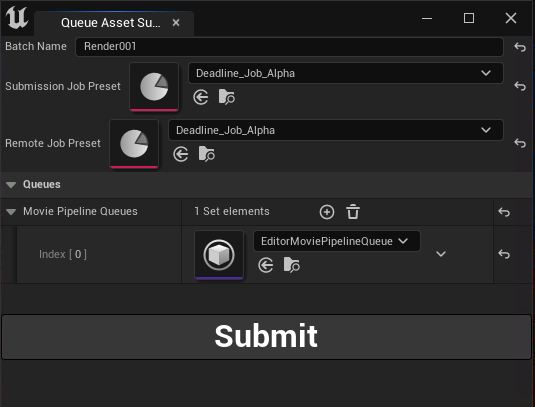
Figure 10: The Queue Asset Submitter configured to remotely execute rendering in Deadline.
To execute a render remotely via the Queue Asset Submitter:
- Open the Queue Asset submitter (Deadline > Submit Movie Render Queue Asset).
- Set the Batch Name for the job.
- Set the Submission Preset Name and Remote Preset Name to the Deadline Job Preset from Step 4 defining the job information to use.
- In the Queues section, select + and add the MoviePipelineQueue asset that encapsulates your Movie Render Queue shots/sequences and related information.
- Choose Submit to submit the job to Deadline.
The Deadline Job and Workers
If you open the Deadline Monitor application, you will see your job queued up to render, as well as any other job on the farm from other users.
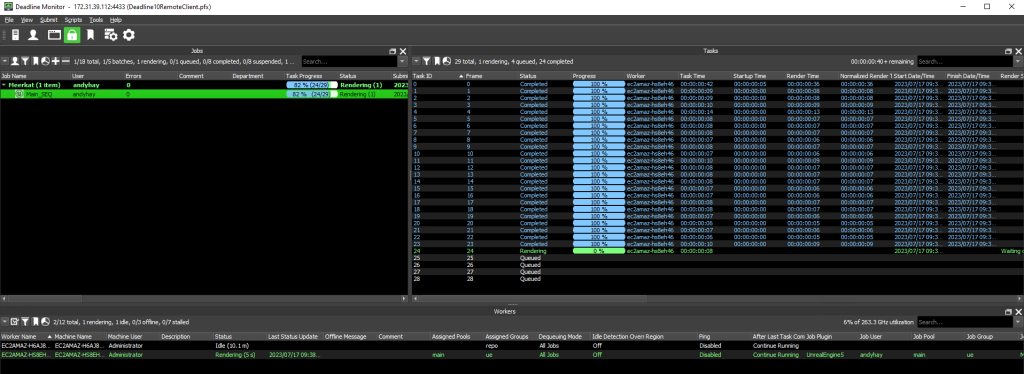
Figure 11: The Deadline Monitor showing the Batch, Job and Tasks. You can see the Job “Main_SEQ” nested underneath the “Meerkat” Batch Name, and resultant tasks created for each Movie Render Queue entity.
Any worker connected to Deadline has the potential to process Unreal Engine tasks, but you want to properly configure your worker pools and groups to ensure that only workers who can handle Unreal Engine tasks get assigned that work. The workers need:
- Hardware suitable for the task at hand, such as a GPU.
- Unreal Engine (and related requirements) installed in the location defined by the Deadline Data Asset.
- Access to the Unreal Engine Project as stipulated on the Deadline Data Asset.
- Membership of the appropriate Deadline Group and Pool associated with the job.
Cloud Rendering
Deadline also has the ability to extend its fleet automatically and elastically into the cloud by provisioning Amazon Elastic Compute Cloud (Amazon EC2) instances as additional workers. These cloud workers can be launched, perform tasks when needed, and then automatically shut down when idle, utilizing a pay-as-you-go model for that compute.
The are many benefits to using elastic rendering on AWS:
- A variable cost “on demand” model removes the need for significant up-front fixed cost investment for render farms, and the ongoing cost of ownership in terms of power, cooling, space and security, simplifying the cost of that farm.
- At a moment’s notice you can switch your render farm to use the latest AWS instances, including new GPU instances. This removes the need for lengthy hardware renewal cycles that are typically much longer than the advances in GPU and CPU technology, key to products such as Unreal Engine.
- Infrastructure for render farms can dynamically scale at a moment’s notice, in line with needs of design team sizes and their ever-changing production needs. This reduces the need to predict, manage, and buy machines ahead of production peaks.
AWS has over 200 fully featured services, including compute for rendering, across 32 global Regions (at the time of writing) each offering multiple Availability Zones for data and service redundancy and availability. By utilizing a Site-To-Site Virtual Private Network, or a Direct Connection with AWS, you can synchronize Unreal Engine project data to render workers prior to processing, and you can bring back resultant images/artifacts upon completion.
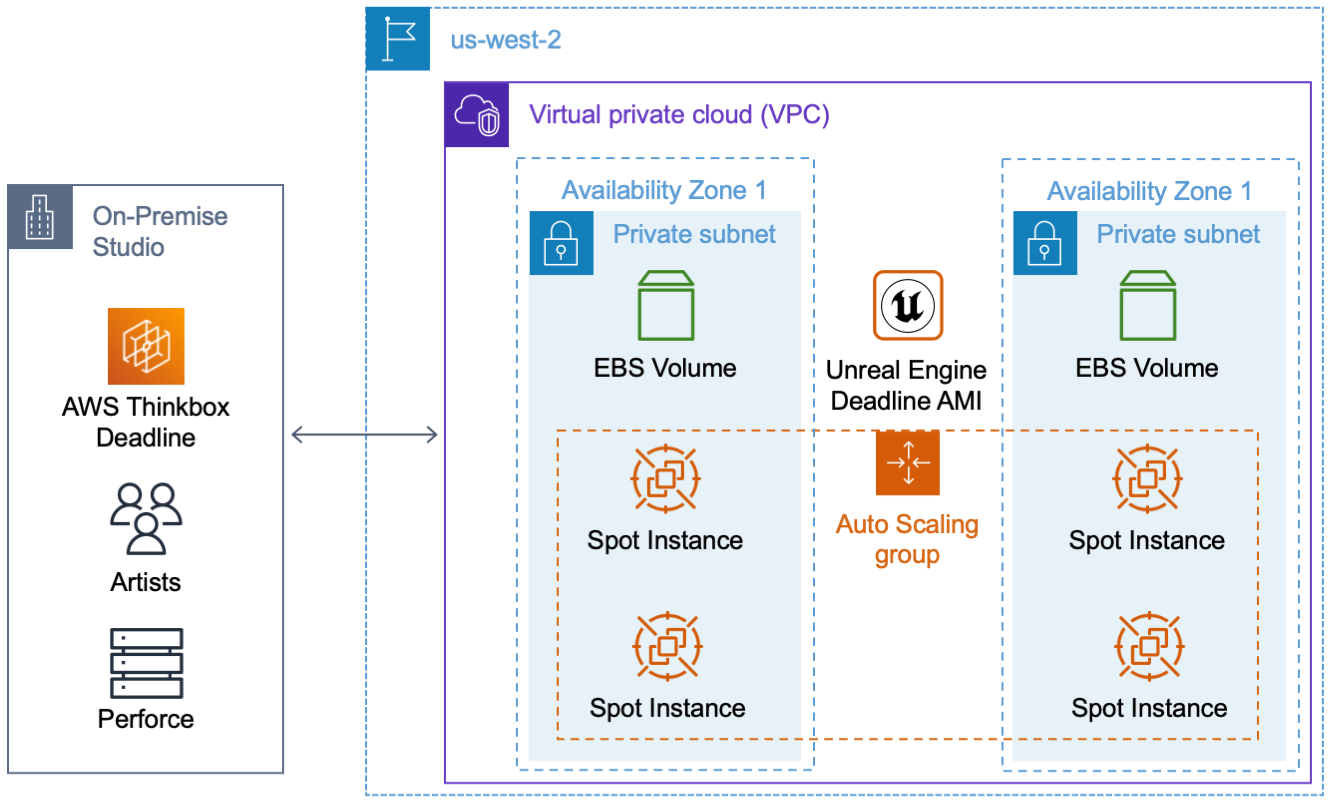
Figure 12: An example architecture of a burst render scenario utilizing Perforce as a storage solution.
Stay tuned for a future blog post discussing the details of Unreal Engine data hydration to cloud-based workers.
Summary
In this post, we detailed how teams using Unreal Engine can offload their processing and rendering requirements to a Deadline-based render farm away from artists. Unreal Engine tasks can now be integrated into a single array of jobs, alongside other 3D, 2D and pipeline processes as a whole, to be scheduled within the priorities of that group. On-premises resources such as artist machines can integrate into a larger compute pool, maximizing the compute available for Unreal Engine and other applications. With the new, tighter integration with Deadline, Unreal Engine can use the AWS cloud to scale at a moment’s notice when project needs dictate.
If you want to flag potential issues or suggest features with Unreal Engine Plugins within AWS Thinkbox Deadline, please reach out to Thinkbox Support via email: support@awsthinkbox.zendesk.com.
Further Reading
Information surrounding Unreal Engine can be found here:
Extensive Deadline documentation can be found here:
https://www.awsthinkbox.com/deadline
Looking at GPU utilization for both your workstations and render machines can be helpful in determining the efficiency. This blog details how to set up and capture useful logs of GPU data for analysis on AWS.
https://aws.amazon.com/blogs/machine-learning/monitoring-gpu-utilization-with-amazon-cloudwatch/
About Unreal Engine
Epic Games’ Unreal Engine is the world’s most open and advanced real-time 3D tool. Creators across games, film and television, broadcast and live events, architecture, automotive, simulation and other industries choose Unreal to deliver cutting-edge content, interactive experiences, and immersive virtual worlds. Follow @UnrealEngine and download Unreal for free at unrealengine.com.

About Rodeo FX
Repeatedly voted one of Montreal’s Top Employers and Employer of the Year for the 2022 Mercuriades Awards, Rodeo FX is a high-end creative company offering services in visual effects, advertising, animation, and experiential. Nominated for 3 Emmy® Awards last year for its work on the series Stranger Things season 4, The Witcher season 2 and Foundation Season 1, and recently for the first season of The Lord of the Rings: The Rings of Power, the independent, Oscar®-winning company boasts close to 800 artists crafting from studios in Montreal, Québec City, Toronto, Los Angeles and Paris. Rodeo FX is a creative partner to the world’s best storytellers including Netflix, HBO, Disney, Marvel, Amazon Studios, Warner Bros. and Sony, and has collaborated on ads for YouTube, NBC and Apple. Current projects include Blue Beetle, and Foundation Season 2. Recently released projects include The Witcher Season 3, John Wick: Chapter 4, The Little Mermaid, Guardians of the Galaxy Vol. 3 and Love, Death and Robots Volume 3, for which the company won a 2023 VES award.

About Glitch Productions
Glitch Productions is a Sydney-based independent animation studio making online content that has been seen by millions of fans around the world. Unreal Engine and real-time rendering have been one of the biggest factors of their success, giving them the ability to create amazing visuals using a fraction of the budget and time. Their current popular series is ‘Murder Drones’, which is available for free public viewing on the Glitch Productions YouTube channel.
