Networking & Content Delivery
AWS Global Accelerator Custom Routing with Amazon Elastic Kubernetes Service
AWS Global Accelerator is a networking service that for your end users will improve the internet performance and availability by using Amazon Web Service’s global network infrastructure. There are workloads such as multiplayer gaming, VoIP, virtual classrooms (EdTech), video collaboration and social media applications that require the application logic to assign multiple users to a specific media server to initiate voice, video, or conferencing sessions on a specific target machine. At AWS re:Invent 2020 we launched custom routing for AWS Global Accelerator, a new type of accelerator that allows you to use your own application logic to deterministically route users to a specific Amazon EC2 destination. The introduction blog well explains how AWS Global Accelerator Custom Routing (AGA-CR) works and provides step-by-step guidance to set up an AGA-CR configuration. It also explains core concepts on how to configure the required subnets as Endpoint Groups, and then add EC2 targets as endpoints to these groups. This blog is in continuation of the previously mentioned blog. In this post, we explain how to configure AGA-CR for Elastic Kubernetes Service (EKS). We can apply the same understanding to other AWS Container technologies.
In this post, we use game tech customers as example. Today, game tech customers find hosting their game servers on EKS challenging, because they need to connect to stateful sessions on a certain container running inside Kubernetes Pod. The primary concern is that a Pod cannot get a public IP address automatically, and you cannot use load balancers with TCP or UDP protocols to deterministically connect to the correct Pod using private IPs. The solution is to use Public IPs. To use Public IPs for EKS Pods use either Kubernetes hostPort or hostNetworking features to expose the Pod’s service to the internet via the EKS Node’s Public IP address. The hostPort mechanism requires you to allocate a free IP port from the node when you deploy the Pod, so you must implement your own port allocation backend service to keep track of free ports. With hostNetworking you remove the security layers between the Pod and the EKS Node, allowing the process inside the Pod to behave like it is natively running on the Node with full privileges. Global Accelerator with custom routing offers an elegant solution to these workarounds.
How does custom routing work with Elastic Kubernetes Service?
As described in the introduction blog, custom routing maps Global Accelerator listener ports to private IP addresses and ports inside your VPC Subnet . The IP Address Management is different for Elastic Kubernetes Service (EKS) as compared to Amazon EC2. EKS uses EC2 instances as Nodes to host the Pods and it has to use Amazon VPC Container Network Interface (CNI) plugin for Kubernetes for native VPC networking. The VPC CNI for Kubernetes assigns an IP address from your VPC to each pod. We add these addresses as secondary IP addresses on the EC2 instance hosting the EKS Pod. The VPC CNI plugin will add more ENIs to the EC2 instance when it reaches the maximum number of secondary IP addresses on the previous ENIs. Each EC2 instance type has a maximum number of secondary IP addresses and you can see this limit for each instance type in eni-max-pods.txt on GitHub. Choose the instance type as per your requirement. Although it is possible to configure alternative CNI plugins, this blog will use Amazon VPC Container Network Interface (CNI). Follow the link for more details on VPC Pod Networking.
When using AWS Global Accelerator, endpoints for custom routing accelerators must be the VPC subnets, and custom routing accelerators can only route traffic to private IPs on Amazon EC2 instances in those subnets. Follow the link to read more the AGA-CR procedures and recommendations. Global Accelerator creates an elastic network interface (ENI) for each subnet where an endpoint is present. You can read more about this in AGA best practices. Global Accelerator sends traffic via this ENI to the Kubernetes Pods. Because of the VPC-CNI plugin, these Pods have IP addresses assigned from the worker node’s subnet CIDR block. Also, by default, VPC-CNI enables (SNAT) for traffic destined outside of the VPC. When traffic is destined for the internet (outside of the VPC), the SNAT translates the private IP address of each pod to the primary private IP address of the Amazon EC2 node that the pod is running on. In AGA-CR customer routing case this SNAT behavior prevents the returning traffic from reaching AGA ENI, therefore we must disable the SNAT. To disable the SNAT, we set a VPC CNI setting AWS_VPC_K8S_CNI_EXTERNALSNAT to true to allow the returning traffic from Kubernetes Pods to reach the AGA ENI directly.
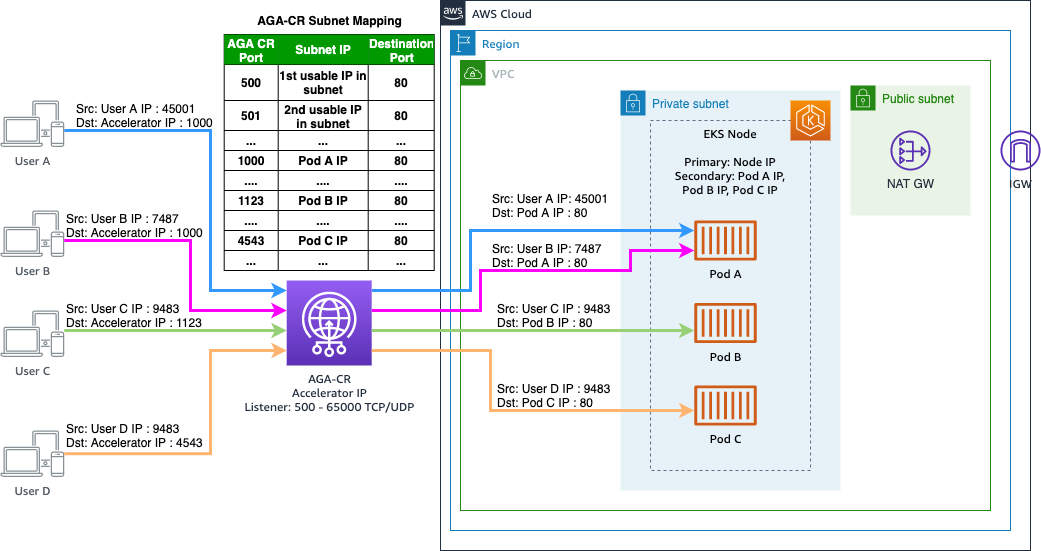
To understand how a custom routing accelerator would work with an EKS cluster, let’s look at the multiplayer gaming use case. When a user initiates a request to join a new or ongoing game session, a match-making service matches this new user to a session, which in an EKS cluster runs on a Pod. The matchmaking service queries AGA-CR to get an AGA port for this specific session, and responds with this port to the client to connect to that session. The client then makes a request on this AGA-CR port. AGA-CR routes this request to the specific pod (game session) and improves the network performance for end users playing the game (up to 60%) by accelerating traffic through Amazon Web Services’ global network infrastructure. In the following figure, the matchmaking service has mapped User A and User B to a game session on Pod A, Users C to a game session on Pod B, and Users D to a game session on Pod C.
Demo Setup
Create and configure a custom routing accelerator for EKS
To show how this connectivity works, we’ll walk through the steps of setting up an EKS cluster using the “eksctl” tool, and then show the steps for setting up custom routing in the Global Accelerator service using the AWS Management Console. If you have an existing EKS cluster, please follow to step 4 below.
1. Initial setup / Prerequisites
You need an AWS account with permissions to create CloudFormation Stacks, which creates VPC, EKS, Security Groups, CloudWatch, Autoscaling Groups, Elastic Load Balancers and IAM roles. You also need permissions to set up Global Accelerator. The EKS setup steps create a new VPC for hosting the EKS cluster and Global Accelerator endpoints.
- Authenticate your CLI (Command-Line Interface) program and ensure your IAM credentials are setup properly before running the ekstctl -tool.
- You can find the minimal IAM Policies here:
- https://eksctl.io/usage/minimum-iam-policies/
- Install the Kubernetes and EKS tools called kubectl and eksctl:
2. EKS setup
To create a new EKS cluster with Managed Node group in a private subnet, we use the eksctl tool.
- To create the new EKS cluster, we need to define the cluster configuration. For this we create a file, let’s call it aga-cr-demo-cluster.yaml with following content. Kindly replace the Region and Availability Zones info. (Note: In this file we define the EKS version, the VPC CIDR range, and the cluster endpoints that enable us to communicate with Kubernetes API from public internet, and from inside the VPC.)
apiVersion: eksctl.io/v1alpha5
kind: ClusterConfig

metadata:
  name: aga-cr-demo
  region: <REGION>
  version: "1.21"

availabilityZones: ["<REGION>a", "<REGION>b", "<REGION>c"]

vpc:
  nat:
    gateway: Single
  cidr: 10.10.0.0/16
  clusterEndpoints:
    publicAccess: true
    privateAccess: true

managedNodeGroups:
- name: private-ng-1
  instanceType: t3.large
  privateNetworking: true
desiredCapacity: 1- To deploy the new EKS cluster, we issue the following command:
$ eksctl create cluster --config-file=aga-cr-demo-cluster.yaml- The deployment takes around 15-30 minute. During this time
eksctltool creates a new VPC, IAM instance profiles, NAT Gateways and deploy EKS Cluster with 2 Nodes in a private subnet. It will also install the EKS add-ons: VPC CNI, CoreDNS and Kube-proxy.
$ eksctl create cluster --config-file=aga-cr-demo-cluster.yaml
 eksctl version 0.63.0
 using region eu-north-1
 subnets for eu-north-1a - public:10.10.0.0/19 private:10.10.96.0/19
 subnets for eu-north-1b - public:10.10.32.0/19 private:10.10.128.0/19
 subnets for eu-north-1c - public:10.10.64.0/19 private:10.10.160.0/19
 nodegroup "private-ng-1" will use "" [AmazonLinux2/1.21]
 using Kubernetes version 1.21
 creating EKS cluster "aga-cr-demo" in "eu-north-1" region with managed nodes
 1 nodegroup (private-ng-1) was included (based on the include/exclude rules)
 will create a CloudFormation stack for cluster itself and 0 nodegroup stack(s)
 will create a CloudFormation stack for cluster itself and 1 managed nodegroup stack(s)
 if you encounter any issues, check CloudFormation console or try 'eksctl utils describe-stacks --region=eu-north-1 --cluster=aga-cr-demo'
 CloudWatch logging will not be enabled for cluster "aga-cr-demo" in "eu-north-1"
 you can enable it with 'eksctl utils update-cluster-logging --enable-types={SPECIFY-YOUR-LOG-TYPES-HERE (e.g. all)} --region=eu-north-1 --cluster=aga-cr-demo'
 Kubernetes API endpoint access will use provided values {publicAccess=true, privateAccess=true} for cluster "aga-cr-demo" in "eu-north-1"
 2 sequential tasks: { create cluster control plane "aga-cr-demo", 3 sequential sub-tasks: { 2 sequential sub-tasks: { wait for control plane to become ready, update cluster VPC endpoint access configuration }, 1 task: { create addons }, create managed nodegroup "private-ng-1" } }
 building cluster stack "eksctl-aga-cr-demo-cluster"
 deploying stack "eksctl-aga-cr-demo-cluster"
 waiting for CloudFormation stack "eksctl-aga-cr-demo-cluster"
 waiting for CloudFormation stack "eksctl-aga-cr-demo-cluster"

 waiting for requested "EndpointAccessUpdate" in cluster "aga-cr-demo" to succeed
 building managed nodegroup stack "eksctl-aga-cr-demo-nodegroup-private-ng-1"
 deploying stack "eksctl-aga-cr-demo-nodegroup-private-ng-1"

 waiting for CloudFormation stack "eksctl-aga-cr-demo-nodegroup-private-ng-1"
 waiting for the control plane availability...
  saved kubeconfig as "/home/ec2-user/.kube/config"
 no tasks
  all EKS cluster resources for "aga-cr-demo" have been created
 nodegroup "private-ng-1" has 1 node(s)
 node "ip-10-10-143-204.eu-north-1.compute.internal" is ready
 waiting for at least 1 node(s) to become ready in "private-ng-1"
 nodegroup "private-ng-1" has 1 node(s)
 node "ip-10-10-143-204.eu-north-1.compute.internal" is ready
 kubectl command should work with "/home/ec2-user/.kube/config", try 'kubectl get nodes'
  EKS cluster "aga-cr-demo" in "eu-north-1" region is ready
- When the cluster is ready, you can view it by using
$ kubectl get nodes
NAME                                           STATUS   ROLES    AGE     VERSION
ip-10-10-143-204.eu-north-1.compute.internal Ready <none> 3m42s v1.21.2-eks-c1718fb- For the last step for the EKS Cluster we need to enable the External SNAT mode to enable communication with the Kubernetes Pods and custom routing accelerator. To change this mode, we must set an environment variable called
AWS_VPC_K8S_CNI_EXTERNALSNATtotruefor the VPC CNI plugin
$ kubectl set env daemonset -n kube-system aws-node AWS_VPC_K8S_CNI_EXTERNALSNAT=true3. Deploy payload on the EKS cluster
For this demo, we deploy a NGINX HTTP server on the new EKS cluster. It listens on port 80 for incoming connections. We use K8s deployment resource to define this container and set it to create 3 separate K8s pods. Create nginx-deployment.yaml -file with following contents:
apiVersion: apps/v1
kind: Deployment
metadata:
  name: nginx-deployment
  labels:
    app: nginx
spec:
  replicas: 3
  selector:
    matchLabels:
      app: nginx
  template:
    metadata:
      labels:
        app: nginx
    spec:
      containers:
      - name: nginx
        image: public.ecr.aws/nginx/nginx:latest
        ports:
        - containerPort: 80
- Deploy it to the EKS cluster using following command:
$ kubectl apply -f nginx-deployment.yaml- Check the status of the deployment using following commands:
$ kubectl get deployments
NAME               READY   UP-TO-DATE   AVAILABLE   AGE
nginx-deployment   3/3     3            3           27s
$kubectl get pods
NAME                                READY   STATUS    RESTARTS   AGE
nginx-deployment-544554c8c8-grwnl   1/1     Running   0          33s
nginx-deployment-544554c8c8-pcxbj   1/1     Running   0          33s
nginx-deployment-544554c8c8-z7v8d 1/1 Running 0 33s- To lookup the private IP addresses of the running NGINX Pods, use the following command:
$ kubectl get pods -o wide - The source address for the incoming connections are the public IP addresses of the clients (custom routing accelerator preserves the client IP), we must allow an incoming connection from everywhere.
Edit the EKS Node Security Group and add a new “Allow HTTP“ rule with source address 0.0.0.0/0.
EKS Security Groups Configurations
- At this point your EKS cluster is ready, and configured to take traffic via AGA-CR.
4. Existing EKS Clusters
If you have an existing EKS cluster already deployed in a VPC, with VPC CNI then you will only need to enable External SNAT mode to turn on the connection between custom routing accelerator and your EKS pods. We recommend that you deploy your EKS Node group in a private subnet and use NAT Gateway to reach Internet. If you enable External SNAT with an EKS Node group that is inside a public subnet, the pods running on those nodes will lose access to the internet.
To enable this, you must be able to update aws-node -daemonset under kube-system -namespace. To change this mode, we need to set an environmental variable called AWS_VPC_K8S_CNI_EXTERNALSNAT to true for the VPC CNI plugin:
$ kubectl set env daemonset -n kube-system aws-node AWS_VPC_K8S_CNI_EXTERNALSNAT=true5. Create new Global Accelerator with custom routing
To create a new AGA-CR, navigate to AWS Global Accelerator page in the AWS Management Console and follow the steps below. Or, you can configure using the AWS Command Line Interface (CLI) and follow the steps mentioned in AGA-CR introduction blog. To better understand the steps, we advise to have a read on AGA components. For a getting started guide and detailed steps, please review the Getting started with AWS Global Accelerator documentation
- Create new Accelerator, and choose a convenient name such as AGA-CR-EKS. Select custom routing as the Accelerator type. Let IP address pool selection be “Amazon’s pool of IP address,” the default value. We recommend tagging the AGA-CR. Click Next

Basic Configurations for AGA-CR
- listeners for ports 500-65000. Select an adequate range. This range must be greater than the total destination addresses, that includes all of theEndpoints configured below. For the demo, we select a large range. Click Next.

Listeners Port Configurations
- Add endpoint groups. We associate an endpoint group with a specific AWS Region. Each endpoint group includes one or more endpoints (these are configured in the next step). We should keep this range short, to have a lower number of destinations, which will allow us to have a lower number of listener ports (configured above).For this demonstration, we choose NGINX, which listens on port 80 on the Pod’s private IP address. Select the protocol you need.

Endpoint Groups Configurations
- Add endpoints. An endpoint is a VPC Subnet, with one or many resources where AGA can send traffic. Select each private subnet created by EKS cluster and allow all traffic for this subnet. Click Create accelerator

Endpoint Configuration
- Deployment takes about 5-10 minutes. Once AGA-CR has finished mapping all destinations (EKS pod IPs+ports) to its listener ports, the Provisioning status changes from In Progress to Deployed. At this point, the AGA-CR has internally saved this mapping into a static file.

Global Accelerator Custom Routing Summary
When Global Accelerator creates your custom routing accelerator, it auto-generates a static mapping from the ports to every possible destination private IP and port in your subnet(s), whether they are allowing traffic or not. You can retrieve the port mapping to route user traffic to specific EC2 destinations. The mapping does not change after you create the accelerator. We recommend that you save this static file in the matchmaking server, and parse this file to get the AGA-CR port respective to the Pod’s IP and port. The end user initiates a new connection to this AGA-CR port to connect to the game session. To download the full custom routing accelerator port mapping using following command:
$ aws globalaccelerator list-custom-routing-port-mappings --region us-west-2 \
                                --accelerator-arn (GLOBAL ACCELERATOR ARN HERE)
...
...
{
    "PortMappings": [
        {
            "AcceleratorPort": 64,
            "EndpointGroupArn": "arn:aws:globalaccelerator::123456789012:accelerator/60b13389-3ddd-4ac5-b5b7-a86790f26b5a/listener/330419cc/endpoint-group/bc992ac51902",
            "EndpointId": "subnet-096b9dfb6f3cf1e38",
            "DestinationSocketAddress": {
                "IpAddress": "10.10.160.4",
                "Port": 80
            },
            "Protocols": [
                "TCP"
            ],
            "DestinationTrafficState": "ALLOW"
        },
        {
            "AcceleratorPort": 65,
            "EndpointGroupArn": "arn:aws:globalaccelerator::123456789012:accelerator/60b13389-3ddd-4ac5-b5b7-a86790f26b5a/listener/330419cc/endpoint-group/bc992ac51902",
            "EndpointId": "subnet-096b9dfb6f3cf1e38",
            "DestinationSocketAddress": {
                "IpAddress": "10.10.160.5",
                "Port": 80
            },
            "Protocols": [
                "TCP"
            ],
            "DestinationTrafficState": "ALLOW"
        },
Alternatively, you can query AGA-CR with an IP and endpoint-id (subnet-id) for this EKS pod. TheAGA-CR responds with the mappings for one destination IP address. To do this, you use the following command
$ aws globalaccelerator list-custom-routing-port-mappings-by-destination --region us-west-2 \
                --endpoint-id (SUBNET ID HERE) --destination-address (PRIVATE IP ADDRESS HERE)
Demonstration
We have the NGINX deployed on an EKS cluster, with External SNAT mode enabled. To connect to the NGINX pod, we must look up the custom routing accelerator mapping for the pod’s private IP address.
- First pick one of the NGINX Pod’s that we deployed in step 4, and note it’s Private IP address:
$ kubectl get pods -o wide - Then, lookup the public port using the two commands we listed in the end of step 5 to lookup the address.
You can get the full mapping with:$ aws globalaccelerator list-custom-routing-port-mappings --accelerator-arn (GLOBAL ACCELERATOR ARN HERE) --region us-west-2Or look up the Pod specific IP address with:
$ aws globalaccelerator list-custom-routing-port-mappings-by-destination --endpoint-id (SUBNET ID HERE) --destination-address (PRIVATE IP ADDRESS HERE) --region us-west-2
- Now connect to this private pod using:
curl -v http://IP-ADDRESS:PORTwherePORTis AGA port received from the mapping above.$ curl -v http://198.51.100.39:17061 * Trying 198.51.100.39:17061... * Connected to 198.51.100.39 (198.51.100.39) port 17061 (#0) > GET / HTTP/1.1 > Host: 198.51.100.39:17061 > User-Agent: curl/7.76.1 > Accept: */* > * Mark bundle as not supporting multiuse < HTTP/1.1 200 OK < Server: nginx/1.21.1 < Date: Mon, 30 Aug 2021 10:27:35 GMT < Content-Type: text/html < Content-Length: 612 < Last-Modified: Tue, 06 Jul 2021 14:59:17 GMT < Connection: keep-alive < ETag: "60e46fc5-264" < Accept-Ranges: bytes < <!DOCTYPE html> <html> <head> <title>Welcome to nginx!</title> <style> body { width: 35em; margin: 0 auto; font-family: Tahoma, Verdana, Arial, sans-serif; } </style> </head> <body> <h1>Welcome to nginx!</h1> <p>If you see this page, the nginx web server is successfully installed and working. Further configuration is required.</p> <p>For online documentation and support please refer to <a href="http://nginx.org/">nginx.org</a>.<br/> Commercial support is available at <a href="http://nginx.com/">nginx.com</a>.</p> <p><em>Thank you for using nginx.</em></p> </body> </html> * Connection #0 to host 198.51.100.39 left intactTo verify this, look up the log for the NGINX pod we are connecting to on the EKS cluster using:
kubectl logs pod/<POD NAME>$ kubectl logs pod/nginx-deployment-544554c8c8-grwnl /docker-entrypoint.sh: /docker-entrypoint.d/ is not empty, will attempt to perform configuration /docker-entrypoint.sh: Looking for shell scripts in /docker-entrypoint.d/ /docker-entrypoint.sh: Launching /docker-entrypoint.d/10-listen-on-ipv6-by-default.sh ..... 192.0.2.123 - - [30/Aug/2021:10:28:43 +0000] "GET / HTTP/1.1" 200 612 "-" "curl/7.76.1" "-"
Elastic Container Service and Fargate
You can use this same method to connect to EKS Fargate pods. This also works with Elastic Container Service (ECS) tasks both on EC2 instances and Fargate. Also, ECS doesn’t have a need enable External SNAT.
Clean up
You can clean up this demo by first deleting the custom routing accelerator and then deleting the CloudFormation stacks that were created by eksctl -tool. This must be done in this order because Global Accelerator will prevent the CloudFormation stack from deleting the VPC if the accelerator still has endpoints inside the VPC’s subnets.


Vivek Sharma
Vivek Sharma is Senior Solutions Architect for AWS Global and Strategic customers. He is focuses on helping developers build performant applications on AWS. He has a background in analytics, media workflows, performance engineering, security and content delivery networks.

Toni Syvanen
Toni Syvanen is Game Tech Solutions Architect based in Finland and works closely with Nordic Game Tech customers. He focusses on helping game studios to build and launch their games on AWS. Outside of work he enjoys playing video games, walking with his dog and organizing Assembly computer festival.