Networking & Content Delivery
Image Optimization using Amazon CloudFront and AWS Lambda
Image Optimization using Amazon CloudFront and AWS Lambda
Images are usually the heaviest components of a web page, both in terms of bytes and number of HTTP requests. Optimizing images on your website is critical to improve your users’ experience, reduce delivery costs and enhance your position in search engine ranking. For example, Google’s Largest Contentful Paint metric in their search ranking algorithm is highly impacted by how much you optimize the images on your website. In the blog post, we provide you with a simple and performant solution for image optimization using serverless components such as Amazon CloudFront, Amazon S3 and AWS Lambda. Then, we illustrate this solution in a sample web page built using Next.js, a popular framework used by developers to build websites.
Image optimization architecture
An image optimization solution can be architected in a variety of ways, based on your requirements in terms of cost, flexibility, and performance. When architecting an image optimization solution, you need to make the following technical decisions:
- What image transformations are needed? Is it formatting, resizing, cropping, etc.
- Where do we decide which transformation to be applied for a specific image request? In the front-end on the client-side (static, responsive design, etc.), on the server side (based on request content such as device) or combination of both?
- Where do we execute the transformation? In a central location or in a distributed way?
- When do we execute the transformation? Every time or do we store transformed images for a short duration? Is it synchronously or asynchronously executed?
The proposed architecture is suitable for most common use cases. Image transformation is executed centrally in an AWS Region, only when the image hasn’t been already transformed and stored. The available transformations include resizing and formatting, but can be extended to more operations if needed. Both transformations can be requested by the front-end, with the possibility of automatic format selection done on server side. The architecture is based on S3 for storage, CloudFront for content delivery, and Lambda for image processing. The request flow is explained in the next diagram:
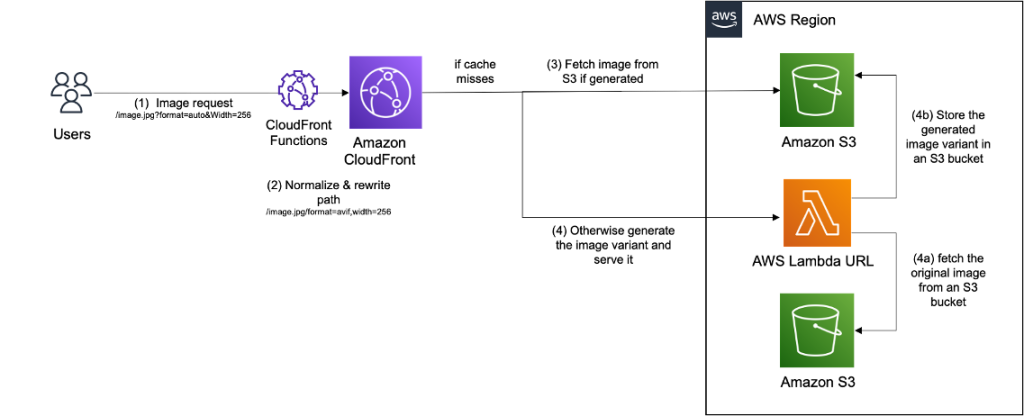
Figure 1 – Solution Architecture
- The user sends a HTTP request for an image with specific transformations, such as encoding and size. The transformations are encoded in the URL, more precisely as query parameters. An example URL would look like this:
https://exmaples.com/images/cats/mycat.jpg?format=webp&width=200. - The request is processed by a nearby CloudFront edge location providing the best performance. Before passing the request upstream, a CloudFront Function is executed on viewer request event to rewrite the request URL. CloudFront Functions is a feature of CloudFront that allows you to write lightweight functions in JavaScript for high-scale, latency-sensitive CDN customizations. In our architecture, we rewrite the URL to validate the requested transformations and normalize the URL by ordering transformations and convert them to lower case to increase the cache hit ratio. When an automatic transformation is requested, the function also decides about the best one to apply. For example, if the user asks for the most optimized image format (JPEG,WebP, or AVIF) using the directive
format=auto, CloudFront Function will select the best format based on theAcceptheader present in the request. - If the requested image is already cached in CloudFront then there will be a cache hit and the image is returned from CloudFront cache. To increase the cache hit ratio, we enable Origin shield, a feature of CloudFront that acts as an additional layer of caching before the origin, to further offload it from requests. If the Image is not in CloudFront cache, then the request will be forwarded to an S3 bucket, which is created to store the transformed images. If the requested image is already transformed and stored in S3, then it is simply served and cached in CloudFront.
- Otherwise, S3 will respond with a 403 error code, which is detected by CloudFront’s Origin Failover. Thanks to this native feature, CloudFront retries the same URL but this time using the secondary origin based on Lambda function URL. When invoked, the Lambda function downloads the original image from another S3 bucket, where original images are stored, transforms it using Sharp library, stores the transformed image in S3, then serve it through CloudFront where it will be cached for future requests.
Note the following:
- The transformed image is stored in S3 with a lifecycle policy that deletes it after a certain duration (default of 90 days) to reduce the storage cost. Ideally, you’d set this value according to the duration after which the number of requests to a new image drops significantly. They are created with the same key as the original image in addition to a suffix based on the normalized image transformations. For example, the transformed image in response to
/mycat.jpg?format=auto&width=200would be stored with the key/mycat.jpg/format=webp,width=200if the automatically detected format was webp. To remove all generated variants of the same image in S3, delete all files listed under the key of the original image/mycat.jpg/*. Transformed images are added to S3 with a Cache-Control header of 1 year. If you need to invalidate all cached variants of an image in CloudFront, use the following invalidation pattern:/mycat.jpg*. - To prevent from unauthorized invocations of the Lambda function, CloudFront is configured to send a secret key in a Custom origin header, which is validated in the Lambda function before processing the image.
Deploy solution using CDK
AWS CDK is an open-source software development framework used to define cloud infrastructure in code and provision it through AWS CloudFormation. Follow these steps in your command line to deploy the image optimization solution with CDK, using the region and account information configured in your AWS CLI.
git clone https://github.com/aws-samples/image-optimization.git
cd image-optimization
npm install
cdk bootstrap
npm run build
cdk deploy -c DEPLOY_SAMPLE_WEBSITE=true
When the deployment is completed within minutes, the CDK output will include the domain name of the CloudFront distribution created for image optimization (ImageDeliveryDomain =YOURDISTRIBUTION.cloudfront.net). The stack will include an S3 bucket with sample images (OriginalImagesS3Bucket = YourS3BucketWithOriginalImagesGeneratedName). To verify that it is working properly, test the following optimized image URL https:// YOURDISTRIBUTION.cloudfront.net/images/rio/1.jpeg?format=auto&width=300.
Note that when deploying in production, it’s recommended to use an existing S3 bucket where your images are stored. To do that, deploy the stack in the same region of your S3 bucket, using the following parameter: cdk deploy -c S3_IMAGE_BUCKET_NAME=’YOUR_S3_BUCKET_NAME’. The solution allows you to configure other parameters such as whether you want to store transformed images in S3 (STORE_TRANSFORMED_IMAGES), the duration after which transformed images are automatically removed from S3 (STORE_TRANSFORMED_IMAGES), and the Cache-Control header used with transformed images (S3_TRANSFORMED_IMAGE_CACHE_TTL).
Use the solution on a Next.js web page with responsive design
In this section, we will create a simple web page using Next.js, and use the previously deployed image solution to optimize the image. Start a new Next.js project by typing the following in your command line:
npx create-next-app@latest
Navigate to your project folder (by default my-app). Modify the file package.json by changing the build script to allow exporting the build files to S3:
"build": "next build && next export",
In the pages directory within your project folder, you can find the file index.js which contains the code of your web page. Then update the index.js to the following code after replacing YOURDISTRIBUTION.cloudfront.net with the domain name of the CloudFront distribution created for image delivery in the previous step:
import Head from 'next/head'
import styles from '../styles/Home.module.css'
import Image from 'next/image'

const myLoader = ({ src, width, quality }) => {
    if (quality) {
        return ` https://YOURDISTRIBUTION.cloudfront.net${src}?format=auto&quality=${quality}&width=${width}`;
    } else return ` https://YOURDISTRIBUTION.cloudfront.net${src}?format=auto&width=${width}`;
}

export default function Home() {
    return (
        <div className={styles.container}>
            <Head>
                <title>Next App with optimized images</title>
                <meta name="description" content="Generated by create next app" />
                <link rel="icon" href="/favicon.ico" />
            </Head>

            <main className={styles.main}>
            <h1 className={styles.title}>The official website of Rio</h1>
            <p className={styles.description}> All animals are equal but some are more equal than others — Orwell</p>            <div className={styles.grid}>
                <div className={styles.card}>
                    <h2>The look</h2>
                    <p>When Rio wants to ask you for something</p><br/>
                    <Image src="/images/rio/4.jpeg" loader={myLoader} layout="responsive" sizes="20vw" width={900} height={1200}/>                </div>
                <div className={styles.card}>
                    <h2>New encounters</h2>
                    <p>When Rio meets a goose for the first time</p><br/>
                    <Image src="/images/rio/3.jpeg" loader={myLoader} layout="responsive" sizes="20vw" width={900} height={1200}/>                </div>
                <div className={styles.card}>
                    <h2>Happiness</h2>
                    <p>When Rio goes to play at the beach</p><br/>
                    <Image src="/images/rio/1.jpeg" loader={myLoader} layout="responsive" sizes="20vw" width={900} height={1200}/>                </div>
                    <div className={styles.card}>
                    <h2>In love</h2>
                    <p>When Rio falls in love.. with Flo the neighboor dog</p><br/>
                    <Image src="/images/rio/2.jpeg" loader={myLoader} layout="responsive" sizes="20vw" width={900} height={1200}/>                </div>
            </div>
            </main>
        </div>
    )
}
Instead of setting the image width statically in the front-end using the traditional HTML Img component, we implemented responsive design using the Image component of Next.js. This component automatically selects the best image size for a specific user screen, and provides additional benefits such as lazy loading. To use our image optimization solution as a provider to the Image component of Next.js, change module.exports in the next.config.js file to:
module.exports = {
    images: { loader: 'custom',   },
 }
Note that in the index.js, we implemented the custom loader, which tells Next.js how to construct image URL to our image optimization provider.
In your command line, navigate to your Next.js project directory (e.g. cd my-app), then deploy the site to the S3 bucket (SampleWebsiteS3Bucket = SampleWebsiteS3BucketName) created in the previous section using the AWS CLI:
npm run build
aws s3 cp out s3://SampleWebsiteS3BucketName/ --recursive
Navigate to the deployed web page in a Chrome browser using the previously generated CloudFront domain name (SampleWebsiteDomain = SAMPLEWEBSITE.cloudfront.net). Using developer tools, check the requested images size based on the viewport. For example, you can verify responsiveness by emulate a mobile device rendering in Chrome. Finally, if you are using a recent Chrome browser, you can see that images are returned in the modern AVIF format since they were requested with the format=auto directive.
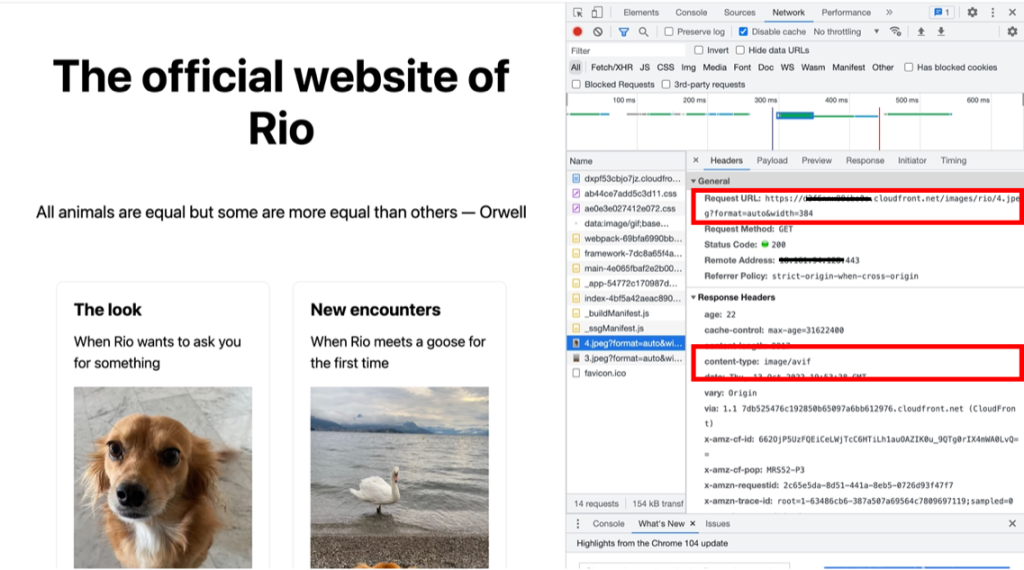
Figure 2 – Sample website screenshot
Cost considerations
The cost of this solution, excluding the image delivery and the storage of original images, is based on multiple components, which depends on your image library size, traffic patterns, and your configuration. To illustrate the cost calculation, consider 100 thousands original images with a 400Kb average size; 24 variants requested for each original image, with an average size of 22Kb; 20% of the image library is renewed on a monthly basis; 1 million image requests per month from US/EU region, with an average of 95% Cache Hit Ratio.
- The cost of storing images on S3 in us-east-1 with Standard Tier equals to (100000 x 400 +100000 x 24 x 22)/1024/1024 x 0.023 = $2.03 /month.
- The cost of transforming images using a Lambda function with 1500MB memory and an average execution duration of 100 ms, equals 100000 x 0.2 x 24 x (100/1000 x 1500/1024 x 0.0000166667 + 0.2/1000000) = $1.27 /month. In addition, we need to account for the cost of downloading then uploading transformed images to S3 (GET & PUT requests), which is equal to 100000 x 0.2 x 24 x (0.005 + 0.0004)/1000 = $2.59 /month.
- The cost of delivery using CloudFront equals the sum of different components:
- CloudFront Data transfer to internet equals 1000000 x 22/1024/1024×0.085=$1.78 /month.
- CloudFront Request fees equals 1000000*0.0075/10000=$0.75 /month.
- CloudFront Functions equals $0.1 /month.
- The cost of S3 GET requests and Origin Shield requests on cache misses is marginal.
In total, the cost would be around $7.84 /month. In reality, it will be closer to $4.62 /month thanks to the (Always) Free tiers of CloudFront and Lambda. You can optimize the cost of this solution according to your business needs by dialing up or down parameters like S3 object retention period or Lambda memory configuration, by changing S3 storage tier, by reconsidering the need for storing transformed images in S3 or by using ARM based Lambda.
Clean up resources
To remove cloud resources created for this solution, just execute the following command:
cdk destroy
Conclusion
In this blog, you learned how to deploy a simple and performant image optimization solution, then how to use it in a sample web page based on the popular framework Next.js. With building blocks such as CloudFront, Amazon S3, and Lambda, you can implement the most optimal delivery solution according to your business requirements. For example, you can customize the solution in this blog to add new image transformations, normalize operations to a predefined set of possibilities, or create a personalized image monitoring dashboard.
To learn more about other use cases when building applications with CloudFront, visit AWS content delivery blogs.
About the author

Achraf Souk
Achraf Souk is leading the Edge Specialist Solutions Architects team in EMEA. This team helps companies and developers to secure and accelerate their web applications using AWS Edge Services.