AWS DevOps & Developer Productivity Blog
UI Testing at Scale with AWS Lambda
This is a guest blog post by Wes Couch and Kurt Waechter from the Blackboard Internal Product Development team about their experience using AWS Lambda.
One year ago, one of our UI test suites took hours to run. Last month, it took 16 minutes. Today, it takes 39 seconds. Here’s how we did it.
The backstory:
Blackboard is a global leader in delivering robust and innovative education software and services to clients in higher education, government, K12, and corporate training. We have a large product development team working across the globe in at least 10 different time zones, with an internal tools team providing support for quality and workflows. We have been using Selenium Webdriver to perform automated cross-browser UI testing since 2007. Because we are now practicing continuous delivery, the automated UI testing challenge has grown due to the faster release schedule. On top of that, every commit made to each branch triggers an execution of our automated UI test suite. If you have ever implemented an automated UI testing infrastructure, you know that it can be very challenging to scale and maintain. Although there are services that are useful for testing different browser/OS combinations, they don’t meet our scale needs.
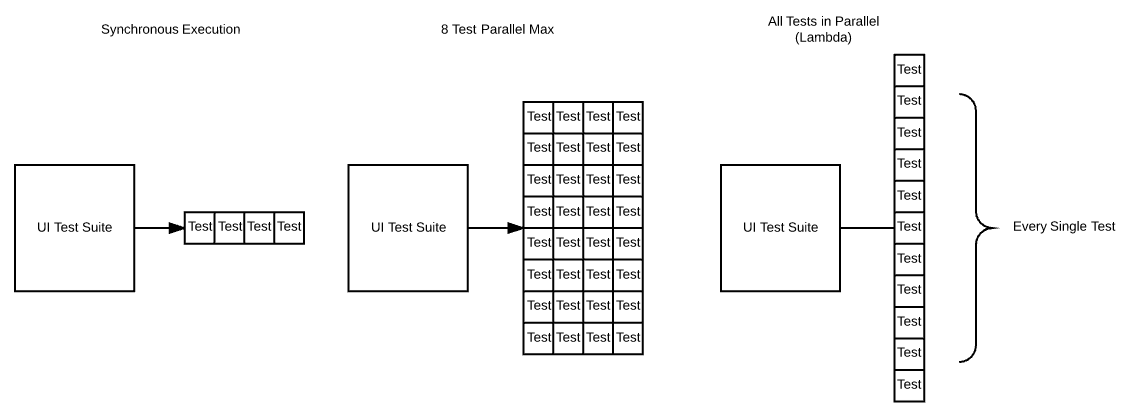
It used to take three hours to synchronously run our functional UI suite, which revealed the obvious need for parallel execution. Previously, we used Mesos to orchestrate a Selenium Grid Docker container for each test run. This way, we were able to run eight concurrent threads for test execution, which took an average of 16 minutes. Although this setup is fine for a single workflow, the cracks started to show when we reached the scale required for Blackboard’s mature product lines. Going beyond eight concurrent sessions on a single container introduced performance problems that impact the reliability of tests (for example, issues in Webdriver or the browser popping up frequently). We tried Mesos and considered Kubernetes for Selenium Grid orchestration, but the answer to scaling a Selenium Grid was to think smaller, not larger. This led to our breakthrough with AWS Lambda.
The solution:
We started using AWS Lambda for UI testing because it doesn’t require costly infrastructure or countless man hours to maintain. The steps we outline in this blog post took one work day, from inception to implementation. By simply packaging the UI test suite into a Lambda function, we can execute these tests in parallel on a massive scale. We use a custom JUnit test runner that invokes the Lambda function with a request to run each test from the suite. The runner then aggregates the results returned from each Lambda test execution.
Selenium is the industry standard for testing UI at scale. Although there are other options to achieve the same thing in Lambda, we chose this mature suite of tools. Selenium is backed by Google, Firefox, and others to help the industry drive their browsers with code. This makes Lambda and Selenium a compelling stack for achieving UI testing at scale.
Making Chrome Run in Lambda
Currently, Chrome for Linux will not run in Lambda due to an absent mount point. By rebuilding Chrome with a slight modification, as Marco Lüthy originally demonstrated, you can run it inside Lambda anyway! It took about two hours to build the current master branch of Chromium to build on a c4.4xlarge. Unfortunately, the current version of ChromeDriver, 2.33, does not support any version of Chrome above 62, so we’ll be using Marco’s modified version of version 60 for the near future.
Required System Libraries
The Lambda runtime environment comes with a subset of common shared libraries. This means we need to include some extra libraries to get Chrome and ChromeDriver to work. Anything that exists in the java resources folder during compile time is included in the base directory of the compiled jar file. When this jar file is deployed to Lambda, it is placed in the /var/task/ directory. This allows us to simply place the libraries in the java resources folder under a folder named lib/ so they are right where they need to be when the Lambda function is invoked.
To get these libraries, create an EC2 instance and choose the Amazon Linux AMI.

Next, use ssh to connect to the server. After you connect to the new instance, search for the libraries to find their locations.
sudo find / -name libgconf-2.so.4
sudo find / -name libORBit-2.so.0
Now that you have the locations of the libraries, copy these files from the EC2 instance and place them in the java resources folder under lib/.
Packaging the Tests
To deploy the test suite to Lambda, we used a simple Gradle tool called ShadowJar, which is similar to the Maven Shade Plugin. It packages the libraries and dependencies inside the jar that is built. Usually test dependencies and sources aren’t included in a jar, but for this instance we want to include them. To include the test dependencies, add this section to the build.gradle file.
shadowJar {
   from sourceSets.test.output
   configurations = [project.configurations.testRuntime]
}
Deploying the Test Suite
Now that our tests are packaged with the dependencies in a jar, we need to get them into a running Lambda function. We use simple SAM templates to upload the packaged jar into S3, and then deploy it to Lambda with our settings.
{
   "AWSTemplateFormatVersion": "2010-09-09",
   "Transform": "AWS::Serverless-2016-10-31",
   "Resources": {
       "LambdaTestHandler": {
           "Type": "AWS::Serverless::Function",
           "Properties": {
               "CodeUri": "./build/libs/your-test-jar-all.jar",
               "Runtime": "java8",
               "Handler": "com.example.LambdaTestHandler::handleRequest",
               "Role": "<YourLambdaRoleArn>",
               "Timeout": 300,
               "MemorySize": 1536
           }
       }
   }
}
We use the maximum timeout available to ensure our tests have plenty of time to run. We also use the maximum memory size because this ensures our Lambda function can support Chrome and other resources required to run a UI test.
Specifying the handler is important because this class executes the desired test. The test handler should be able to receive a test class and method. With this information it will then execute the test and respond with the results.
public LambdaTestResult handleRequest(TestRequest testRequest, Context context) {
   LoggerContainer.LOGGER = new Logger(context.getLogger());

   BlockJUnit4ClassRunner runner = getRunnerForSingleTest(testRequest);

   Result result = new JUnitCore().run(runner);

   return new LambdaTestResult(result);
}
Creating a Lambda-Compatible ChromeDriver
We provide developers with an easily accessible ChromeDriver for local test writing and debugging. When we are running tests on AWS, we have configured ChromeDriver to run them in Lambda.
To configure ChromeDriver, we first need to tell ChromeDriver where to find the Chrome binary. Because we know that ChromeDriver is going to be unzipped into the root task directory, we should point the ChromeDriver configuration at that location.
The settings for getting ChromeDriver running are mostly related to Chrome, which must have its working directories pointed at the tmp/ folder.
Start with the default DesiredCapabilities for ChromeDriver, and then add the following settings to enable your ChromeDriver to start in Lambda.
public ChromeDriver createLambdaChromeDriver() {
   ChromeOptions options = new ChromeOptions();

   // Set the location of the chrome binary from the resources folder
   options.setBinary("/var/task/chrome");

   // Include these settings to allow Chrome to run in Lambda
   options.addArguments("--disable-gpu");
   options.addArguments("--headless");
   options.addArguments("--window-size=1366,768");
   options.addArguments("--single-process");
   options.addArguments("--no-sandbox");
   options.addArguments("--user-data-dir=/tmp/user-data");
   options.addArguments("--data-path=/tmp/data-path");
   options.addArguments("--homedir=/tmp");
   options.addArguments("--disk-cache-dir=/tmp/cache-dir");

   DesiredCapabilities desiredCapabilities = DesiredCapabilities.chrome();
   desiredCapabilities.setCapability(ChromeOptions.CAPABILITY, options);

   return new ChromeDriver(desiredCapabilities);
}
Executing Tests in Parallel
You can approach parallel test execution in Lambda in many different ways. Your approach depends on the structure and design of your test suite. For our solution, we implemented a custom test runner that uses reflection and JUnit libraries to create a list of test cases we want run. When we have the list, we create a TestRequest object to pass into the Lambda function that we have deployed. In this TestRequest, we place the class name, test method, and the test run identifier. When the Lambda function receives this TestRequest, our LambdaTestHandler generates and runs the JUnit test. After the test is complete, the test result is sent to the test runner. The test runner compiles a result after all of the tests are complete. By executing the same Lambda function multiple times with different test requests, we can effectively run the entire test suite in parallel.
To get screenshots and other test data, we pipe those files during test execution to an S3 bucket under the test run identifier prefix. When the tests are complete, we link the files to each test execution in the report generated from the test run. This lets us easily investigate test executions.

Pro Tip: Dynamically Loading Binaries
AWS Lambda has a limit of 250 MB of uncompressed space for packaged Lambda functions. Because we have libraries and other dependencies to our test suite, we hit this limit when we tried to upload a function that contained Chrome and ChromeDriver (~140 MB). This test suite was not originally intended to be used with Lambda. Otherwise, we would have scrutinized some of the included libraries. To get around this limit, we used the Lambda functions temporary directory, which allows up to 500 MB of space at runtime. Downloading these binaries at runtime moves some of that space requirement into the temporary directory. This allows more room for libraries and dependencies. You can do this by grabbing Chrome and ChromeDriver from an S3 bucket and marking them as executable using built-in Java libraries. If you take this route, be sure to point to the new location for these executables in order to create a ChromeDriver.
private static void downloadS3ObjectToExecutableFile(String key) throws IOException {
   File file = new File("/tmp/" + key);

   GetObjectRequest request = new GetObjectRequest("s3-bucket-name", key);

   FileUtils.copyInputStreamToFile(s3client.getObject(request).getObjectContent(), file);
   file.setExecutable(true);
}
Lambda-Selenium Project Source
We have compiled an open source example that you can grab from the Blackboard Github repository. Grab the code and try it out!
https://blackboard.github.io/lambda-selenium/
Conclusion
One year ago, one of our UI test suites took hours to run. Last month, it took 16 minutes. Today, it takes 39 seconds. Thanks to AWS Lambda, we can reduce our build times and perform automated UI testing at scale!